2014 Lancia Voyager ABS
[x] Cancel search: ABSPage 41 of 364

If the liftgate release button isactivated while the power lift-
gate is closing, the liftgate will
reverse to the full open position.
The power liftgate buttons will not operate if the shift lever is in
gear or the vehicle speed is
above 0 km/h.
The power liftgate will not oper- ate in temperatures below �24°C
or temperatures above 62°C. Be
sure to remove any buildup of
snow or ice from the liftgate be-
fore pressing any of the power
liftgate buttons.
If the power liftgate encounters multiple obstructions within the
same cycle, the system will auto-
matically stop and must be
opened or closed manually.WARNING!
Driving with the liftgate open canallow poisonous exhaust gases
into your vehicle. You and your
passengers could be injured by
these fumes. Keep the liftgate
closed when you are operating the
vehicle.
If you are required to drive with the liftgate open, make sure that
all windows are closed, and the
climate control blower switch is
set at high speed. Do not use the
recirculation mode.
OCCUPANT RESTRAINTS
Some of the most important safety
features in your vehicle are the re-
straint systems:
Three-point lap and shoulder belts for all seating positions
Advanced Front Air Bags for driver and front passenger Supplemental Active Head Re-
straints (AHR) located on top of the
front seats (integrated into the head
restraint)
Supplemental Side Air Bag Inflat- able Curtains (SABIC) that span
the front, second, and third row
seating for the driver and passen-
gers seated next to a window
Supplemental Seat-Mounted Side Air Bags (SAB)
An energy-absorbing steering col- umn and steering wheel
Knee bolsters/blockers for front seat occupants
Front seat belts incorporate preten- sioners that may enhance occupant
protection by managing occupant
energy during an impact event
All seat belt systems (except the
driver’s) include Automatic Locking
Retractors (ALRs), which lock the
seat belt webbing into position by
extending the belt all the way out
and then adjusting the belt to the
35
Page 165 of 364

To Remove The Premium Floor
Console
1. Pull up on the bottom release
handle in the front of the console.
2. Lift the rear of the console up sev-
eral inches/centimeters.
3. Pull rearward to disengage from
floor and remove console.
To Reinstall The Premium Floor
Console:
1. Position the console at a slight
angle (rear slightly higher than the
front).
2. Slide the console forward into the
floor bracket.
3. Rotate the rear of the console
down until it is resting on the floor
bracket.
4. Push down on the rear of the con-
sole until it is seated in the rear floor
bracket.
5. Pull up on the console to be sure it
is firmly latched.WARNING!
In an accident, serious injury could
result if the removable floor console
is not properly installed. Always be
sure the removable floor console is
fully latched.
SUPER CONSOLE (for
versions/markets, where
provided)
The Super Console contains multiple
storage areas, front lower pass
through, top forward bin, top rear-
ward bin and rear pull out drawer.
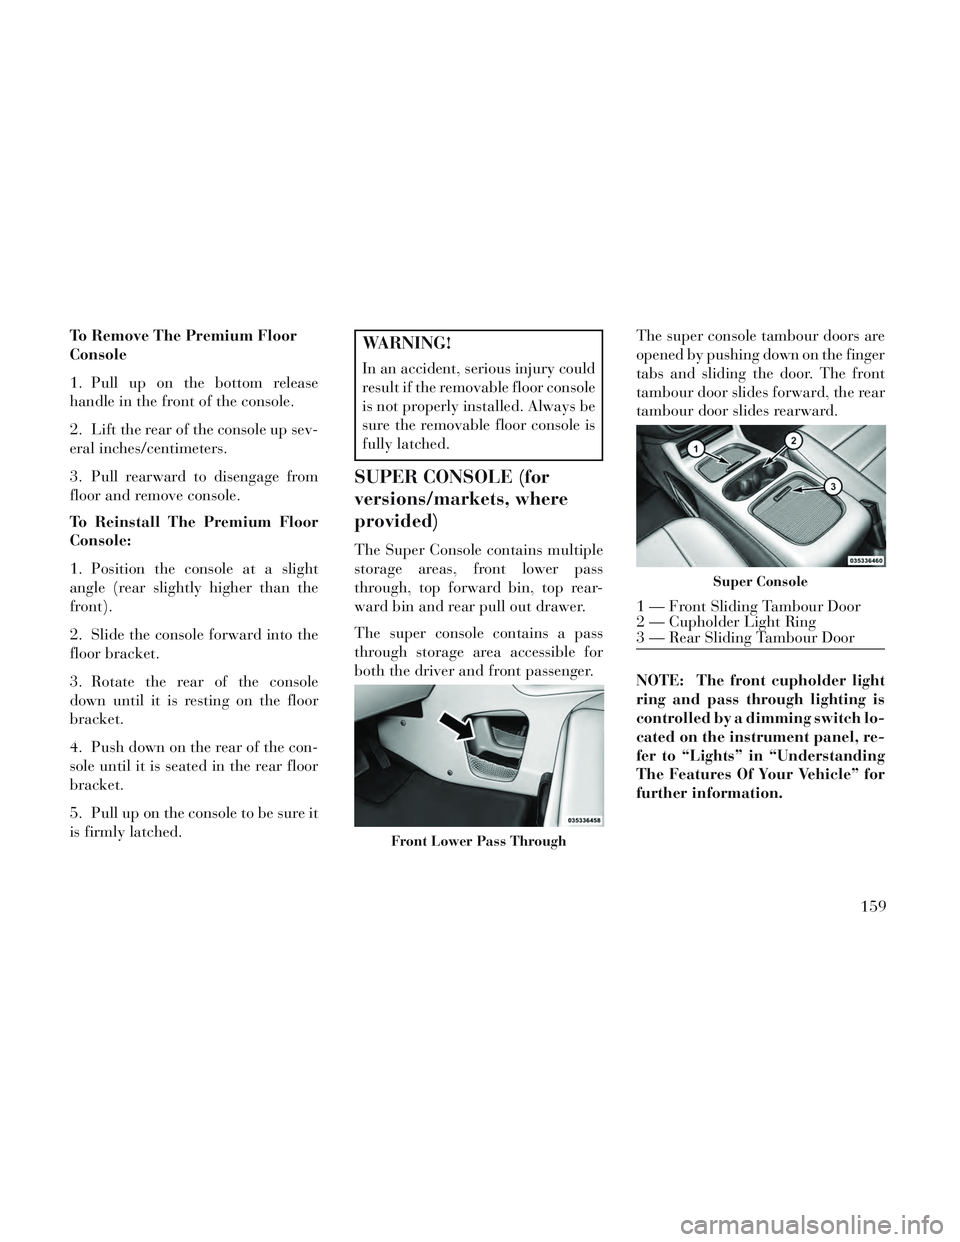
The super console contains a pass
through storage area accessible for
both the driver and front passenger.The super console tambour doors are
opened by pushing down on the finger
tabs and sliding the door. The front
tambour door slides forward, the rear
tambour door slides rearward.
NOTE: The front cupholder light
ring and pass through lighting is
controlled by a dimming switch lo-
cated on the instrument panel, re-
fer to “Lights” in “Understanding
The Features Of Your Vehicle” for
further information.
Front Lower Pass Through
Super Console
1 — Front Sliding Tambour Door
2 — Cupholder Light Ring
3 — Rear Sliding Tambour Door
159
Page 179 of 364

CHAngE OIL
Your vehicle is equipped with an en-
gine oil change indicator system. The
CHAngE OILmessage will flash in
the instrument cluster odometer for
approximately 12 seconds, after a
single chime has sounded, to indicate
the next scheduled oil change inter-
val. The engine oil change indicator
system is duty cycle-based, which
means the engine oil change interval
may fluctuate dependent upon your
personal driving style.
Unless reset, this message will con-
tinue to display each time you turn the
ignition switch to the ON/RUN posi-
tion. To turn off the message tempo-
rarily, press and release the STEP
button on the steering wheel. To reset
the oil change indicator system (after
performing the scheduled mainte-
nance), perform the following steps.
1. Turn the ignition switch to the ON/
RUN position (do not start the en-
gine).
2. Fully depress the accelerator pedal,
slowly, three times within 10 seconds. 3. Turn the ignition switch to the
OFF/LOCK position.
NOTE: If the indicator message
illuminates when you start the en-
gine, the oil change indicator sys-
tem did not reset. If necessary, re-
peat these steps.
Electronic Vehicle Information
Center (EVIC) Display (for versions/
markets, where provided)
The Electronic Vehicle Information
Center (EVIC) features a driver-
interactive display that is located in
the instrument cluster. For further in-
formation, refer to “Electronic Ve-
hicle Information Center (EVIC)”.
7. Anti-Lock Brake (ABS) Light
This light monitors the
Anti-Lock Brake System
(ABS). The light will turn
on when the ignition switch
is turned to the ON/RUN position and
may stay on for as long as four sec-
onds.
If the ABS light remains on or turns on
while driving, it indicates that the Anti-Lock portion of the brake sys-
tem is not functioning and that service
is required. However, the conven-
tional brake system will continue to
operate normally if the BRAKE warn-
ing light is not on.
If the ABS light is on, the brake sys-
tem should be serviced as soon as
possible to restore the benefits of
Anti-Lock brakes. If the ABS light
does not turn on when the ignition
switch is turned to the ON/RUN posi-
tion, have the light inspected by an
authorized dealer.
8. Tire Pressure Monitoring Tell-
tale Light (for versions/markets,
where provided)
Each tire, including the
spare (if provided), should
be checked monthly when
cold and inflated to the in-
flation pressure recommended by the
vehicle manufacturer on the vehicle
placard or tire inflation pressure la-
bel.
As an added safety feature, your ve-
hicle has been equipped with a Tire
Pressure Monitoring System (TPMS)
173
Page 182 of 364

11. Electronic Stability Control
(ESC) OFF Indicator Light (for
versions/markets, where provided)This light indicates the
Electronic Stability Control
(ESC) is off.
12. Speedometer
Indicates vehicle speed.
13. Fuel Door Reminder The arrow in this symbol is
a reminder that the Fuel
Filler Door is located on the
left side of the vehicle.
14. Fuel Gauge
The pointer shows the level of fuel in
the fuel tank when the ignition switch
is in the ON/RUN position.
15. Air Bag Warning Light
This light will turn on for
four to eight seconds as a
bulb check when the igni-
tion switch is first turned to
ON/RUN. If the light is either not on
during starting, stays on, or turns on while driving, have the system in-
spected at an authorized dealer as
soon as possible. Refer to “Occupant
Restraints” in “Things To Know Be-
fore Starting Your Vehicle” for further
information.
16. Shift Lever Indicator
The Shift Lever Indicator is self-
contained within the instrument clus-
ter. It displays the gear position of the
automatic transmission.
NOTE:
You must apply the brakes be-
fore shifting from PARK.
The highest available transmis- sion gear is displayed in the
lower right corner of the Elec-
tronic Vehicle Information Cen-
ter (EVIC) whenever the Elec-
tronic Range Select (ERS)
feature is active. Use the +/- se-
lector on the shift lever to acti-
vate ERS (for versions/markets,
where provided). Refer to “Auto-
matic Transmission” in “Start-
ing And Operating” for further
information. 17. Vehicle Security Light (for
versions/markets, where provided)
This light will flash at a fast
rate for approximately 15
seconds, when the vehicle
security alarm is arming,
and then will flash slowly until the
vehicle is disarmed.
18. Brake Warning Light
This light monitors various
brake functions, including
brake fluid level and parking brake
application. If the brake light turns on
it may indicate that the parking brake
is applied, that the brake fluid level is
low, or that there is a problem with the
anti-lock brake system reservoir.
If the light remains on when the park-
ing brake has been disengaged, and
the fluid level is at the full mark on the
master cylinder reservoir, it indicates
a possible brake hydraulic system
malfunction or that a problem with
the Brake Booster has been detected
by the Anti-Lock Brake System (ABS)
/ Electronic Stability Control (ESC)
system. In this case, the light will re-
main on until the condition has been
176
Page 183 of 364

corrected. If the problem is related to
the brake booster, the ABS pump will
run when applying the brake and a
brake pedal pulsation may be felt dur-
ing each stop.
The dual brake system provides a re-
serve braking capacity in the event of
a failure to a portion of the hydraulic
system. A leak in either half of the
dual brake system is indicated by the
Brake Warning Light, which will turn
on when the brake fluid level in the
master cylinder has dropped below a
specified level.
The light will remain on until the
cause is corrected.
NOTE: The light may flash mo-
mentarily during sharp cornering
maneuvers, which change fluid
level conditions. The vehicle
should have service performed,
and the brake fluid level checked.
If brake failure is indicated, immedi-
ate repair is necessary.WARNING!
Driving a vehicle with the red brake
light on is dangerous. Part of the
brake system may have failed. It
will take longer to stop the vehicle.
You could have a collision. Have the
vehicle checked immediately.
Vehicles equipped with the Anti-Lock
Brake System (ABS), are also
equipped with Electronic Brake Force
Distribution (EBD). In the event of an
EBD failure, the Brake Warning Light
will turn on along with the ABS Light.
Immediate repair to the ABS system is
required.
Operation of the Brake Warning Light
can be checked by turning the ignition
switch from the OFF position to the
ON/RUN position. The light should
illuminate for approximately two sec-
onds. The light should then turn off
unless the parking brake is applied or
a brake fault is detected. If the light
does not illuminate, have the light
inspected by an authorized dealer. The light also will turn on when the
parking brake is applied with the ig-
nition switch in the ON/RUN posi-
tion.
NOTE: This light shows only
that the parking brake is applied.
It does not show the degree of
brake application.
19. Seat Belt Reminder Light
When the ignition switch is
first turned to ON/RUN, this
light will turn on for four to
eight seconds as a bulb check. During
the bulb check, if the driver or front
passenger's seat belt is unbuckled, a
chime will sound. After the bulb
check or when driving, if the driver's
seat belt remains unbuckled, the Seat
Belt Reminder Light will illuminate
and the chime will sound. Refer to
“Occupant Restraints” in “Things To
Know Before Starting Your Vehicle”
for further information.
177
Page 234 of 364

PARKING BRAKE....................... .245
ANTI-LOCK BRAKE SYSTEM (ABS) ...........246
ANTI-LOCK BRAKE WARNING LIGHT . . . . . .247
ELECTRONIC BRAKE CONTROL SYSTEM (for versions/markets, where provided) ...........248
TRACTION CONTROL SYSTEM (TCS) (for versions/markets, where provided) .........248
BRAKE ASSIST SYSTEM (BAS) (for versions/ markets, where provided) ................249
ELECTRONIC STABILITY CONTROL (ESC) . .249
TRAILER SWAY CONTROL (TSC) ..........251
HILL START ASSIST (HSA) ...............252
TIRE SAFETY INFORMATION ...............252
Tire Markings ........................ .252
Tire Identification Number (TIN) ...........255
Tire Terminology And Definitions ...........256
Tire Loading And Tire Pressure ............256
TIRES — GENERAL INFORMATION ..........258
Tire Pressure ......................... .258
Tire Inflation Pressures ..................259
Tire Pressures For High Speed Operation . . . .260
Radial Ply Tires ....................... .260
Tire Types............................ .261
Run Flat Tires (for versions/markets, where provided) ............................ .261
Spare Tires (for versions/markets, where provided) ............................ .262
228
Page 252 of 364

NOTE:
When the parking brake is ap-plied and the automatic trans-
mission is placed in gear, the
“Brake Warning Light” will
flash. If vehicle speed is de-
tected, a chime will sound to
alert the driver. Fully release the
parking brake before attempting
to move the vehicle.
This light only shows that the parking brake is applied. It does
not show the degree of brake ap-
plication.
When parking on a hill, it is important
to turn the front wheels toward the
curb on a downhill grade and away
from the curb on an uphill grade. For
vehicles equipped with an automatic
transmission, apply the parking brake
before placing the shift lever in PARK,
otherwise the load on the transmis-
sion locking mechanism may make it
difficult to move the shift lever out of
PARK. The parking brake should al-
ways be applied whenever the driver
is not in the vehicle.WARNING!
Never use the PARK position as a substitute for the parking brake.
Always apply the parking brake
fully when parked to guard
against vehicle movement and
possible injury or damage.
When leaving the vehicle, always remove the key fob from the igni-
tion and lock your vehicle.
Never leave children alone in a vehicle, or with access to an un-
locked vehicle. Allowing children
to be in a vehicle unattended is
dangerous for a number of rea-
sons. A child or others could be
seriously or fatally injured. Chil-
dren should be warned not to
touch the parking brake, brake
pedal or the shift lever.
(Continued)
WARNING!(Continued)
Do not leave the key fob in or nearthe vehicle (or in a location acces-
sible to children), and do not
leave the ignition of a vehicle
equipped with Keyless Enter-N-
Go™ in the ACC or ON/RUN
mode. A child could operate
power windows, other controls, or
move the vehicle.
CAUTION!
If the Brake System Warning Light
remains on with the parking brake
released, a brake system malfunc-
tion is indicated. Have the brake
system serviced by an authorized
dealer immediately.
ANTI-LOCK BRAKE
SYSTEM (ABS)
The Anti-Lock Brake System (ABS)
provides increased vehicle stability
and brake performance under most
braking conditions. The system oper-
ates with a separate computer to
246
Page 253 of 364

modulate hydraulic pressure to pre-
vent wheel lock-up and help avoid
skidding on slippery surfaces.
ABS is activated during braking un-
der certain road or stopping condi-
tions. ABS-inducing conditions can
include ice, snow, gravel, bumps, rail-
road tracks, loose debris, or panic
stops.
You may experience the following
when the brake system goes into anti-
lock:
The ABS motor running (it maycontinue to run for a short time
after the stop).
A clicking sound of solenoid valves.
Brake pedal pulsations.
A slight drop or fall away of the brake pedal at the end of the stop.WARNING!
The Anti-Lock Brake Systemcontains sophisticated electronic
equipment that may be suscep-
tible to interference caused by
improperly installed, or high out-
put radio transmitting equip-
ment. This interference can cause
possible loss of anti-lock braking
capability. Installation of such
equipment should be performed
by qualified professionals.
Pumping of the Anti-Lock Brakes will diminish their effectiveness
and may lead to a collision.
Pumping makes the stopping dis-
tance longer. Just press firmly on
your brake pedal when you need
to slow down or stop.
The Anti-Lock Brake System cannot prevent collisions, includ-
ing those resulting from excessive
speed in turns, following another
vehicle too closely, or hydroplan-
ing.
(Continued)
WARNING!(Continued)
The capabilities of an ABS-equipped vehicle must never be
exploited in a reckless or danger-
ous manner, which could jeopar-
dize the user’s safety or the safety
of others.
The ABS cannot prevent the natural laws of physics from act-
ing on the vehicle, nor can it in-
crease braking or steering effi-
ciency beyond that afforded by
the condition of the vehicle
brakes and tires or the traction
afforded.
All vehicle wheels and tires must be
the same size and type, and tires must
be properly inflated to produce accu-
rate signals for the computer.
ANTI-LOCK BRAKE
WARNING LIGHT
The “Anti-Lock Brake
Warning Light” monitors
the anti-lock brake system.
The light will come on when
247