Page 33 of 50

31
ALWAYS CHECK THE OWNER’S MANUAL FOR COMPLETE OPERATING INFORMATION AND SAFET Y WARNINGS. *IF EQUIPPED
REAR FRONT
CLIMATE
Automatic Climate Control with UVO System*
REMINDER: Your Automatic
Climate Control system
may differ from those in the
illustrations. See your Owner’s
Manual for more details.
Climate Control Auto Function:
1. Press AUTO to select Full Auto
Operation
2. Press
MODE buttons to control
which vents air flows through
3. Press DUAL to select Dual
Temperature Control OperationDefrost Outside Windshield:
1. Set Fan Speed to the highest
position
2. Set Te m p e r a t u r e to Hot
3. Press the Front Defrost button
Defog Inside Windshield:
1. Set desired Fan Speed
2. Set desired Temperature
3. Press the Front Defrost button
Air Flow Modes
To select Air Flow Modes, rotate the Mode Selection button:
Face-Level Bi-Level Floor-Level Floor/Defrost-Level
���O
���OKeep inside glass
as clean as possible
to reduce window
fogging
���ODefrost
Mode
activates A/C and
opens Fresh Air Vent
���OMAX A/C Mode
automatically
engages Recirculated
Air
���ODuring Auto
Operation, the A/C
indicator will NOT
illuminate. The fan
speed, air intake,
airflow and air
conditioning may
be engaged at any
time to reach desired
temperature and
reduce humidity
QUICK TIPS
Climate Control
display
Fan Speed Control
button
Temperature Control
knob
Rear Windshield
Defroster Front Windshield
Defroster
System OFF buttonMode Selection button
Air Conditioning On/Off
button
Dual Temperature
Control knob
Recirculated Air button
ECON (Economy Air
Conditioning) button Automatic Climate
Control button
Dual Climate Control
Button
Climate information
screen selection button
CENTER PANEL
Page 34 of 50

OPTIMA HYBRID
FEATURES & FUNCTIONS GUIDE
32
*IF EQUIPPED
Automatic Climate Control with Navigation System*
REMINDER: Your Automatic
Climate Control system
may differ from those in the
illustrations. See your Owner’s
Manual for more details.
Climate Control Auto Function:
1. Press AUTO to select Full Auto
Operation
2. Press
MODE buttons to control
which vents air flows through
3. Press DUAL to select Dual
Temperature Control OperationDefrost Outside Windshield:
1. Set Fan Speed to the highest
position
2. Set Te m p e r a t u r e to Hot
3. Press the Front Defrost button
Defog Inside Windshield:
1. Set desired Fan Speed
2. Set desired Temperature
3. Press the Front Defrost button
���O
���OKeep inside glass
as clean as possible
to reduce window
fogging
���ODefrost
Mode
activates A/C and
opens Fresh Air Vent
���OMAX A/C Mode
automatically
engages Recirculated
Air
���ODuring Auto
Operation, the A/C
indicator will NOT
illuminate. The fan
speed, air intake,
airflow and air
conditioning may
be engaged at any
time to reach desired
temperature and
reduce humidity
QUICK TIPS
Air Flow Modes
To select Air Flow Modes, rotate the Mode Selection button:
Face-Level Bi-Level Floor-Level Floor/Defrost-Level
REAR FRONT
CLIMATE
Fan Speed Control
button
Temperature Control
knob
Rear Windshield
Defroster Front Windshield
Defroster
System OFF buttonMode Selection button
Air Conditioning On/Off
button
Dual Temperature
Control knob
Dual Climate Control
Button
Recirculated Air button
ECON (Economy Air
Conditioning) button
Climate information
screen selection button Automatic Climate
Control button
CENTER PANEL
Page 35 of 50

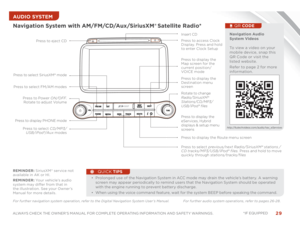
33
ALWAYS CHECK THE OWNER’S MANUAL FOR COMPLETE OPERATING INFORMATION AND SAFET Y WARNINGS. *IF EQUIPPED
���OWith the seat warmer switch in the ON position, the
heating system in the seat turns off or on automatically
depending on the seat temperature
���OSystem defaults to the OFF position whenever the
ignition switch is turned ON
QUICK TIPS
Seat Warmers* Press button once for
high setting (2 LEDs
lit). Press again for low
setting (1 LED lit) and
again to turn OFF.
Ye l l o w C o l o r :
Warming
Ye l l o w C o l o r :
WarmingBlue Color:
Ventilated
Ty p e A Shown
Kia Sportmatic® Shifting
Video
To view a video on your
mobile device, snap this
QR Code or visit the
listed website.
Refer to page 2 for more
information.
QR CODE
www.KuTechVideos.com/tf23/2014
Seat Warmers/Ventilated Seats*
P: Park
R: Reverse
N: Neutral
D: Drive
[+]: Sport Mode
Upshift
[–]: Sport Mode
DownshiftAutomatic Gear Shift with
Sportmatic® Shifting*
P
R
N
D
���OPress brake pedal and depress release button to move gear shift from
N or R to P or from P to any gear
���OSport Mode downshifts are made automatically when the vehicle slows
down. When the vehicle stops, 1st gear is automatically selected
QUICK TIPS
Seat Warmers —
Press top of button once
for high setting (2 LEDs
lit). Press button twice
for low setting (1 LED lit).
Press a third time to
turn OFF.Ventilated Seats —
Press bottom of button
once for high setting
(2 LEDs lit). Press twice
for low setting (1 LED lit).
Press a third time to
turn OFF.
Sport Mode: Move shift lever from D to left gate.
Sport Mode Shifting: Move shift lever up [+] to Upshift or down [-]
to Downshif t.CENTER PANEL
Page 36 of 50
OPTIMA HYBRID
FEATURES & FUNCTIONS GUIDE
34
*IF EQUIPPED
SEATING
21SET
Driver Position Memory System*To store a seating position into memory, first place the
shifter into P (Park) while the ignition switch is on. Then:
1. Adjust the driver’s seat and outside rearview mirror
2. Press the SET button
A on the control panel. System
will beep once
3. Press one of the memory buttons
B within 5 seconds
after pressing the SET button
A. The system will beep twice when memory has been stored
4. “Driver (1 or 2) set is memorized” will appear on the instrument cluster LCD
Power Adjustable Driver’s Seat*Move/Press controls to adjust Seat forward/backward, Seat Cushion, Seatback and Lumbar
SeatbackB
LumbarC
Seat forward/
backwardA
Seat CushionA
B
C
A
Driver Position Memory
System Video
To view a video on your
mobile device, snap this
QR Code or visit the
listed website.
Refer to page 2 for more
information.
QR CODE
www.KuTechVideos.com/tf23/2014
AB
Page 37 of 50
35
ALWAYS CHECK THE OWNER’S MANUAL FOR COMPLETE OPERATING INFORMATION AND SAFET Y WARNINGS. *IF EQUIPPED SEATING
Front Seat Headrest AdjustmentTo adjust headrest forward*: Pull headrest
forward at an upward angle to one of three
positions.
To adjust headrest back*: Pull headrest
completely
forward at an upward angle, then release.
To raise headrest: Pull headrest up.
To lower headrest: Press lock, then press the
headrest down.
Manual Adjustable Driver’s Seat*Pull lever
A to slide Seat forward/backward
Pull/press lever
B to adjust Seat Height
Pull lever
C to adjust Seatback Recline
Press button
D to adjust Lumbar Support
C
B
A
D
When adjusting the headrest back, you may need
to raise headrest to allow space for the headrest to
fully adjust backward.
QUICK TIPS
PRESS
Page 38 of 50

OPTIMA HYBRID
FEATURES & FUNCTIONS GUIDE
36
*IF EQUIPPED
A Press to lock All DoorsB Press to unlock Driver’s Door. Press twice within 4
seconds to unlock All DoorsC Press and hold to unlock Trunk and manually open
REMINDER: The Trunk unlocks when the Smart Key fob is within close
proximity of the vehicle.
REMINDER: The Trunk does not automatically open when the
C
button is pressed. D Press and hold more than 1 second for Panic Alarm.
To turn off Alarm, press any buttonE Press to release Mechanical Key
Smart KeyMechanical Key
F:
���O���/�!�O�0�+�O�1�*�(�+���'�O� �.�%�2�!�.���/�O� �+�+�.
���O���/�!�O�0�+�O�!�*�����(�!�%� �%�/�����(�!�O���$�%�(� �O�����"�!�0�5�O���+���'�/�O�(�/�!�!�O�����#�!�O�����)
���O���/�!�O�0�+�O�(�+���'�O�#�(�+�2�!�O���+�4
Driver’s Door Lock/Unlock button
G:
���O���.�!�/�/�O���1�0�0�+�*�O�+�*���!�O�0�+�O�1�*�(�+���'�O� �.�%�2�!�.���/�O� �+�+�.
���O���.�!�/�/�O���#���%�*�O�3�%�0�$�%�*�O���O�/�!���+�*� �/�O�0�+�O�1�*�(�+���'�O���(�(�O� �+�+�.�/
���O���.�!�/�/�O���#���%�*�O�0�+�O�(�+���'�O���(�(�O� �+�+�.�/
Optima Hybrid Start/Stop
Button & Smart Key Video
To view a video on your
mobile device, snap this
QR Code or visit the
listed website.
Refer to page 2 for more
information.
QR CODE
www.KuTechVideos.com/tf23/2014
���OThe Smart Key’s signal can be
blocked by the normal operation of
a cellular phone or smartphone. To
help prevent this, store each device
separately.
QUICK TIPS
REMINDER: Remote button configuration
may vary depending on vehicle options.
HOLD
D
A
BECF
G
(Key release button on back side of key fob)
OTHER KEY FEATURES
Page 39 of 50

37
ALWAYS CHECK THE OWNER’S MANUAL FOR COMPLETE OPERATING INFORMATION AND SAFET Y WARNINGS. *IF EQUIPPED
���O
���OYou can reprogram a single HomeLink ® button by repeating Step 2
���OErasing programmed buttons will delete all trained transmitters
QUICK TIPS
The Auto-Dimming Rearview Mirror is designed to reduce
glare from a vehicle’s headlights visible in the rear and also
connect up to three electronic transmitters in one location.
To turn automatic dimming ON or OFF, press button
F
HomeLink® with Auto-Dimming
Rearview Mirror*
How to Sync Transmitter with HomeLink®*
Erasing programmed buttons:
A HomeLink® button B HomeLink® button C Indicator lightD HomeLink® button
E Glare detection sensor F Automatic dimming ON/OFF G Compass control buttonIf programming for the first time, begin with Step 1
(repeating this step will delete all information).
To program non-rolling and rolling code garage door
openers and other devices:
1. Press and hold the left
A and center
D buttons
simultaneously until the indicator light C begins to
flash (to reprogram buttons, skip this step)
2. Press and hold the desired button
A B D and hold
the button on the transmitter while it is approximately
1 to 3 inches away from the mirror. The HomeLink®
Indicator light
C will flash rapidly once the frequency
signal has been successfully programmed
To finish programming rolling code garage door openers,
complete these steps:
3. Locate the “learn” or “smart ” button on the garage
door’s motor head unit. Press and release the button
and complete Step 4 within 30 seconds
4. Firmly press and release the programmed HomeLink®
button up to three times
Press and hold the left
A and center
D buttons
simultaneously for approximately 20 seconds,
and then release both buttons within 30 seconds.Operating HomeLink®:
Press one of the programmed HomeLink® buttons.
REMINDER: Mirror indicator light
C will illuminate when automatic
dimming is ON.
If your garage door opener was manufactured in 2011 or later, and you’re unable to program your vehicle’s HomeLink
® system, you may need to
purchase a HomeLink
® Repeater Kit. For more information, go to www.HomeLink.com or call (800) 355-3515 .
A
B
C
D
E
F
G
OTHER KEY FEATURES
Page 40 of 50

OPTIMA HYBRID
FEATURES & FUNCTIONS GUIDE
38
*IF EQUIPPED
Map/Room/Dome LampsAutomatic turn off function*
The interior lights automatically turn off approximately 30
seconds after the ENGINE START/STOP button is OFF.
Map/Personal Lamp
Push the lens
A to turn the Map Lamp ON/OFF. This light
produces a spot beam for convenient use as a Map Lamp
or Personal Lamp for the driver or front passenger.
Dome Lamp
B
OFF: In the off position, the lamp is off even if the door
is opened.
DOOR: In the door position, the lamp turns on when
any door is opened. ON: In the on position, the lamp stays on continuously.���O
���OWhen doors are unlocked by the Smart Key, the lamp turns
ON for approximately 30 seconds
���OIf your vehicle is equipped with the theft alarm system, the
interior lights automatically turn off approximately 3 seconds
after the system is in the armed stage
���OUsing interior lights for an extended period of time may
cause battery discharge
QUICK TIPS
B
A
A
A
OTHER KEY FEATURES


 while the ignit")
