2014 FORD EXPEDITION light
[x] Cancel search: lightPage 280 of 519
FUEL FILTER
Your vehicle is equipped with a lifetime fuel filter that is integrated with
the fuel tank. Regular maintenance or replacement is not needed.
WASHER FLUID CHECK
WARNING:If you operate your vehicle in temperatures below
40°F (5°C), use washer fluid with antifreeze protection. Failure
to use washer fluid with antifreeze protection in cold weather could
result in impaired windshield vision and increase the risk of injury or
accident.
Add fluid to fill the reservoir if the level is low. Only use a washer fluid
that meets Ford specifications. See the technical specifications chart in
theCapacities and Specificationschapter.
Note:The front and rear washer systems are supplied from the same
reservoir.
State or local regulations on volatile organic compounds may restrict the
use of methanol, a common windshield washer antifreeze additive.
Washer fluids containing non-methanol antifreeze agents should be used
only if they provide cold weather protection without damaging the
vehicle’s paint finish, wiper blades or washer system.
CHANGING THE VEHICLE BATTERY
WARNING:Batteries normally produce explosive gases which
can cause personal injury. Therefore, do not allow flames, sparks
or lighted substances to come near the battery. When working near the
battery, always shield your face and protect your eyes. Always provide
proper ventilation.
WARNING:When lifting a plastic-cased battery, excessive
pressure on the end walls could cause acid to flow through the
vent caps, resulting in personal injury and/or damage to the vehicle or
battery. Lift the battery with a battery carrier or with your hands on
opposite corners.
Maintenance279
2014 Expedition(exd)
Owners Guide gf, 1st Printing, June 2013
USA(fus)
Page 286 of 519

5. Release the three clamps that secure
the cover to the air filter housing. Push
the air filter cover toward the center of
the vehicle and up slightly to release it.
6. Remove the air filter element
from the air filter housing.
7. Install a new air filter element.
8. Replace the air filter housing
cover and secure the clamps.
Be careful not to crimp the filter
element edges between the air filter
housing and cover and ensure that
the tabs on the edge are properly
aligned into the slots.
9. Slip the air tube onto the air
filter housing and tighten the
air-tube clamp bolt snugly, but do
not overtighten it.
10. Reconnect the mass air flow
sensor electrical connector to the
outlet tube. Make sure the locking
tab on the connector is in the
“locked” position (connector shown
from below for clarity).
Maintenance285
2014 Expedition(exd)
Owners Guide gf, 1st Printing, June 2013
USA(fus)
Page 287 of 519
ADJUSTING THE HEADLAMPS
The headlamps on your vehicle are properly aimed at the assembly plant.
If your vehicle has been in an accident, an authorized dealer should
check the alignment of your headlamps.
Vertical Aim Adjustment
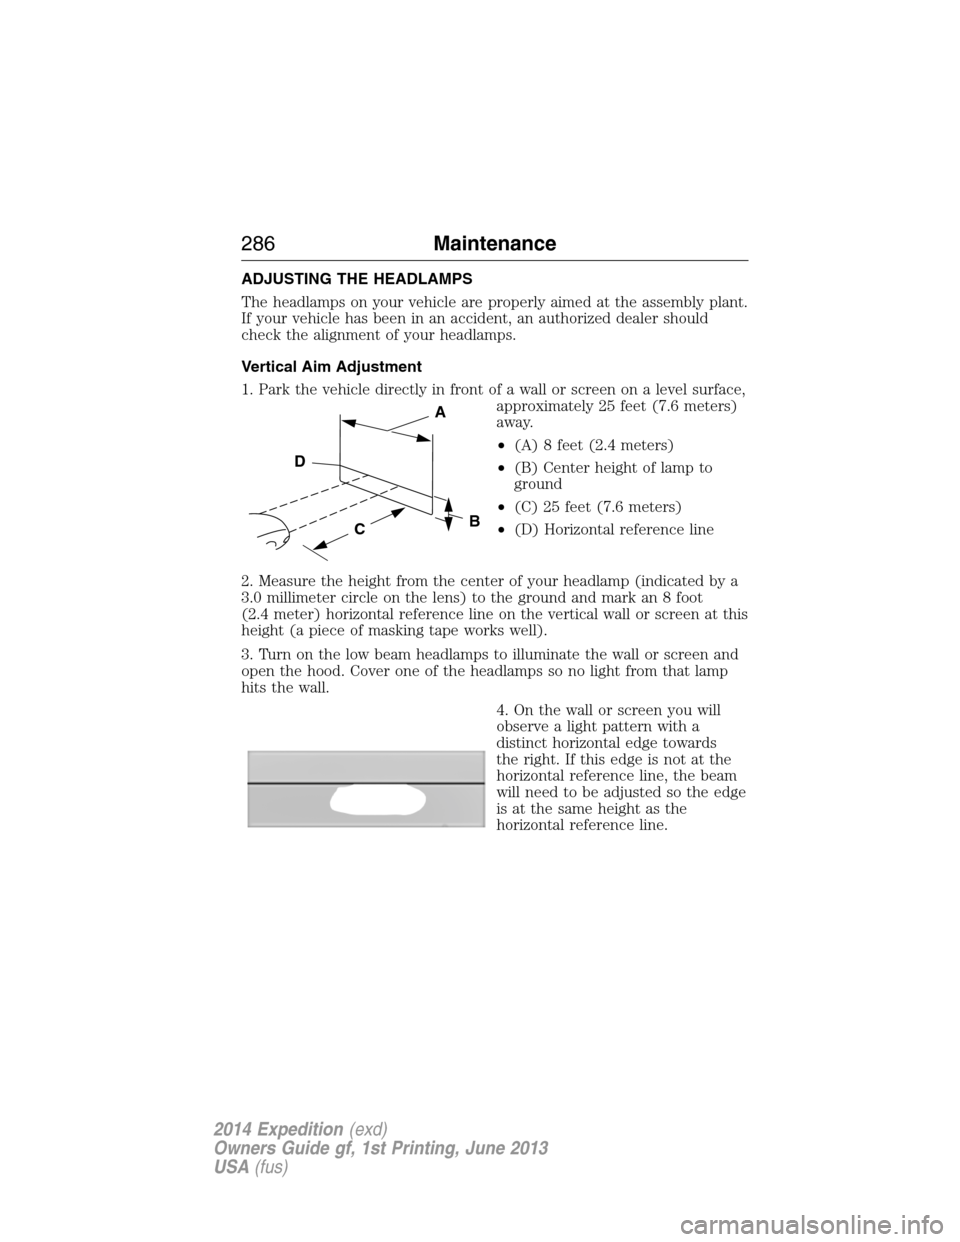
1. Park the vehicle directly in front of a wall or screen on a level surface,
approximately 25 feet (7.6 meters)
away.
•(A) 8 feet (2.4 meters)
•(B) Center height of lamp to
ground
•(C) 25 feet (7.6 meters)
•(D) Horizontal reference line
2. Measure the height from the center of your headlamp (indicated by a
3.0 millimeter circle on the lens) to the ground and mark an 8 foot
(2.4 meter) horizontal reference line on the vertical wall or screen at this
height (a piece of masking tape works well).
3. Turn on the low beam headlamps to illuminate the wall or screen and
open the hood. Cover one of the headlamps so no light from that lamp
hits the wall.
4. On the wall or screen you will
observe a light pattern with a
distinct horizontal edge towards
the right. If this edge is not at the
horizontal reference line, the beam
will need to be adjusted so the edge
is at the same height as the
horizontal reference line.
C
A
B
D
286Maintenance
2014 Expedition(exd)
Owners Guide gf, 1st Printing, June 2013
USA(fus)
Page 288 of 519
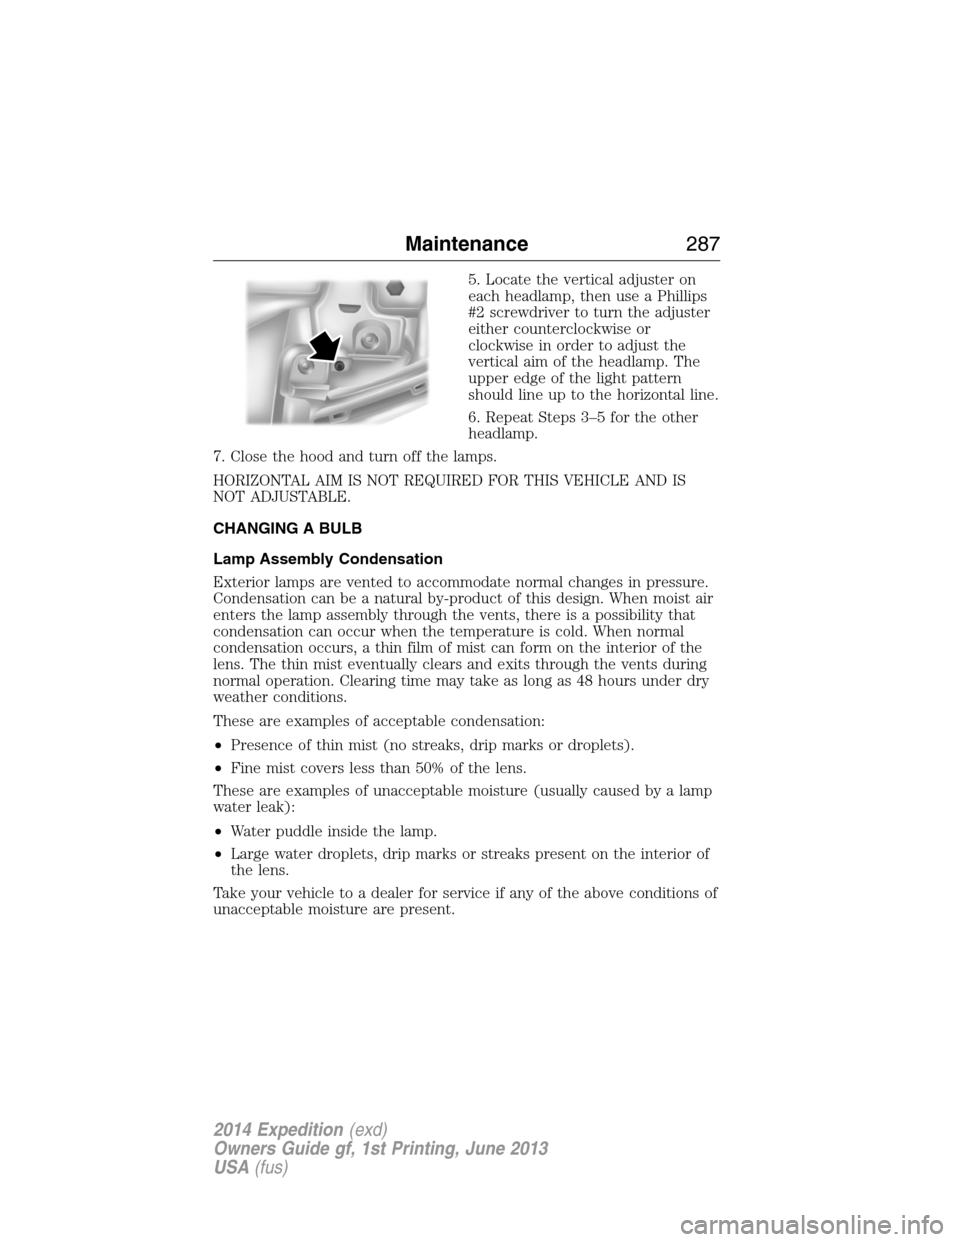
5. Locate the vertical adjuster on
each headlamp, then use a Phillips
#2 screwdriver to turn the adjuster
either counterclockwise or
clockwise in order to adjust the
vertical aim of the headlamp. The
upper edge of the light pattern
should line up to the horizontal line.
6. Repeat Steps 3–5 for the other
headlamp.
7. Close the hood and turn off the lamps.
HORIZONTAL AIM IS NOT REQUIRED FOR THIS VEHICLE AND IS
NOT ADJUSTABLE.
CHANGING A BULB
Lamp Assembly Condensation
Exterior lamps are vented to accommodate normal changes in pressure.
Condensation can be a natural by-product of this design. When moist air
enters the lamp assembly through the vents, there is a possibility that
condensation can occur when the temperature is cold. When normal
condensation occurs, a thin film of mist can form on the interior of the
lens. The thin mist eventually clears and exits through the vents during
normal operation. Clearing time may take as long as 48 hours under dry
weather conditions.
These are examples of acceptable condensation:
•Presence of thin mist (no streaks, drip marks or droplets).
•Fine mist covers less than 50% of the lens.
These are examples of unacceptable moisture (usually caused by a lamp
water leak):
•Water puddle inside the lamp.
•Large water droplets, drip marks or streaks present on the interior of
the lens.
Take your vehicle to a dealer for service if any of the above conditions of
unacceptable moisture are present.
Maintenance287
2014 Expedition(exd)
Owners Guide gf, 1st Printing, June 2013
USA(fus)
Page 292 of 519
Replacing License Plate Lamp Bulbs
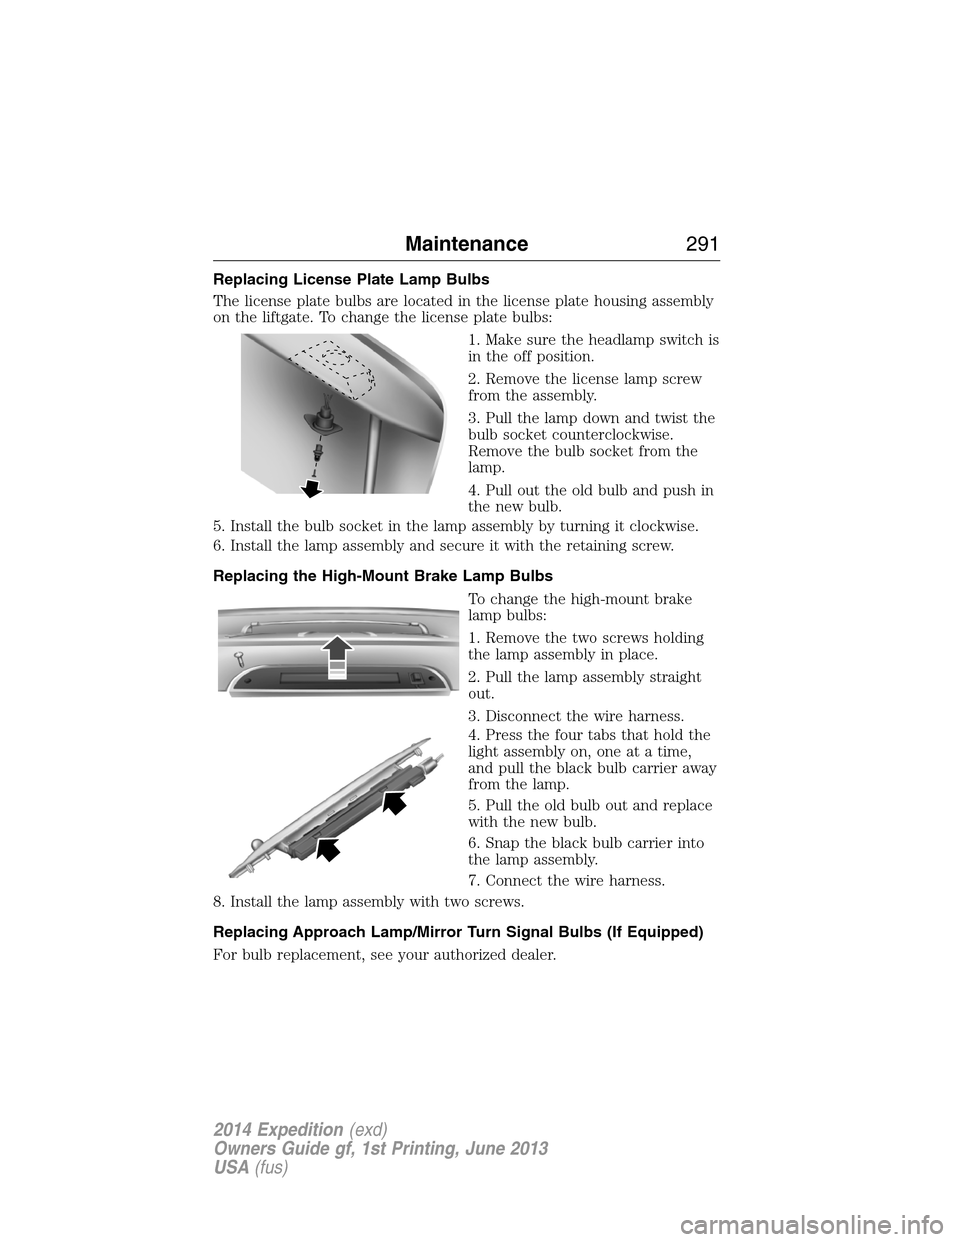
The license plate bulbs are located in the license plate housing assembly
on the liftgate. To change the license plate bulbs:
1. Make sure the headlamp switch is
in the off position.
2. Remove the license lamp screw
from the assembly.
3. Pull the lamp down and twist the
bulb socket counterclockwise.
Remove the bulb socket from the
lamp.
4. Pull out the old bulb and push in
the new bulb.
5. Install the bulb socket in the lamp assembly by turning it clockwise.
6. Install the lamp assembly and secure it with the retaining screw.
Replacing the High-Mount Brake Lamp Bulbs
To change the high-mount brake
lamp bulbs:
1. Remove the two screws holding
the lamp assembly in place.
2. Pull the lamp assembly straight
out.
3. Disconnect the wire harness.
4. Press the four tabs that hold the
light assembly on, one at a time,
and pull the black bulb carrier away
from the lamp.
5. Pull the old bulb out and replace
with the new bulb.
6. Snap the black bulb carrier into
the lamp assembly.
7. Connect the wire harness.
8. Install the lamp assembly with two screws.
Replacing Approach Lamp/Mirror Turn Signal Bulbs (If Equipped)
For bulb replacement, see your authorized dealer.
Maintenance291
2014 Expedition(exd)
Owners Guide gf, 1st Printing, June 2013
USA(fus)
Page 293 of 519

BULB SPECIFICATION CHART
Replacement bulbs are specified in the chart below. Headlamp bulbs
must be marked with an authorized “D.O.T.” for North America to ensure
lamp performance, light brightness and pattern and safe visibility. The
correct bulbs will not damage the lamp assembly or void the lamp
assembly warranty and will provide quality bulb burn time.
Function Number of bulbs Trade number
Headlamps (low and
high-beam)2 H13/9008
Front side marker 2 194
Front park/turn lamps 2 3157 A
Fog lamps 2 9140
Front row map lamps 2 W5W
Front row map/dome
lamps3 578
Rear cargo lamp 1 578
2nd row reading lamp 2 W5W
Turn/tail/brake/side
marker lamps2 3157K
Backup lamp 2 921
Approach/mirror
turn signal lamps
(if equipped)2 906
Mirror approach lamps
– non turn signal
(if equipped)2 *See your dealer
License lamp 2 168
Visor vanity lamp -
Slide on rail system
(SOR)2 A6224PF
High-mount brake lamp 5 W5W
All replacement bulbs are clear in color except where noted.
To replace all instrument panel lights - see your authorized dealer
* To obtain replacement approach lamp assembly bulbs, see your
authorized dealer and reference Ford part no. 2L1Z–13B374–BB for the
passenger side mirror and 2L1Z–13B375–BB for the driver side mirror.
292Maintenance
2014 Expedition(exd)
Owners Guide gf, 1st Printing, June 2013
USA(fus)
Page 294 of 519
GENERAL INFORMATION
Your Ford or Lincoln authorized dealer has many quality products
available to clean your vehicle and protect its finishes.
CLEANING PRODUCTS
For best results, use the following products or products of equivalent
quality:
Motorcraft Bug and Tar Remover (ZC-42)
Motorcraft Custom Bright Metal Cleaner (ZC-15)
Motorcraft Detail Wash (ZC-3-A)
Motorcraft Dusting Cloth (ZC-24)
Motorcraft Engine Shampoo and Degreaser (United States only) (ZC-20)
Motorcraft Engine Shampoo (Canada only) (CXC-66-A)
Motorcraft Multi-Purpose Cleaner (Canada only) (CXC-101)
Motorcraft Premium Glass Cleaner (Canada only) (CXC-100)
Motorcraft Premium Quality Windshield Washer Fluid (Canada only)
[CXC-37-(A, B, D or F)]
Motorcraft Premium Windshield Wash Concentrate with Bitterant (United
States only) ZC-32-B1)
Motorcraft Professional Strength Carpet & Upholstery Cleaner (ZC-54)
Motorcraft Spot and Stain Remover (United States only) (ZC-14)
Motorcraft Ultra-Clear Spray Glass Cleaner (ZC-23)
Motorcraft Wheel and Tire Cleaner (ZC-37-A)
CLEANING THE EXTERIOR
Wash your vehicle regularly with cool or lukewarm water and a neutral
pH shampoo, such as Motorcraft® Detail Wash.
•Do not use a commercial or high-pressure wand on the surface or
edge of stripes and graphics. This can cause damage to the film and
cause the edge of the film to peel away from the vehicle surface.
•
Never use strong household detergents or soap, such as dish washing or
laundry liquid. These products can discolor and spot painted surfaces.
•Never wash a vehicle that is hot to the touch or during exposure to
strong, direct sunlight.
•Dry the vehicle with a chamois or soft terry cloth towel in order to
eliminate water spotting.
Vehicle Care293
2014 Expedition(exd)
Owners Guide gf, 1st Printing, June 2013
USA(fus)
Page 296 of 519
WAXING
Regular waxing is necessary to protect the paint on your car from the
elements. We recommend that you wash and wax the painted surface
once or twice a year.
When washing and waxing, park your vehicle in a shaded area out of
direct sunlight. Always wash your vehicle before applying wax.
•Use a quality wax that does not contain abrasives.
•Follow the manufacturer’s instructions to apply and remove the wax.
•Apply a small amount of wax in a back-and-forth motion, not in
circles.
•Do not allow wax to come in contact with any non-body (low-gloss
black) colored trim. The wax discolors or stains the parts over time,
such as:
•Bumpers
•Grained door handles
•Side mouldings
•Mirror housings
•Windshield cowl area.
•Do not apply wax to glass areas.
•After waxing, your car’s paint should feel smooth, and be free of
streaks and smudges.
REPAIRING MINOR PAINT DAMAGE
Your authorized dealer has touch-up paint to match your vehicle’s color.
Take your color code (printed on a sticker in the driver’s door jamb) to
an authorized dealer to make sure you get the correct color.
•Remove particles, such as bird droppings, tree sap, insect deposits, tar
spots, road salt and industrial fallout, before repairing paint chips.
•Always read the instructions before using the products.
CLEANING THE ENGINE
Engines are more efficient when they are clean because grease and dirt
buildup keep the engine warmer than normal.
When washing:
•Take care when using a power washer to clean the engine. The
high-pressure fluid could penetrate the sealed parts and cause
damage.
•Do not spray a hot engine with cold water to avoid cracking the
engine block or other engine components.
Vehicle Care295
2014 Expedition(exd)
Owners Guide gf, 1st Printing, June 2013
USA(fus)