2014 FORD EXPEDITION light
[x] Cancel search: lightPage 327 of 519

Low tire
pressure
warning lightPossible cause Customer action required
Flashing warning
lightSpare tire in use Repair the damaged road wheel and
tire and reinstall it on the vehicle to
restore system function. For a
description on how the system
functions, seeWhen your
temporary spare tire is installedin
this section.
Tire pressure
monitoring
system
malfunctionIf the tires are properly inflated and
the spare tire is not in use but the
light remains on, contact your
authorized dealer as soon as possible.
When inflating your tires
When putting air into your tires (such as at a gas station or in your
garage), the tire pressure monitoring system may not respond
immediately to the air added to your tires.
It may take up to two minutes of driving over 20 mph (32 km/h) for the
light to turn off after you have filled your tires to the recommended
inflation pressure.
How temperature affects your tire pressure
The tire pressure monitoring system monitors tire pressure in each
pneumatic tire. While driving in a normal manner, a typical passenger
tire inflation pressure may increase approximately 2 to 4 psi (14 to
28 kPa) from a cold start situation. If the vehicle is stationary overnight
with the outside temperature significantly lower than the daytime
temperature, the tire pressure may decrease approximately 3 psi
(21 kPa) for a drop of 30°F (17°C) in ambient temperature. This lower
pressure value may be detected by the system as being significantly
lower than the recommended inflation pressure and activate the system
warning light for low tire pressure. If the low tire pressure warning light
is on, visually check each tire to verify that no tire is flat. If one or more
tires are flat, repair as necessary. Check air pressure in the road tires.
If any tire is under-inflated, carefully drive the vehicle to the nearest
location where air can be added to the tires. Inflate all the tires to the
recommended inflation pressure.
326Wheels and Tires
2014 Expedition(exd)
Owners Guide gf, 1st Printing, June 2013
USA(fus)
Page 328 of 519

CHANGING A ROAD WHEEL
WARNING:The use of tire sealants may damage your tire
pressure monitoring system and should not be used. However, if
you must use a sealant, have an authorized dealer install a new tire
pressure monitoring system sensor and valve stem.
WARNING:SeeTire Pressure Monitoring Systemin this
chapter for important information. If the tire pressure monitoring
sensor becomes damaged, it will no longer function.
Note:The tire pressure monitoring system indicator light will illuminate
when the spare tire is in use. To restore the full function of the
monitoring system, all road wheels equipped with tire pressure
monitoring sensors must be mounted on this vehicle.
If you get a flat tire while driving, do not apply the brake heavily.
Instead, gradually decrease your speed. Hold the steering wheel firmly
and slowly move to a safe place on the side of the road.
Have a flat serviced by an authorized dealer in order to prevent damage
to the system sensors. SeeTire Pressure Monitoring Systemearlier in
this chapter. Replace the spare tire with a road tire as soon as possible.
During repairing or replacing of the flat tire, have the authorized dealer
inspect the tire pressure monitoring system sensor for damage.
Dissimilar Spare Tire and Wheel Assembly Information
WARNING:Failure to follow these guidelines could result in an
increased risk of loss of vehicle control, injury or death.
If you have a dissimilar spare tire and wheel assembly, then it is intended
for temporary use only. This means that if you need to use it, you should
replace it as soon as possible with a road tire and wheel assembly that is
the same size and type as the road tires and wheels that were originally
provided by Ford. If the dissimilar spare tire or wheel is damaged, it
should be replaced rather than repaired.
A dissimilar spare tire and wheel assembly is defined as a spare tire or
wheel that is different in brand, size or appearance from the road tires
and wheels and can be one of three types:
1.T-type mini-spare:This spare tire begins with the letter T for tire
size and may have Temporary Use Only molded in the sidewall.
Wheels and Tires327
2014 Expedition(exd)
Owners Guide gf, 1st Printing, June 2013
USA(fus)
Page 332 of 519

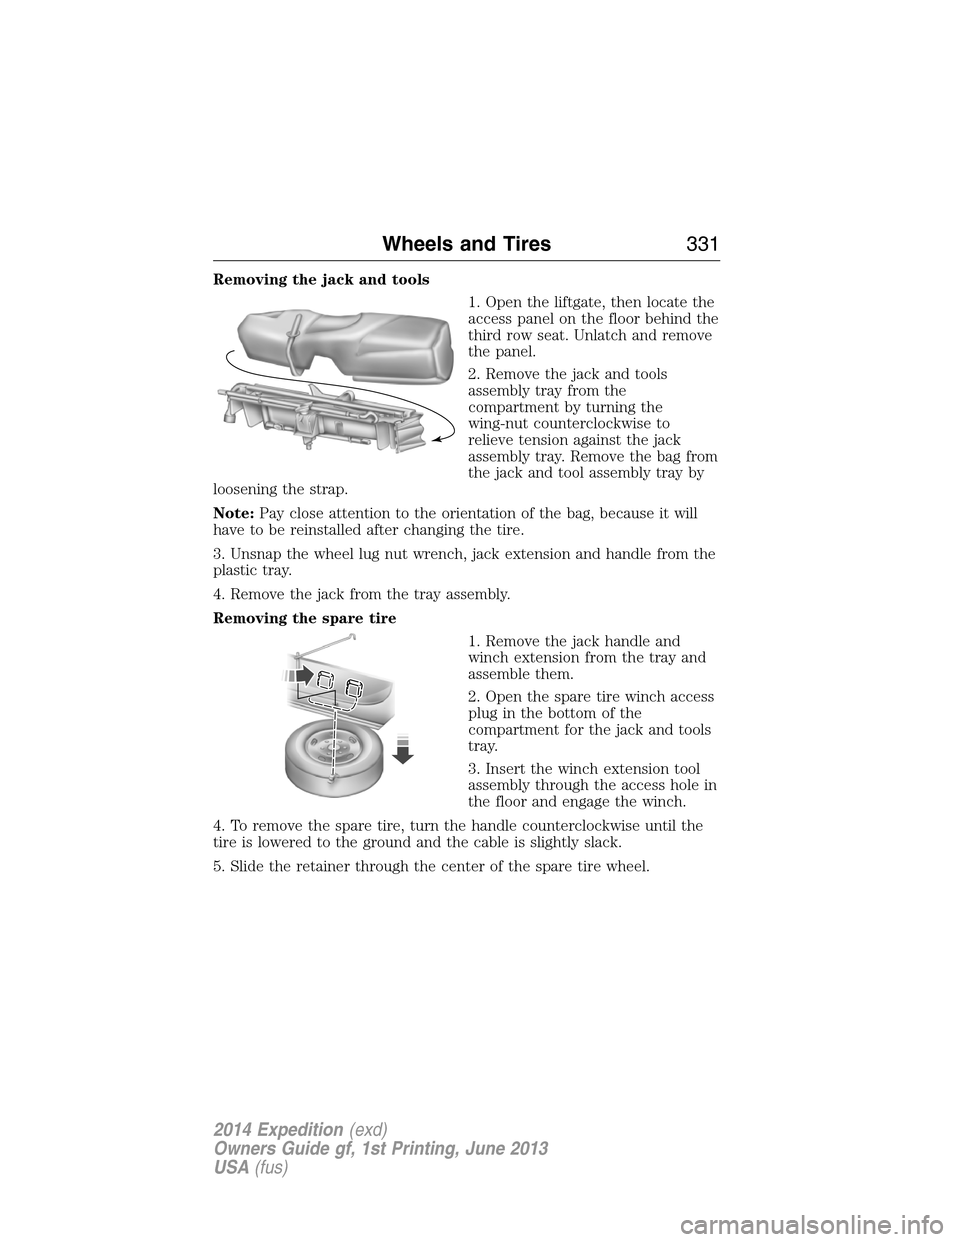
Removing the jack and tools
1. Open the liftgate, then locate the
access panel on the floor behind the
third row seat. Unlatch and remove
the panel.
2. Remove the jack and tools
assembly tray from the
compartment by turning the
wing-nut counterclockwise to
relieve tension against the jack
assembly tray. Remove the bag from
the jack and tool assembly tray by
loosening the strap.
Note:Pay close attention to the orientation of the bag, because it will
have to be reinstalled after changing the tire.
3. Unsnap the wheel lug nut wrench, jack extension and handle from the
plastic tray.
4. Remove the jack from the tray assembly.
Removing the spare tire
1. Remove the jack handle and
winch extension from the tray and
assemble them.
2. Open the spare tire winch access
plug in the bottom of the
compartment for the jack and tools
tray.
3. Insert the winch extension tool
assembly through the access hole in
the floor and engage the winch.
4. To remove the spare tire, turn the handle counterclockwise until the
tire is lowered to the ground and the cable is slightly slack.
5. Slide the retainer through the center of the spare tire wheel.
Wheels and Tires331
2014 Expedition(exd)
Owners Guide gf, 1st Printing, June 2013
USA(fus)
Page 345 of 519

ACCESSORIES
For a complete listing of the accessories that are available for your
vehicle, please contact an authorized dealer or visit our online store at
www.Accessories.Ford.com(United States only).
Ford Motor Company will repair or replace any properly authorized
dealer-installed Ford Genuine Accessories found to be defective in
factory-supplied materials or workmanship during the warranty period, as
well as any component damaged by the defective accessories.
Ford Motor Company will warrant your vehicle through the warranty that
provides the greatest benefit:
•12 months or 12000 miles (20000 kilometers) (whichever occurs first).
•The remainder of your new vehicle limited warranty.
Contact an authorized dealer for details and a copy of the warranty.
Exterior style
•Bug shields•Splash guards
•Deflectors•Chrome exhaust tips
Interior style
•Ambient lighting•Floor mats
•Illuminated door sill plates•Cargo area protector
•Electrochromatic compass/temperature interior mirrors
Lifestyle
•Rear seat entertainment*•Roof crossbars
•Cargo organization and
management•SUV camping tent*
•Racks and carriers*•Towing accessories
Peace of mind
•Remote start•Vehicle security systems
•Back up alarm*•Wheel locks
•Locking gas plug for capless fuel
system•Warning sensors
•Vehicle cover
*The accessory manufacturer designs, develops and therefore warrants
Ford Licensed Accessories, and does not design or test these accessories
344Accessories
2014 Expedition(exd)
Owners Guide gf, 1st Printing, June 2013
USA(fus)
Page 350 of 519

GENERAL INFORMATION
Radio Frequencies and Reception Factors
AM and FM frequencies are established by the Federal Communications
Commission (FCC) and the Canadian Radio and Telecommunications
Commission (CRTC). Those frequencies are:
AM: 530, 540–1700, 1710 kHz
FM: 87.9–107.7, 107.9 MHz
Radio reception factors
Distance and
strengthThe further you travel from an FM station,
the weaker the signal and the weaker the
reception.
TerrainHills, mountains, tall buildings, bridges,
tunnels, freeway overpasses, parking garages,
dense tree foliage and thunderstorms can
interfere with the reception.
Station overloadWhen you pass a ground-based broadcast
repeating tower, a stronger signal may
overtake a weaker one and result in the audio
system muting.
CD and CD Player Information
Note:CD units play commercially pressed 4.75-inch (12 centimeter)
audio compact discs only. Due to technical incompatibility, certain
recordable and re-recordable compact discs may not function correctly
when used in Ford CD players.
Note:Do not insert CDs with homemade paper (adhesive) labels into
the CD player as the label may peel and cause the CD to become
jammed. You should use a permanent felt tip marker rather than
adhesive labels on your homemade CDs. Ballpoint pens may damage
CDs. Please contact your authorized dealer for further information.
Note:Do not use any irregularly shaped discs or discs with a scratch
protection film attached.
Always handle discs by their edges only. Clean the disc with an approved
CD cleaner only. Wipe it from the center of the disc toward the edge.
Do not clean in a circular motion.
Do not expose discs to direct sunlight or heat sources for extended
periods.
Audio System349
2014 Expedition(exd)
Owners Guide gf, 1st Printing, June 2013
USA(fus)
Page 364 of 519

Your system does not play the following types of discs:
•Optical disc CD-1
•CD-ROM
•DVD-ROM mini disc-CDG (audio only, not graphics)
Important Notice
It is unlawful in most jurisdictions for a person to drive a motor vehicle
which is equipped with a television viewer or screen that is located in
the motor vehicle at any point forward of the back of the driver’s seat, or
that is visible, directly or indirectly, to the driver while operating your
vehicle. In the interest of safety, do not install the unit where it is visible,
directly or indirectly, by the operator of the motor vehicle. If your vehicle
is equipped with a wireless rear seat audio system or any other wireless
infrared device, power the system off in order to operate the DVD
headrest system. If the system is on, the two systems may interfere with
each other canceling out or creating undesirable audio through the
wireless headphones.
Safety Precaution
For safety reasons:
•Do not change discs while your vehicle is moving.
•Do not allow children to unfasten their safety belts to change discs or
make changes to the system.
•Make changes with the remote control, while safety belts remain
fastened.
Enjoy your entertainment system, but remember that safety of your
passengers is the highest priority.
Wireless Headphones
This unit includes a built-in dual channel infrared transmitter for use
with your wireless headphones. You can change headphone volume using
the individual controls on each headset. To use wireless headphones
effectively, you must maintain line-of-sight between headphones and
transmitter. Allowing obstructions to come between headphone and
transmitter, or body motions that allow the user to conceal the
headphone from the transmitter (like reaching or bending), adversely
affect audio performance. Infrared transmission, like visible light, travels
only in a straight line.
Audio System363
2014 Expedition(exd)
Owners Guide gf, 1st Printing, June 2013
USA(fus)
Page 366 of 519

Console Controls
Note:Do not use any solvents or cleaning materials when cleaning the
video device.
Note:Do not use any abrasive cleaners, which may scratch the screen.
Use only a lightly dampened lint free cloth to wipe the screen if it is
dirty.
Note:Lock the LCD screen in the fully closed position when not in use.
Note:Do not put pressure on the screen.
Note:Caution children against touching or scratching the screen, as it
may become dirty or damaged.
Note:Items marked with an
*are only available on systems with a DVD
player.
A.DVD compartment slot
*:Insert a disc with the label side facing the
rear passengers.
B.Infrared transmitters:These transmit audio to the wireless
headphones.
C.EJECT
*:Press this button to eject the disc from the DVD
compartment.
VIDEOdisc
POWER SOURCE VDEO L RAUDIO PLAY STOP ELECT
AV INPUT
HFJ
IG
C
B
A
E
DL
N
M
O
K
Audio System365
2014 Expedition(exd)
Owners Guide gf, 1st Printing, June 2013
USA(fus)
Page 367 of 519

D.STOP*:Press this button to stop playing the disc.
E.PLAY*:Press this button to play the disc.
F.Headphone jack:Plug in your wired headphones with a 1/8-inch
(3.5 millimeter) stereo connector plug to listen to audio from the
program.
G.Video input jack (red):Connect an RCA cable to this port.
H.Video input jack (white):Connect an RCA cable to this port.
I.Video input jack (yellow):Connect an RCA cable to this port.
J.USB port (optional):Listen to music or view images you stored on a
USB device such as a USB memory stick or a memory card reader.
K.SOURCE:Press this button to select Monitor A, Monitor B, AUX/TV
(if available), and AUX 2 (if available).
L.POWER:Press this button to turn the system off and on.
M.TFT LCD panel:Seven-inch TFT LCD panel.
N.Level lock and release latch:Use this latch to change the viewing
angle of the LCD panel or lock the panel into the secured position.
O.Infrared sensor - forward sensor eye:This allows the remote
control to navigate the on-screen display.
Remote Control
Note:The remote control uses infrared light to send commands to the
DVD player, just as many home video systems do. Just point the remote
control at the DVD player infrared window located above each screen in
order to control that DVD player. While you can connect a second device
such as a VCR through the auxiliary inputs, and view the playback on
the screen, you cannot control that device by aiming its remote control
at the Ford DVD player. The Ford DVD system remote control is the
only remote control you can use with the system. For example, if you
connect a VCR to the DVD system, you must point the VCR remote
control at the VCR to control it.
Installing the Battery
Before using your remote control, install the batteries as follows:
1. Turn the remote control face down. Press down on the ridged area of
the battery cover and slide it off.
2. Install two AAA batteries. Make sure you install the batteries
properly, with the + and – facing the correct way, as shown in the
battery compartment.
3. Slide the cover back until it clicks.
366Audio System
2014 Expedition(exd)
Owners Guide gf, 1st Printing, June 2013
USA(fus)