Page 34 of 420
STEERING LOCK
Engagement:when the key is in position STOP,
remove the key and turn the steering wheel until it is
locked.
Disengagement:move the steering wheel slightly
as you turn the ignition key to MAR.
WARNING
It is absolutely forbidden to carr y out
any after-market operation involving
steering system or steering column
modifications (e.g.: installation of anti-theft
device) that could badly affect performance and
safety, invalidate the warranty and also result
in non-compliance of the car with type-
approval requirements.
WARNING
Never remove the key while the car is
moving.The steering wheel will lock
as soon as it is turned.This holds true for cars
being towed as well.
SEATS
WARNING
All adjustments must be made with the
car stationary.The fabric upholstery of the seats has
been designed to withstand long-term
wear deriving from normal use of the car.
Some precautions are however required. Avoid
prolonged and/or excessive rubbing against
clothing accessories such as metal buckles and
Velcro strips which, by applying a high pressure on
the fabric in a small area, could cause it to
break, thereby damaging the upholstery.
30GETTING TO
KNOW YOUR CAR
SAFETY
STARTING AND
DRIVING
WARNING LIGHTS
AND MESSAGES
IN AN EMERGENCY
SERVICING AND
MAINTENANCE
TECHNICAL
SPECIFICATIONS
INDEX
Page 35 of 420
FRONT SEATS
Lengthwise adjustment
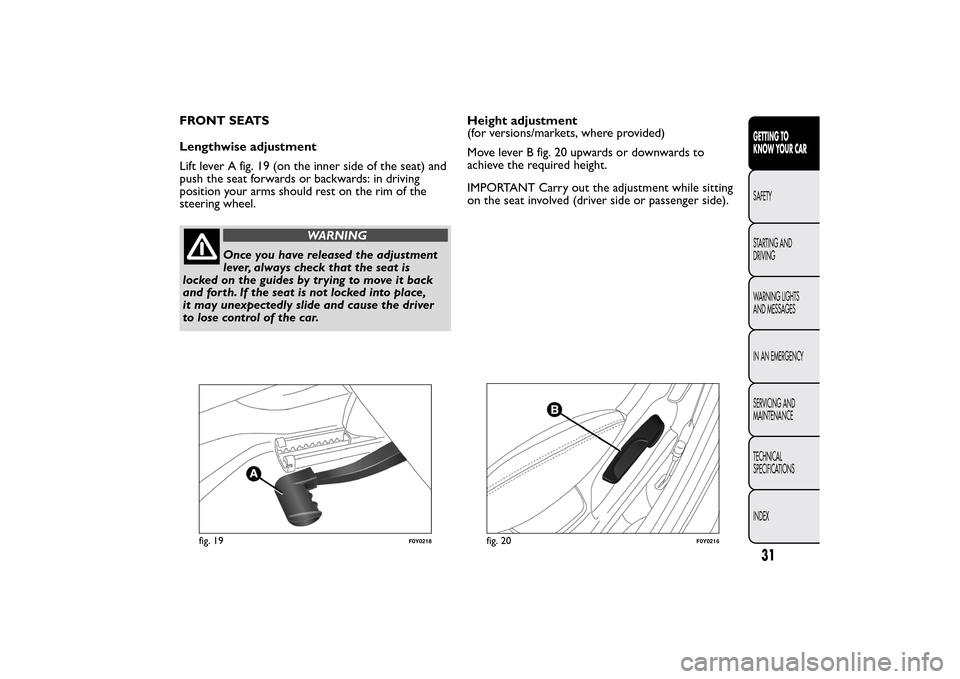
Lift lever A fig. 19 (on the inner side of the seat) and
push the seat forwards or backwards: in driving
position your arms should rest on the rim of the
steering wheel.
WARNING
Once you have released the adjustment
lever, always check that the seat is
locked on the guides by trying to move it back
and for th. If the seat is not locked into place,
it may unexpectedly slide and cause the driver
to lose control of the car.Height adjustment
(for versions/markets, where provided)
Move lever B fig. 20 upwards or downwards to
achieve the required height.
IMPORTANT Carry out the adjustment while sitting
on the seat involved (driver side or passenger side).
fig. 19
F0Y0218
fig. 20
F0Y0216
31GETTING TO
KNOW YOUR CARSAFETY
STARTING AND
DRIVING
WARNING LIGHTS
AND MESSAGES
IN AN EMERGENCY
SERVICING AND
MAINTENANCE
TECHNICAL
SPECIFICATIONS
INDEX
Page 39 of 420
In the rear of the backrests there is also an object
retaining net C.
IMPORTANT Do not place objects heavier than 3 kg
on the supporting surface: for safety reasons the
supporting surface is detached from its housing when
subject to higher loads.
WARNING
Do not travel with the supporting
surface open: always make sure it is
correctly closed.SLIDING AND FOLDING REAR SEATS
Lengthwise adjustment
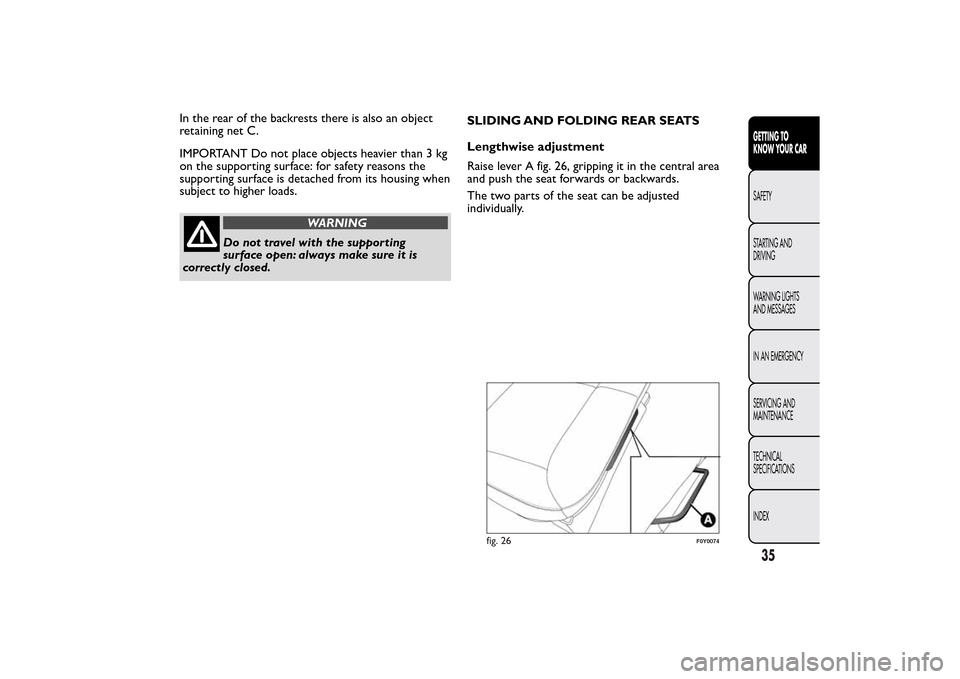
Raise lever A fig. 26, gripping it in the central area
and push the seat forwards or backwards.
The two parts of the seat can be adjusted
individually.
fig. 26
F0Y0074
35GETTING TO
KNOW YOUR CARSAFETY
STARTING AND
DRIVING
WARNING LIGHTS
AND MESSAGES
IN AN EMERGENCY
SERVICING AND
MAINTENANCE
TECHNICAL
SPECIFICATIONS
INDEX
Page 41 of 420
HEAD RESTRAINTSFRONT
They are height-adjustable: to adjust them, operate
as follows.
Upwards adjustment: raise the head restraint until it
clicks into place.
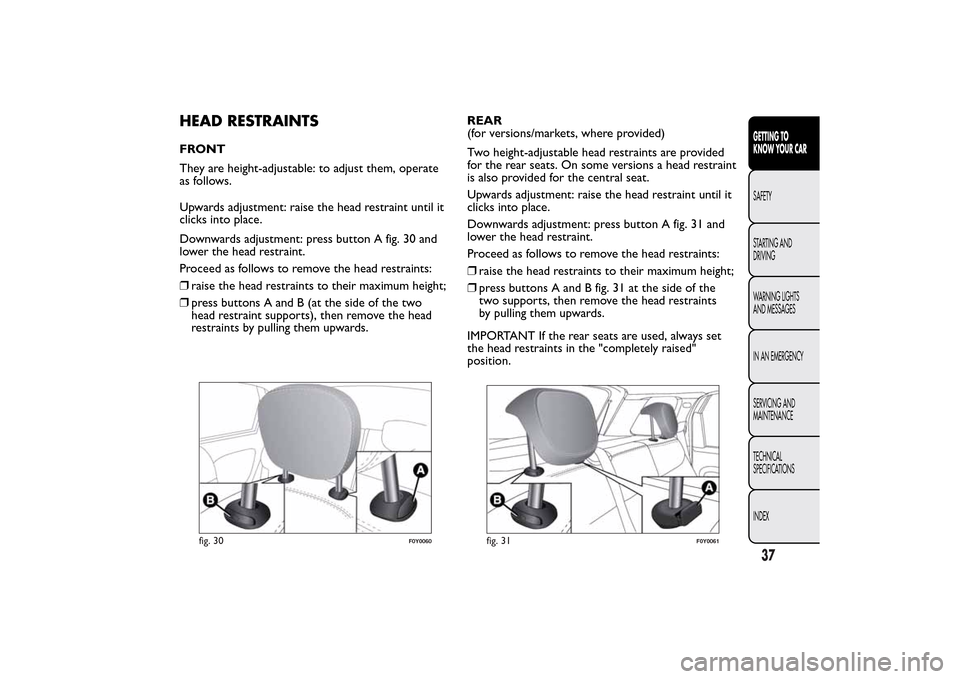
Downwards adjustment: press button A fig. 30 and
lower the head restraint.
Proceed as follows to remove the head restraints:
❒raise the head restraints to their maximum height;
❒press buttons A and B (at the side of the two
head restraint supports), then remove the head
restraints by pulling them upwards.REAR
(for versions/markets, where provided)
Two height-adjustable head restraints are provided
for the rear seats. On some versions a head restraint
is also provided for the central seat.
Upwards adjustment: raise the head restraint until it
clicks into place.
Downwards adjustment: press button A fig. 31 and
lower the head restraint.
Proceed as follows to remove the head restraints:
❒raise the head restraints to their maximum height;
❒press buttons A and B fig. 31 at the side of the
two supports, then remove the head restraints
by pulling them upwards.
IMPORTANT If the rear seats are used, always set
the head restraints in the "completely raised"
position.
fig. 30
F0Y0060
fig. 31
F0Y0061
37GETTING TO
KNOW YOUR CARSAFETY
STARTING AND
DRIVING
WARNING LIGHTS
AND MESSAGES
IN AN EMERGENCY
SERVICING AND
MAINTENANCE
TECHNICAL
SPECIFICATIONS
INDEX
Page 101 of 420
WARNING
Be careful not to hit objects on the
storage shelf when you open the
tailgate.
Emergency opening from inside
Proceed as follows:
❒remove the rear head restraints and completely
fold back the seats (see the paragraph "Extending
the luggage compartment");
❒take the screwdriver provided from the tool box
or the Fix&Go Automatic container, depending
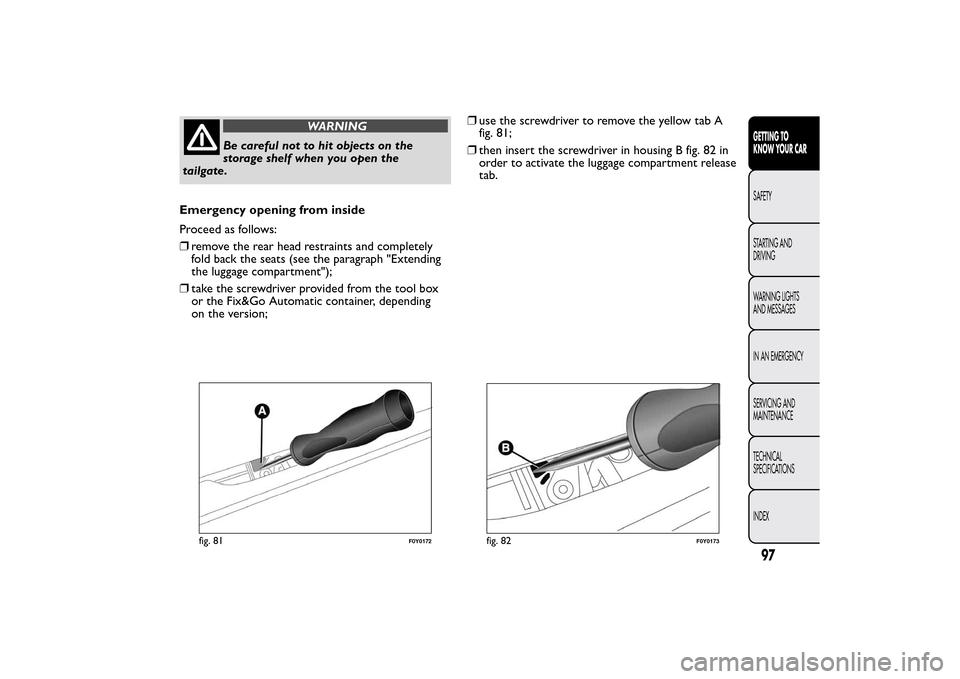
on the version;❒use the screwdriver to remove the yellow tab A
fig. 81;
❒then insert the screwdriver in housing B fig. 82 in
order to activate the luggage compartment release
tab.
fig. 81
F0Y0172
fig. 82
F0Y0173
97GETTING TO
KNOW YOUR CARSAFETY
STARTING AND
DRIVING
WARNING LIGHTS
AND MESSAGES
IN AN EMERGENCY
SERVICING AND
MAINTENANCE
TECHNICAL
SPECIFICATIONS
INDEX
Page 102 of 420
CLOSING
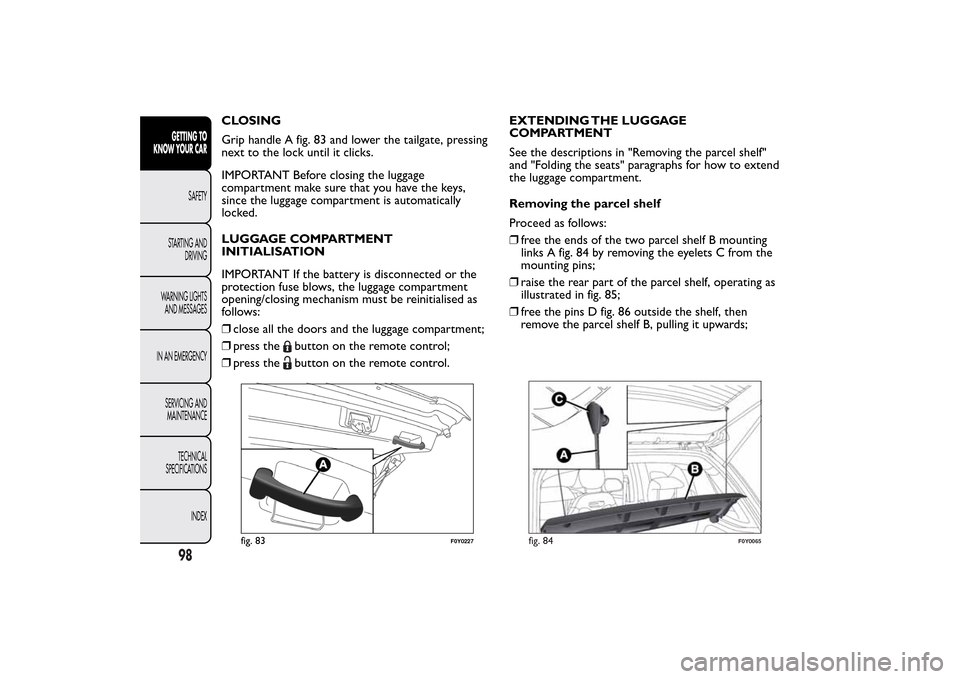
Grip handle A fig. 83 and lower the tailgate, pressing
next to the lock until it clicks.
IMPORTANT Before closing the luggage
compartment make sure that you have the keys,
since the luggage compartment is automatically
locked.
LUGGAGE COMPARTMENT
INITIALISATION
IMPORTANT If the battery is disconnected or the
protection fuse blows, the luggage compartment
opening/closing mechanism must be reinitialised as
follows:
❒close all the doors and the luggage compartment;
❒press the
button on the remote control;
❒press thebutton on the remote control.EXTENDING THE LUGGAGE
COMPARTMENT
See the descriptions in "Removing the parcel shelf"
and "Folding the seats" paragraphs for how to extend
the luggage compartment.
Removing the parcel shelf
Proceed as follows:
❒free the ends of the two parcel shelf B mounting
links A fig. 84 by removing the eyelets C from the
mounting pins;
❒raise the rear part of the parcel shelf, operating as
illustrated in fig. 85;
❒free the pins D fig. 86 outside the shelf, then
remove the parcel shelf B, pulling it upwards;
fig. 83
F0Y0227
fig. 84
F0Y0065
98GETTING TO
KNOW YOUR CAR
SAFETY
STARTING AND
DRIVING
WARNING LIGHTS
AND MESSAGES
IN AN EMERGENCY
SERVICING AND
MAINTENANCE
TECHNICAL
SPECIFICATIONS
INDEX
Page 105 of 420
Backrest and seat folding (total extension)
Proceed as follows:
❒completely lower the rear seat head restraints;
❒move the seat belts to the side, making sure that
they are correctly extended and not twisted;
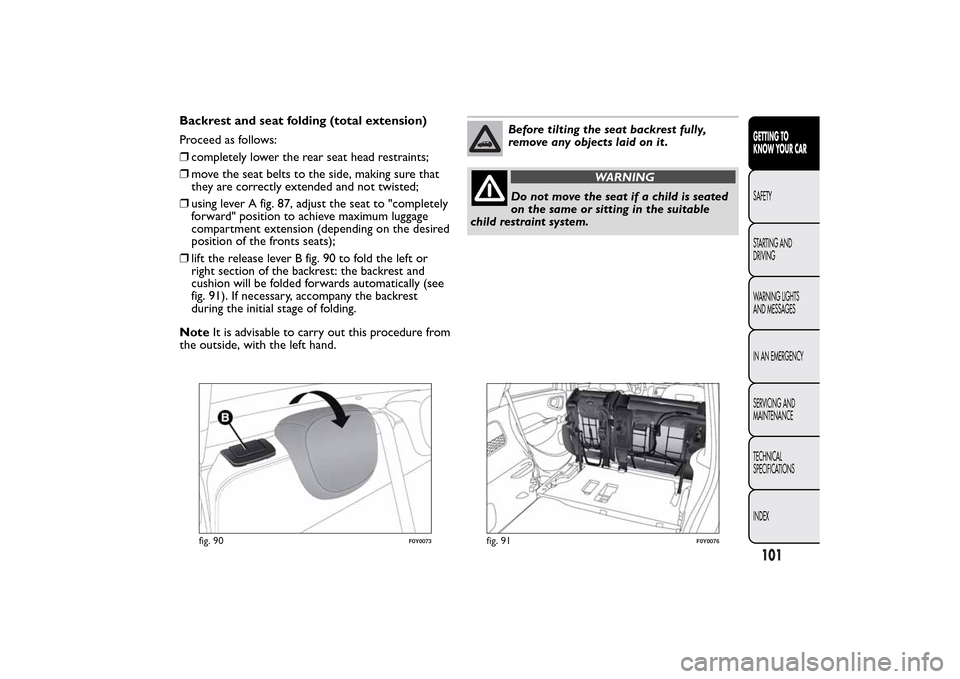
❒using lever A fig. 87, adjust the seat to "completely
forward" position to achieve maximum luggage
compartment extension (depending on the desired
position of the fronts seats);
❒lift the release lever B fig. 90 to fold the left or
right section of the backrest: the backrest and
cushion will be folded forwards automatically (see
fig. 91). If necessary, accompany the backrest
during the initial stage of folding.
NoteIt is advisable to carry out this procedure from
the outside, with the left hand.
Before tilting the seat backrest fully,
remove any objects laid on it .
WARNING
Do not move the seat if a child is seated
on the same or sitting in the suitable
child restraint system.
fig. 90
F0Y0073
fig. 91
F0Y0076
101GETTING TO
KNOW YOUR CARSAFETY
STARTING AND
DRIVING
WARNING LIGHTS
AND MESSAGES
IN AN EMERGENCY
SERVICING AND
MAINTENANCE
TECHNICAL
SPECIFICATIONS
INDEX
Page 113 of 420
HEADLIGHTSLIGHT BEAM DIRECTION
The correct alignment of the headlights is important
for the comfort and safety of not only the driver
but all other road users. This is also covered by
a specific rule of the highway code.
The headlights must be correctly aligned to
guarantee the best visibility conditions for all drivers
while travelling with headlights on.
Contact a Fiat Dealership to have the headlights
checked and adjusted, if necessary.
Check beam alignment every time the load or its
distribution changes.
HEADLAMP ALIGNMENT CORRECTOR
This device works with the ignition key in the MAR
position and the dipped headlights on.Headlight alignment adjustment
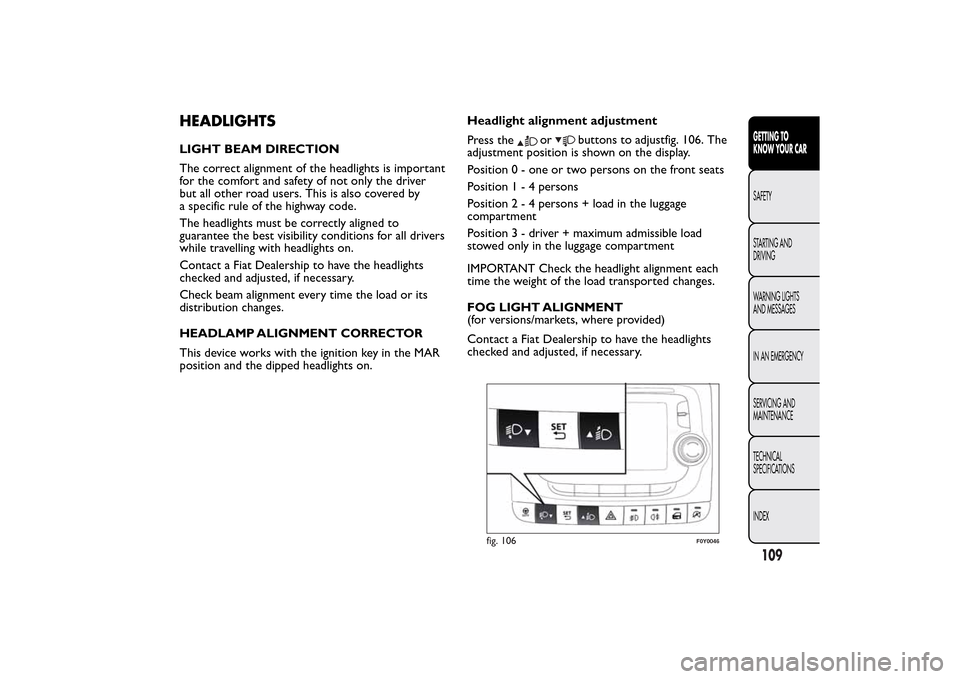
Press the
or
buttons to adjustfig. 106. The
adjustment position is shown on the display.
Position 0 - one or two persons on the front seats
Position1-4persons
Position2-4persons + load in the luggage
compartment
Position 3 - driver + maximum admissible load
stowed only in the luggage compartment
IMPORTANT Check the headlight alignment each
time the weight of the load transported changes.
FOG LIGHT ALIGNMENT
(for versions/markets, where provided)
Contact a Fiat Dealership to have the headlights
checked and adjusted, if necessary.
fig. 106
F0Y0046
109GETTING TO
KNOW YOUR CARSAFETY
STARTING AND
DRIVING
WARNING LIGHTS
AND MESSAGES
IN AN EMERGENCY
SERVICING AND
MAINTENANCE
TECHNICAL
SPECIFICATIONS
INDEX