Page 34 of 420
STEERING LOCK
Engagement:when the key is in position STOP,
remove the key and turn the steering wheel until it is
locked.
Disengagement:move the steering wheel slightly
as you turn the ignition key to MAR.
WARNING
It is absolutely forbidden to carr y out
any after-market operation involving
steering system or steering column
modifications (e.g.: installation of anti-theft
device) that could badly affect performance and
safety, invalidate the warranty and also result
in non-compliance of the car with type-
approval requirements.
WARNING
Never remove the key while the car is
moving.The steering wheel will lock
as soon as it is turned.This holds true for cars
being towed as well.
SEATS
WARNING
All adjustments must be made with the
car stationary.The fabric upholstery of the seats has
been designed to withstand long-term
wear deriving from normal use of the car.
Some precautions are however required. Avoid
prolonged and/or excessive rubbing against
clothing accessories such as metal buckles and
Velcro strips which, by applying a high pressure on
the fabric in a small area, could cause it to
break, thereby damaging the upholstery.
30GETTING TO
KNOW YOUR CAR
SAFETY
STARTING AND
DRIVING
WARNING LIGHTS
AND MESSAGES
IN AN EMERGENCY
SERVICING AND
MAINTENANCE
TECHNICAL
SPECIFICATIONS
INDEX
Page 41 of 420
HEAD RESTRAINTSFRONT
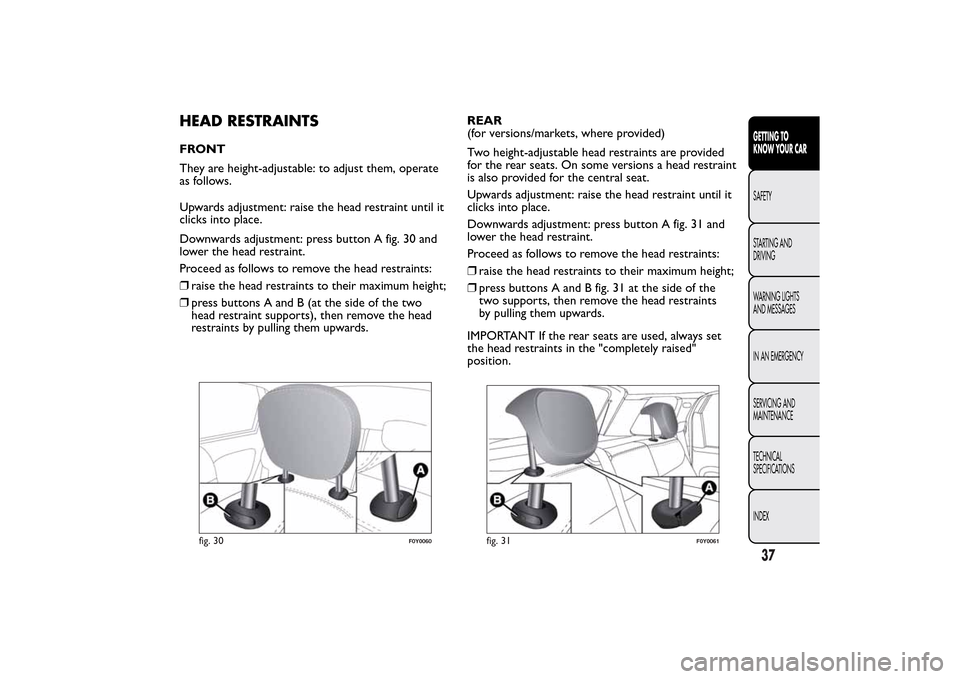
They are height-adjustable: to adjust them, operate
as follows.
Upwards adjustment: raise the head restraint until it
clicks into place.
Downwards adjustment: press button A fig. 30 and
lower the head restraint.
Proceed as follows to remove the head restraints:
❒raise the head restraints to their maximum height;
❒press buttons A and B (at the side of the two
head restraint supports), then remove the head
restraints by pulling them upwards.REAR
(for versions/markets, where provided)
Two height-adjustable head restraints are provided
for the rear seats. On some versions a head restraint
is also provided for the central seat.
Upwards adjustment: raise the head restraint until it
clicks into place.
Downwards adjustment: press button A fig. 31 and
lower the head restraint.
Proceed as follows to remove the head restraints:
❒raise the head restraints to their maximum height;
❒press buttons A and B fig. 31 at the side of the
two supports, then remove the head restraints
by pulling them upwards.
IMPORTANT If the rear seats are used, always set
the head restraints in the "completely raised"
position.
fig. 30
F0Y0060
fig. 31
F0Y0061
37GETTING TO
KNOW YOUR CARSAFETY
STARTING AND
DRIVING
WARNING LIGHTS
AND MESSAGES
IN AN EMERGENCY
SERVICING AND
MAINTENANCE
TECHNICAL
SPECIFICATIONS
INDEX
Page 101 of 420
WARNING
Be careful not to hit objects on the
storage shelf when you open the
tailgate.
Emergency opening from inside
Proceed as follows:
❒remove the rear head restraints and completely
fold back the seats (see the paragraph "Extending
the luggage compartment");
❒take the screwdriver provided from the tool box
or the Fix&Go Automatic container, depending
on the version;❒use the screwdriver to remove the yellow tab A
fig. 81;
❒then insert the screwdriver in housing B fig. 82 in
order to activate the luggage compartment release
tab.
fig. 81
F0Y0172
fig. 82
F0Y0173
97GETTING TO
KNOW YOUR CARSAFETY
STARTING AND
DRIVING
WARNING LIGHTS
AND MESSAGES
IN AN EMERGENCY
SERVICING AND
MAINTENANCE
TECHNICAL
SPECIFICATIONS
INDEX
Page 102 of 420
CLOSING
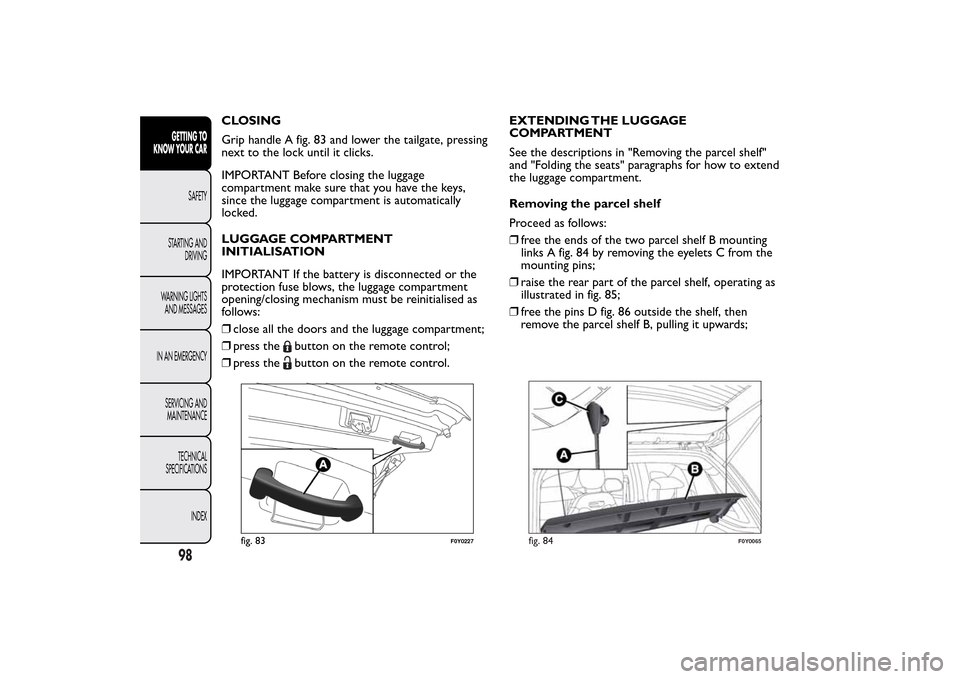
Grip handle A fig. 83 and lower the tailgate, pressing
next to the lock until it clicks.
IMPORTANT Before closing the luggage
compartment make sure that you have the keys,
since the luggage compartment is automatically
locked.
LUGGAGE COMPARTMENT
INITIALISATION
IMPORTANT If the battery is disconnected or the
protection fuse blows, the luggage compartment
opening/closing mechanism must be reinitialised as
follows:
❒close all the doors and the luggage compartment;
❒press the
button on the remote control;
❒press thebutton on the remote control.EXTENDING THE LUGGAGE
COMPARTMENT
See the descriptions in "Removing the parcel shelf"
and "Folding the seats" paragraphs for how to extend
the luggage compartment.
Removing the parcel shelf
Proceed as follows:
❒free the ends of the two parcel shelf B mounting
links A fig. 84 by removing the eyelets C from the
mounting pins;
❒raise the rear part of the parcel shelf, operating as
illustrated in fig. 85;
❒free the pins D fig. 86 outside the shelf, then
remove the parcel shelf B, pulling it upwards;
fig. 83
F0Y0227
fig. 84
F0Y0065
98GETTING TO
KNOW YOUR CAR
SAFETY
STARTING AND
DRIVING
WARNING LIGHTS
AND MESSAGES
IN AN EMERGENCY
SERVICING AND
MAINTENANCE
TECHNICAL
SPECIFICATIONS
INDEX
Page 105 of 420
Backrest and seat folding (total extension)
Proceed as follows:
❒completely lower the rear seat head restraints;
❒move the seat belts to the side, making sure that
they are correctly extended and not twisted;
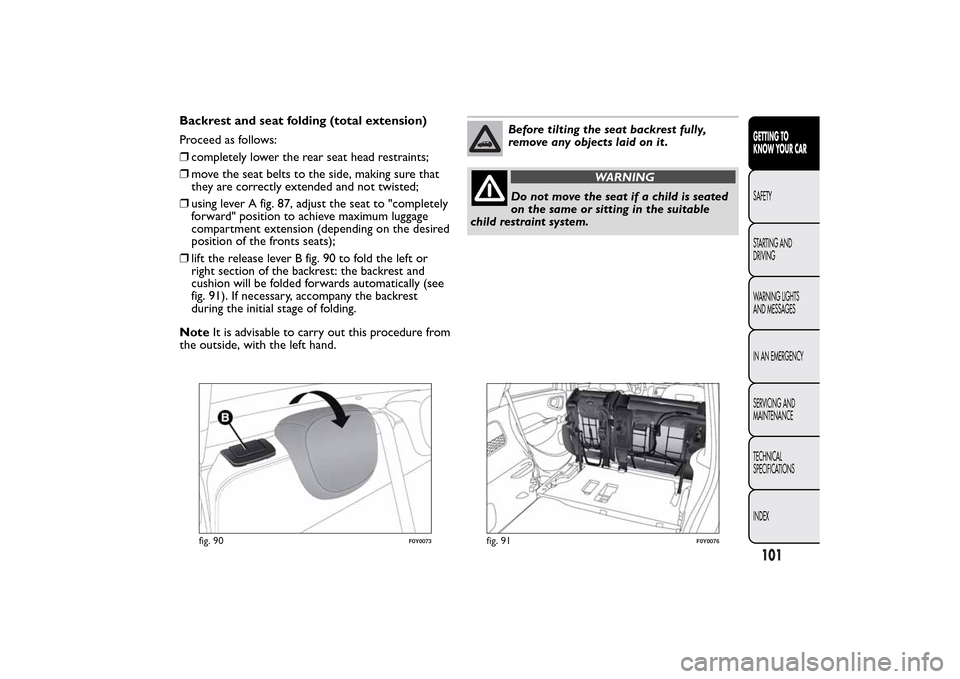
❒using lever A fig. 87, adjust the seat to "completely
forward" position to achieve maximum luggage
compartment extension (depending on the desired
position of the fronts seats);
❒lift the release lever B fig. 90 to fold the left or
right section of the backrest: the backrest and
cushion will be folded forwards automatically (see
fig. 91). If necessary, accompany the backrest
during the initial stage of folding.
NoteIt is advisable to carry out this procedure from
the outside, with the left hand.
Before tilting the seat backrest fully,
remove any objects laid on it .
WARNING
Do not move the seat if a child is seated
on the same or sitting in the suitable
child restraint system.
fig. 90
F0Y0073
fig. 91
F0Y0076
101GETTING TO
KNOW YOUR CARSAFETY
STARTING AND
DRIVING
WARNING LIGHTS
AND MESSAGES
IN AN EMERGENCY
SERVICING AND
MAINTENANCE
TECHNICAL
SPECIFICATIONS
INDEX
Page 175 of 420
PARKINGProceed as follows:
❒stop the engine and engage the handbrake;
❒engage a gear (first gear if parked uphill or reverse
if facing downhill) and leave the wheels turned.
If the car is parked on a steep slope, it is also
advisable to block the wheels with a wedge or stone.
Do not leave the key in the ignition switch to
prevent the battery from running down.
WARNING
Never leave children unattended in the
car. Always remove the key from the
ignition when leaving the car and take it with
you.HANDBRAKE
The handbrake lever is located between the front
seats.
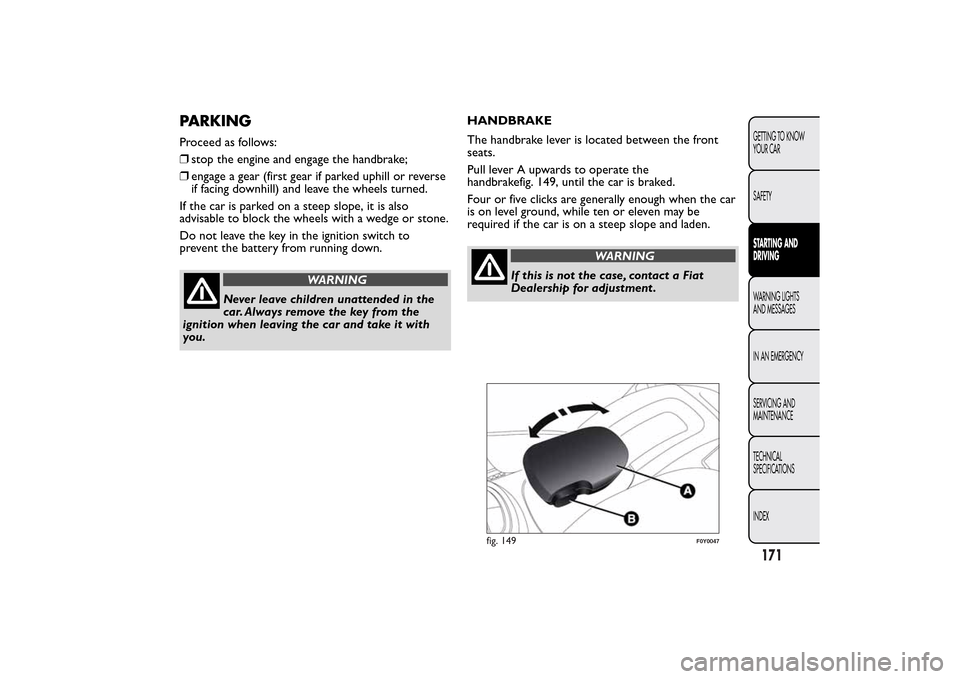
Pull lever A upwards to operate the
handbrakefig. 149, until the car is braked.
Four or five clicks are generally enough when the car
is on level ground, while ten or eleven may be
required if the car is on a steep slope and laden.
WARNING
If this is not the case, contact a Fiat
Dealership for adjustment .
fig. 149
F0Y0047
171GETTING TO KNOW
YOUR CAR
SAFETYSTARTING AND
DRIVINGWARNING LIGHTS
AND MESSAGES
IN AN EMERGENCY
SERVICING AND
MAINTENANCE
TECHNICAL
SPECIFICATIONS
INDEX
Page 206 of 420
REFITTING THE STANDARD WHEEL
Following the procedure described previously, raise
the car and remove the space-saver wheel.
Versions with steel rims
Proceed as follows:
❒make sure the contact surfaces between standard
wheel and hub are clean so that the fixing studs
will not come loose;
❒fit the standard wheel inserting the 5 studs into
the holes;
❒press-fit the hub cap, aligning the special splining
(on the cap) with the inflation valve;
❒using the wrench provided, tighten the fixing studs;
❒lower the car and remove the jack;
❒using the wrench provided, fully tighten the studs
in the sequence shown previously.Versions with alloy wheels
Proceed as follows:
❒insert the wheel on the hub and using the wrench
provided tighten the studs;
❒lower the car and remove the jack;
❒using the wrench provided, fully tighten the 5 studs
in the sequence shown;
❒reinstall the hub cap, taking care to position the 3
plastic pins in the dedicated seats on the wheel.
Slightly press the cap to prevent any damage to the
plastic pins.
IMPORTANT If it is not fitted properly, the hub cap
may detach itself when the car is running.
After tyre replacement
❒stow the space-saver wheel in the compartment
provided in the boot;
❒insert the jack and the other tools in the
container;
❒arrange the container and tools on the space-saver
wheel;
❒correctly reposition the boot stiff cover.
202GETTING TO KNOW
YOUR CAR
SAFETY
STARTING AND
DRIVING
WARNING LIGHTS
AND MESSAGES
IN AN
EMERGENCY
SERVICING AND
MAINTENANCE
TECHNICAL
SPECIFICATIONS
INDEX
Page 266 of 420
SEATS AND FABRIC PARTS
Remove dust with a soft brush or a vacuum cleaner.
It is advisable to use a moist brush on velvet
upholstery.
Rub the seats with a sponge and a solution of water
and mild soap.
PLASTIC AND COATED PARTS
Clean interior plastic parts with a damp cloth (if
possible made from microfibre), and a solution
of water and neutral, non-abrasive detergent. To
clean oily or persistent stains, use specific products
free from solvents and designed to maintain the
original appearance and colour of the components.
Remove any dust using a microfibre cloth, if
necessary moistened with water. The use of paper
tissues is not recommended as these may leave
residues.
IMPORTANT Never use alcohol, petrols and
derivatives to clean the instrument panel lens.LEATHER PARTS
(for versions/markets, where provided)
Use only water and neutral soap to clean these parts.
Never use alcohol or alcohol-based products. Before
using a specific product for cleaning interiors, make
sure that it does not contain alcohol and/or alcohol
based substances.
262GETTING TO KNOW
YOUR CAR
SAFETY
STARTING AND
DRIVING
WARNING LIGHTS
AND MESSAGES
IN AN EMERGENCYSERVICING AND
MAINTENANCE
TECHNICAL
SPECIFICATIONS
INDEX