Page 35 of 420
FRONT SEATS
Lengthwise adjustment
Lift lever A fig. 19 (on the inner side of the seat) and
push the seat forwards or backwards: in driving
position your arms should rest on the rim of the
steering wheel.
WARNING
Once you have released the adjustment
lever, always check that the seat is
locked on the guides by trying to move it back
and for th. If the seat is not locked into place,
it may unexpectedly slide and cause the driver
to lose control of the car.Height adjustment
(for versions/markets, where provided)
Move lever B fig. 20 upwards or downwards to
achieve the required height.
IMPORTANT Carry out the adjustment while sitting
on the seat involved (driver side or passenger side).
fig. 19
F0Y0218
fig. 20
F0Y0216
31GETTING TO
KNOW YOUR CARSAFETY
STARTING AND
DRIVING
WARNING LIGHTS
AND MESSAGES
IN AN EMERGENCY
SERVICING AND
MAINTENANCE
TECHNICAL
SPECIFICATIONS
INDEX
Page 37 of 420
Electric lumbar adjustment
(for versions/markets, where provided)
With key at MAR-ON press button A fig. 22 to
operate the lumbar area supporting device for
regulating comfort level when driving.
Release the button when you reach the desired
position.
Electric seat heating
(for versions/markets, where provided)
With the key turned to MAR-ON, press button B to
switch the function on/off.
When the function is enabled, the LED on the
button switches on.
IMPORTANT If this function is activated with engine
off the battery may run down.Driver's side seat armrest
(for versions/markets, where provided)
On some versions the driver's side seat is equipped
with an armrest.
The armrest can be raised/lowered by acting in the
direction shown by the arrows (see fig. 23).
fig. 22
F0Y0215
fig. 23
F0Y0159
33GETTING TO
KNOW YOUR CARSAFETY
STARTING AND
DRIVING
WARNING LIGHTS
AND MESSAGES
IN AN EMERGENCY
SERVICING AND
MAINTENANCE
TECHNICAL
SPECIFICATIONS
INDEX
Page 113 of 420

HEADLIGHTSLIGHT BEAM DIRECTION
The correct alignment of the headlights is important
for the comfort and safety of not only the driver
but all other road users. This is also covered by
a specific rule of the highway code.
The headlights must be correctly aligned to
guarantee the best visibility conditions for all drivers
while travelling with headlights on.
Contact a Fiat Dealership to have the headlights
checked and adjusted, if necessary.
Check beam alignment every time the load or its
distribution changes.
HEADLAMP ALIGNMENT CORRECTOR
This device works with the ignition key in the MAR
position and the dipped headlights on.Headlight alignment adjustment
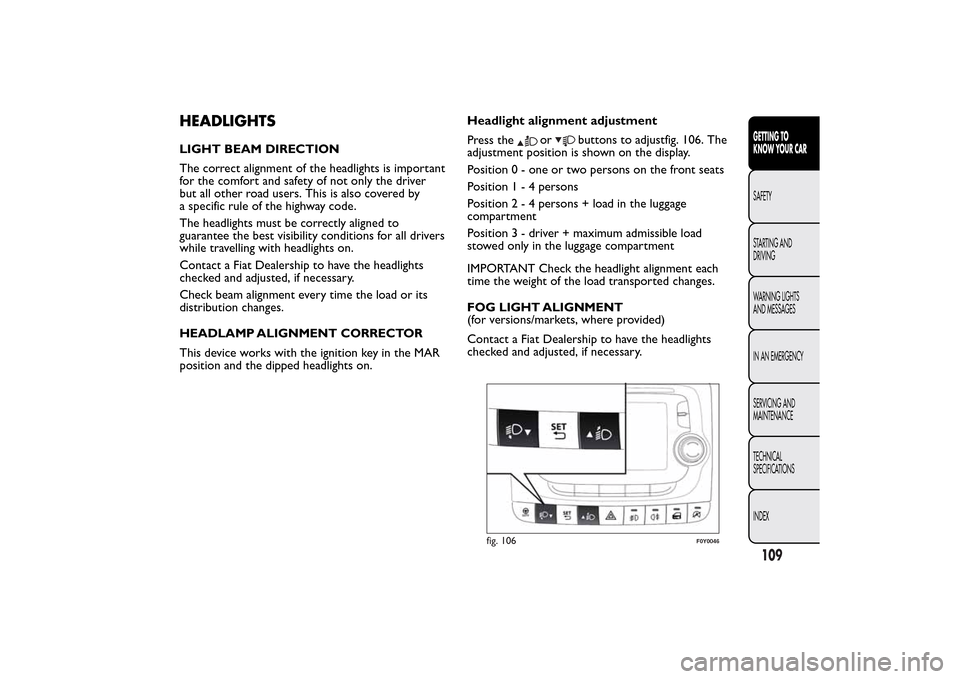
Press the
or
buttons to adjustfig. 106. The
adjustment position is shown on the display.
Position 0 - one or two persons on the front seats
Position1-4persons
Position2-4persons + load in the luggage
compartment
Position 3 - driver + maximum admissible load
stowed only in the luggage compartment
IMPORTANT Check the headlight alignment each
time the weight of the load transported changes.
FOG LIGHT ALIGNMENT
(for versions/markets, where provided)
Contact a Fiat Dealership to have the headlights
checked and adjusted, if necessary.
fig. 106
F0Y0046
109GETTING TO
KNOW YOUR CARSAFETY
STARTING AND
DRIVING
WARNING LIGHTS
AND MESSAGES
IN AN EMERGENCY
SERVICING AND
MAINTENANCE
TECHNICAL
SPECIFICATIONS
INDEX
Page 323 of 420

JACK
Please note that:
❒the jack weight is 1.76 kg;
❒the jack requires no adjustment;
❒the jack cannot be repaired and in the event of a
fault it must be replaced by another original one;
❒no tool other than its cranking device may be fitted
on the jack.
WHEEL REPLACEMENT PROCEDURE
To change a wheel, proceed as follows:
❒stop the car in a position that is not dangerous for
oncoming traffic where you can change the wheel
safely. The ground should be flat if possible, and
sufficiently firm;
❒switch off the engine, pull up the handbrake and
engage the 1
stgear or reverse. Wear the reflective
safety jacket (compulsory by law) before getting
out of the car;
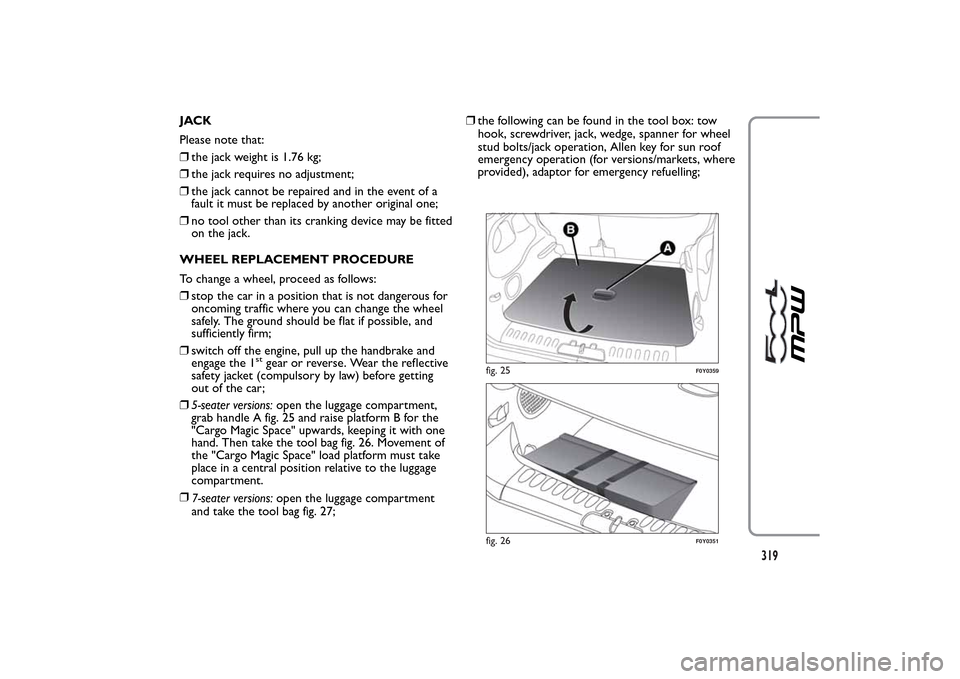
❒5-seater versions:open the luggage compartment,
grab handle A fig. 25 and raise platform B for the
"Cargo Magic Space" upwards, keeping it with one
hand. Then take the tool bag fig. 26. Movement of
the "Cargo Magic Space" load platform must take
place in a central position relative to the luggage
compartment.
❒
7-seater versions:open the luggage compartment
and take the tool bag fig. 27;❒the following can be found in the tool box: tow
hook, screwdriver, jack, wedge, spanner for wheel
stud bolts/jack operation, Allen key for sun roof
emergency operation (for versions/markets, where
provided), adaptor for emergency refuelling;
fig. 25
F0Y0359
fig. 26
F0Y0351
319