2014 FIAT 500L LIVING clock
[x] Cancel search: clockPage 19 of 420

Activation/Trip B data
(Activating Trip B)
With this function it is possible to activate ("On") or
deactivate ("Off") the Trip B display (partial trip).
For more information see the "Trip computer"
paragraph.
For activation/deactivation, proceed as follows:
❒press the
button briefly to make the display flash
On or Off according to the previous setting;
❒press theor
button to make the
adjustment;
❒press the
button briefly to return to the menu
screen or give the button a long press to return
to the standard screen without storing.
Time adjustment (Clock adjustment)
This function enables the clock to be set through
two submenus: “Time” and “Format”.
To carry out the adjustment, proceed as follows:
❒press button
briefly. The display shows the two
submenus "Time" and "Format";
❒press theor
button to switch between
the two submenus;
❒once you have selected the submenu to be
changed, press the button
briefly;
❒if the "Time" submenu is selected and button
is
pressed briefly, "hours" will flash on the display.
Press the
or
button to make the
adjustment;❒pressing the
button briefly again: the "minutes"
flash on the display. Press the
or
button
to make the adjustment;
❒if the "Format" submenu is selected and button
is pressed briefly, the display mode will flash
on the display. Press the
or
button to
select "12h" or "24h" mode. When you have
carried out the required settings, briefly press the
button to go back to the submenu screen or
hold the button down to go back to the main
menu screen without storing the new settings.
Hold down the
button again to return to the
standard screen or to the main menu according to
the menu items where you are in.
IMPORTANT The setting will increase or decrease
by one unit each time the button
or
is
pressed. Keeping the button pressed causes an
automatic rapid speed increase/decrease. Complete
the setting by briefly pressing the button when
you approach the required value.
15GETTING TO
KNOW YOUR CARSAFETY
STARTING AND
DRIVING
WARNING LIGHTS
AND MESSAGES
IN AN EMERGENCY
SERVICING AND
MAINTENANCE
TECHNICAL
SPECIFICATIONS
INDEX
Page 52 of 420
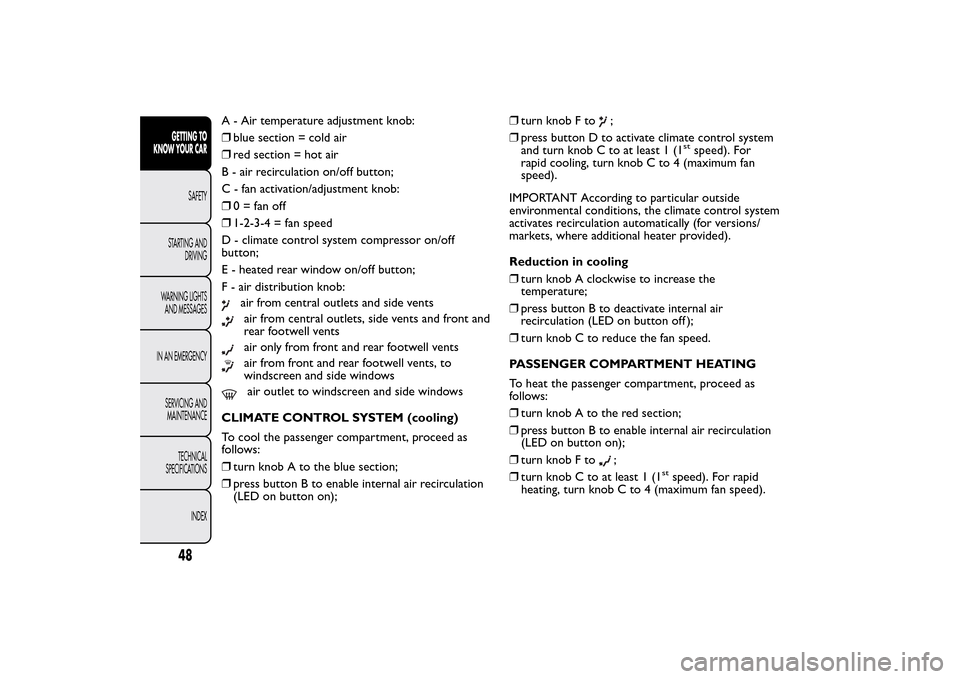
A - Air temperature adjustment knob:
❒blue section = cold air
❒red section = hot air
B - air recirculation on/off button;
C - fan activation/adjustment knob:
❒0 = fan off
❒1-2-3-4 = fan speed
D - climate control system compressor on/off
button;
E - heated rear window on/off button;
F - air distribution knob:
air from central outlets and side ventsair from central outlets, side vents and front and
rear footwell ventsair only from front and rear footwell ventsair from front and rear footwell vents, to
windscreen and side windowsair outlet to windscreen and side windows
CLIMATE CONTROL SYSTEM (cooling)
To cool the passenger compartment, proceed as
follows:
❒turn knob A to the blue section;
❒press button B to enable internal air recirculation
(LED on button on);❒turn knob F to
;
❒press button D to activate climate control system
and turn knob C to at least 1 (1
stspeed). For
rapid cooling, turn knob C to 4 (maximum fan
speed).
IMPORTANT According to particular outside
environmental conditions, the climate control system
activates recirculation automatically (for versions/
markets, where additional heater provided).
Reduction in cooling
❒turn knob A clockwise to increase the
temperature;
❒press button B to deactivate internal air
recirculation (LED on button off );
❒turn knob C to reduce the fan speed.
PASSENGER COMPARTMENT HEATING
To heat the passenger compartment, proceed as
follows:
❒turn knob A to the red section;
❒press button B to enable internal air recirculation
(LED on button on);
❒turn knob F to
;
❒turn knob C to at least 1 (1
stspeed). For rapid
heating, turn knob C to 4 (maximum fan speed).
48GETTING TO
KNOW YOUR CAR
SAFETY
STARTING AND
DRIVING
WARNING LIGHTS
AND MESSAGES
IN AN EMERGENCY
SERVICING AND
MAINTENANCE
TECHNICAL
SPECIFICATIONS
INDEX
Page 53 of 420
Reduction in heating
❒turn knob A anticlockwise to decrease the
temperature;
❒press button B to deactivate internal air
recirculation (LED on button off );
❒turn knob C to reduce the fan speed.
IMPORTANT When the engine is cold, it takes a few
minutes to achieve optimum passenger compartment
heating.
RAPID DEMISTING/DEFROSTING
This operation allows the windscreen and front side
windows to be rapidly demisted/defrosted.
For rapid demisting/defrosting, proceed as follows:
❒turn knob A to the red section;
❒turn knob C to 4 (maximum fan speed);
❒turn knob F to
.
IMPORTANT In this condition, the climate control
system deactivates the recirculation function (LED
on button B off ) and activates the compressor (LED
on button D on). The purpose of this automatic
operation is to prevent the window misting up.
Window demisting
The climate control system is very useful in
preventing the windows from misting up in the event
of high levels of humidity.In the event of considerable external humidity and/or
rain and/or large differences in temperature inside
and outside the passenger compartment, perform
the following preventive window demisting
procedure:
❒turn knob A to the red section;
❒turn knob F to
with the possibility of moving it
to position
if misting does not occur;
❒turn knob C to the 2
nd
speed.
HEATED REAR WINDOW
DEMISTING/DEFROSTING
Press button E (
) to turn the function on/off.
Warning lighton the instrument panel comes on
to show that the function has been activated. The
function is automatically deactivated after 20
minutes.
For versions/markets where provided, press the
button to activate demisting/defrosting of door
mirrors and heated windscreen (for versions/
markets, where provided).
IMPORTANT Do not affix stickers to the inside of
the heated rear window over the heating filaments,
to avoid damage that might cause them to stop
working properly.
49GETTING TO
KNOW YOUR CARSAFETY
STARTING AND
DRIVING
WARNING LIGHTS
AND MESSAGES
IN AN EMERGENCY
SERVICING AND
MAINTENANCE
TECHNICAL
SPECIFICATIONS
INDEX
Page 55 of 420
START&STOP
Manual climate control system
If the Start&Stop function is activated (engine off
when the car speed is zero), the system keeps the air
flow selected by the user.
In these conditions, the passenger compartment
cooling and heating cannot be guaranteed, as the
compressor stops with the engine coolant pump.
The Start&Stop function can be deactivated, to
enhance the operation of the climate control system,
by pressing the dedicated button on the dashboard.
ADDITIONAL ELECTRIC HEATER
(for versions/markets, where provided)
The additional electric heater ensures more rapid
passenger compartment heating.
It activates in cold weather conditions, if the
following conditions are verified:
❒outside temperature low;
❒engine coolant temperature low;
❒engine on;
❒fan speed set at least to 1
stspeed;
❒knob A turned completely clockwise to red
section.The heater is switched off when at least one of the
conditions above is no longer verified.
NoteThe power of the electric heater is modulated
according to the battery voltage.
SYSTEM MAINTENANCE
In winter, the climate control system must be turned
on at least once a month for about 10 minutes.
Have the system inspected at a Fiat Dealership
before the summer.
The system uses R134a coolant which
does not pollute the environment in the
event of accidental leakage. Under no
circumstances use R12 fluid, which is
incompatible with the components of the system.
51GETTING TO
KNOW YOUR CARSAFETY
STARTING AND
DRIVING
WARNING LIGHTS
AND MESSAGES
IN AN EMERGENCY
SERVICING AND
MAINTENANCE
TECHNICAL
SPECIFICATIONS
INDEX
Page 59 of 420
ADJUSTING THE AIR TEMPERATURE
Turn the A or L knob clockwise or anticlockwise to
adjust the air temperature in the front left (knob
A) or right (knob L) zone of the passenger
compartment.
The set temperatures are shown on the displays.
Press the MONO button to align the air
temperature between the two zones.
Turn the L knob to return to the separate
management of air temperatures in the two zones.
Turning the knobs completely in one direction or the
other activates the "HI" (maximum heating) or
"LO" (maximum cooling) functions respectively.
To deactivate these functions, turn the temperature
knob to the desired temperature.
AIR DISTRIBUTION SELECTION
By pressing buttons H (
/
/
), it is possible to
set one of the 7 possible air distributions manually:
Air flow to the windscreen and front side
window diffusers to demist/defrost them.Air flow at central and side dashboard vents to
ventilate the chest and the face during the hot
season.Air flow to the front and rear footwell diffusers.
This air distribution setting heats the passenger
compartment most quickly, giving a prompt
sensation of warmth.
Air flow distributed between footwell
diffusers (hotter air) and central and side
dashboard vents (cooler air). This distribution
setting is useful in spring and autumn on
sunny days.Air flow distributed between footwell
diffusers and windscreen and front side
window defrosting/demisting diffusers. This
distribution setting allows the passenger
compartment to be warmed effectively and
prevents the windows from misting.Air flow distribution between windscreen
demisting/defrosting diffusers and side and
central dashboard vents. This allows air to be
sent to the windscreen in conditions of
strong sunlight.
Air flow distribution to all diffusers on
the car.
NoteAir always flows from the side dashboard
diffusers: it is, however, possible to interrupt the air
flow by operating the wheel located near the
corresponding vents.
In AUTO mode, the climate control system
automatically manages air distribution (the LEDs on
buttons H are off ).
When set manually, the air distribution is indicated
by the LEDs on the selected buttons switching on.
55GETTING TO
KNOW YOUR CARSAFETY
STARTING AND
DRIVING
WARNING LIGHTS
AND MESSAGES
IN AN EMERGENCY
SERVICING AND
MAINTENANCE
TECHNICAL
SPECIFICATIONS
INDEX
Page 90 of 420
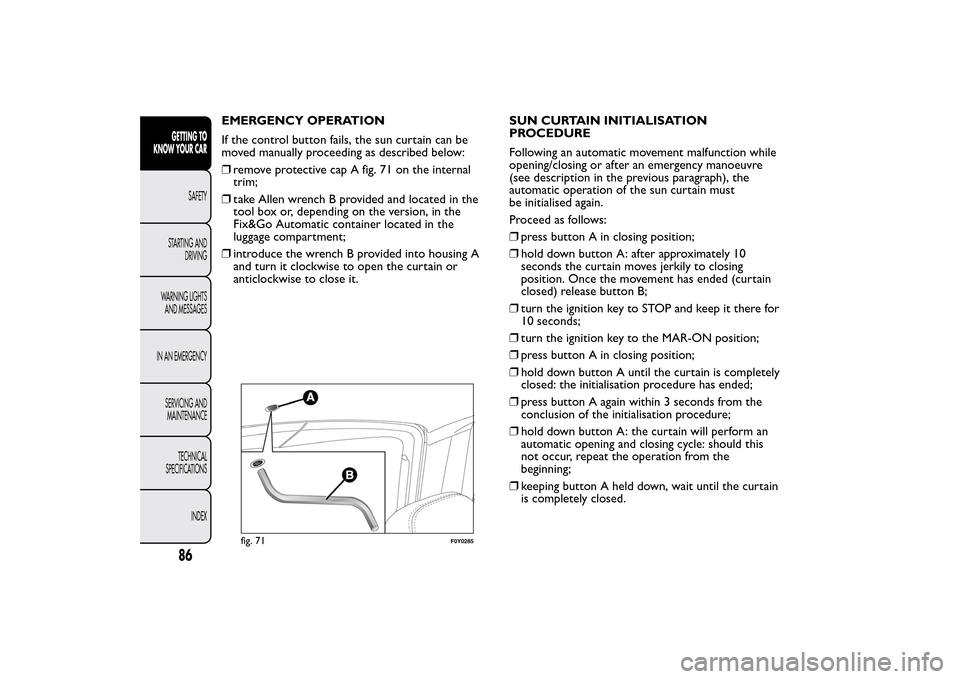
EMERGENCY OPERATION
If the control button fails, the sun curtain can be
moved manually proceeding as described below:
❒remove protective cap A fig. 71 on the internal
trim;
❒take Allen wrench B provided and located in the
tool box or, depending on the version, in the
Fix&Go Automatic container located in the
luggage compartment;
❒introduce the wrench B provided into housing A
and turn it clockwise to open the curtain or
anticlockwise to close it.SUN CURTAIN INITIALISATION
PROCEDURE
Following an automatic movement malfunction while
opening/closing or after an emergency manoeuvre
(see description in the previous paragraph), the
automatic operation of the sun curtain must
be initialised again.
Proceed as follows:
❒press button A in closing position;
❒hold down button A: after approximately 10
seconds the curtain moves jerkily to closing
position. Once the movement has ended (curtain
closed) release button B;
❒turn the ignition key to STOP and keep it there for
10 seconds;
❒turn the ignition key to the MAR-ON position;
❒press button A in closing position;
❒hold down button A until the curtain is completely
closed: the initialisation procedure has ended;
❒press button A again within 3 seconds from the
conclusion of the initialisation procedure;
❒hold down button A: the curtain will perform an
automatic opening and closing cycle: should this
not occur, repeat the operation from the
beginning;
❒keeping button A held down, wait until the curtain
is completely closed.
fig. 71
F0Y0285
86GETTING TO
KNOW YOUR CAR
SAFETY
STARTING AND
DRIVING
WARNING LIGHTS
AND MESSAGES
IN AN EMERGENCY
SERVICING AND
MAINTENANCE
TECHNICAL
SPECIFICATIONS
INDEX
Page 92 of 420
BLIND MOVEMENT
Press again button B fig. 72: the blind will move
towards the rear part of the car, until it is fully open.
With blind fully open press button B: the blind will
move towards the front part of the car, until it is fully
closed.
During the automatic opening and closing stages,
press button B again to interrupt the blind
movement.
ANTI-PINCH SAFETY DEVICE
The sun roof and the electric blind are equipped with
an anti-pinch safety system capable of detecting the
presence of an obstacle whilst the roof is closing:
if this happens, the system intervenes and the
movement of the glass is immediately reversed.EMERGENCY OPERATION
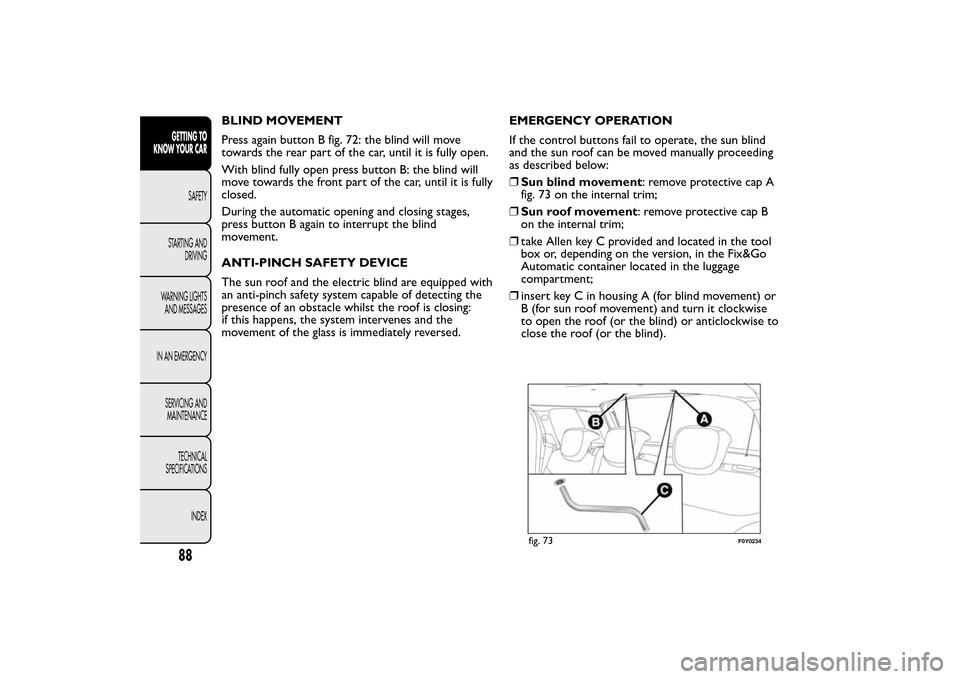
If the control buttons fail to operate, the sun blind
and the sun roof can be moved manually proceeding
as described below:
❒Sun blind movement: remove protective cap A
fig. 73 on the internal trim;
❒Sun roof movement: remove protective cap B
on the internal trim;
❒take Allen key C provided and located in the tool
box or, depending on the version, in the Fix&Go
Automatic container located in the luggage
compartment;
❒insert key C in housing A (for blind movement) or
B (for sun roof movement) and turn it clockwise
to open the roof (or the blind) or anticlockwise to
close the roof (or the blind).
fig. 73
F0Y0234
88GETTING TO
KNOW YOUR CAR
SAFETY
STARTING AND
DRIVING
WARNING LIGHTS
AND MESSAGES
IN AN EMERGENCY
SERVICING AND
MAINTENANCE
TECHNICAL
SPECIFICATIONS
INDEX
Page 96 of 420
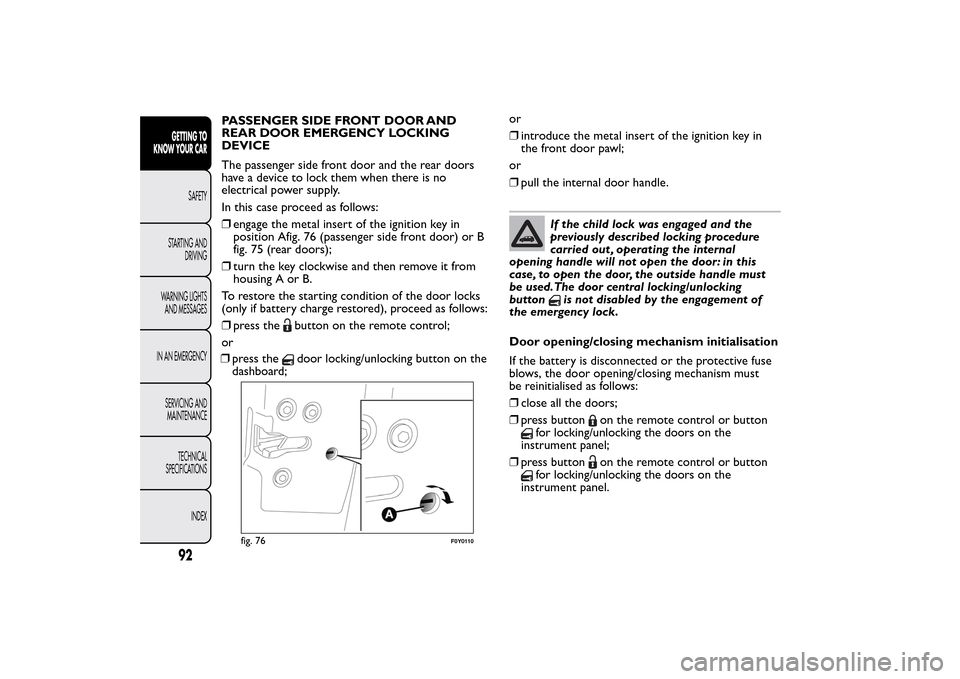
PASSENGER SIDE FRONT DOOR AND
REAR DOOR EMERGENCY LOCKING
DEVICE
The passenger side front door and the rear doors
have a device to lock them when there is no
electrical power supply.
In this case proceed as follows:
❒engage the metal insert of the ignition key in
position Afig. 76 (passenger side front door) or B
fig. 75 (rear doors);
❒turn the key clockwise and then remove it from
housing A or B.
To restore the starting condition of the door locks
(only if battery charge restored), proceed as follows:
❒press the
button on the remote control;
or
❒press thedoor locking/unlocking button on the
dashboard;or
❒introduce the metal insert of the ignition key in
the front door pawl;
or
❒pull the internal door handle.
If the child lock was engaged and the
previously described locking procedure
carried out , operating the internal
opening handle will not open the door: in this
case, to open the door, the outside handle must
be used.The door central locking/unlocking
button
is not disabled by the engagement of
the emergency lock.
Door opening/closing mechanism initialisation
If the battery is disconnected or the protective fuse
blows, the door opening/closing mechanism must
be reinitialised as follows:
❒close all the doors;
❒press button
on the remote control or button
for locking/unlocking the doors on the
instrument panel;
❒press button
on the remote control or button
for locking/unlocking the doors on the
instrument panel.
fig. 76
F0Y0110
92GETTING TO
KNOW YOUR CAR
SAFETY
STARTING AND
DRIVING
WARNING LIGHTS
AND MESSAGES
IN AN EMERGENCY
SERVICING AND
MAINTENANCE
TECHNICAL
SPECIFICATIONS
INDEX