2014 FIAT 500L LIVING stop start
[x] Cancel search: stop startPage 240 of 420
WARNING
Before towing, turn the ignition key to
MAR and then to STOP without
removing it .The steering column will
automatically lock when the key is removed and
the wheels cannot be steered.
WARNING
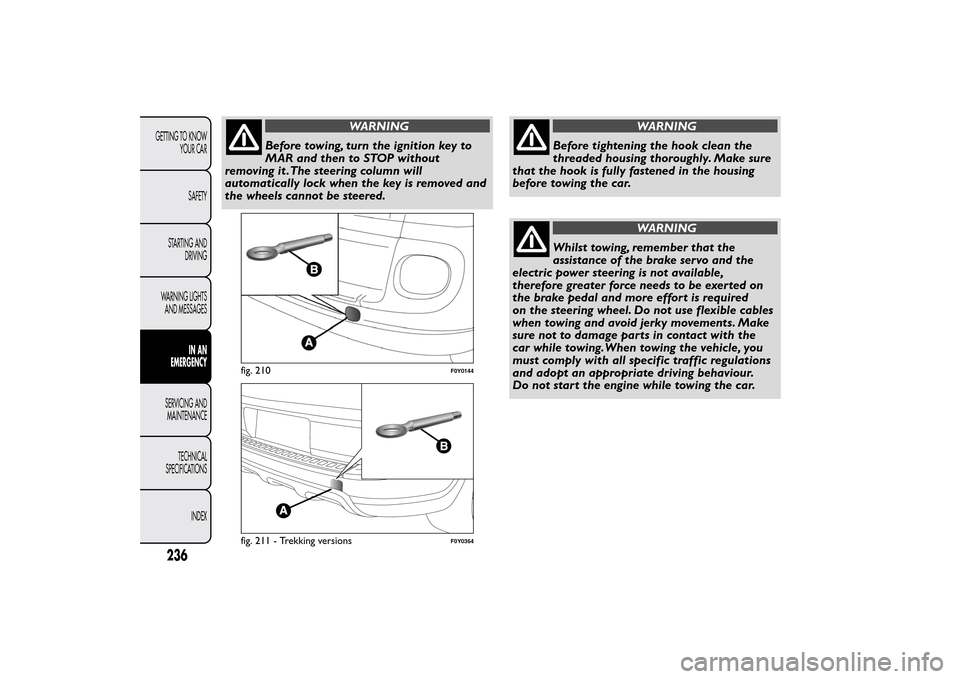
Before tightening the hook clean the
threaded housing thoroughly. Make sure
that the hook is fully fastened in the housing
before towing the car.
WARNING
Whilst towing, remember that the
assistance of the brake servo and the
electric power steering is not available,
therefore greater force needs to be exerted on
the brake pedal and more effort is required
on the steering wheel. Do not use flexible cables
when towing and avoid jerky movements. Make
sure not to damage parts in contact with the
car while towing.When towing the vehicle, you
must comply with all specific traffic regulations
and adopt an appropriate driving behaviour.
Do not start the engine while towing the car.
fig. 210
F0Y0144
fig. 211 - Trekking versions
F0Y0364
236GETTING TO KNOW
YOUR CAR
SAFETY
STARTING AND
DRIVING
WARNING LIGHTS
AND MESSAGES
IN AN
EMERGENCY
SERVICING AND
MAINTENANCE
TECHNICAL
SPECIFICATIONS
INDEX
Page 254 of 420
ENGINE OIL
Check the oil level a few minutes (about 5) after the
engine has stopped, with the vehicle parked on
level ground.
For 1.4 16V, 1.3 16V MultiJet and 1.6 16V
MultiJet versions
Remove the engine oil dipstick A, clean it with a
lint-free cloth and reinsert it. Extract the engine oil
dipstick again and check that the level is between the
MIN and MAX marks on the dipstick.
The range between the MIN and MAX marks
corresponds to about 1 litre of oil.
If the oil level is near or under the MIN line, add oil
through the filler B until it reaches the MAX line.
The oil level must never exceed the MAX
mark.
For 0.9 TwinAir 105 HP versions
The engine oil dipstick A is integral with plug B.
Undo the plug, clean the dipstick with a cloth that
does not leave traces, reinsert the dipstick and
re-tighten the plug.
Unscrew the plug again and check that the engine oil
level is between the MIN and MAX marks on the
dipstick.Engine oil consumption
The maximum engine oil consumption is
approximately 400 grams every 1,000 km.
During the initial period of usage for the vehicle, the
engine is bedding in, therefore the engine oil
consumption may settle down only after the first
5,000 - 6,000 km.
IMPORTANT After adding or changing the oil, let the
engine run for a few seconds and wait a few minutes
after switching it off before checking the level.
Do not add oil with characteristics that
are different from those of the oil
currently in the engine.Used engine oil and oil filters contain
substances which are harmful to the
environment .To change the oil and filters,
we advise you to contact a Fiat Dealership.
250GETTING TO KNOW
YOUR CAR
SAFETY
STARTING AND
DRIVING
WARNING LIGHTS
AND MESSAGES
IN AN EMERGENCYSERVICING AND
MAINTENANCE
TECHNICAL
SPECIFICATIONS
INDEX
Page 259 of 420
WHEELS AND TYRESBefore long trips, and every two weeks, check the
tyre and space-saver wheel inflation pressure (for
versions/markets, where provided). Check the tyres
when cold.
While driving the car, the pressure increases under
standard conditions: for the correct tyre inflation
pressure, see "Wheels" paragraph in the "Technical
specifications" chapter.
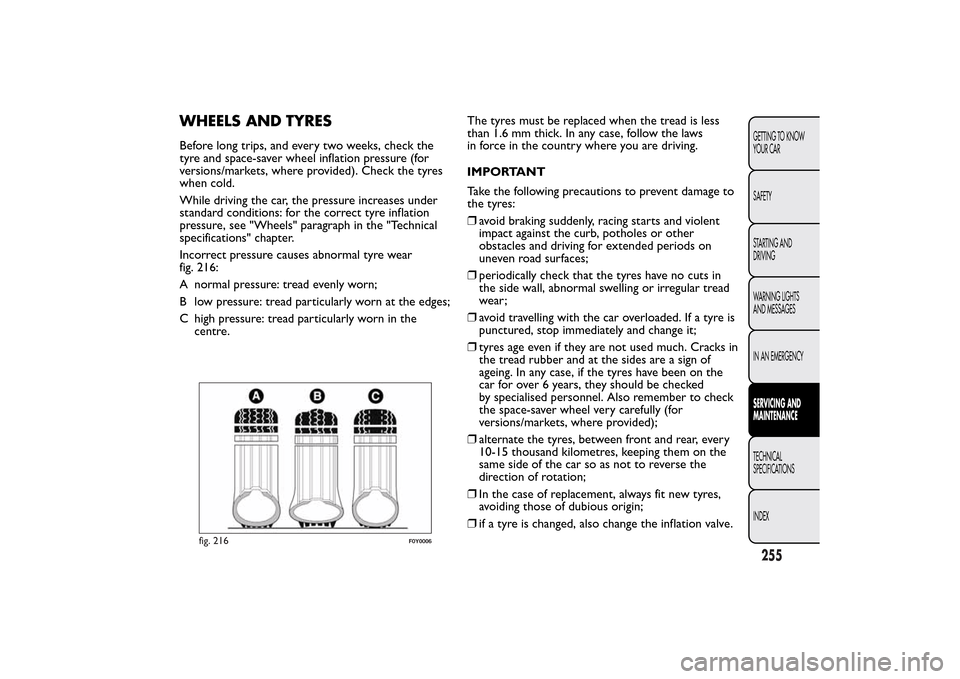
Incorrect pressure causes abnormal tyre wear
fig. 216:
A normal pressure: tread evenly worn;
B low pressure: tread particularly worn at the edges;
C high pressure: tread particularly worn in the
centre.The tyres must be replaced when the tread is less
than 1.6 mm thick. In any case, follow the laws
in force in the country where you are driving.
IMPORTANT
Take the following precautions to prevent damage to
the tyres:
❒avoid braking suddenly, racing starts and violent
impact against the curb, potholes or other
obstacles and driving for extended periods on
uneven road surfaces;
❒periodically check that the tyres have no cuts in
the side wall, abnormal swelling or irregular tread
wear;
❒avoid travelling with the car overloaded. If a tyre is
punctured, stop immediately and change it;
❒tyres age even if they are not used much. Cracks in
the tread rubber and at the sides are a sign of
ageing. In any case, if the tyres have been on the
car for over 6 years, they should be checked
by specialised personnel. Also remember to check
the space-saver wheel very carefully (for
versions/markets, where provided);
❒alternate the tyres, between front and rear, every
10-15 thousand kilometres, keeping them on the
same side of the car so as not to reverse the
direction of rotation;
❒In the case of replacement, always fit new tyres,
avoiding those of dubious origin;
❒if a tyre is changed, also change the inflation valve.
fig. 216
F0Y0006
255GETTING TO KNOW
YOUR CAR
SAFETY
STARTING AND
DRIVING
WARNING LIGHTS
AND MESSAGES
IN AN EMERGENCYSERVICING AND
MAINTENANCETECHNICAL
SPECIFICATIONS
INDEX
Page 261 of 420
Lifting the wiper blades
If it is necessary to raise the blades from the
windscreen (e.g. in the event of snow or if the blades
need replacement) proceed as follows:
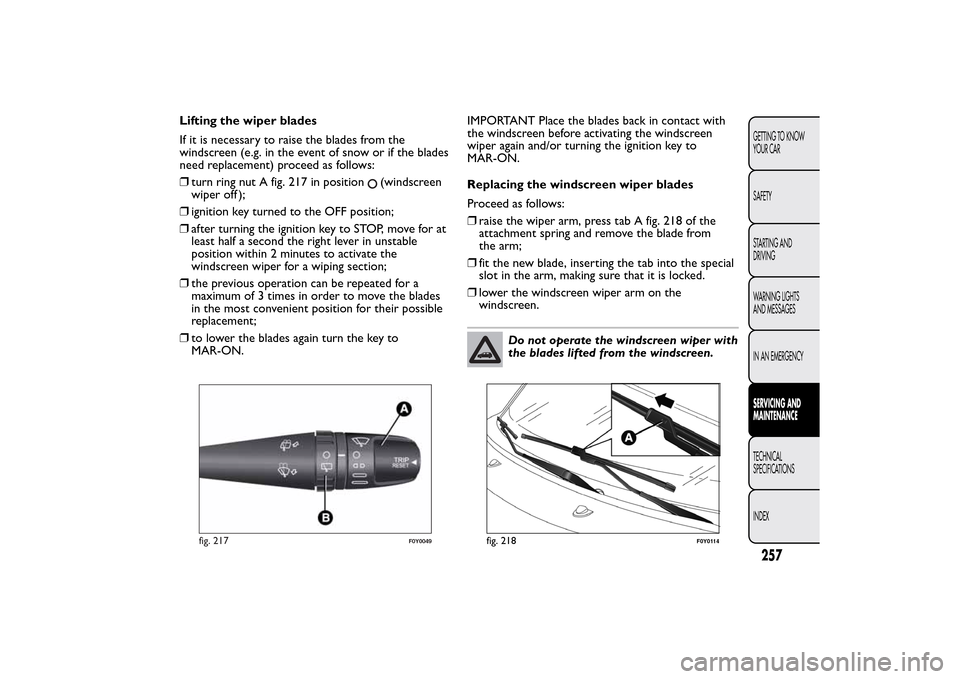
❒turn ring nut A fig. 217 in position
(windscreen
wiper off );
❒ignition key turned to the OFF position;
❒after turning the ignition key to STOP, move for at
least half a second the right lever in unstable
position within 2 minutes to activate the
windscreen wiper for a wiping section;
❒the previous operation can be repeated for a
maximum of 3 times in order to move the blades
in the most convenient position for their possible
replacement;
❒to lower the blades again turn the key to
MAR-ON.IMPORTANT Place the blades back in contact with
the windscreen before activating the windscreen
wiper again and/or turning the ignition key to
MAR-ON.
Replacing the windscreen wiper blades
Proceed as follows:
❒raise the wiper arm, press tab A fig. 218 of the
attachment spring and remove the blade from
the arm;
❒fit the new blade, inserting the tab into the special
slot in the arm, making sure that it is locked.
❒lower the windscreen wiper arm on the
windscreen.
Do not operate the windscreen wiper with
the blades lifted from the windscreen.
fig. 217
F0Y0049
fig. 218
F0Y0114
257GETTING TO KNOW
YOUR CAR
SAFETY
STARTING AND
DRIVING
WARNING LIGHTS
AND MESSAGES
IN AN EMERGENCYSERVICING AND
MAINTENANCETECHNICAL
SPECIFICATIONS
INDEX
Page 265 of 420
Windows
Use specific detergents and clean cloths to prevent
scratching or altering the transparency.
IMPORTANT Wipe the inside surface of the rear
window gently with a cloth in the direction of the
filaments to avoid damaging the heating device.
Front headlights
Use a soft, damp cloth soaked in water and
detergent for washing cars.
IMPORTANT Never use aromatic substances (e.g.
petrol) or ketenes (e.g. acetone) for cleaning the
plastic lenses of the front headlights.
IMPORTANT When cleaning with a pressure washer,
keep the water jet at least 20 cm away from the
headlights.
Engine compartment
At the end of every winter, wash the engine
compartment thoroughly, taking care not to aim the
jet of water directly at the electronic control units or
at the windscreen wiper motors. Have this
operation performed at a specialised workshop.
IMPORTANT The washing should take place with the
engine cold and the ignition key in the STOP
position. After washing, make sure that the various
protective devices (e.g. rubber caps and guards) have
not been removed or damaged.
INTERIORSPeriodically check for water puddles under the mats
that could cause the panels to rust.
WARNING
Never use flammable products, such as
petrol ether or rectified petrol to clean
the inside of the car.The electrostatic charges
which are generated by rubbing during the
cleaning operation may cause a fire.
WARNING
Do not keep aerosol cans in the car:
they might explode. Aerosol cans must
not be exposed to temperatures above 50°C .
Temperatures may greatly exceed this value
inside a car exposed to direct sunlight .
261GETTING TO KNOW
YOUR CAR
SAFETY
STARTING AND
DRIVING
WARNING LIGHTS
AND MESSAGES
IN AN EMERGENCYSERVICING AND
MAINTENANCETECHNICAL
SPECIFICATIONS
INDEX
Page 365 of 420
PREVIOUS/NEXT RADIO STATION SEARCH
Briefly press buttons
or
on the display: when
the button is released the previous or the next radio
station is displayed.
When searching forwards, if the system reaches the
end of the band, it will automatically stop on the
station where the search has started from.
PREVIOUS/NEXT RADIO STATION FAST
SEARCH
Hold down buttons
or
on the display to start
the fast search: when the button is released, the first
tunable radio station can be heard.
AM/FM RADIO STATION TUNING
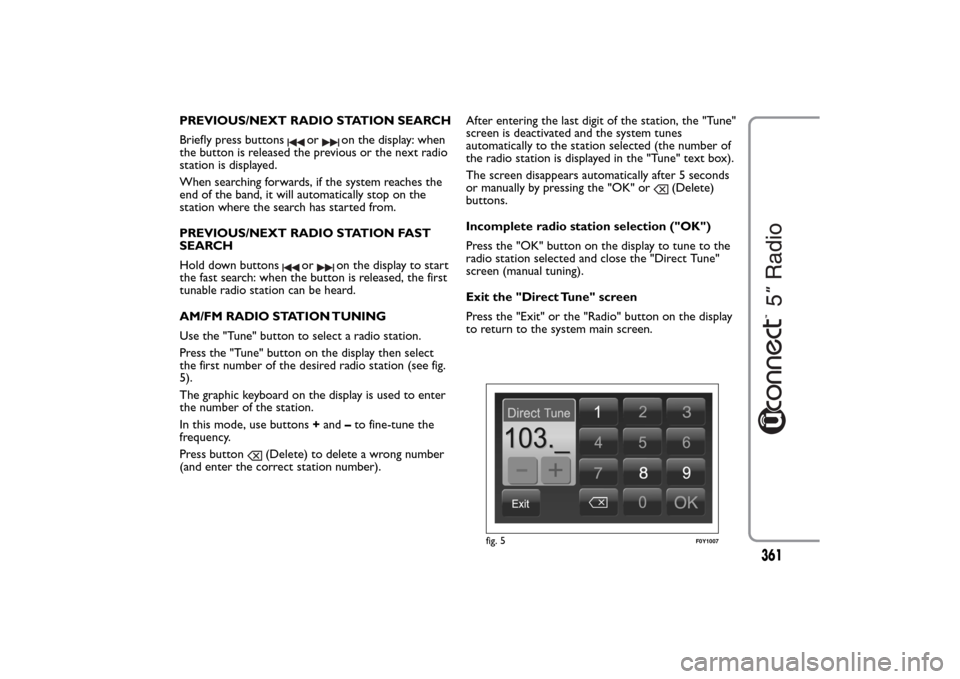
Use the "Tune" button to select a radio station.
Press the "Tune" button on the display then select
the first number of the desired radio station (see fig.
5).
The graphic keyboard on the display is used to enter
the number of the station.
In this mode, use buttons+and–to fine-tune the
frequency.
Press button
(Delete) to delete a wrong number
(and enter the correct station number).After entering the last digit of the station, the "Tune"
screen is deactivated and the system tunes
automatically to the station selected (the number of
the radio station is displayed in the "Tune" text box).
The screen disappears automatically after 5 seconds
or manually by pressing the "OK" or
(Delete)
buttons.
Incomplete radio station selection ("OK")
Press the "OK" button on the display to tune to the
radio station selected and close the "Direct Tune"
screen (manual tuning).
Exit the "Direct Tune" screen
Press the "Exit" or the "Radio" button on the display
to return to the system main screen.
fig. 5
F0Y1007
361
Page 384 of 420
Activation
Press the "eco:Drive" button (see fig. 13) to interact
with the function.
To activate the function press the "eco:Drive ON"
button.
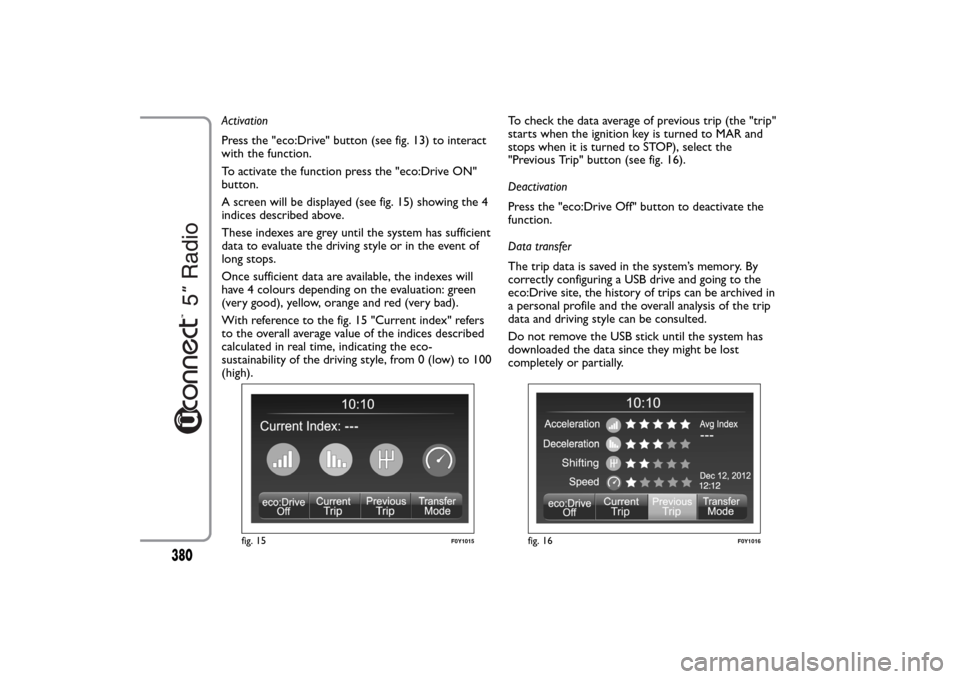
A screen will be displayed (see fig. 15) showing the 4
indices described above.
These indexes are grey until the system has sufficient
data to evaluate the driving style or in the event of
long stops.
Once sufficient data are available, the indexes will
have 4 colours depending on the evaluation: green
(very good), yellow, orange and red (very bad).
With reference to the fig. 15 "Current index" refers
to the overall average value of the indices described
calculated in real time, indicating the eco-
sustainability of the driving style, from 0 (low) to 100
(high).To check the data average of previous trip (the "trip"
starts when the ignition key is turned to MAR and
stops when it is turned to STOP), select the
"Previous Trip" button (see fig. 16).
Deactivation
Press the "eco:Drive Off" button to deactivate the
function.
Data transfer
The trip data is saved in the system’s memory. By
correctly configuring a USB drive and going to the
eco:Drive site, the history of trips can be archived in
a personal profile and the overall analysis of the trip
data and driving style can be consulted.
Do not remove the USB stick until the system has
downloaded the data since they might be lost
completely or partially.
fig. 15
F0Y1015
fig. 16
F0Y1016
380
Page 416 of 420
– maintenance .......................... 146
– pretensioners ........................ 143
– SBR system ............................ 142
– using the seat belts .............. 141
Seats............................................... 30
– Adjusting the seats ............... 30
Servicing and care ...................... 238
– heavy-duty use of the car ... 244
– periodic checks ..................... 244
– scheduled servicing .............. 238
Setup menu .................................. 11
Side airbags (side airbag -
window airbag) ......................... 164
Side air diffusers .......................... 41
Side bag)....................................... 164
Snow chains................................. 181
Sound system (wiring) .............. 130
Speed Limiter............................... 71
Speedometer ............................... 6
Starting the engine ............ 168-196
Start&Stop system..................... 117
Steering ........................................ 270
Steering lock ................................ 30
Steering Wheel ........................... 38
Steering wheel stalks– left stalk................................... 62
Storage compartments .............. 80
Storing the car ............................ 181
Sun visors ..................................... 83
Suspension ................................... 269
Table ............................................. 35
Technical data ............................. 263
The keys ........................................ 25
Top speed .................................... 280
Towing the car............................ 235
Towing trailers ............................ 175
Traction Plus system ................. 116
Transmission ............................... 268
TRIP button ................................. 23
Trip Computer
– TRIP button ............................ 23
– Trip Computer....................... 20
– Trip Computer
parameters.............................. 21
Tyres
– correct tyre reading............. 271
– Fix&Go Automatic (kit)...... 203
– inflation pressures ................ 276
– Rim Protector tyres............. 277
Tyres - maintenance .................. 255
"Universal" child restraint
system fitting ............................ 156U
pper air diffusers .................... 41
Using the gearbox...................... 172
W
arning lights and
messages .................................... 182
Weights and loads...................... 281
Wheel geometry........................ 271
Wheel rims
– correct reading of the
rim code ................................. 272
– Rim Protector ....................... 277
– rims and tyres ....................... 271
– wheels and tyres................... 255
Wheels and tyres
– changing a wheel .................. 197
– Fix&Go Automatic (kit)...... 203
– tyre inflation pressure ......... 276
– Wheels and tyres ................. 255
Wheels and tyres provided ..... 273
Wheels ......................................... 271
Window airbag ........................... 164
Window cleaning ........................ 65
Windows (cleaning) .................. 261
Windscreen washer
412GETTING TO KNOW
YOUR CAR
SAFETY
STARTING AND
DRIVING
WARNING LIGHTS
AND MESSAGES
IN AN EMERGENCY
SERVICING AND
MAINTENANCE
TECHNICAL
SPECIFICATIONS
INDEX