Page 198 of 420
“DUALDRIVE” ELECTRIC POWER
STEERING ON (green)
The CITY indication appears (an icon appears on the
display on some versions) when "Dualdrive" electric
power steering is activated by pressing the
corresponding button (see the "Dualdrive electric
power steering" paragraph in "Knowing your car"
chapter).
The indication CITY (or the symbol on the display)
disappears when the button is pressed again.DOORS/BONNET/LUGGAGE
COMPARTMENT OPEN (red)
The warning light switches on (on some versions
together with a message and a symbol on the display)
when one or more doors, the bonnet or the tailgate
are not properly closed.
An acoustic signal is emitted with the doors open
and the car moving.City Brake Control - "Collision
Mitigation" SYSTEM DEACTIVATED
(amber)
(for versions/markets where provided)
The warning light switches on when the City Brake
Control - "Collision Mitigation" system is deactivated
through the Setup Menu (see paragraph "Menu
Items", chapter "Knowing your car).START&STOP SYSTEM ACTIVATION/
DEACTIVATION
Start&Stop system activation
A message will appear on the display when the
Start&Stop system is activated.
In this condition the LED on the
button on the
dashboard control panel (see "Start&Stop" paragraph
in "Knowing your car" chapter) is off.
Turning the Start&Stop off
❒Versions with reconf igurable multifunction display:a
message appears on the display when the
Start&Stop system is deactivated.
❒Versions with reconf igurable multifunction display:the
symbol and a dedicated message appear on the
display when the Start&Stop system is deactivated.
The LED above the
button is on when the system
is deactivated.
194GETTING TO KNOW
YOUR CAR
SAFETY
STARTING AND
DRIVINGWARNING LIGHTS
AND MESSAGESIN AN EMERGENCY
SERVICING AND
MAINTENANCE
TECHNICAL
SPECIFICATIONS
INDEX
Page 199 of 420
START&STOP SYSTEM FAILURE
Versions with multifunction display
Start&Stop system failure is indicated by the
switching on of the
warning light (for versions/
markets, where provided) on the instrument panel
and a message on the display.
Versions with reconfigurable multifunction
display
The
symbol and a dedicated message appear on
the display when a failure in the Start&Stop system is
detected.
In the event of a Start&Stop system failure, contact a
Fiat Dealership.TRACTION PLUS SYSTEM
ACTIVATION/DEACTIVATION
(for versions/markets, where provided)
Traction Plus system activation/deactivation by
pressing the corresponding button (see the "Traction
Plus system" paragraph in the "Knowing your car"
section) is indicated by a message on the display.
195GETTING TO KNOW
YOUR CAR
SAFETY
STARTING AND
DRIVINGWARNING LIGHTS
AND MESSAGESIN AN EMERGENCY
SERVICING AND
MAINTENANCE
TECHNICAL
SPECIFICATIONS
INDEX
Page 200 of 420
IN AN EMERGENCY
In an emergency we recommend that you call the free-phone number found on the Warranty
Booklet.You can also go to the www.fiat.com website to find your nearest Fiat Dealership.STARTING THE ENGINEContact to a Fiat Dealership immediately if
instrument panel warning light
comes on
constantly.
JUMP STARTING
If the battery is flat, the engine may be started using
an auxiliary battery with the same capacity or a
little higher than the flat one.Proceed as follows to start the car:
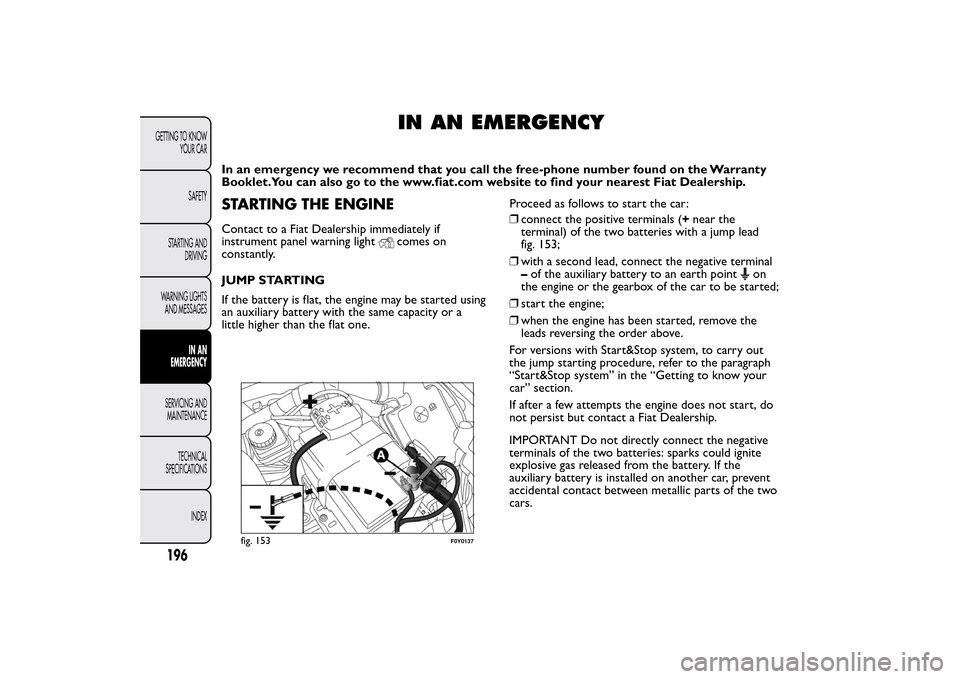
❒connect the positive terminals (+near the
terminal) of the two batteries with a jump lead
fig. 153;
❒with a second lead, connect the negative terminal
–of the auxiliary battery to an earth point
on
the engine or the gearbox of the car to be started;
❒start the engine;
❒when the engine has been started, remove the
leads reversing the order above.
For versions with Start&Stop system, to carry out
the jump starting procedure, refer to the paragraph
“Start&Stop system” in the “Getting to know your
car” section.
If after a few attempts the engine does not start, do
not persist but contact a Fiat Dealership.
IMPORTANT Do not directly connect the negative
terminals of the two batteries: sparks could ignite
explosive gas released from the battery. If the
auxiliary battery is installed on another car, prevent
accidental contact between metallic parts of the two
cars.
fig. 153
F0Y0137
196GETTING TO KNOW
YOUR CAR
SAFETY
STARTING AND
DRIVING
WARNING LIGHTS
AND MESSAGES
IN AN
EMERGENCY
SERVICING AND
MAINTENANCE
TECHNICAL
SPECIFICATIONS
INDEX
Page 202 of 420
WARNING
Alert other drivers that the car is
stationary in compliance with local
regulations: hazard warning lights, warning
triangle, etc . Any passengers on board should
leave the car, especially if it is heavily laden.
Passengers should stay away from on-coming
traffic while the wheel is being changed. If you
are on a slope or uneven surface, place the
wedge provided under the wheel (see the
instructions on the next pages).
WARNING
The vehicle's driving characteristics will
be modified with the space-saver wheel
fitted. Avoid sudden starting or stopping, sharp
or fast turns.The overall duration of the
space-saver spare wheel is of about 3000 km,
after which the relevant tyre must be replaced
with another one of the same type. Never
install a standard tyre on a rim that is designed
for use with a space-saver wheel. Have the
wheel repaired and refitted as soon as possible.
Two or more space-saver wheels should never
be used together. Do not grease the threads
of wheel studs before fitting them: they might
slip out .
WARNING
The jack shall only be used for raising
the car model it has been supplied with.
Never use the jack for other purposes, such as
raising other car models. Never use the jack for
repair operations under the vehicle. Incorrectly
positioning the jack may cause the vehicle to
fall. Do not use the jack for loads higher than
the one shown on its label.The space-saver
wheel cannot be fitted with snow chains. If a
front (drive) tyre is punctured and chains are
needed, use a standard wheel from the rear
axle and install the space-saver wheel on the
rear axle. In this way, with two normal drive
wheels at the front axle, it is possible to use
snow chains.
WARNING
Incorrectly fitting the wheel cap may
cause it to fall off when the vehicle is in
motion. Never tamper with the inflating valve.
Never introduce tools of any kind between
rim and tyre. Check tyre and space-saver wheel
pressures regularly, complying with the values
given in the "Technical specifications" chapter.
198GETTING TO KNOW
YOUR CAR
SAFETY
STARTING AND
DRIVING
WARNING LIGHTS
AND MESSAGES
IN AN
EMERGENCY
SERVICING AND
MAINTENANCE
TECHNICAL
SPECIFICATIONS
INDEX
Page 203 of 420
JACK
Please note that:
❒the jack weight is 1,76 kg;
❒the jack requires no adjustment;
❒the jack cannot be repaired and in the event of a
fault it must be replaced by another original one;
❒no tool other than its cranking device may be
fitted on the jack.
To change a wheel, proceed as follows:
❒Stop the car in a position that is not dangerous for
oncoming traffic where you can change the wheel
safely. The ground must be flat and sufficiently
compact;
❒switch off the engine, pull up the handbrake and
engage the 1
stgear or reverse. Wear the reflective
safety jacket (compulsory by law) before getting
out of the car;
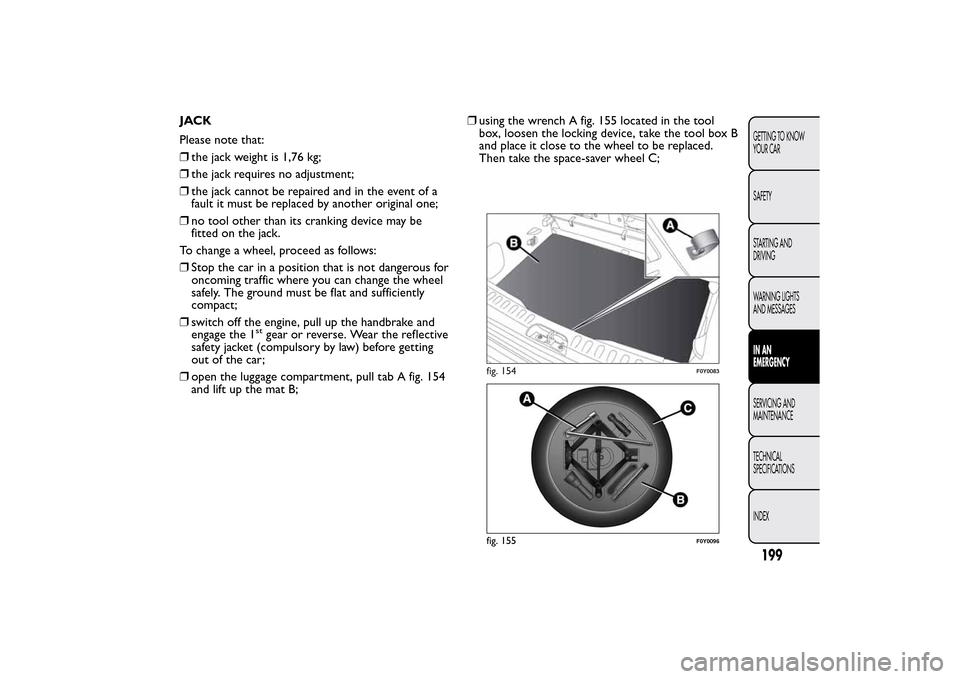
❒open the luggage compartment, pull tab A fig. 154
and lift up the mat B;❒using the wrench A fig. 155 located in the tool
box, loosen the locking device, take the tool box B
and place it close to the wheel to be replaced.
Then take the space-saver wheel C;
fig. 154
F0Y0083
fig. 155
F0Y0096
199GETTING TO KNOW
YOUR CAR
SAFETY
STARTING AND
DRIVING
WARNING LIGHTS
AND MESSAGESIN AN
EMERGENCYSERVICING AND
MAINTENANCE
TECHNICAL
SPECIFICATIONS
INDEX
Page 210 of 420
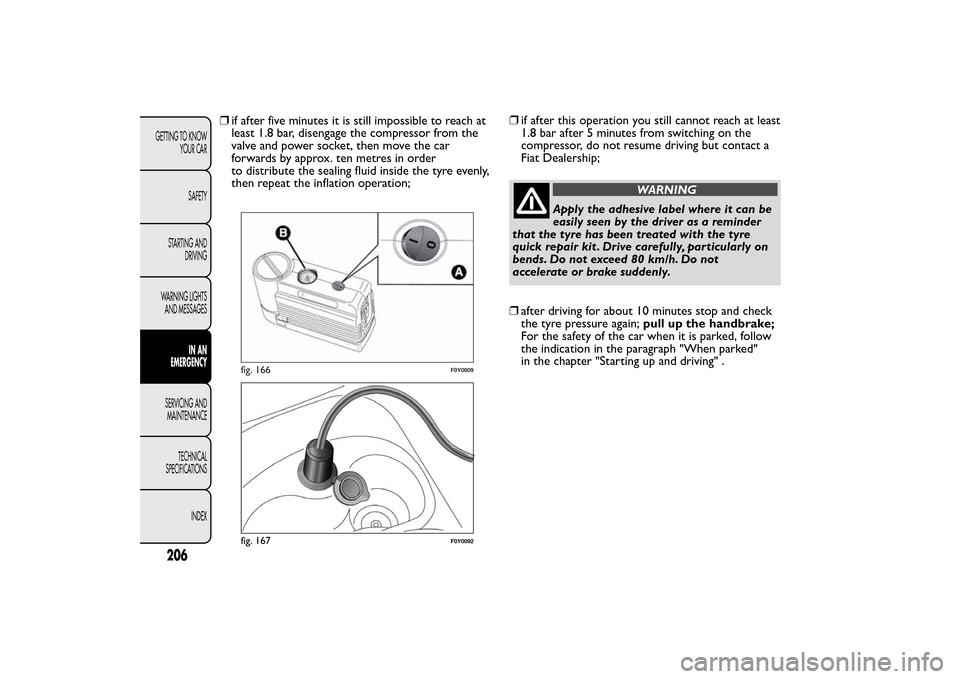
❒if after five minutes it is still impossible to reach at
least 1.8 bar, disengage the compressor from the
valve and power socket, then move the car
forwards by approx. ten metres in order
to distribute the sealing fluid inside the tyre evenly,
then repeat the inflation operation;❒if after this operation you still cannot reach at least
1.8 bar after 5 minutes from switching on the
compressor, do not resume driving but contact a
Fiat Dealership;
WARNING
Apply the adhesive label where it can be
easily seen by the driver as a reminder
that the tyre has been treated with the tyre
quick repair kit . Drive carefully, particularly on
bends. Do not exceed 80 km/h. Do not
accelerate or brake suddenly.
❒after driving for about 10 minutes stop and check
the tyre pressure again;pull up the handbrake;
For the safety of the car when it is parked, follow
the indication in the paragraph "When parked"
in the chapter "Starting up and driving" .
fig. 166
F0Y0009
fig. 167
F0Y0092
206GETTING TO KNOW
YOUR CAR
SAFETY
STARTING AND
DRIVING
WARNING LIGHTS
AND MESSAGES
IN AN
EMERGENCY
SERVICING AND
MAINTENANCE
TECHNICAL
SPECIFICATIONS
INDEX
Page 215 of 420
LightsUse Type Power Ref. Figure
Dipped/main beam headlights H7 55W D
Front side lights/Day lights (DRL) W21/5W 21W/5W B
Rear side lights/Brake lights P21/5 W 21W/5W B
Front direction indicators WY21W 21 W B
Side direction indicators WY5W 5 W A
Rear direction indicators P21W 21 W B
3°Stop LED – –
Fog lights H11 55W E
Reverse W16W 16 W B
Rear fog lights W16W 16 W B
Number plate C5W 5 W C
Front roof light C5W 5 W C
Front roof lights (sun visors) C5W 5 W C
Luggage compartment roof light W5W 5 W A
Glove compartment light C5W 5 W C
Rear courtesy lights C5W 5 W C
211GETTING TO KNOW
YOUR CAR
SAFETY
STARTING AND
DRIVING
WARNING LIGHTS
AND MESSAGESIN AN
EMERGENCYSERVICING AND
MAINTENANCE
TECHNICAL
SPECIFICATIONS
INDEX
Page 237 of 420
BATTERY RECHARGINGIMPORTANT The battery recharging procedure is
given as information only. You are advised to contact
a Fiat Dealership to have this operation carried
out.
Low amperage slow recharging for approximately 24
hours is advised. Charging for a longer time may
damage the battery.
VERSIONS WITHOUT Start&Stop SYSTEM
(for versions/markets, where provided)
Charge the battery as follows:
❒disconnect the negative battery terminal;
❒connect the charger cables to the battery
terminals, observing the polarity;
❒turn on the charger;
❒when finished, turn the charger off before
disconnecting the battery;
❒reconnect the negative battery terminal.
VERSIONS WITH Start&Stop SYSTEM
(for versions/markets, where provided)
Charge the battery as follows:
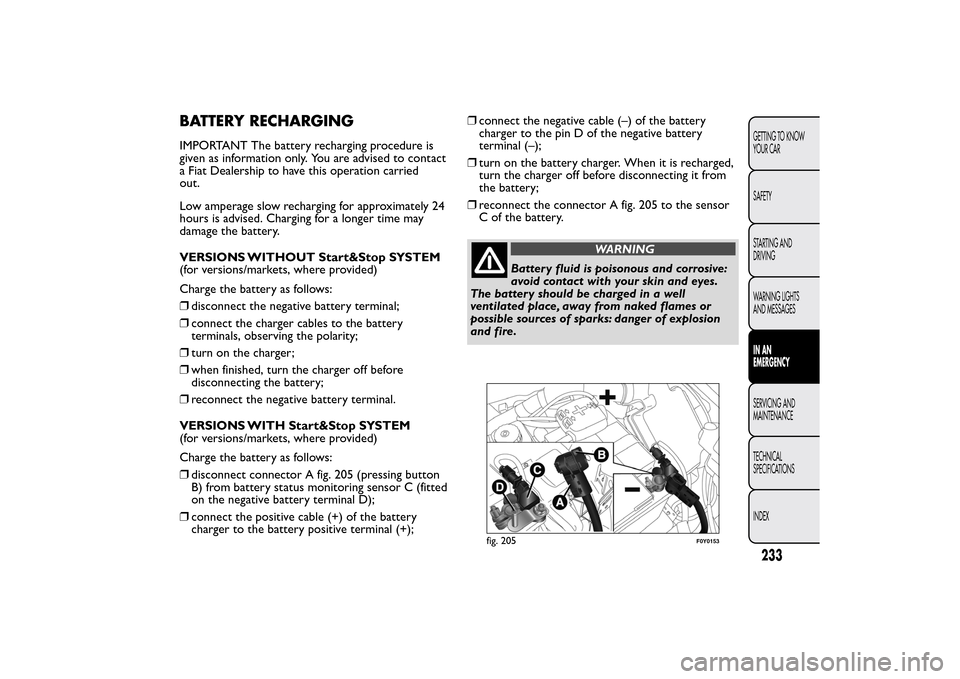
❒disconnect connector A fig. 205 (pressing button
B) from battery status monitoring sensor C (fitted
on the negative battery terminal D);
❒connect the positive cable (+) of the battery
charger to the battery positive terminal (+);❒connect the negative cable (–) of the battery
charger to the pin D of the negative battery
terminal (–);
❒turn on the battery charger. When it is recharged,
turn the charger off before disconnecting it from
the battery;
❒reconnect the connector A fig. 205 to the sensor
C of the battery.
WARNING
Battery fluid is poisonous and corrosive:
avoid contact with your skin and eyes.
The battery should be charged in a well
ventilated place, away from naked flames or
possible sources of sparks: danger of explosion
and fire.
fig. 205
F0Y0153
233GETTING TO KNOW
YOUR CAR
SAFETY
STARTING AND
DRIVING
WARNING LIGHTS
AND MESSAGESIN AN
EMERGENCYSERVICING AND
MAINTENANCE
TECHNICAL
SPECIFICATIONS
INDEX