2014 FIAT 500L LIVING change wheel
[x] Cancel search: change wheelPage 2 of 420
We really know your car because we invented, designed and built it: we really know every single detail.
At Fiat Service authorised workshopsyou can find technicians directly trained by us,
offering quality and professionalism for all service operations.
Fiat workshops are always close to you for the regular servicing operations, season checks
and practical recommendations by our experts.
With Fiat Genuine Parts you keep the reliability, comfort and performance features
of your new car unchanged in time: that's why you bought it for.
Always ask for Genuine Parts for the components used on our cars; we recommend them because
they come from our steady commitment in research and development of highly innovative technologies.
For all these reasons: rely on Genuine Parts, because they are the only ones designed
by Fiat for your car.
SAFETY:
BRAKING SYSTEMENVIRONMENT: PARTICULATE FILTERS,
CLIMATE CONTROL MAINTENANCECOMFORT: SUSPENSION
AND WINDSCREEN WIPERS PERFORMANCE: SPARK PLUGS,
INJECTORS AND BATTERIESLINEACCESSORI
ROOF RACK BARS, WHEEL RIMS
WHY CHOOSING
GENUINE PARTS
COP 500L UM GB SISTEMA 15-06-2012 8:30 Pagina 2
Page 68 of 420
FLASHING
To do this, pull the stalk towards the steering wheel
(unstable position) regardless of the position of
ring nut A.
The
warning light switches on in the instrument
panel.
DIRECTION INDICATORS
Bring the stalk to the (stable) position:
upwards:right-hand direction indicator activation;
downwards:left-hand direction indicator activation.
Theor
warning light will flash on the
instrument panel.
Direction indicators are switched off automatically
when the steering wheel is straightened.
Lane change function
If you wish to signal a lane change, put the left stalk
in the unstable position for less than half a second.
The direction indicator on the side selected will
be activated for 5 flashes and then go out
automatically.
“Cornering lights”
When the dipped headlamps are on and the speed is
below 40 km/h, if the steering wheel rotation angle
is large or the direction indicators are on, a light
(incorporated in the fog light) will switch on on the
relevant side to improve visibility at nighttime.“FOLLOW ME HOME” DEVICE
This allows the space in front of the car to be lit up
for a certain period of time.
Activation: with the ignition key turned to STOP or
removed, pull the stalk towards the steering wheel
within 2 minutes from when the engine is turned off.
Each time the stalk is moved, the lights stay on for
an extra 30 seconds up to a maximum of 210
seconds; then the lights are switched off
automatically.
Also, each time the stalk is operated, the
warning light on the instrument panel switches
on. The display shows a message and the time set for
the function.
The
warning light switches on when the stalk is
first moved and stays on until the function is
automatically deactivated. Each movement of the
stalk only increases the amount of time the lights
stay on.
Deactivation: keep the stalk pulled towards the
steering wheel for more than two seconds.
64GETTING TO
KNOW YOUR CAR
SAFETY
STARTING AND
DRIVING
WARNING LIGHTS
AND MESSAGES
IN AN EMERGENCY
SERVICING AND
MAINTENANCE
TECHNICAL
SPECIFICATIONS
INDEX
Page 136 of 420
ACCESSORIES PURCHASED
BY THE OWNERIf after buying the car, you decide to install electrical
accessories that require a permanent electric supply
(radio, satellite anti-theft system, etc.) or accessories
that in any case burden the electric supply, contact
a Fiat Dealership, whose qualified personnel, besides
suggesting the most suitable devices from
Lineaccessori Fiat, will also evaluate the overall
electric consumption, checking whether the car's
electrical system is able to withstand the load
required, or whether it needs to be integrated with a
more powerful battery.
WARNING
Take care when fitting additional
spoilers, alloy wheels or non-standard
wheel hubs: they could reduce the ventilation of
the brakes and affect efficiency under sharp,
repeated braking or on long descents. Make
sure that nothing obstructs the pedal stroke
(mats, etc .)INSTALLING ELECTRICAL/ELECTRONIC
DEVICES
Electrical and electronic devices installed after buying
the car in the context of after-sales service must
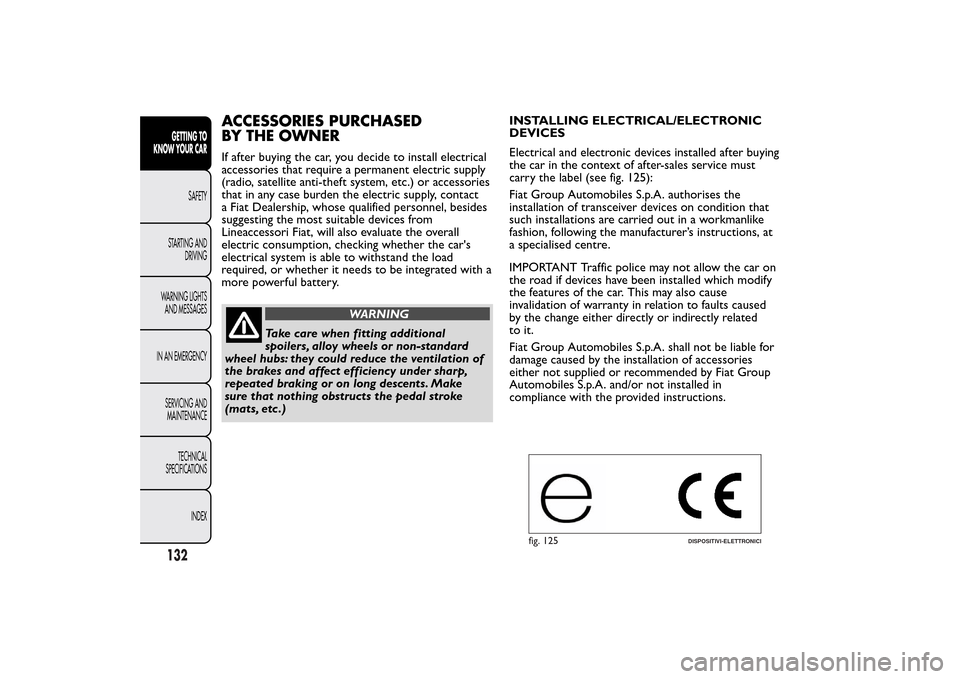
carry the label (see fig. 125):
Fiat Group Automobiles S.p.A. authorises the
installation of transceiver devices on condition that
such installations are carried out in a workmanlike
fashion, following the manufacturer’s instructions, at
a specialised centre.
IMPORTANT Traffic police may not allow the car on
the road if devices have been installed which modify
the features of the car. This may also cause
invalidation of warranty in relation to faults caused
by the change either directly or indirectly related
to it.
Fiat Group Automobiles S.p.A. shall not be liable for
damage caused by the installation of accessories
either not supplied or recommended by Fiat Group
Automobiles S.p.A. and/or not installed in
compliance with the provided instructions.
fig. 125
DISPOSITIVI-ELETTRONICI
132GETTING TO
KNOW YOUR CAR
SAFETY
STARTING AND
DRIVING
WARNING LIGHTS
AND MESSAGES
IN AN EMERGENCY
SERVICING AND
MAINTENANCE
TECHNICAL
SPECIFICATIONS
INDEX
Page 184 of 420
SNOW TYRESUse snow tyres of the same size as the normal tyres
provided with the car.
A Fiat Dealership will be happy to provide advice
concerning the most suitable type of tyre for the
customer's requirements.
For the type of tyre to be used, inflation pressures
and the specifications of snow tyres, follow the
instructions given in paragraph "Wheels" in section
"Technical specifications".
The winter performance of these tyres is
considerably reduced when the tread thickness is less
than 4 mm. Replace them in this case.
Due to the specific characteristics of snow tyres, in
normal weather conditions or on long motorway
journeys, the performance of these tyres is lower
than that of standard tyres.
Their usage should therefore be restricted in
accordance with their type-approval; always comply
with specific local regulations relating to the use
of snow tyres.
All four tyres should be the same (brand and track)
to ensure greater safety when driving and braking
and better driveability. Remember that you should
not change the rotation direction of the tyres.
WARNING
The maximum speed for snow tyres
marked "Q" is 160 km/h, while it is 190
km/h for "T" tyres and 210 km/h for "H" tyres.
The highway code speed limits must however
always be complied with.
180GETTING TO KNOW
YOUR CAR
SAFETYSTARTING AND
DRIVINGWARNING LIGHTS
AND MESSAGES
IN AN EMERGENCY
SERVICING AND
MAINTENANCE
TECHNICAL
SPECIFICATIONS
INDEX
Page 202 of 420
WARNING
Alert other drivers that the car is
stationary in compliance with local
regulations: hazard warning lights, warning
triangle, etc . Any passengers on board should
leave the car, especially if it is heavily laden.
Passengers should stay away from on-coming
traffic while the wheel is being changed. If you
are on a slope or uneven surface, place the
wedge provided under the wheel (see the
instructions on the next pages).
WARNING
The vehicle's driving characteristics will
be modified with the space-saver wheel
fitted. Avoid sudden starting or stopping, sharp
or fast turns.The overall duration of the
space-saver spare wheel is of about 3000 km,
after which the relevant tyre must be replaced
with another one of the same type. Never
install a standard tyre on a rim that is designed
for use with a space-saver wheel. Have the
wheel repaired and refitted as soon as possible.
Two or more space-saver wheels should never
be used together. Do not grease the threads
of wheel studs before fitting them: they might
slip out .
WARNING
The jack shall only be used for raising
the car model it has been supplied with.
Never use the jack for other purposes, such as
raising other car models. Never use the jack for
repair operations under the vehicle. Incorrectly
positioning the jack may cause the vehicle to
fall. Do not use the jack for loads higher than
the one shown on its label.The space-saver
wheel cannot be fitted with snow chains. If a
front (drive) tyre is punctured and chains are
needed, use a standard wheel from the rear
axle and install the space-saver wheel on the
rear axle. In this way, with two normal drive
wheels at the front axle, it is possible to use
snow chains.
WARNING
Incorrectly fitting the wheel cap may
cause it to fall off when the vehicle is in
motion. Never tamper with the inflating valve.
Never introduce tools of any kind between
rim and tyre. Check tyre and space-saver wheel
pressures regularly, complying with the values
given in the "Technical specifications" chapter.
198GETTING TO KNOW
YOUR CAR
SAFETY
STARTING AND
DRIVING
WARNING LIGHTS
AND MESSAGES
IN AN
EMERGENCY
SERVICING AND
MAINTENANCE
TECHNICAL
SPECIFICATIONS
INDEX
Page 203 of 420
JACK
Please note that:
❒the jack weight is 1,76 kg;
❒the jack requires no adjustment;
❒the jack cannot be repaired and in the event of a
fault it must be replaced by another original one;
❒no tool other than its cranking device may be
fitted on the jack.
To change a wheel, proceed as follows:
❒Stop the car in a position that is not dangerous for
oncoming traffic where you can change the wheel
safely. The ground must be flat and sufficiently
compact;
❒switch off the engine, pull up the handbrake and
engage the 1
stgear or reverse. Wear the reflective
safety jacket (compulsory by law) before getting
out of the car;
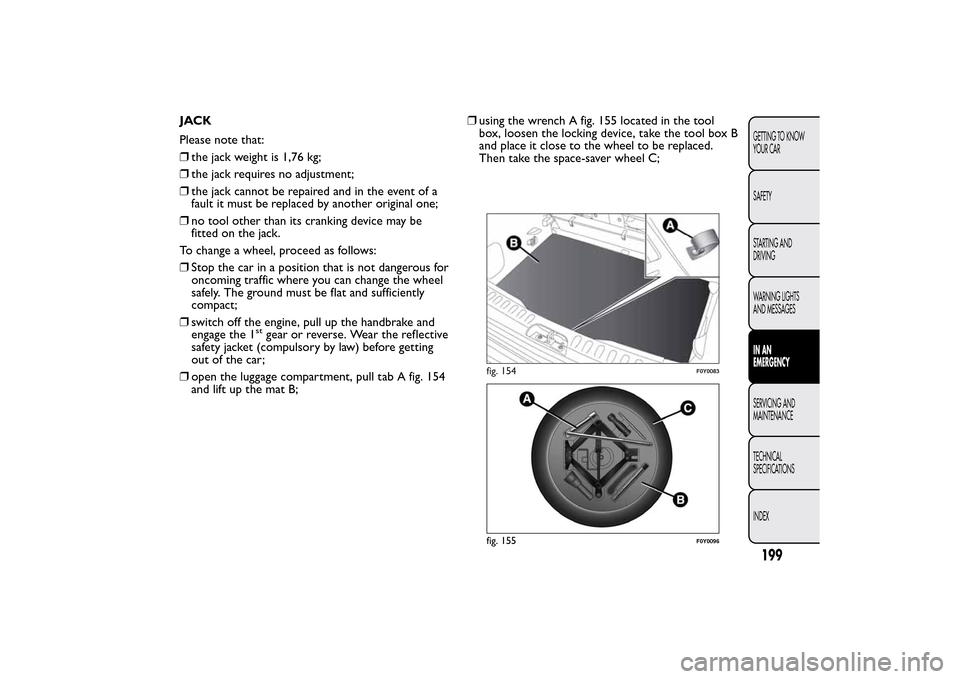
❒open the luggage compartment, pull tab A fig. 154
and lift up the mat B;❒using the wrench A fig. 155 located in the tool
box, loosen the locking device, take the tool box B
and place it close to the wheel to be replaced.
Then take the space-saver wheel C;
fig. 154
F0Y0083
fig. 155
F0Y0096
199GETTING TO KNOW
YOUR CAR
SAFETY
STARTING AND
DRIVING
WARNING LIGHTS
AND MESSAGESIN AN
EMERGENCYSERVICING AND
MAINTENANCE
TECHNICAL
SPECIFICATIONS
INDEX
Page 204 of 420
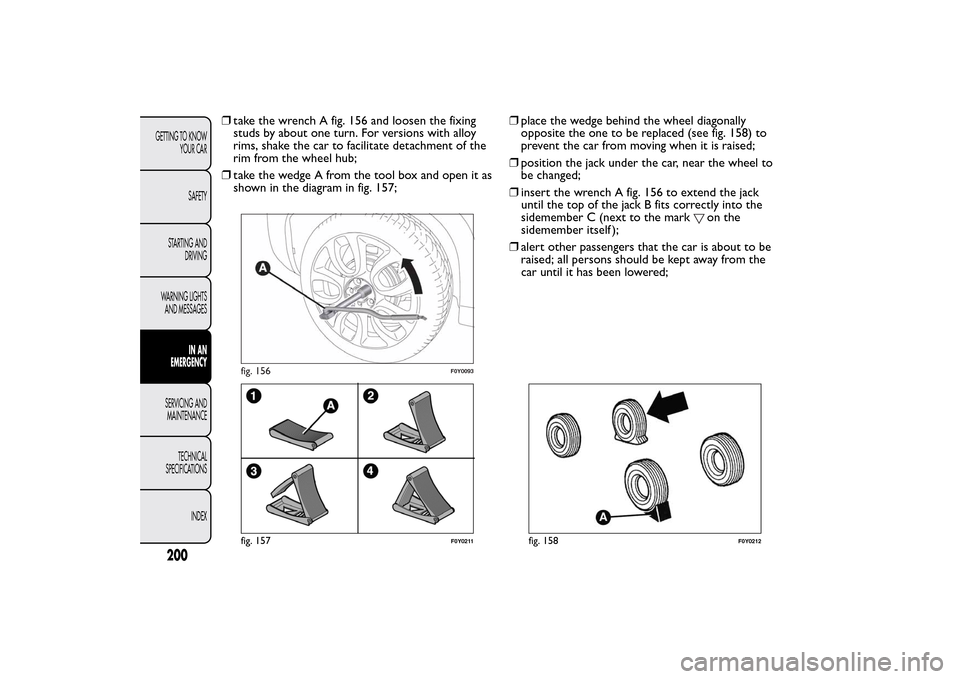
❒take the wrench A fig. 156 and loosen the fixing
studs by about one turn. For versions with alloy
rims, shake the car to facilitate detachment of the
rim from the wheel hub;
❒take the wedge A from the tool box and open it as
shown in the diagram in fig. 157;❒place the wedge behind the wheel diagonally
opposite the one to be replaced (see fig. 158) to
prevent the car from moving when it is raised;
❒position the jack under the car, near the wheel to
be changed;
❒insert the wrench A fig. 156 to extend the jack
until the top of the jack B fits correctly into the
sidemember C (next to the mark
on the
sidemember itself );
❒alert other passengers that the car is about to be
raised; all persons should be kept away from the
car until it has been lowered;
fig. 156
F0Y0093
fig. 157
F0Y0211
fig. 158
F0Y0212
200GETTING TO KNOW
YOUR CAR
SAFETY
STARTING AND
DRIVING
WARNING LIGHTS
AND MESSAGES
IN AN
EMERGENCY
SERVICING AND
MAINTENANCE
TECHNICAL
SPECIFICATIONS
INDEX
Page 218 of 420
MAIN BEAM HEADLIGHTS
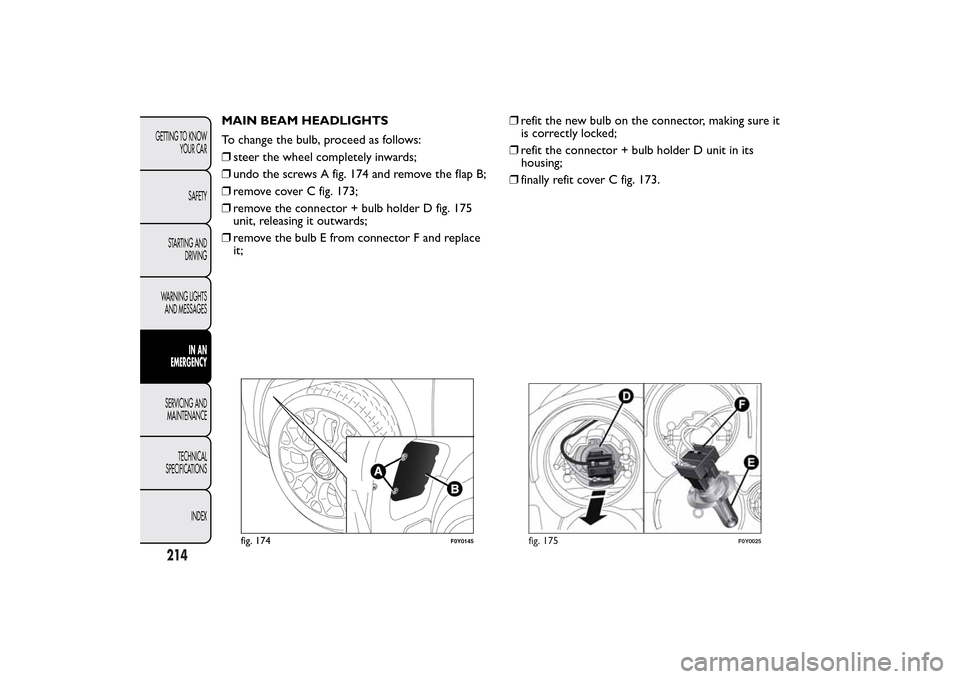
To change the bulb, proceed as follows:
❒steer the wheel completely inwards;
❒undo the screws A fig. 174 and remove the flap B;
❒remove cover C fig. 173;
❒remove the connector + bulb holder D fig. 175
unit, releasing it outwards;
❒remove the bulb E from connector F and replace
it;❒refit the new bulb on the connector, making sure it
is correctly locked;
❒refit the connector + bulb holder D unit in its
housing;
❒finally refit cover C fig. 173.
fig. 174
F0Y0145
fig. 175
F0Y0025
214GETTING TO KNOW
YOUR CAR
SAFETY
STARTING AND
DRIVING
WARNING LIGHTS
AND MESSAGES
IN AN
EMERGENCY
SERVICING AND
MAINTENANCE
TECHNICAL
SPECIFICATIONS
INDEX