2014 FIAT 500L LIVING change wheel
[x] Cancel search: change wheelPage 219 of 420
SIDE LIGHTS/DAYTIME RUNNING LIGHTS
(DRL)
To change the bulb, proceed as follows:
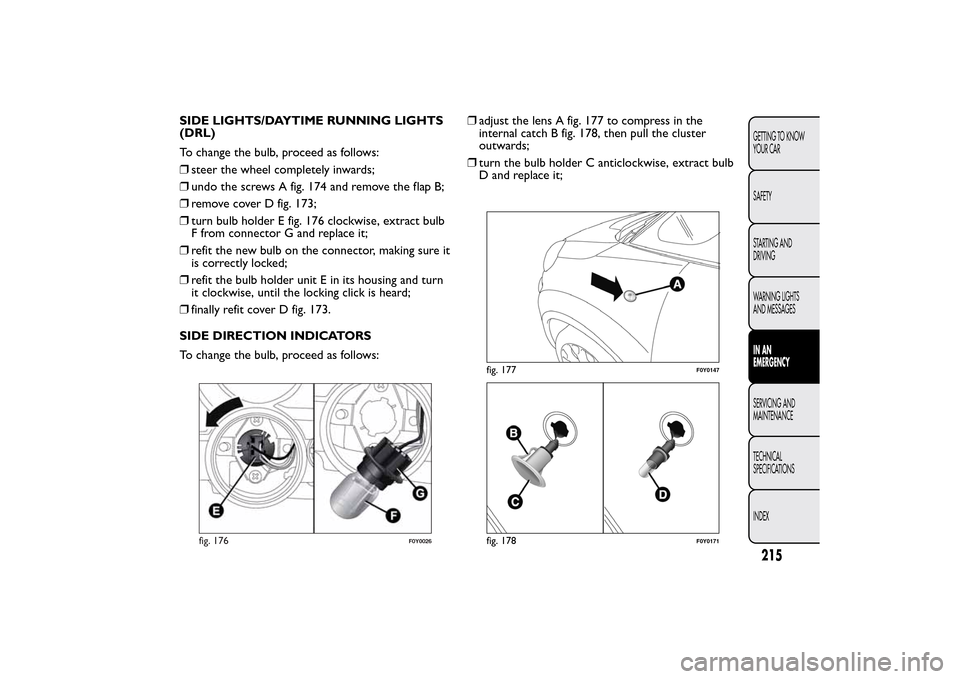
❒steer the wheel completely inwards;
❒undo the screws A fig. 174 and remove the flap B;
❒remove cover D fig. 173;
❒turn bulb holder E fig. 176 clockwise, extract bulb
F from connector G and replace it;
❒refit the new bulb on the connector, making sure it
is correctly locked;
❒refit the bulb holder unit E in its housing and turn
it clockwise, until the locking click is heard;
❒finally refit cover D fig. 173.
SIDE DIRECTION INDICATORS
To change the bulb, proceed as follows:❒adjust the lens A fig. 177 to compress in the
internal catch B fig. 178, then pull the cluster
outwards;
❒turn the bulb holder C anticlockwise, extract bulb
D and replace it;
fig. 176
F0Y0026
fig. 177
F0Y0147
fig. 178
F0Y0171
215GETTING TO KNOW
YOUR CAR
SAFETY
STARTING AND
DRIVING
WARNING LIGHTS
AND MESSAGESIN AN
EMERGENCYSERVICING AND
MAINTENANCE
TECHNICAL
SPECIFICATIONS
INDEX
Page 220 of 420
❒refit the bulb holder C in the lens A and turn it
clockwise;
❒refit the cluster making sure that the internal catch
B clips into position.
FOG LIGHTS
(for versions/markets, where provided)
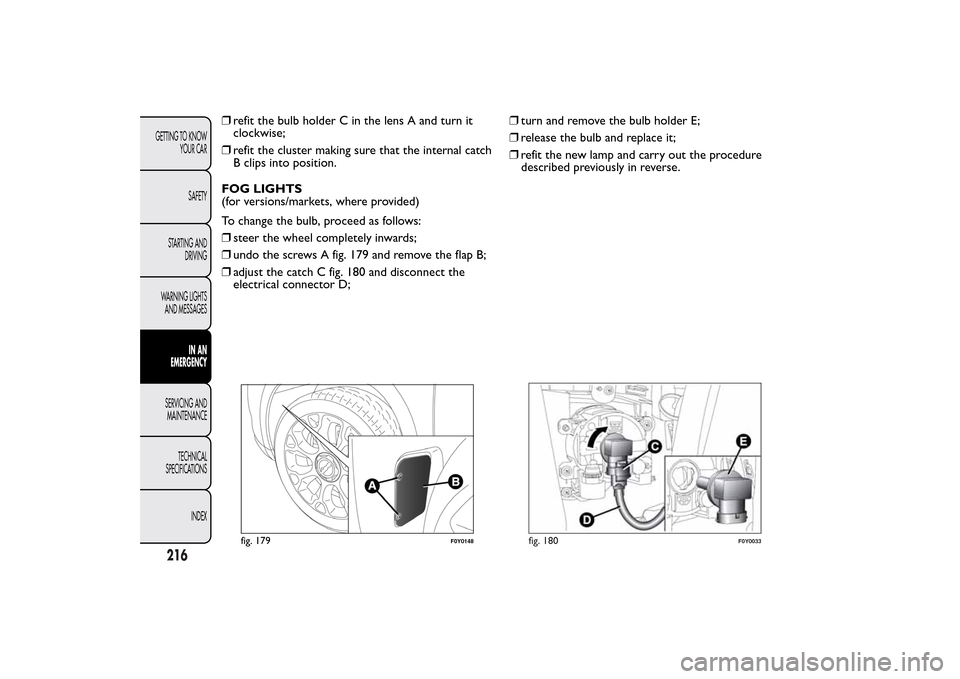
To change the bulb, proceed as follows:
❒steer the wheel completely inwards;
❒undo the screws A fig. 179 and remove the flap B;
❒adjust the catch C fig. 180 and disconnect the
electrical connector D;❒turn and remove the bulb holder E;
❒release the bulb and replace it;
❒refit the new lamp and carry out the procedure
described previously in reverse.
fig. 179
F0Y0148
fig. 180
F0Y0033
216GETTING TO KNOW
YOUR CAR
SAFETY
STARTING AND
DRIVING
WARNING LIGHTS
AND MESSAGES
IN AN
EMERGENCY
SERVICING AND
MAINTENANCE
TECHNICAL
SPECIFICATIONS
INDEX
Page 259 of 420
WHEELS AND TYRESBefore long trips, and every two weeks, check the
tyre and space-saver wheel inflation pressure (for
versions/markets, where provided). Check the tyres
when cold.
While driving the car, the pressure increases under
standard conditions: for the correct tyre inflation
pressure, see "Wheels" paragraph in the "Technical
specifications" chapter.
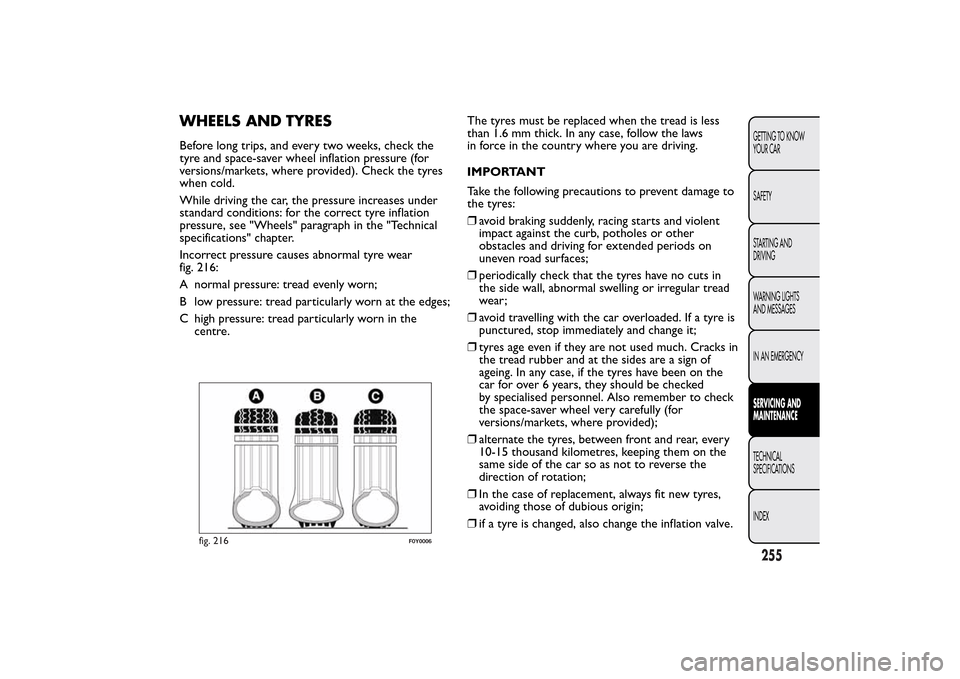
Incorrect pressure causes abnormal tyre wear
fig. 216:
A normal pressure: tread evenly worn;
B low pressure: tread particularly worn at the edges;
C high pressure: tread particularly worn in the
centre.The tyres must be replaced when the tread is less
than 1.6 mm thick. In any case, follow the laws
in force in the country where you are driving.
IMPORTANT
Take the following precautions to prevent damage to
the tyres:
❒avoid braking suddenly, racing starts and violent
impact against the curb, potholes or other
obstacles and driving for extended periods on
uneven road surfaces;
❒periodically check that the tyres have no cuts in
the side wall, abnormal swelling or irregular tread
wear;
❒avoid travelling with the car overloaded. If a tyre is
punctured, stop immediately and change it;
❒tyres age even if they are not used much. Cracks in
the tread rubber and at the sides are a sign of
ageing. In any case, if the tyres have been on the
car for over 6 years, they should be checked
by specialised personnel. Also remember to check
the space-saver wheel very carefully (for
versions/markets, where provided);
❒alternate the tyres, between front and rear, every
10-15 thousand kilometres, keeping them on the
same side of the car so as not to reverse the
direction of rotation;
❒In the case of replacement, always fit new tyres,
avoiding those of dubious origin;
❒if a tyre is changed, also change the inflation valve.
fig. 216
F0Y0006
255GETTING TO KNOW
YOUR CAR
SAFETY
STARTING AND
DRIVING
WARNING LIGHTS
AND MESSAGES
IN AN EMERGENCYSERVICING AND
MAINTENANCETECHNICAL
SPECIFICATIONS
INDEX
Page 315 of 420
Curtain rolling up
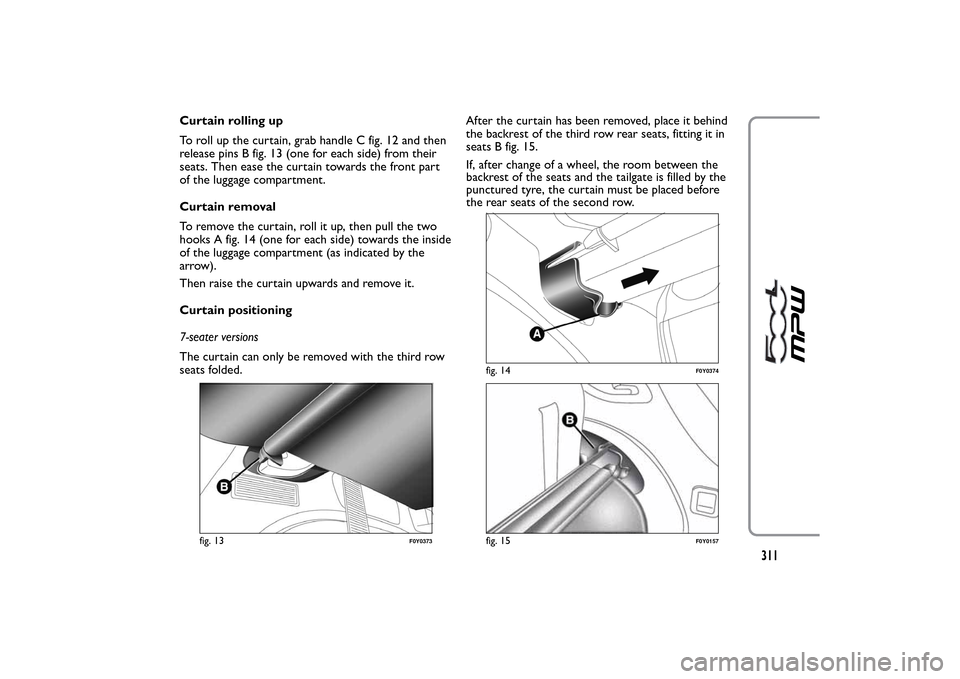
To roll up the curtain, grab handle C fig. 12 and then
release pins B fig. 13 (one for each side) from their
seats. Then ease the curtain towards the front part
of the luggage compartment.
Curtain removal
To remove the curtain, roll it up, then pull the two
hooks A fig. 14 (one for each side) towards the inside
of the luggage compartment (as indicated by the
arrow).
Then raise the curtain upwards and remove it.
Curtain positioning
7-seater versions
The curtain can only be removed with the third row
seats folded.After the curtain has been removed, place it behind
the backrest of the third row rear seats, fitting it in
seats B fig. 15.
fig. 13
F0Y0373
fig. 14
F0Y0374
fig. 15
F0Y0157
311
If, after change of a wheel, the room between the
backrest of the seats and the tailgate is filled by the
punctured tyre, the curtain must be placed before
the rear seats of the second row.
Page 322 of 420
WARNING
Alert other drivers that the car is
stationary in compliance with local
regulations: hazard warning lights, warning
triangle, etc . Any passengers on board should
leave the car, especially if it is heavily laden.
Passengers should stay away from on-coming
traffic while the wheel is being changed. If you
are on a slope or uneven surface, place the
wedge provided under the wheels (see the
instructions on the next pages).
WARNING
The vehicle's driving characteristics will
be modified with the space-saver wheel
fitted. Avoid violent acceleration and braking,
abrupt steering and fast cornering.The overall
duration of the space-saver wheel is of about
3000 km, after which the relevant tyre must be
replaced with another one of the same type.
Never install a standard tyre on a rim that is
designed for use with a space-saver wheel. Have
the wheel repaired and refitted as soon as
possible. Using two or more small space-saver
wheels at the same time is forbidden. Do not
grease the threads of the stud bolts before
fitting them: they might slip out .
WARNING
The jack shall only be used for raising
the car model it has been supplied with.
Never use the jack for other purposes, such as
raising other car models. Never use the jack for
repair operations under the vehicle. Incorrectly
positioning of the jack may cause the car to fall.
Do not use the jack for loads higher than the
one shown on its label.The space-saver wheel
cannot be fitted with snow chains. If a front
(drive) tyre is punctured and chains are needed,
use a standard wheel from the rear axle and
install the space-saver wheel on the rear axle. In
this way, with two normal drive wheels at the
front axle, it is possible to use snow chains.
WARNING
Incorrectly fitting the wheel cap may
cause it to fall off when the vehicle is in
motion. Never tamper with the inflation valve.
Never introduce tools of any kind between rim
and tyre. Check tyre and space-saver wheel
pressures regularly, complying with the values
given in the “Wheels” paragraph.
318
Page 323 of 420
JACK
Please note that:
❒the jack weight is 1.76 kg;
❒the jack requires no adjustment;
❒the jack cannot be repaired and in the event of a
fault it must be replaced by another original one;
❒no tool other than its cranking device may be fitted
on the jack.
WHEEL REPLACEMENT PROCEDURE
To change a wheel, proceed as follows:
❒stop the car in a position that is not dangerous for
oncoming traffic where you can change the wheel
safely. The ground should be flat if possible, and
sufficiently firm;
❒switch off the engine, pull up the handbrake and
engage the 1
stgear or reverse. Wear the reflective
safety jacket (compulsory by law) before getting
out of the car;
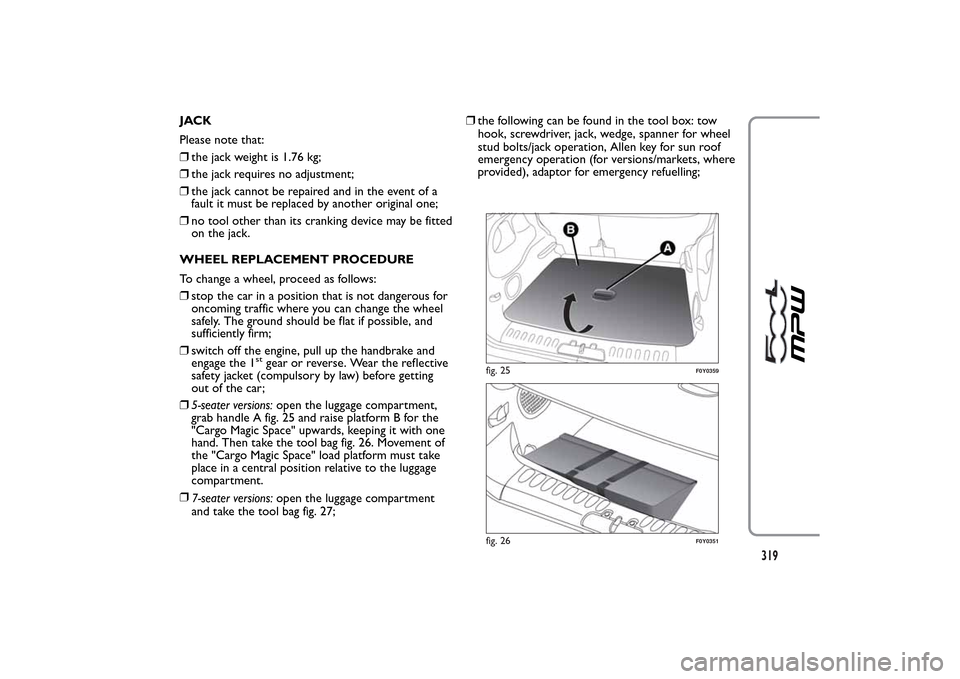
❒5-seater versions:open the luggage compartment,
grab handle A fig. 25 and raise platform B for the
"Cargo Magic Space" upwards, keeping it with one
hand. Then take the tool bag fig. 26. Movement of
the "Cargo Magic Space" load platform must take
place in a central position relative to the luggage
compartment.
❒
7-seater versions:open the luggage compartment
and take the tool bag fig. 27;❒the following can be found in the tool box: tow
hook, screwdriver, jack, wedge, spanner for wheel
stud bolts/jack operation, Allen key for sun roof
emergency operation (for versions/markets, where
provided), adaptor for emergency refuelling;
fig. 25
F0Y0359
fig. 26
F0Y0351
319
Page 326 of 420
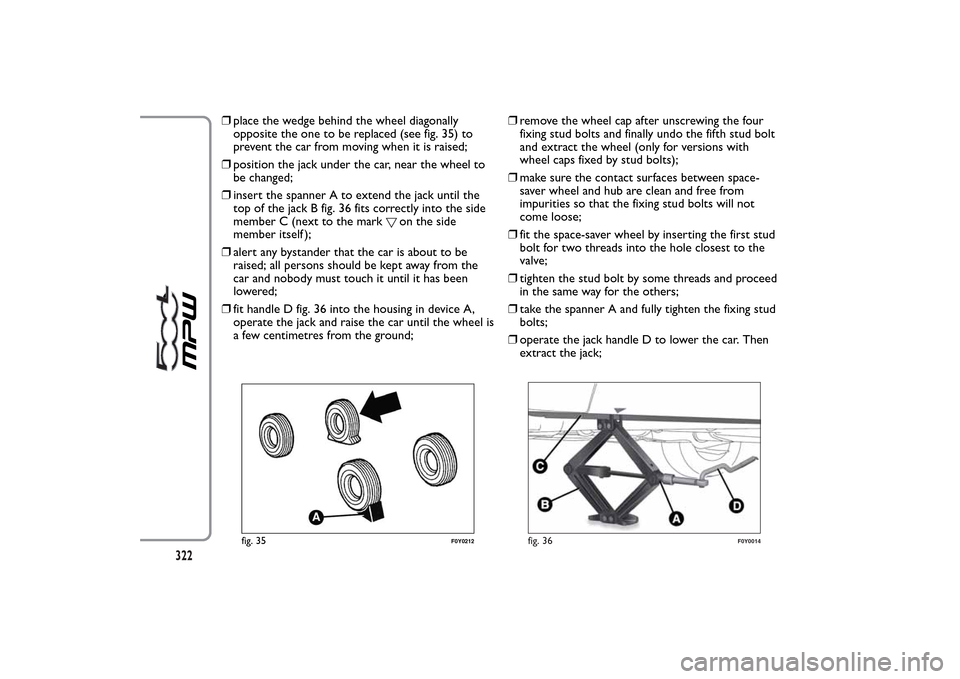
❒place the wedge behind the wheel diagonally
opposite the one to be replaced (see fig. 35) to
prevent the car from moving when it is raised;
❒position the jack under the car, near the wheel to
be changed;
❒insert the spanner A to extend the jack until the
top of the jack B fig. 36 fits correctly into the side
member C (next to the mark
on the side
member itself );
❒alert any bystander that the car is about to be
raised; all persons should be kept away from the
car and nobody must touch it until it has been
lowered;
❒fit handle D fig. 36 into the housing in device A,
operate the jack and raise the car until the wheel is
a few centimetres from the ground;❒remove the wheel cap after unscrewing the four
fixing stud bolts and finally undo the fifth stud bolt
and extract the wheel (only for versions with
wheel caps fixed by stud bolts);
❒make sure the contact surfaces between space-
saver wheel and hub are clean and free from
impurities so that the fixing stud bolts will not
come loose;
❒fit the space-saver wheel by inserting the first stud
bolt for two threads into the hole closest to the
valve;
❒tighten the stud bolt by some threads and proceed
in the same way for the others;
❒take the spanner A and fully tighten the fixing stud
bolts;
❒operate the jack handle D to lower the car. Then
extract the jack;
fig. 35
F0Y0212
fig. 36
F0Y0014
322
Page 351 of 420
TABLE OF CONTENTS
INTRODUCTION ...................................................................349
TIPS, CONTROLS AND GENERAL INFORMATION ...350
TIPS ...........................................................................................350
MULTIMEDIA DEVICES: SUPPORTED AUDIO FILES
AND FORMATS.....................................................................352
NOTES ON TRADEMARKS...............................................352
EXTERNAL AUDIO SOURCES .........................................352
ANTI-THEFT PROTECTION .............................................353
SOFTWARE UPDATES ........................................................354
TECHNICAL SPECIFICATIONS........................................354
QUICK GUIDE .........................................................................355
CONTROLS ON FRONT PANEL ....................................355
FRONT PANEL CONTROL SUMMARY TABLE............356
STEERING WHEEL CONTROLS ........................................357
DESCRIPTION .......................................................................357
STEERING WHEEL CONTROL SUMMARY TABLE ....358
SWITCHING THE SYSTEM ON/OFF ................................359
RADIO (TUNER) MODE ....................................................359
RADIO MODE SELECTION ..............................................359
FREQUENCY BAND SELECTION...................................359
DISPLAYED INFORMATION .............................................360
RADIO STATION SELECTION .........................................360
PREVIOUS/NEXT RADIO STATION SEARCH ............361
PREVIOUS/NEXT RADIO STATION FAST SEARCH ..361
AM/FM RADIO STATION TUNING ................................361
DAB RADIO ...........................................................................362
SETTING THE PRESELECTIONS .....................................363
AUDIO .....................................................................................363
MEDIA MODE ..........................................................................366
TRACK CHANGE (previous/next) ...................................366TRACK FAST FORWARD/REWIND ...............................366
TRACK SELECTION (Browse) ..........................................366
AUDIO SOURCE SELECTION..........................................367
TRACK INFORMATION DISPLAY ...................................367
RANDOM TRACK REPRODUCTION ...........................367
TRACK REPETITION...........................................................367
CD PLAYER ...............................................................................368
LOADING/EJECTING A CD ..............................................368
Bluetooth
® SOURCE.........................................................369
PAIRING ABluetooth
® AUDIO DEVICE .................369
USB/iPod SUPPORT.................................................................370
AUX SUPPORT.........................................................................370
PHONE MODE ........................................................................371
PHONE MODE ACTIVATION ..........................................371
MAIN FUNCTIONS .............................................................371
DISPLAYED INFORMATION .............................................371
PAIRING A MOBILE PHONE.............................................372
STORING NAMES/NUMBERS IN THE MOBILE
PHONE PHONEBOOK ......................................................372
CONNECTION/DISCONNECTION OF A MOBILE
PHONE OR A
Bluetooth
® AUDIO DEVICE ...........373
DELETION OF A MOBILE PHONE OR A
Bluetooth
® AUDIO DEVICE ........................................373
SETTING A MOBILE PHONE OR A
Bluetooth
®
AUDIO DEVICE AS FAVOURITE .....................................374
DELETION OF PHONE DATA
(PHONEBOOK AND RECENT CALLS) ........................374
TRANSMISSION OF PHONE DATA
(PHONEBOOK AND RECENT CALLS) ........................374
347