2014 FIAT 500L LIVING tailgate
[x] Cancel search: tailgatePage 30 of 420
KEY WITH REMOTE CONTROL
(for versions/markets, where provided)
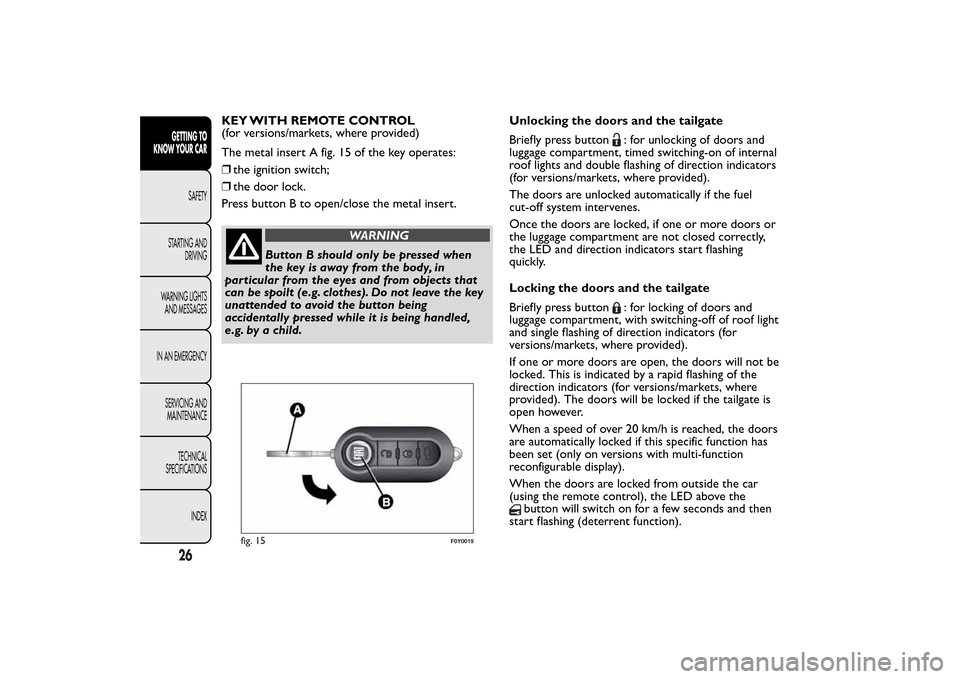
The metal insert A fig. 15 of the key operates:
❒the ignition switch;
❒the door lock.
Press button B to open/close the metal insert.
WARNING
Button B should only be pressed when
the key is away from the body, in
particular from the eyes and from objects that
can be spoilt (e.g. clothes). Do not leave the key
unattended to avoid the button being
accidentally pressed while it is being handled,
e.g. by a child.Unlocking the doors and the tailgate
Briefly press button
: for unlocking of doors and
luggage compartment, timed switching-on of internal
roof lights and double flashing of direction indicators
(for versions/markets, where provided).
The doors are unlocked automatically if the fuel
cut-off system intervenes.
Once the doors are locked, if one or more doors or
the luggage compartment are not closed correctly,
the LED and direction indicators start flashing
quickly.
Locking the doors and the tailgate
Briefly press button: for locking of doors and
luggage compartment, with switching-off of roof light
and single flashing of direction indicators (for
versions/markets, where provided).
If one or more doors are open, the doors will not be
locked. This is indicated by a rapid flashing of the
direction indicators (for versions/markets, where
provided). The doors will be locked if the tailgate is
open however.
When a speed of over 20 km/h is reached, the doors
are automatically locked if this specific function has
been set (only on versions with multi-function
reconfigurable display).
When the doors are locked from outside the car
(using the remote control), the LED above the
button will switch on for a few seconds and then
start flashing (deterrent function).
fig. 15
F0Y0019
26GETTING TO
KNOW YOUR CAR
SAFETY
STARTING AND
DRIVING
WARNING LIGHTS
AND MESSAGES
IN AN EMERGENCY
SERVICING AND
MAINTENANCE
TECHNICAL
SPECIFICATIONS
INDEX
Page 101 of 420
WARNING
Be careful not to hit objects on the
storage shelf when you open the
tailgate.
Emergency opening from inside
Proceed as follows:
❒remove the rear head restraints and completely
fold back the seats (see the paragraph "Extending
the luggage compartment");
❒take the screwdriver provided from the tool box
or the Fix&Go Automatic container, depending
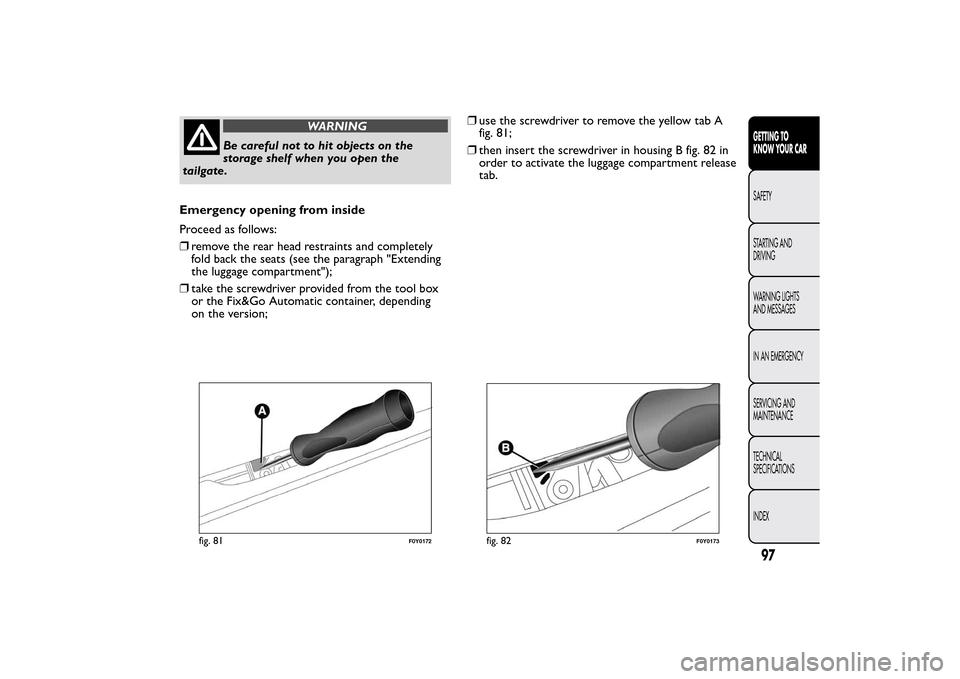
on the version;❒use the screwdriver to remove the yellow tab A
fig. 81;
❒then insert the screwdriver in housing B fig. 82 in
order to activate the luggage compartment release
tab.
fig. 81
F0Y0172
fig. 82
F0Y0173
97GETTING TO
KNOW YOUR CARSAFETY
STARTING AND
DRIVING
WARNING LIGHTS
AND MESSAGES
IN AN EMERGENCY
SERVICING AND
MAINTENANCE
TECHNICAL
SPECIFICATIONS
INDEX
Page 102 of 420
CLOSING
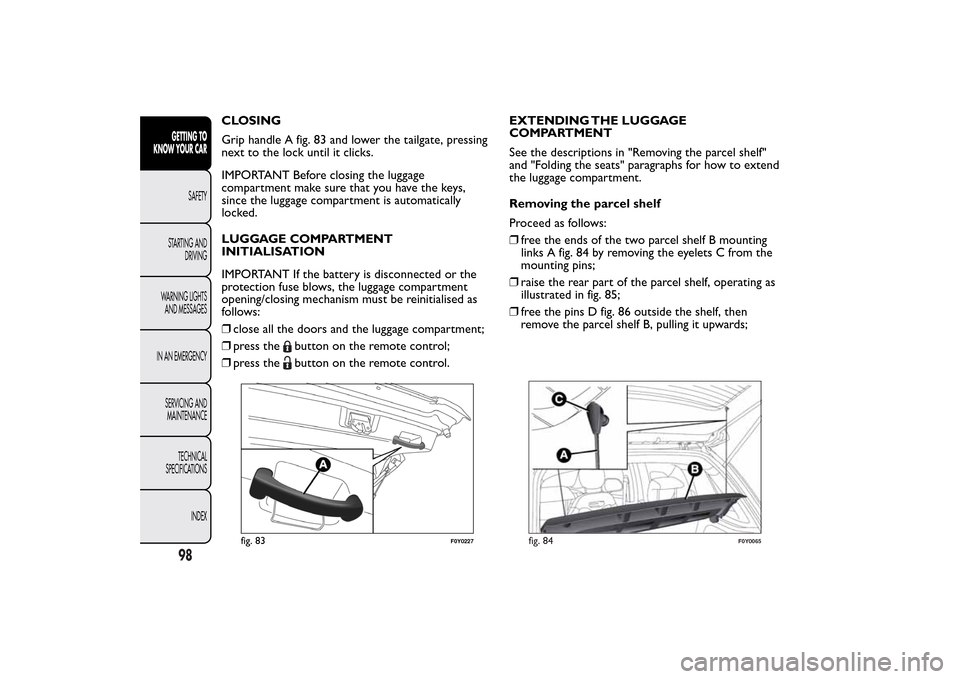
Grip handle A fig. 83 and lower the tailgate, pressing
next to the lock until it clicks.
IMPORTANT Before closing the luggage
compartment make sure that you have the keys,
since the luggage compartment is automatically
locked.
LUGGAGE COMPARTMENT
INITIALISATION
IMPORTANT If the battery is disconnected or the
protection fuse blows, the luggage compartment
opening/closing mechanism must be reinitialised as
follows:
❒close all the doors and the luggage compartment;
❒press the
button on the remote control;
❒press thebutton on the remote control.EXTENDING THE LUGGAGE
COMPARTMENT
See the descriptions in "Removing the parcel shelf"
and "Folding the seats" paragraphs for how to extend
the luggage compartment.
Removing the parcel shelf
Proceed as follows:
❒free the ends of the two parcel shelf B mounting
links A fig. 84 by removing the eyelets C from the
mounting pins;
❒raise the rear part of the parcel shelf, operating as
illustrated in fig. 85;
❒free the pins D fig. 86 outside the shelf, then
remove the parcel shelf B, pulling it upwards;
fig. 83
F0Y0227
fig. 84
F0Y0065
98GETTING TO
KNOW YOUR CAR
SAFETY
STARTING AND
DRIVING
WARNING LIGHTS
AND MESSAGES
IN AN EMERGENCY
SERVICING AND
MAINTENANCE
TECHNICAL
SPECIFICATIONS
INDEX
Page 129 of 420
WARNING
The system intervenes on vehicles
travelling in the same lane. Small sized
vehicles (e.g. bicycles or motorbikes) or people,
animals and things (e.g. pushchairs) and more in
general all those obstacles with a low reflection
of the light emitted by the laser (e.g. vehicles
soiled with mud) are not taken into
consideration.If a trailer or a car is towed the system
must be deactivated with the display
Setup Menu (see paragraph "Menu
items" in this chapter).
WARNING
If the car must be placed on a roller
bench (at a speed within 5 and 30 km/h)
for maintenance interventions or if it is washed
in an automatic roller washing tunnel with an
obstacle in the front part (e.g. another car, a
wall or another obstacle), the system may
detect its presence and activate. In this case the
system must be deactivated with the display
setup menu (see paragraph “Menu items”
in this chapter).
REAR CAMERA (PARKVIEW®
REAR BACK UP CAMERA)(for versions/markets, where provided)
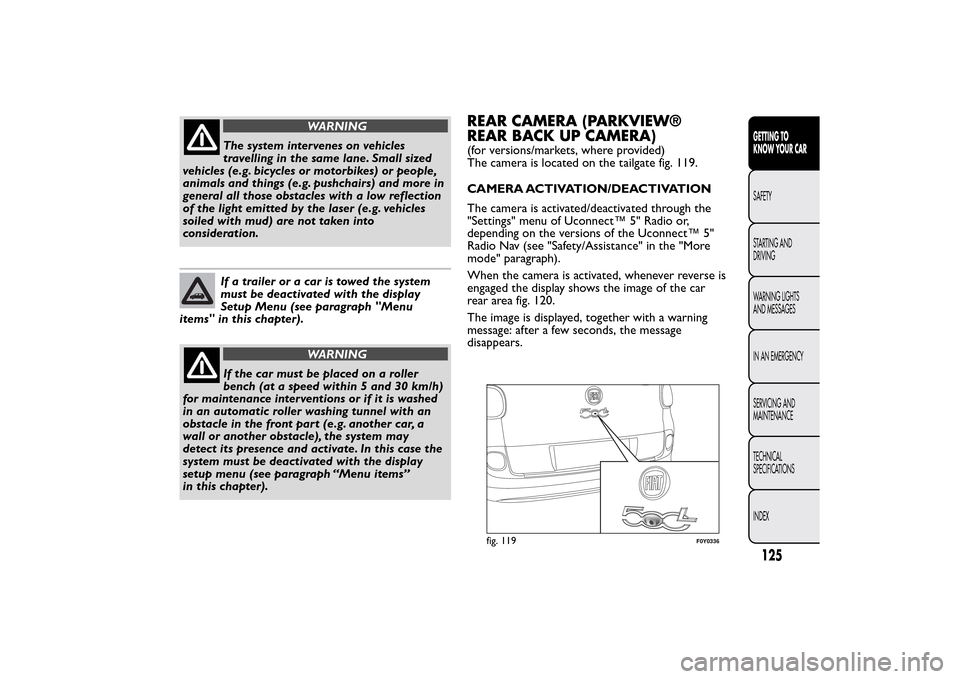
The camera is located on the tailgate fig. 119.
CAMERA ACTIVATION/DEACTIVATION
The camera is activated/deactivated through the
"Settings" menu of Uconnect™ 5" Radio or,
depending on the versions of the Uconnect™ 5"
Radio Nav (see "Safety/Assistance" in the "More
mode" paragraph).
When the camera is activated, whenever reverse is
engaged the display shows the image of the car
rear area fig. 120.
The image is displayed, together with a warning
message: after a few seconds, the message
disappears.
fig. 119
F0Y0336
125GETTING TO
KNOW YOUR CARSAFETY
STARTING AND
DRIVING
WARNING LIGHTS
AND MESSAGES
IN AN EMERGENCY
SERVICING AND
MAINTENANCE
TECHNICAL
SPECIFICATIONS
INDEX
Page 130 of 420
When reverse is disengaged, the image is still
displayed for approx. 10 seconds, then it disappears
and the previously active screen is displayed again.
NoteThe displayed image may look a bit distorted.SYMBOLS AND MESSAGES
ON THE DISPLAY
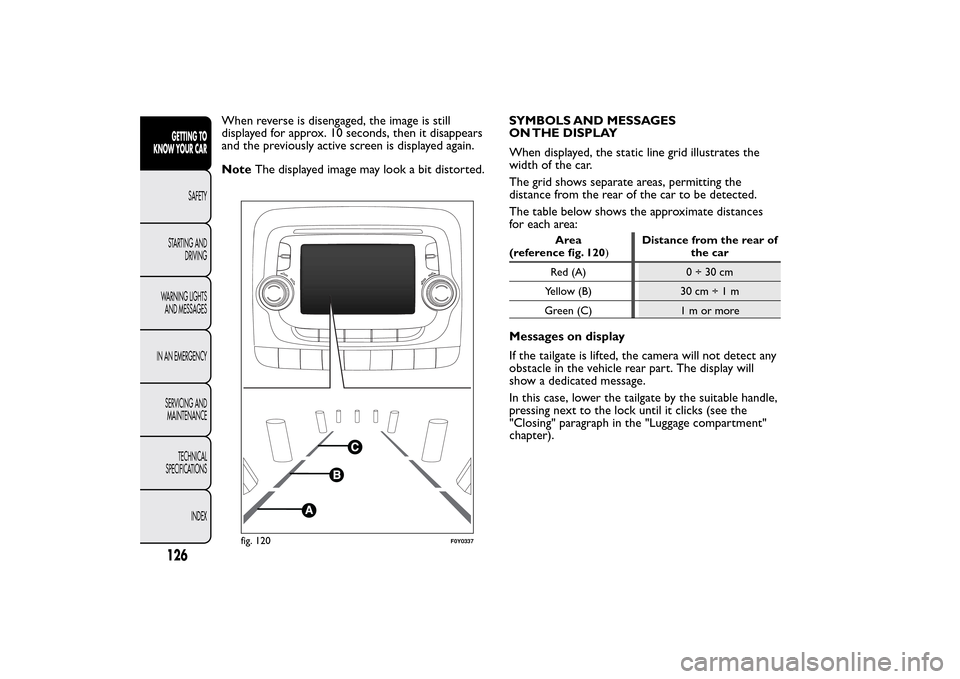
When displayed, the static line grid illustrates the
width of the car.
The grid shows separate areas, permitting the
distance from the rear of the car to be detected.
The table below shows the approximate distances
foreacharea:
Area
(reference fig. 120)Distance from the rear of
the car
Red(A) 0÷30cm
Yellow (B) 30 cm÷1m
Green (C) 1 m or more
Messages on display
If the tailgate is lifted, the camera will not detect any
obstacle in the vehicle rear part. The display will
show a dedicated message.
In this case, lower the tailgate by the suitable handle,
pressing next to the lock until it clicks (see the
"Closing" paragraph in the "Luggage compartment"
chapter).
fig. 120
F0Y0337
126GETTING TO
KNOW YOUR CAR
SAFETY
STARTING AND
DRIVING
WARNING LIGHTS
AND MESSAGES
IN AN EMERGENCY
SERVICING AND
MAINTENANCE
TECHNICAL
SPECIFICATIONS
INDEX
Page 131 of 420
IMPORTANT
IMPORTANT In some circumstances, such as with
ice, snow or mud on the surface of the camera,
the camera sensitivity may be reduced.
IMPORTANT If the tailgate is to be re-painted
following to repairs, make sure the paint does not
get in contact with the camera.
IMPORTANT When parking, take the utmost care
over obstacles that may be above or under the
camera range.
WARNING
The responsibility for parking and other
manoeuvres is always and in any case
charged to the driver.While carr ying out these
manoeuvres, always make sure that no people
(especially children) or animals are in the area
concerned.The camera is an aid for the driver,
but the driver must never allow his/her
attention to lapse during potentially dangerous
manoeuvres, even those executed at low speeds.
Always keep a slow speed, so as to promptly
brake in case of obstacles.
It is vital, for correct operation, that the
camera is always kept clean and free from
any mud, dirt , snow or ice. Be careful not
to scratch or damage the camera while cleaning
it . Avoid using dry, rough or hard cloths.The
camera must be washed using clean water, with
the addition of car shampoo if necessary. In
washing stations which use steam or high-
pressure jets, clean the camera quickly, keeping
the nozzle more than 10 cm away from the
sensors. Also, do not apply stickers to the camera.
127GETTING TO
KNOW YOUR CARSAFETY
STARTING AND
DRIVING
WARNING LIGHTS
AND MESSAGES
IN AN EMERGENCY
SERVICING AND
MAINTENANCE
TECHNICAL
SPECIFICATIONS
INDEX
Page 198 of 420
“DUALDRIVE” ELECTRIC POWER
STEERING ON (green)
The CITY indication appears (an icon appears on the
display on some versions) when "Dualdrive" electric
power steering is activated by pressing the
corresponding button (see the "Dualdrive electric
power steering" paragraph in "Knowing your car"
chapter).
The indication CITY (or the symbol on the display)
disappears when the button is pressed again.DOORS/BONNET/LUGGAGE
COMPARTMENT OPEN (red)
The warning light switches on (on some versions
together with a message and a symbol on the display)
when one or more doors, the bonnet or the tailgate
are not properly closed.
An acoustic signal is emitted with the doors open
and the car moving.City Brake Control - "Collision
Mitigation" SYSTEM DEACTIVATED
(amber)
(for versions/markets where provided)
The warning light switches on when the City Brake
Control - "Collision Mitigation" system is deactivated
through the Setup Menu (see paragraph "Menu
Items", chapter "Knowing your car).START&STOP SYSTEM ACTIVATION/
DEACTIVATION
Start&Stop system activation
A message will appear on the display when the
Start&Stop system is activated.
In this condition the LED on the
button on the
dashboard control panel (see "Start&Stop" paragraph
in "Knowing your car" chapter) is off.
Turning the Start&Stop off
❒Versions with reconf igurable multifunction display:a
message appears on the display when the
Start&Stop system is deactivated.
❒Versions with reconf igurable multifunction display:the
symbol and a dedicated message appear on the
display when the Start&Stop system is deactivated.
The LED above the
button is on when the system
is deactivated.
194GETTING TO KNOW
YOUR CAR
SAFETY
STARTING AND
DRIVINGWARNING LIGHTS
AND MESSAGESIN AN EMERGENCY
SERVICING AND
MAINTENANCE
TECHNICAL
SPECIFICATIONS
INDEX
Page 223 of 420
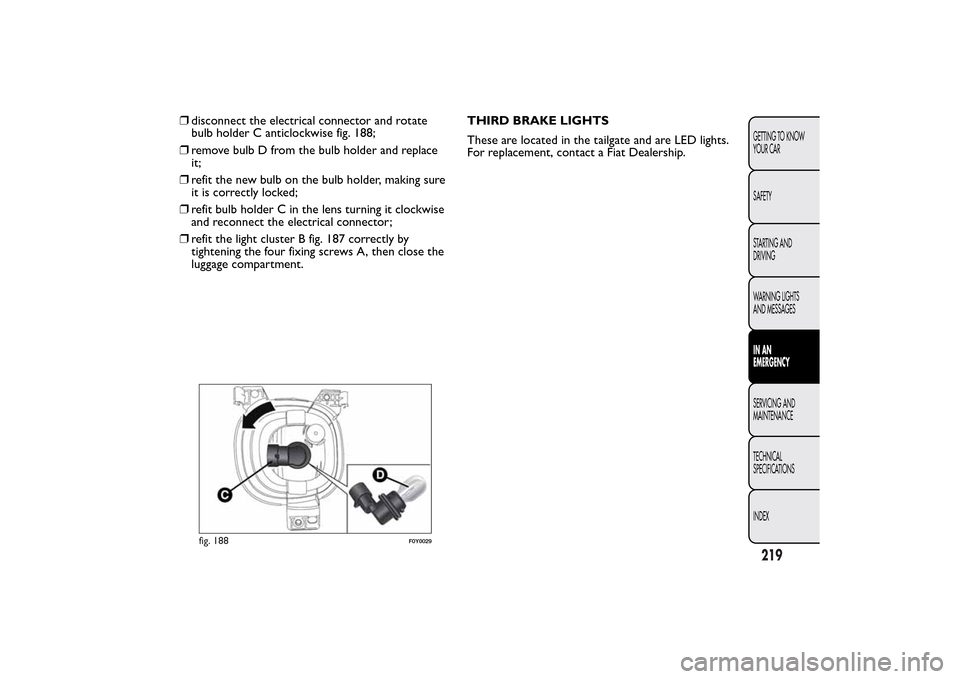
❒disconnect the electrical connector and rotate
bulb holder C anticlockwise fig. 188;
❒remove bulb D from the bulb holder and replace
it;
❒refit the new bulb on the bulb holder, making sure
it is correctly locked;
❒refit bulb holder C in the lens turning it clockwise
and reconnect the electrical connector;
❒refit the light cluster B fig. 187 correctly by
tightening the four fixing screws A, then close the
luggage compartment.THIRD BRAKE LIGHTS
These are located in the tailgate and are LED lights.
For replacement, contact a Fiat Dealership.
fig. 188
F0Y0029
219GETTING TO KNOW
YOUR CAR
SAFETY
STARTING AND
DRIVING
WARNING LIGHTS
AND MESSAGESIN AN
EMERGENCYSERVICING AND
MAINTENANCE
TECHNICAL
SPECIFICATIONS
INDEX