Page 145 of 188

3. For the front axle, place the jack on thebody flange just behind the front tire as
indicated by the triangular lift point sym-
bol on the sill molding. Do not raise the
vehicle until you are sure the jack is fully
engaged.
4. For a rear tire, place the jack in the slot on the rear tie-down bracket, just forward of
the rear tire (as indicated by the triangu-
lar lift point symbol on the sill molding).
Do not raise the vehicle until you are
sure the jack is fully engaged.
5. Raise the vehicle by turning the jack screw clockwise. Raise the vehicle just
enough to remove the flat tire.
6. Remove the lug nuts and wheel.
7.
Install the temporary spare wheel/tire and
lightly tighten the lug nuts prior to lowering
to prevent the vehicle from moving on the
jack.
8.Lower the vehicle by turning the jack screw
counterclockwise, and remove the jack.
9. Finish tightening the lug nuts. Push down on the wrench while at the end of the
handle for increased leverage. Tighten
the lug nuts in a star pattern until each
nut has been tightened twice. The correct
wheel nut tightness is 130 ft lbs (176 N·m). If in doubt about the correct tightness, have
them checked with a torque wrench by your authorized dealer or at a service station.
WHAT TO DO IN EMERGENCIES
143
Page 146 of 188

10. Remove the Dodge center cap using ajack tool from inside the aluminum road
wheel and snap on the protective plastic
plate.
NOTE:
The plastic plate will prevent the road wheel
from being scratched when sliding it under
the vehicle.
11. Stand the wheel up against the bumper with the plastic plate facing you.
12. Slide the cable end, spring and metal tube through the wheel and plastic plate.
Rotate the stamping on the cable and
push it through the wheel and plastic
plate. Snap the stamping into place.
13.
Slide the road wheel on the ground using
the protective plate until it is directly un-
der the winch and between the rear bum-
per and exhaust system heat shields.
Raise the tire by turning the lug wrench on
the winch extension clockwise until it
clicks/skips three times to make sure the
cable is tight.
NOTE:
Double check to ensure the tire is snug against the underbody of the vehicle. Damage to the
winch cable may result if the vehicle is driven with the tire loose.
14. Lower the jack to the fully closed posi- tion. Return the tools to the proper posi-
tions in the tool bag. Fold the flap on the
tool bag under the tools and roll the tools
in the bag underneath the others. Use
the Velcro® straps to secure the tool bag
to the jack with the lug wrench on the
forward side of the jack. Expand the jack
on the bracket by turning the thumb
screw clockwise until it is tight to pre-
vent rattles.
WHAT TO DO IN EMERGENCIES
144
Page 147 of 188

15. Reinstall the plastic plug into the floor of the cargo area. Roll up and store the Jack, ToolKit and Tire Changing Instructions. Reinstall the cover for the jack in the rear storage
bin.
NOTE:
The plastic thumb screw being on the right and the position of the lug wrench before the
Velcro® straps go around the fully closed jack.
16.
Remove the blocks/rocks from the opposite tire.
17. Have the aluminum road wheel and tire repaired as soon as possible and properly secure the spare tire, jack and tool kit.
Road Tire Installation
1. Mount the road tire on the axle.
2. Install the remaining lug nuts with the cone shaped end of the nut toward the wheel.Lightly tighten the lug nuts.
3. Lower the vehicle to the ground by turning the jack handle counterclockwise.
4. Finish tightening the lug nuts. Push down on the wrench while at the end of the handle for increased leverage. Tighten the lug nuts in a star pattern until each nut has been
tightened twice. The correct tightness of each lug nut is 130 ft/lbs (176 N·m). If in doubt
about the correct tightness, have them checked with a torque wrench by your authorized
dealer or service station.
5. After 25 miles (40 km) check the lug nut torque with a torque wrench to ensure that all lug nuts are properly seated against the wheel.
CAUTION!
• Do not use power tools to winch the tire up or down. Impact type tools can damage the winch mechanism.
• Do not attempt to raise the vehicle by jacking on locations other than those indicated
in the Jacking Instructions for this vehicle.
• Be sure to mount the spare tire with the valve stem facing outward. The vehicle could
be damaged if the spare tire is mounted incorrectly.
WHAT TO DO IN EMERGENCIES
145
Page 148 of 188

WARNING!
• Do not attempt to change a tire on the side of the vehicle close to moving traffic. Pullfar enough off the road to avoid the danger of being hit when operating the jack or
changing the wheel.
• Being under a jacked-up vehicle is dangerous. The vehicle could slip off the jack and
fall on you. You could be crushed. Never put any part of your body under a vehicle that
is on a jack. If you need to get under a raised vehicle, take it to a service center where
it can be raised on a lift.
• The jack is designed to be used as a tool for changing tires only. The jack should not
be used to lift the vehicle for service purposes. The vehicle should be jacked on a firm
level surface only. Avoid ice or slippery areas.
• Always park on a firm, level surface as far from the edge of the roadway as possible
before raising the vehicle.
• Turn on the Hazard Warning flasher.
• Block the wheel diagonally opposite the wheel to be raised.
• Set the parking brake firmly and set the automatic transmission in PARK.
• Never start or run the engine with the vehicle on a jack.
• Do not let anyone sit in the vehicle when it is on a jack.
• Do not get under the vehicle when it is on a jack.
• Only use the jack in the positions indicated and for lifting this vehicle during a tire
change.
• If working on or near a roadway, be extremely careful of motor traffic.
• To assure that spare tires, flat or inflated, are securely stowed, spares must be
stowed with the valve stem facing the ground. Carefully follow these tire changing
warnings to help prevent personal injury or damage to your vehicle:
• Raising the vehicle higher than necessary can make the vehicle less stable. Itcould slip off the jack and hurt someone near it. Raise the vehicle only enough
to remove the tire.
• To avoid the risk of forcing the vehicle off the jack, do not fully tighten the
wheel nuts until the vehicle has been lowered. Failure to follow this warning
may result in personal injury.
• Do not use power tools to winch the tire up or down. Impact-type tools may
damage the winch mechanism.
• A loose tire or jack, thrown forward in a collision or hard stop could endanger
the occupants of the vehicle. Always stow the jack parts and the spare tire in
the places provided.
• To avoid the risk of forcing the vehicle off the jack, do not tighten the lug nuts
fully until the vehicle is lowered to the ground.
WHAT TO DO IN EMERGENCIES
146
Page 149 of 188

BATTERY LOCATION
The battery in your vehicle is located under the passenger's front seat. Remote battery
posts are located on the right side of the engine compartment for jump-starting.
JUMP-STARTING
If your vehicle has a discharged battery it can be jump-started using a set of jumper cables
and a battery in another vehicle or by using a portable battery booster pack.
Jump-starting can be dangerous if done improperly so please follow the procedures in this
section carefully.
NOTE:
When using a portable battery booster pack follow the manufacturer’s operating instruc-
tions and precautions.
Preparations For Jump-Start
The battery in your vehicle is located under
the passengers front seat. There are remote
locations under the hood to assist in jump
starting.
• Set the parking brake, shift the automatictransmission into PARK and turn the igni-
tion to OFF.
• Turn off the heater, radio, and all unneces- sary electrical accessories.
• Remove the protective cover over the re- mote positive (+) battery post. Pull upward
on the cover to remove it.
• Remove the protective plug covering the remote negative (-) post.
• If using another vehicle to jump-start the battery, park the vehicle within the jumper
cables reach, set the parking brake and
make sure the ignition is OFF.
1 — Remote Positive (+) Jump Starting Post
2 — Remote Negative (-) Jump Starting Post
WHAT TO DO IN EMERGENCIES
147
Page 150 of 188
end of the jumper cable to the remote positive (+)post of the
vehicle with discharged battery.
2. Connect the opposite end of the positive (+)jumper c")
Jump-Starting Procedure
1. Connect the positive(+)end of the jumper cable to the remote positive (+)post of the
vehicle with discharged battery.
2. Connect the opposite end of the positive (+)jumper cable to the positive (+)post of the
booster battery.
3. Connect the negative end (-)of the jumper cable to the negative (-)post of the booster
battery.
4. Connect the opposite end of the negative (-)jumper cable to the remote negative (-)post
of the vehicle with the discharged battery.
5. Start the engine in the vehicle that has the booster battery, let the engine idle a few minutes, and then start the engine in the vehicle with the discharged battery.
Once the engine is started, remove the jumper cables in the reverse sequence:
1. Disconnect the negative (-)jumper cable from the remote negative (-)post of the vehicle
with the discharged battery.
2. Disconnect the negative end (-)of the jumper cable from the negative (-)post of the
booster battery.
3. Disconnect the opposite end of the positive (+)jumper cable from the positive (+)post of
the booster battery.
4. Disconnect the positive (+)end of the jumper cable from the remote positive (+)post of
the vehicle with the discharged battery.
5. Reinstall the protective cover over the remote positive (+)post of the vehicle with the
discharged battery.
6. Reinstall the protective plug over the remote negative (-)post of the vehicle with the
discharged battery.
NOTE:
If frequent jump-starting is required to start your vehicle you should have the battery and
charging system inspected at your authorized dealer.
WHAT TO DO IN EMERGENCIES
148
Page 151 of 188

CAUTION!
• Do not use a portable battery booster pack or any other booster source with a systemvoltage greater than 12 Volts or damage to the battery, starter motor, alternator or
electrical system may occur.
• Failure to follow these procedures could result in damage to the charging system of the booster vehicle or the discharged vehicle.
• Accessories that can be plugged into the vehicle power outlets draw power from the vehicle’s battery, even when not in use (e.g., cellular phones, etc.). Eventually, if
plugged in long enough, the vehicle’s battery discharges sufficiently to degrade
battery life and/or prevent the engine from starting.
WARNING!
• When temperatures are below the freezing point, electrolyte in a discharged batterymay freeze. Do not attempt jump-starting because the battery could rupture or
explode and cause personal injury. Battery temperature must be brought above the
freezing point before attempting a jump-start.
• Take care to avoid the radiator cooling fan whenever the hood is raised. It can start anytime the ignition switch is on. You can be injured by moving fan blades.
• Remove any metal jewelry, such as watch bands or bracelets, that might make an
inadvertent electrical contact. You could be severely injured.
• Batteries contain sulfuric acid that can burn your skin or eyes and generate hydrogen
gas which is flammable and explosive. Keep open flames or sparks away from the
battery.
• Do not allow vehicles to touch each other as this could establish a ground connection
and personal injury could result.
• Failure to follow this procedure could result in personal injury or property damage
due to battery explosion.
• Do not connect the cable to the negative post (-) of the discharged battery. The resulting electrical spark could cause the battery to explode and could result in
personal injury.
WHAT TO DO IN EMERGENCIES
149
Page 152 of 188
, a Manual Park Release is available. The Manual Park")
MANUAL PARK RELEASE 8-SPEED
In order to push or tow the vehicle in cases where the transmission will not shift out of PARK
(such as a dead battery), a Manual Park Release is available. The Manual Park Release is
located in the center console under an access cover.
Follow these steps to use the Manual Park Release:
1. Lift upward on the access cover, located in the rear portion of the center console torelease it from the console hinges.
2.
Using a screwdriver or similar tool, push
the metal latch in towards the tether strap.
3. While the metal latch is in the open posi- tion, simultaneously pull upwards on the
tether strap until it clicks and releases
out of the park position.
NOTE:
To prevent the vehicle from rolling uninten-
tionally, firmly apply the parking brake.
To Disengage the Manual Park Release
Lever:
1.
Pull upward on the tether while pushing the
release latch towards the tether to unlock
the lever.
2.Once the tension has been released and
the lever has been unlocked, push the lever
all the way down to be sure it is stowed
properly and locks into position.
3. Reinstall the access cover by pushing it downward until it is locked into place.
WHAT TO DO IN EMERGENCIES
150
 1
1 2
2 3
3 4
4 5
5 6
6 7
7 8
8 9
9 10
10 11
11 12
12 13
13 14
14 15
15 16
16 17
17 18
18 19
19 20
20 21
21 22
22 23
23 24
24 25
25 26
26 27
27 28
28 29
29 30
30 31
31 32
32 33
33 34
34 35
35 36
36 37
37 38
38 39
39 40
40 41
41 42
42 43
43 44
44 45
45 46
46 47
47 48
48 49
49 50
50 51
51 52
52 53
53 54
54 55
55 56
56 57
57 58
58 59
59 60
60 61
61 62
62 63
63 64
64 65
65 66
66 67
67 68
68 69
69 70
70 71
71 72
72 73
73 74
74 75
75 76
76 77
77 78
78 79
79 80
80 81
81 82
82 83
83 84
84 85
85 86
86 87
87 88
88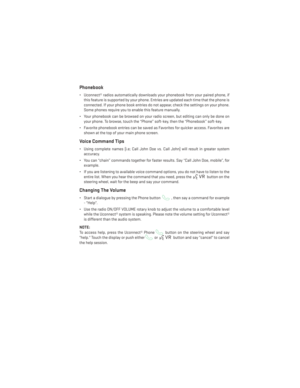 89
89 90
90 91
91 92
92 93
93 94
94 95
95 96
96 97
97 98
98 99
99 100
100 101
101 102
102 103
103 104
104 105
105 106
106 107
107 108
108 109
109 110
110 111
111 112
112 113
113 114
114 115
115 116
116 117
117 118
118 119
119 120
120 121
121 122
122 123
123 124
124 125
125 126
126 127
127 128
128 129
129 130
130 131
131 132
132 133
133 134
134 135
135 136
136 137
137 138
138 139
139 140
140 141
141 142
142 143
143 144
144 145
145 146
146 147
147 148
148 149
149 150
150 151
151 152
152 153
153 154
154 155
155 156
156 157
157 158
158 159
159 160
160 161
161 162
162 163
163 164
164 165
165 166
166 167
167 168
168 169
169 170
170 171
171 172
172 173
173 174
174 175
175 176
176 177
177 178
178 179
179 180
180 181
181 182
182 183
183 184
184 185
185 186
186 187
187