Page 65 of 188
• Ensure that Via Mobile data has beenturned on under “Settings” in the
Uconnect® Access App.
• A green indicator next to the words Via Mobile will show when it is ready to pro-
vide data to the radio (a blue indicator
when data is being sent). A red indicator
means that it is not ready to provide data.
Each time you want to use a Via Mobile
app in your vehicle, the Uconnect Access
App must be running on your smartphone
and the smartphone must be paired via
Bluetooth®.
Enable Smartphone For via Mobile Apps
Via Mobile Data Indicator
ELECTRONICS
63
Page 66 of 188

If equipped, the Via Mobile apps can be found by selecting the “Apps” soft-key in the lower
right corner of the radio touchscreen. Via Mobile apps are listed under the “All Apps” tab.
The words “Via Mobile” will appear after the app name indicating it is a Via Mobile app.
Via Mobile apps can also be launched through Voice Recognition by pressing the VR button
on the steering wheel and stating “launch” and then the name of the app. For example, you
can say “launch Aha via Mobile.”
NOTE:
For detailed information on how to use Via Mobile apps visit the Mopar Owner Connect
website (www.moparownerconnect.com) and login using the username and password you
set up when registering for Uconnect® Access.
A message will be displayed to remind you that Via Mobile apps utilize the data plan on your
connected smartphone to provide content. Many smartphones have a limit to how much
data they can utilize before incurring additional charges. The amount of data being used
varies by smartphone device, cellular service provider and specific app. Check your mobile
phone service plan for more details.* Touch “OK” to continue or the “X” to exit.
(*Additional smartphone data usage charges may apply.)
Favorite Apps
ELECTRONICS
64
Page 67 of 188

Determine If Your Vehicle Is Via Mobile-Enabled
To see if your Uconnect® 8.4A or 8.4AN system is equipped with Via Mobile, press the “Apps”
button on the touchscreen, then press the “All Apps” tab on the left side of the touchscreen.
If you see Aha™, iHeartRadio, Pandora® and Slacker then your system is capable of playing
Via Mobile apps (registration required).
Earlier vehicles with Uconnect® 8.4A or 8.4AN may qualify for a software upgrade to enable
Via Mobile. Call Uconnect Care at 855-792-4241 and please have the last eight characters of
your Vehicle Identification Number (VIN) available, or visit:
DriveUconnect.com/features/via-mobile/
• Click on Help & Support > Select your Brand > System Updates
Via Mobile Apps — If Equipped
•Aha™ by HARMAN — Aha™ by HARMAN makes it easy to instantly access your favorite
Web content on the go. Choose from over 40,000+ stations spanning internet radio,
personalized music, news, entertainment, hotels, weather, audiobooks, Facebook®,
Twitter®, and more.
• iHeartRadio — iHeartRadio provides instant access to more than 1,500 live radio stations
from across the country and allows listeners to create custom music stations inspired by
their favorite artists or songs.
• Pandora® — Pandora® gives people the music and comedy they love anytime, anywhere.
Personalized stations launch instantly, with the input of a favorite artist, track, comedian,
or genre.
• Slacker Radio — Enjoy millions of songs and hundreds of handcrafted stations.
NOTE:
For detailed information on how to use Via Mobile apps visit the Mopar Owner Connect
website (moparownerconnect.com) and log in using the username and password you set up
when registering for Uconnect® Access.
ELECTRONICS
65
Page 68 of 188

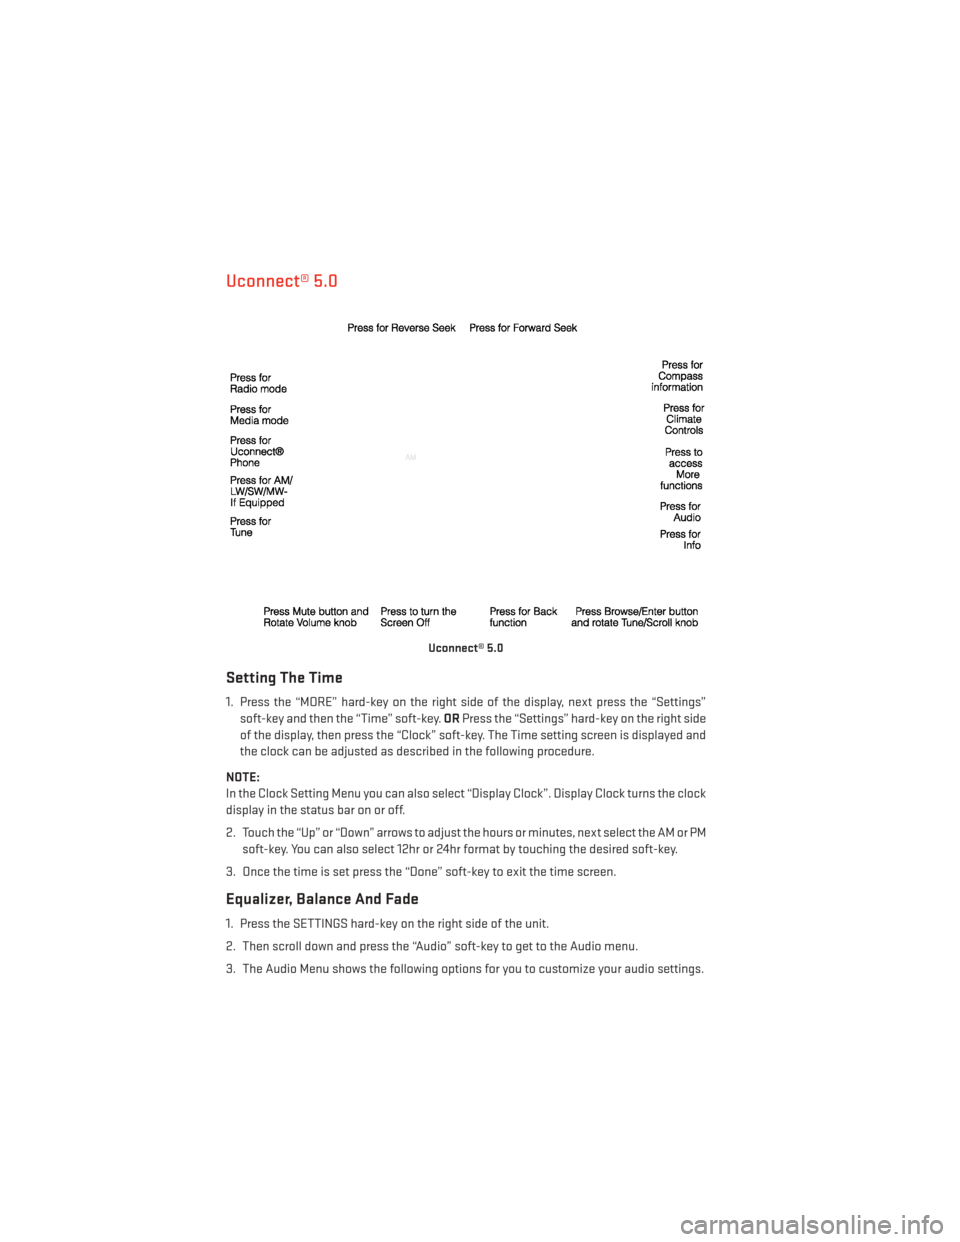
Uconnect® 5.0
Setting The Time
1. Press the “MORE” hard-key on the right side of the display, next press the “Settings”soft-key and then the “Time” soft-key. ORPress the “Settings” hard-key on the right side
of the display, then press the “Clock” soft-key. The Time setting screen is displayed and
the clock can be adjusted as described in the following procedure.
NOTE:
In the Clock Setting Menu you can also select “Display Clock”. Display Clock turns the clock
display in the status bar on or off.
2. Touch the “Up” or “Down” arrows to adjust the hours or minutes, next select the AM or PM soft-key. You can also select 12hr or 24hr format by touching the desired soft-key.
3. Once the time is set press the “Done” soft-key to exit the time screen.
Equalizer, Balance And Fade
1. Press the SETTINGS hard-key on the right side of the unit.
2. Then scroll down and press the “Audio” soft-key to get to the Audio menu.
3. The Audio Menu shows the following options for you to customize your audio settings.
Uconnect® 5.0
ELECTRONICS
66
Page 69 of 188

Equalizer
• Touch the “Equalizer” soft-key to adjust the Bass, Mid and Treble. Use the + or - soft-keyto adjust the equalizer to your desired settings. Press the “Back Arrow” soft-key when
done.
Balance/Fade
• Touch the “Balance/Fade” soft-key to adjust the sound from the speakers. Use the arrow soft-key to adjust the sound level from the front and rear or right and left side speakers.
Touch the Center “C” soft-key to reset the balance and fade to the factory setting. Press
the “Back Arrow” arrow soft-key when done.
Speed Adjusted Volume
• Touch the “Speed Adjusted Volume” soft-key to select between OFF, 1, 2 or 3. This will decrease the radio volume relative to a decrease in vehicle speed. Press the “Back Arrow”
soft-key when done.
Loudness
• Touch the “Loudness” soft-key to select the Loudness feature. When this feature is activated it improves sound quality at lower volumes.
Surround Sound
• Touch the “Surround Sound” soft-key, select On or Off followed by pressing the “Back Arrow” soft-key. When this feature is activated, it provides simulated surround sound
mode.
Radio Operation
Seek Up/Down Buttons
• Press to seek through radio stations in AM, FM or SXM bands.
• Hold either button to bypass stations without stopping.
Store Radio Presets
• When you are receiving a station that you wish to commit into memory, press and holdthe desired numbered soft-key for more than two seconds, or until you hear a confirma-
tion beep.
• The Radio stores up to 12 presets in each of the Radio modes. Four presets are visible at the top of the radio screen. Touching the “all” soft-key on the radio home screen will
display all of the preset stations for that mode.
ELECTRONICS
67
Page 70 of 188

SiriusXM Premier Over 160 Channels
•Get every channel available on your satellite radio, and enjoy all you want, all in one place.
Hear commercial-free music plus sports, news, talk and entertainment. Get all the premium
programming, including Howard Stern, every NFL game, Oprah Radio®, every MLB® and
NHL® game, every NASCAR® race, Martha Stewart and more. And get 20+ extra channels,
including SiriusXM Latino, offering 20 channels of commercial free music, news, talk,
comedy, sports and more dedicated to Spanish language programming.
• To access SiriusXM Satellite Radio, press the RADIO hard-key and then the “SXM” soft-key.
• SiriusXM services require subscriptions, sold separately after the 12-month trial in- cluded with the new vehicle purchase. If you decide to continue your service at the end
of your trial subscription, the plan you choose will automatically renew and bill at
then-current rates until you call SiriusXM at 1-866-635-2349 for U.S. residents and
1-888-539-7474 for Canadian residents to cancel. See SiriusXM Customer Agreement
for complete terms at www.siriusxm.com for U.S. residents and www.siriusxm.ca for
Canadian residents. All fees and programming subject to change. Our satellite service is
available only to those at least 18 and older in the 48 contiguous USA and D.C. Our Sirius
satellite service is also available in PR (with coverage limitations). Our Internet radio
service is available throughout our satellite service area and in AK and HI. ©2014 Sirius
XM Radio Inc. Sirius, XM and all related marks and logos are trademarks of Sirius XM
Radio Inc.
Disc Operation
• Your vehicle may have a remote CD player located in the lower center console storage bin.
• CD/Disc Mode is entered by either inserting a CD/Disc or by touching the “Media” button located on the side of the display. Once in Media Mode, select “Disc”.
• Gently insert one CD into the CD player with the CD label facing as indicated on the illustration located on the Disc player.
Seek Up/Down Buttons
• Press to seek through Disc tracks.
• Hold either button to bypass tracks without stopping.
Browse
• Touch the “Browse” soft-key to scroll through and select a desired track on the Disc. Touch the “Exit” soft-key if you wish to cancel the browse function.
ELECTRONICS
68
Page 71 of 188

USB/Audio Jack (AUX)/Bluetooth® Operation
USB/iPod®
• USB/iPod® Mode is entered by either inserting a USB Jump Drive or iPod® cable into theUSB port or by touching the “Media” hard-key located left of the display. Once in Media
Mode, touch the “Source” soft-key and select USB/iPod®
• Pressing the “Media” hard-key, then touch the “Source” soft-key and then select “USB/ iPod®” to change the mode to the USB device if the device is connected, allowing the
music from your portable device to play through the vehicle's speakers.
Audio Jack (AUX)
• The AUX allows a portable device, such as an MP3 player or an iPod®, to be plugged into the radio and utilize the vehicle’s audio system, using a 3.5 mm audio cable, to amplify
the source and play through the vehicle speakers.
• Pressing the “Media” hard-key, then touch the “Source” soft-key and then select AUX to change the mode to auxiliary device if the audio jack is connected, allowing the music
from your portable device to play through the vehicle's speakers.
• The functions of the portable device are controlled using the device buttons, not the buttons on the radio. The volume may be controlled using the radio or portable device.
Bluetooth®
• If using a Bluetooth® equipped device, you may also be able to stream music to your vehicle's sound system.
• Press the “Media” hard-key, then touch the “Source” soft-key. Select “Bluetooth®” to change the mode to Bluetooth® if the device is paired, allowing the music from your
portable device to play through the vehicle's speakers.
Uconnect® 5.0 Available Media Hubs
Uconnect® 5.0 Media Hub
(SD, USB, AUX Ports) Dual Charging Ports
SO
S = Standard Equipment
O = Optional Equipment
ELECTRONICS
69
Page 72 of 188

Voice Text Reply (Not Compatible With iPhone®)
•Once your Uconnect® system is paired with a compatible mobile device, the system can
announce a new incoming text message, and read it to your over the vehicle audio system.
You can reply to the message using Voice Recognition, by selecting, or saying one of the
18 pre-defined messages.
• Here’s How:Press the Uconnect® Phone buttonand wait for the beep, then say “reply.”
Uconnect® will give the following prompt: “ Please say the message you would like to send.”
Wait for the beep and say one of the pre-defined messages. (If you are not sure, you can say
“help”). Uconnect® will then read the pre-defined messages allowed. As soon as you hear
the message you would like to send, you can interrupt the list of prompts by pressing the
Uconnect® phone button and saying the phrase. Uconnect® will confirm the message by
reading it back to you. Then press the Phone button and say “Send.”
PRE-DEFINED VOICE TEXT REPLY RESPONSES
Yes. Stuck in Traffic. See you later.
No. Start without me. I’ll be Late.
Okay. Where are you?
I will be
minutes late.
Call me. Are you there yet?
I’ll call you later. I need directions.
See you in
of minutes.
I’monmyway.
Can’t talk right now.
I’m lost. Thanks.
• Voice texting reply and voice texting features require a compatible mobile device en-
abled with Bluetooth® Message Access Profile (MAP). iPhone® and some other smart-
phones do not currently support Bluetooth® MAP. Visit www.UconnectPhone.com for
system and device compatibility.
• Want to dictate a personal message? You must first register with Uconnect® Access (U.S. residents only) to take advantage of a new, cloud-based Voice Texting service, an
enhancement to Voice Text Reply.
VOICE COMMAND QUICK REFERENCE
Uconnect® 5.0 Voice Command Quick Reference
• If the Uconnect® Voice Commandbutton exists on your steering wheel, you have
the Voice Command feature, which is optimized for the driver. The Voice Command
feature lets you keep your hands on the wheel, and your eyes on the road.
• When you press the Voice Command
button located on the steering wheel, you
will hear a beep. After the beep, give your command. If you do not know what commands
to say, you can say “help” and the system will provide options to you. If you ever wish to
interrupt the system while it lists options, press the Voice Command
button,
after the beep, say your command.
ELECTRONICS
70