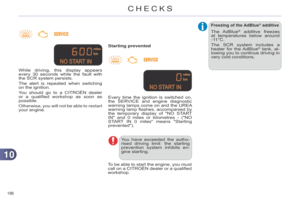
Page 57 of 340

33
55
C4-2_en_Chap03_confort_ed01-2014
Switching the system off
Avoid prolonged operation in in -
terior air recirculation mode or
driving
for
long
periods
with
the
system
of
f
(risk
of
misting
and
deterioration
of air quality).
On stopping the engine
-
While
the
control
screens
remain
on:
the
function
is
available.
-
Pressing
the
REST
button activates
the
ventilation
for
a
few
minutes.
a
ctivation of the function is con-
firmed
by
the
display
of
two
dashes
in
the
control
screens
and
four
air
flow
level
indicator
lamps.
Locking
the
vehicle
has
no
ef
fect
on
this
function.
-
The
control
screens
go
of
f
at
the
end
of
this
period.
Pressing
again
before
the
end
of
the
period
interrupts
of
f
the
ventila
-
tion
definitively:
the
control
screens
go
of
f
and
the
function
is
no
longer
available. F
T
urn
the
air
flow
control
to
the
left
until
all
of
the
indi
-
cator lamps go off.
This
action
switches
of
f
the
air
condi
-
tioning and the ventilation.
Temperature
related
comfort
is
no
long
-
er
assured
but
a
slight
flow
of
air
,
due
to
the
movement
of
the
vehicle,
can
still
be
felt.
F
Modify
the
settings
(temperature,
air
flow
or
air
distribution)
or
press
the
"AUT
O" button to reactivate the
system
with
the
values
set
before
it
was
switched off.
This
switch
does
not
operate
the
air
conditioning,
only
the
air
fan.
When the "REST" function is ac-
tivated,
you
cannot
modify
the
temperature,
air
flow
and
distri
-
bution
settings:
these
are
con
-
trolled
automatically
according
to
the
ambient
temperature.
This function is not available in
the
STOP
mode
of
Stop
&
Start.
COMFORT
Page 58 of 340

33
56
C4-2_en_Chap03_confort_ed01-2014
FRONT DEMIST - DEFROST
These markings on the control panel
indicate the control po -
sitions
for
rapid
demisting
or
defrosting
of
the
windscreen
and
side windows.
With manual air conditioning
F Put the temperature, air flow and distribution
controls to the dedicated marked
position.
F
Put
the
air
intake
control
to
the
"Exterior
air intake" position
(indicator
lamp on the control off).
F
Switch
on
the
air
conditioning
by pressing
the
"A/C"
button; the warn-
ing
lamp in the button comes on.
REAR SCREEN DEMIST - DEFROST
The control button is located on
the air conditioning system
control
panel.
Switching on
The rear screen demisting/defrosting can
only operate when the engine is
running.
F
Press
this
button
to
demist/defrost
the
rear
screen
and
(depending
on
version)
the
door
mirrors.
The
indi
-
cator
lamp
associated
with
the
but
-
ton
comes on.
Switching off
The demisting/defrosting switches of f automatically
to prevent an excessive
consumption
of current.
F
It
is
possible
to
stop
the
demisting/de
-
frosting
operation
before
it
is
switched of
f
automatically
by
pressing
the
button again.
The
indicator
lamp
associated with
the button goes off.
F
Switch
of
f
the
demisting/de
-
frosting
of
the
rear
screen
and
door
mirrors
as
soon
as
appropriate, as lower current
consumption
results
in
re
-
duced
fuel consumption.
With digital dual-zone air
conditioning
Automatic visibility programme
F
Select
this
programme
to
demist
or
defrost
the
windscreen
and
side
windows
as quickly as possible.
The
system
automatically
manages
the
air
conditioning,
air
flow
and
air
intake,
and
provides
optimum
distribu
-
tion
towards
the
windscreen
and
side
windows.
F
To stop the programme, press either the "visibility" button again or "AUT O",
the warning lamp on the button goes of
f
and
the
warning
lamp
on
the "AUT
O"
button comes on.
The system starts again with the values in
use before it was overridden by the
visibility
programme.
With
Stop
&
Start,
when
dem
-
isting
has
been
activated,
the
ST
OP
mode is not available.
With Stop & Start, when the
demisting,
air
conditioning
and
air
flow
functions
are
activated,
ST
OP
mode
is
not
available.
COMFORT
Page 59 of 340
33
57
C4-2_en_Chap03_confort_ed01-2014
FRONT SEATS
Manual adjustments
Forwards-backwardsSeat heightSeat backrest angle
F
Raise
the
control
and
slide
the
seat
forwards
or backwards.
F
Release
the
control
to
lock
the
posi
-
tion. F
Pull
the
control
upwards
to
raise
or
push
it
downwards
to
lower
,
as
many
times
as
necessary
,
to
obtain
the
position required.F
T
urn
the
control
knob
to
adjust
the
seat
backrest angle.
As
a
safety
measure,
seat
ad
-
justments
should
only
be
done
when
stationary. Before
moving
the
seat
backwards,
ensure
that
there
is
nothing
that
might
prevent
the
full
travel
of
the
seat,
so
as
to
avoid
the
risk
of
of
jamming
the
seat
caused
by
the
presence
of
objects
on
the
floor
behind
the
seat
or
rear
passengers.
If the seat jams, stop the movement immediately.
COMFORT
Page 60 of 340
33
58
C4-2_en_Chap03_confort_ed01-2014
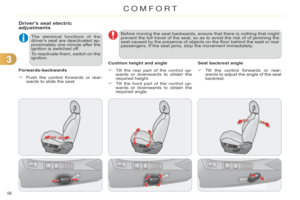
Driver's seat electric
adjustments
Forwards-backwardsThe electrical functions of the
driver's
seat
are
deactivated
ap
-
proximately
one
minute
after
the
ignition
is switched off.
To
reactivate
them,
switch
on
the
ignition.
F
T ilt the rear part of the control up-
wards
or downwards to obtain the
required
height.
F
T
ilt the front part of the control up-
wards
or
downwards
to
obtain
the
required
angle.
Cushion height and angle
F T ilt the control forwards or rear -
wards
to adjust the angle of the seat
backrest.
Seat backrest angle
F
Push
the
control
forwards
or
rear
-
wards
to slide the seat. Before
moving
the
seat
backwards,
ensure
that
there
is
nothing
that
might
prevent
the
full
travel
of
the
seat,
so
as
to
avoid
the
risk
of
of
jamming
the
seat
caused
by
the
presence
of
objects
on
the
floor
behind
the
seat
or
rear
passengers.
If the seat jams, stop the movement immediately.
COMFORT
Page 61 of 340

33
59
C4-2_en_Chap03_confort_ed01-2014
Additional adjustments
Head restraint height and angle
F
T
o
raise
a
head
restraint,
pull
it
up
-
wards.
F
T
o
lower
the
head
restraint,
press
the
lug
A
and
the
head
restraint
at
the
same time.
F
T
o
adjust
the
angle
of
the
head
re
-
straint,
tilt
its
lower
part
forwards
or
rearwards. The
head
restraint
is
fitted
with
a
frame
with
notches
which
pre
-
vents
it
from
lowering;
this
is
a
safety
device in case of impact.
The adjustment is correct
when the upper edge of the
head restraint is level with the
top of the head.
With the engine running, the front seats can
be heated separately.
F
Use
the
adjustment
dial,
placed
on
the
side
of
each
front
seat,
to
switch
on
and
select
the
level
of
heating
re
-
quired:
0:
Off.
1
: Low.
2
: Medium.
3
: High.
Heated seats control
Removing a head restraint
F
T
o
remove
the
head
restraint,
press
the
lug
A
and
pull
the
head
restraint
upwards.
F
T
o
put
the
head
restraint
back
in
place,
engage
the
head
restraint
stems
in
the
openings
keeping
them
in
line
with
the
seat
back
and
press
the
lug A at the same time.
Never
drive
with
the
head
re
-
straints
removed;
they
must
be
in
place and adjusted correctly.
COMFORT
Page 62 of 340
33
60
C4-2_en_Chap03_confort_ed01-2014
F Turn the knob to obtain the desired level
of lumbar support. This
function provides a back massage; it
only operates when the engine is run -
ning.
F
Press the switch to activate the
function.
The
warning
lamp
on
the
switch
comes on
and
the
massage
function
is
activated for
a
period
of
60
minutes.
During
this time,
massage
is
performed
in
6
cycles
of
10
minutes
each
cycle
(6
minutes
of massage
followed by 4 minutes break).
After
an
hour
,
the
function
is
automati
-
cally
deactivated.
The
warning
lamp
in
the
switch goes off.
Deactivation
You
can
deactivate
the
massage
func
-
tion
at
any
time
by
pressing
the
switch.
The
movement
in
progress
continues
until
the
initial
non-massage
position
is
reached.
Manual lumbar adjustment
Massage functionElectric lumbar adjustment
F
Press the front or rear of the control
to obtain the desired lumbar support.
COMFORT
Page 63 of 340
33
61
C4-2_en_Chap03_confort_ed01-2014
Storing driving positions
System which registers the electrical settings
of the driver's seat and door
mirrors.
It
enables
you
to
store
and
re
-
call
two
positions
using
the
buttons
on
the
side of the driver's seat.Storing a position
Using buttons M / 1 / 2
F
Switch
on the ignition.
F
Adjust
your
seat
and
the
door
mir
-
rors.
F
Press button
M, then press button 1
or 2
within four seconds.
An
audible
signal
indicates
that
the
position
has been stored.Recalling a stored position
Ignition on or engine running
F
Press button
1 or 2 to recall the cor-
responding
position.
An
audible
signal
confirms
that
ad
-
justment
is complete.
You can interrupt the current
movement
by
pressing
but
-
ton
M
, 1 or 2
or
by
using
one
of
the
seat controls.
A
stored
position
cannot
be
re
-
called
while driving.
Recalling
stored
positions
is
deactivated
45
seconds
after
switching
off the ignition.
Storing
a
new
position
cancels
the
previous position.
COMFORT
Page 64 of 340

33
62
C4-2_en_Chap03_confort_ed01-2014
REAR SEATS
Bench seat with fixed one-piece cush -
ion and split backrest (left hand 2/3, right hand
1/3)
which
can
be
folded
individually to
adapt the load space in the boot.
Rear head restraints
These have one position for use (up)
and a stowed position (down).
They
can also be removed.
To
remove a head restraint:
F
release
the backrest using control 1,
F
tilt
the backrest 2 slightly forwards,
F
pull
the
head
restraint
upwards
to
the stop,
F
then,
press the lug A.
Never
drive
with
the
head
re
-
straints
removed;
they
must
be
in
place and correctly adjusted.When
repositioning
the
seat
backrest,
take
care
not
to
trap
the
seat belts.
Folding the backrest
F Move the corresponding front seat forward
if necessary.
F
Position the seat belt between the
outer
and
centre
head
restraints
to
avoid
trapping
the
belt
when
reposi
-
tioning
the seat backrest.
F
Place
the
head
restraints
in
the
low
position.
F
Pull control 1
forwards
to
release
the
seat back 2.
F
Fold the seat back 2 on to the cushion.
Repositioning the seat backrest
F Straighten the seat back 2 and se -
cure it.
F
Check
that
the
red
indicator
,
located
next
to
the
control
1
,
is
no
longer
visible.
F
Put
the
seat
belt
back
in
place
on
the
side of the seat backrest.
COMFORT