Page 651 of 751
12-22
2. SYSTEM LAYOUT
The steering pump is driven by the engine power through a belt. This pump circulates the power steering
oil from the reservoir -> steering pump -> oil supply pipe -> steering gear box -> oil return pipe ->
reservoir to perform steering operations
Return hose & tube
Steering pump &
reservoir
High pressure hose
Linkage gear box Steering wheel
Lower shaft Column & shaft
Return hose & tube
Steering pump &
reservoir
High pressure hose
Linkage gear box Steering wheel
Lower shaft Column & shaft
HPS model
SSPS model
Page 679 of 751

14-18
4. WHEEL ALIGNMENT
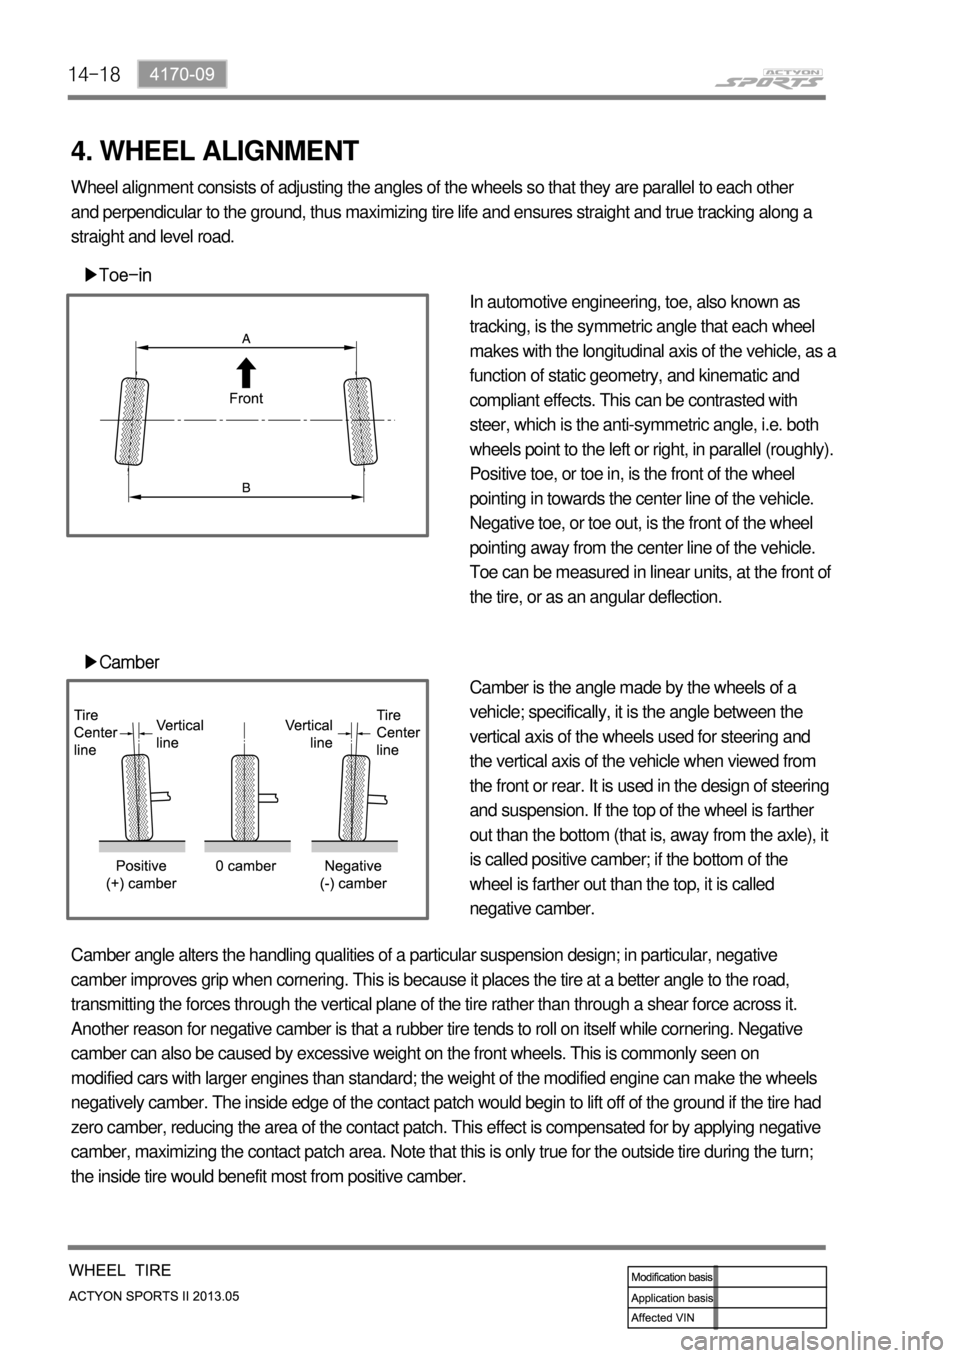
▶Toe-in
▶Camber
In automotive engineering, toe, also known as
tracking, is the symmetric angle that each wheel
makes with the longitudinal axis of the vehicle, as a
function of static geometry, and kinematic and
compliant effects. This can be contrasted with
steer, which is the anti-symmetric angle, i.e. both
wheels point to the left or right, in parallel (roughly).
Positive toe, or toe in, is the front of the wheel
pointing in towards the center line of the vehicle.
Negative toe, or toe out, is the front of the wheel
pointing away from the center line of the vehicle.
Toe can be measured in linear units, at the front of
the tire, or as an angular deflection.
Camber is the angle made by the wheels of a
vehicle; specifically, it is the angle between the
vertical axis of the wheels used for steering and
the vertical axis of the vehicle when viewed from
the front or rear. It is used in the design of steering
and suspension. If the top of the wheel is farther
out than the bottom (that is, away from the axle), it
is called positive camber; if the bottom of the
wheel is farther out than the top, it is called
negative camber. Wheel alignment consists of adjusting the angles of the wheels so that they are parallel to each other
and perpendicular to the ground, thus maximizing tire life and ensures straight and true tracking along a
straight and level road.
Camber angle alters the handling qualities of a particular suspension design; in particular, negative
camber improves grip when cornering. This is because it places the tire at a better angle to the road,
transmitting the forces through the vertical plane of the tire rather than through a shear force across it.
Another reason for negative camber is that a rubber tire tends to roll on itself while cornering. Negative
camber can also be caused by excessive weight on the front wheels. This is commonly seen on
modified cars with larger engines than standard; the weight of the modified engine can make the wheels
negatively camber. The inside edge of the contact patch would begin to lift off of the ground if the tire had
zero camber, reducing the area of the contact patch. This effect is compensated for by applying negative
camber, maximizing the contact patch area. Note that this is only true for the outside tire during the turn;
the inside tire would benefit most from positive camber.
Page 703 of 751
01-24
5. A/C INPUT/OUTPUT DIAGRAM
Below diagram shows the input/output mapping between the components of FATC A/C and A/C
controller briefly.
▶ A/C compressor control by engine ECU
In case of current vehicle models, the system turns ON or OFF the compressor switch according to the
refrigerant pressure, ambient temperature and condenser temperature to protect the A/C circuits.
However, for the vehicles equipped with DI engine, the engine ECU turns off the A/C compressor unde
r
below conditions, including those above.
Coolant temperature: 20℃ or less
Coolant temperature: 115℃ or more
For approx. 4 sec. after starting the engine
Engine speed: 650 rpm or less
Engine speed: 4,500 rpm or more
During abrupt acceleration for the vehicle equipped with manual transmission 1.
2.
3.
4.
5.
6.
Page 730 of 751

03-6
3. WARNINGS FOR POWER SEAT
Adjust the driver's seat before driving.
Make sure that the seat is firmly secured after adjusting.
Never drive the vehicle with the head restraint removed or lowered excessively. Otherwise, your neck,
spine or other parts of the body can be severely injured in the event of an accident.
If you recline the seatback excessively, you could slide under the seat belt and be injured severely in a
collision.
Do not put any object that could damage the seat on the seat.
The front and rear seats are equipped with the heated wire (seat warmer) system. Using the seat
warmer system excessively may cause minor burns. The following occupants should exercise special
care when using the heated wire seat. 1.
2.
3.
4.
5.
6.
Infant, child, old or handicapped person
Person with sensitive skin
Exhausted person
Persons who is drunk or took medicine which causes drowsiness such as sleeping pills, cold
tablets, etc. -
-
-
-
Do not place anything on the seat that insulates against the heat, such as a blanket or cushion.
Make sure that the head restraints are in place and secured properly. Never drive the vehicle with the
head restraint removed.
To minimize the injuries in a collision or an abrupt stop, make sure the seatback is in the upright
position before driving. If the seatback is reclined too much, the occupant could slide under the seat
belt in a collision or an abrupt stop and cannot be protected properly by the airbag system. 7.
5.
9.
4. CAUTIONS FOR POWER SEAT
You can operate the power seat with the ignition switch OFF. However, frequent operation of the seat
switch with the engine stopped can result in battery becoming discharged.
Operating more than one seat adjustment switch at the same time can cause damage to the seat
motor. Therefore, operate the seat switch only one at a time.
Do not use organic solvents such as benzene, thinner, alcohol or gasoline to prevent the seat cover
from being damaged while cleaning.
Do not operate the seat position adjustment switch forcefully when the seat does not move or it
contacts an object.
If the power seat is not operated, check and correct the problem before driving off. 1.
2.
3.
4.
5.
Page 738 of 751

04-37340-00
1. SPECIFICATIONS
2. CAUTIONS WHEN WORKING
Wear clean work clothes and gloves.
Replace and wash the gloves frequently.
Any unauthorized modification or operational test is not allowed since the sunroof motor and control
unit are preset at the factory.
Take care not to drop the sunroof assembly when removing it and do not keep it right up. 1.
2.
3.
4.
Operating voltage 9 ~ 16 V
Operating current (open & close) Max. 6 A
At no load Max. 2 A
Leakage current Max. 1 mA or less
Roof motor operating speed (at opening and closing)1.2 ± 0.5 sec./100 mm
Motor overload stop conditionsCurrent for up to 26 A and torque (load)
for up to 8.3 Nm
Opening amount230 ± 3
Vertical/horizontal tolerance for sunroof glass panel± 2 mm/± 2.5 mm
3. CAUTIONS FOR OPERATION
Even though the sunroof can be operated when the engine is not running, operating the sunroof
repeatedly with the engine turned off will run down the battery. Operate the sunroof while the engine is
running.
When the sunroof operation is completed, release the switch. Keeping pressing the switch can result
in malfunction.
Especially in winter, never operate the sunroof if operation areas are iced. Wait until melted.
Make sure that the sunroof is completely closed when leaving the vehicle. Leaving the vehicle with the
sunroof open result in a theft. In addition, rain or snow can get into the vehicle through the open
sunroof.
When the sunroof is fully open, wind buffeting symptom can be worse. In this case, try to adjust the
sunroof position manually or open the sunroof until the wind buffeting is disappeared
Parts of the body can be trapped in the sunroof and can be struck by passing objects. Do not stick
hands, head or anything else out of the openings.
Remove any dirt and foreign material stuck on the edge of the sunroof glass periodically.
Noise can occur due to friction when operating the sunroof. -
-
-
-
-
-
Page 749 of 751
07-74110-01
3. DESIGN FOR IMPROVING NVH
1) Dual Type Dash Panel and Engine Tunnel with Foaming Pad
Dash
panel
Deadening sheet
Dash
reinforcement
Added an additional member to the bottom of
dash panel to minimize the possibility of engine
retreat when collision.
Reinforcement for Front Floor and Rear Floor ▶