2013 SKODA ROOMSTER lock
[x] Cancel search: lockPage 122 of 219

WARNING■Carefully remove the cap for the mounting recess - there is a risk of hand
injury.■
Keep your hands outside the lever's range of motion when attaching the ball
head – there is a risk of finger injury.
■
Never attempt to pull the operating lever upwards forcibly to turn the key.
Doing so would mean the ball head is not attached correctly.
CAUTION
■ After removing the key, always replace the cap on the lock of the operating lev-
er – there is a risk of dirt getting into the lock.■
Keep the mounting recess of the towing equipment clean at all times. Such dirt
prevents the ball head from being attached securely.
■
After removing the ball head, always place the cap on the mounting recess.
■
Remove the cover from the rear bumper with care - there is a risk of paint dam-
age to the bumper and the cap.
Note
Store cover 2 and cover 4 » Fig. 103 on page 117 in a suitable place in the lug-
gage compartment after removing them.
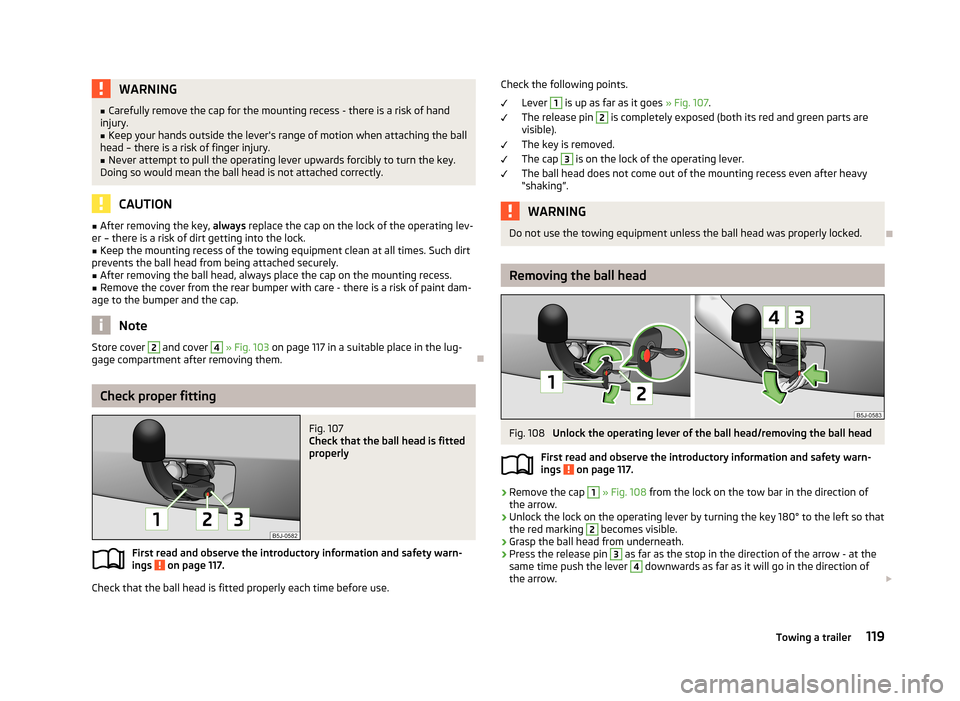
Check proper fitting
Fig. 107
Check that the ball head is fitted
properly
First read and observe the introductory information and safety warn-
ings on page 117.
Check that the ball head is fitted properly each time before use.
Check the following points.
Lever 1
is up as far as it goes » Fig. 107.
The release pin
2
is completely exposed (both its red and green parts are
visible).
The key is removed.
The cap
3
is on the lock of the operating lever.
The ball head does not come out of the mounting recess even after heavy
“shaking”.
WARNINGDo not use the towing equipment unless the ball head was properly locked.
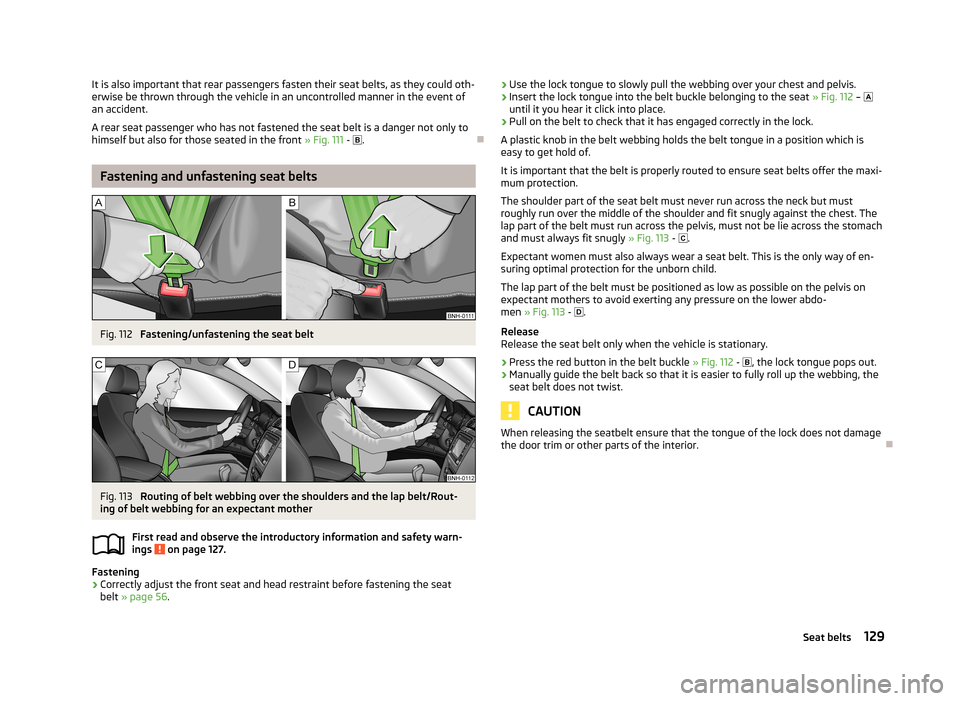
Removing the ball head
Fig. 108
Unlock the operating lever of the ball head/removing the ball head
First read and observe the introductory information and safety warn- ings
on page 117.
›
Remove the cap
1
» Fig. 108 from the lock on the tow bar in the direction of
the arrow.
›
Unlock the lock on the operating lever by turning the key 180° to the left so that
the red marking
2
becomes visible.
›
Grasp the ball head from underneath.
›
Press the release pin
3
as far as the stop in the direction of the arrow - at the
same time push the lever
4
downwards as far as it will go in the direction of
the arrow.
119Towing a trailer
Page 124 of 219

The distribution of the weight is very poor if your vehicle is unladen and the trail-
er is laden. Maintain a particularly low speed if you cannot avoid driving with this
combination.
Tyre pressure
Correct the tyre inflation pressure on your vehicle for a “full load” » page 173,
Service life of tyres .
Trailer load
The permissible trailer load must not be exceeded under any circumstan- ces » page 199 , Technical data .
The trailer loads specified apply only to altitudes up to 1 000 metres above mean
sea level.
The engine output falls as altitude increases, as does the ability to climb. There-
fore, for every additional 1000 m in height (or part), the maximum permissible
towed weight must be reduced by 10 %.
The towed weight comprises the actual weights of the (loaded) towing vehicleand the (loaded) trailer.
The trailer and drawbar load information on the type plate of the towing equip-
ment are merely test data for the towing equipment. The vehicle-specific values
are detailed in the vehicle documents.WARNING■ Do not exceed the maximum permissible axle and drawbar load and the
maximum permissible total or towed weight of the vehicle and the trailer –
there is the risk of an accident and serious injury.■
Slipping loads can significantly affect the stability and safety of the vehicle/
trailer combination – there is the risk of an accident and serious injury.
Towing a trailer
First read and observe the introductory information and safety warn-
ings
on page 120.
Exterior mirrors
You have to have additional exterior mirrors fitted if you are not able to see the
traffic behind the trailer with the standard rear-view mirrors. The national legal requirements must be observed.
Headlights
The front of the vehicle can be lifted when a trailer is being towed and the head- lights can dazzle other road users.
Adjust the headlight setting on the headlight range control » page 42, Headlight
beam adjustment .
Driving speed
For safety reasons, do not drive faster than 80 km/h when towing a trailer.
Immediately reduce your speed as soon as even the slightest swaying of the trail- er is detected. Never attempt to stop the trailer from “swaying” by accelerating.
Brakes
Apply the brakes in good time! If the trailer is fitted with a trailer brake, apply the
brakes gently at first, then brake firmly. This will avoid brake jolts resulting from
the trailer wheels locking.
On downhill sections shift down a gear in good time to also use the engine as a
brake.
Engine overheating
The speed must be reduced immediately if the needle for the coolant tempera-
ture gauge moves into the right-hand area or the red area of the scale.
Stop and switch off the engine if the warning light
in the instrument cluster
starts to flash. Wait a few minutes and check the level of coolant » page 166,
Checking the coolant level .
The following guidelines must be observed » page 22,
Coolant .
The coolant temperature can be reduced by switching on the heating.WARNING■ Adapt your speed to the conditions of the road surface and to the traffic sit-
uation.■
Improper or incorrectly connected electric cables can energise the trailer and
cause functional faults to the vehicle's entire electrical system as well as acci-
dents and severe injuries.
■
Work on the electrical system must only be carried out by specialist garages.
■
Never directly connect the trailer's electrical system with the electrical con-
nections for the tail lights or other current sources.
121Towing a trailer
Page 125 of 219

Note■After coupling the trailer and connecting up the power socket, check the rear
lights on the trailer to ensure they work.■
If there is an error in the trailer lighting system, check the fuses in the fuse box
in the dashboard » page 192.
■
If you tow a trailer frequently, you should also have your car inspected between
service intervals.
■
The handbrake on the towing vehicle must be applied when coupling and un-
coupling the trailer.
Anti-theft alarm system
First read and observe the introductory information and safety warn-
ings
on page 120.
When the vehicle is locked, the alarm is activated as soon as the electrical con- nection to the trailer is interrupted.
Always switch off the anti-theft alarm system before a trailer is coupled or uncou- pled » page 35 .
Conditions for including a trailer in the anti-theft alarm system. The vehicle is factory-fitted with an anti-theft alarm system and towingequipment.
The trailer is electrically connected to the towing vehicle by means of the
trailer socket.
The electrical system of the vehicle and trailer is functional. The vehicle is locked with the vehicle key and the anti-theft alarm system isactivated.
Note
For technical reasons, trailers with rear LED lights cannot be connected to the an-
ti-theft alarm system.
122Driving
Page 127 of 219

What influences the driving safety?First read and observe the introductory information and safety warn-ings
on page 123.
The driver is fully responsible for himself and his occupants. If your driving safety is effected, you place yourself and the oncoming traffic at risk.
The following guidelines must therefore be observed. › Do not become distracted from concentrating on the traffic situation, e.g. by
your passengers or mobile phone calls.
› Never drive when your driving ability is impaired, e.g. due to medication, alcohol
or drugs.
› Keep to the traffic regulations and the permissible speed limit.
› Always adjust the driving speed to the road, traffic and weather conditions.
› Take regular breaks on long journeys – at least every two hours.
Correct seated position
Introduction
This chapter contains information on the following subjects:
Correct seated position for the driver
125
Correct seated position for the front passenger
125
Correct seated position for the passengers in the rear seats
125
Examples of incorrect seated positions
125WARNINGGeneral information■The front seats and head restraints must be adjusted to match the body
size at all times and the seat belt must always be fastened properly to provide the most effective levels of protection to the passengers.■
If the occupant adopts an incorrect seated position, he is exposed to life-
threatening injuries, in case he is hit by a deployed airbag.
■
If the occupants on the rear seats are not sitting upright, the risk of injury is
increased due to incorrect routing of the seat belt.
■
The seat backrests must not be tilted too far back when driving, as this will
impair the function of the seat belts and of the airbag system – risk of injury!
WARNINGInformation for the driver■Always assume the correct seated position before setting off and do not
change this position while driving. Also advise your passengers to adopt the
correct seated position and not to change this position while the car is mov-
ing.■
Maintain a distance of at least 25 cm to the steering wheel. Not maintaining
this minimum distance will mean that the airbag system will not be able to
properly protect you - hazard!
■
When driving, hold the steering wheel with both hands firmly on the outer
edge in the 9 o'clock and 3 o'clock position. Never hold the steering wheel in
the 12 o'clock position or in any other way (e.g. in the middle or inner edge of
the steering wheel). In such cases, you could severely injure the arms, hands
and head when the driver airbag is deployed.
■
Ensure that there are no objects in the driver's footwell, as these may get
caught in the pedal apparatus when driving or braking. You would then no longer be able to operate the clutch, brake or acceleration pedals.
WARNINGInformation for the front seat passenger■Maintain a distance of at least 25 cm from the dash panel. Not maintaining
this minimum distance will mean that the airbag system will not be able to
properly protect you - there is a risk that you could be killed.■
Always keep your feet in the footwell when the car is being driven - never
place your feet on the instrument panel, out of the window or on the seats.
You will be exposed to increased risk of injury if it becomes necessary to apply
the brakes or in the event of an accident. You may suffer fatal injuries when
an airbag is deployed if you have adopted an incorrect seating position.
124Safety
Page 131 of 219

WARNINGObserve the following instructions for the proper use of the seat belts.■Never use one seat belt to secure two persons (including children). The
seatbelt must not be placed over a child who is sitting on the lap of another
passenger.■
The lock tongue should only be inserted into the lock which is the correct
one for your seat. Wrong use of the safety belt will reduce its capacity to pro-
tect and the risk of injury increases.
■
The slot of the belt tongue must not be blocked, otherwise the belt tongue
will not lock in place properly.
■
Many layers of clothing and loose clothing (e. g. a winter coat over a jacket)
do not allow you to be correctly seated and impairs proper operation of the
seat belts.
■
It is prohibited to use clamps or other objects to adjust seat belts (e. g. for
shortening the belts for smaller persons).
■
The seat belts for the rear seats can only fulfil their function reliably when
the seat backrests are correctly locked into position » page 55.
WARNINGObserve the following instructions for proper maintenance of the seat belts.■The belt webbing must always be kept clean. Soiled belt webbing may im-
pair proper operation of the inertia reel » page 156.■
The seat belts must not be removed or changed in any way. Do not attempt
to repair the seat belts yourself.
■
Check the condition of all the seat belts on a regular basis. If any damage to
the seat belts, seat belt connections, inertia reel or the lock is detected, the
relevant seat belt must be replaced by a specialist garage.
■
Damaged seat belts which have been subjected to stress in an accident and
were therefore stretched, must be replaced - this is best done by a specialist
garage. The anchorage points of the belts must also be inspected. The an-
chorage points for the belts should also be checked.
Note
The national legal requirements must be observed when using seat belts.
The physical principle of a frontal collisionFig. 111
Driver without a fastened seat belt/rear passenger without a fas-
tened seat belt
First read and observe the introductory information and safety warn-ings
on page 127.
As soon as the vehicle is moving, so-called kinetic energy (the energy of motion)
is produced both in terms of the car as well as in terms of the occupants.
The magnitude of this kinetic energy depends essentially on the speed at which
the vehicle is travelling and on the weight of the vehicle including the occupants.
The greater the speed and weight increase, the greater the amount of energy
which has to be absorbed in the event of an accident.
The speed of the vehicle is the most important factor. Doubling the speed of the
vehicle from 25 km/h up to 50 km/hour increases the kinetic energy four times.
The idea that it is possible to support your body with your hands in a minor acci- dent is incorrect. Even in a collision at only a low speed, the forces acting on the
body are such that it is no longer possible to support your body.
Even if you only drive at a speed of 30-50 km/h, the forces that your body is ex-
posed to in the event of an accident can exceed a metric ton (1000 kg).
For example, a person's weight of 80 kg “increases” to 4.8 tons (4800 kg) at
50 km/h.
In the event of a frontal collision, occupants of the car not wearing a seat belt are thrown forward in an uncontrolled way and strike parts of the interior of the car,
such as the steering wheel, dash panel or windscreen » Fig. 111 -
. In certain cir-
cumstances you could even be thrown out of the vehicle, which could cause life threatening or even fatal injuries.
128Safety
Page 132 of 219

It is also important that rear passengers fasten their seat belts, as they could oth-
erwise be thrown through the vehicle in an uncontrolled manner in the event of
an accident.
A rear seat passenger who has not fastened the seat belt is a danger not only to
himself but also for those seated in the front » Fig. 111 - .
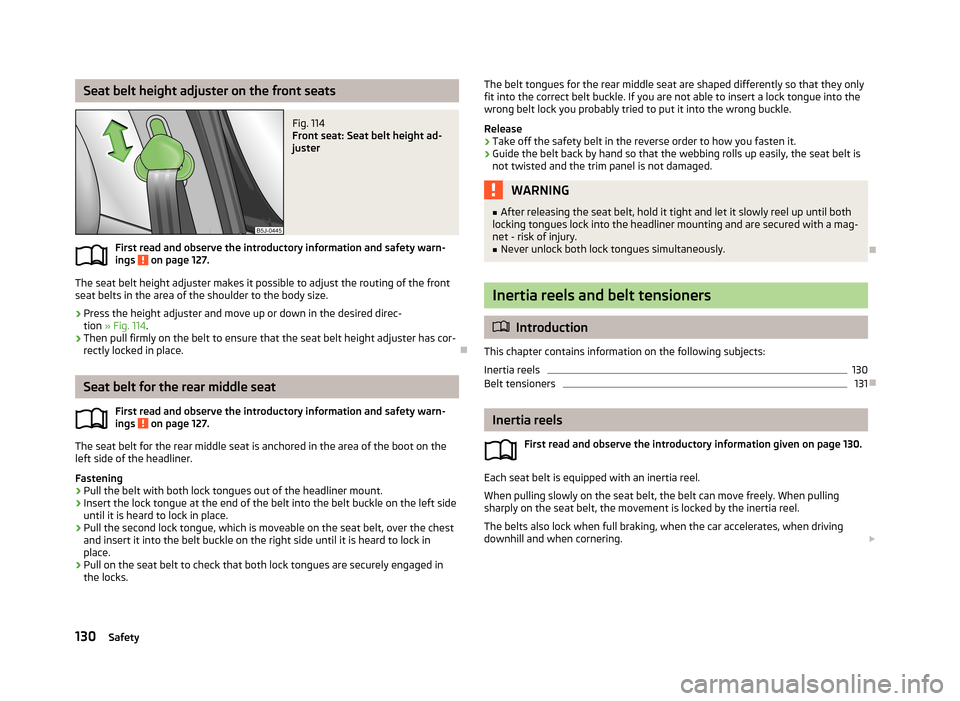
Fastening and unfastening seat belts
Fig. 112
Fastening/unfastening the seat belt
Fig. 113
Routing of belt webbing over the shoulders and the lap belt/Rout-
ing of belt webbing for an expectant mother
First read and observe the introductory information and safety warn-
ings
on page 127.
Fastening
›
Correctly adjust the front seat and head restraint before fastening the seat belt » page 56 .
›Use the lock tongue to slowly pull the webbing over your chest and pelvis.›Insert the lock tongue into the belt buckle belonging to the seat
» Fig. 112 –
until it you hear it click into place.›
Pull on the belt to check that it has engaged correctly in the lock.
A plastic knob in the belt webbing holds the belt tongue in a position which is
easy to get hold of.
It is important that the belt is properly routed to ensure seat belts offer the maxi- mum protection.
The shoulder part of the seat belt must never run across the neck but must
roughly run over the middle of the shoulder and fit snugly against the chest. The
lap part of the belt must run across the pelvis, must not be lie across the stomach
and must always fit snugly » Fig. 113 -
.
Expectant women must also always wear a seat belt. This is the only way of en-
suring optimal protection for the unborn child.
The lap part of the belt must be positioned as low as possible on the pelvis onexpectant mothers to avoid exerting any pressure on the lower abdo-
men » Fig. 113 -
.
Release
Release the seat belt only when the vehicle is stationary.
›
Press the red button in the belt buckle » Fig. 112 -
, the lock tongue pops out.
›
Manually guide the belt back so that it is easier to fully roll up the webbing, the
seat belt does not twist.
CAUTION
When releasing the seatbelt ensure that the tongue of the lock does not damage
the door trim or other parts of the interior.
129Seat belts
Page 133 of 219

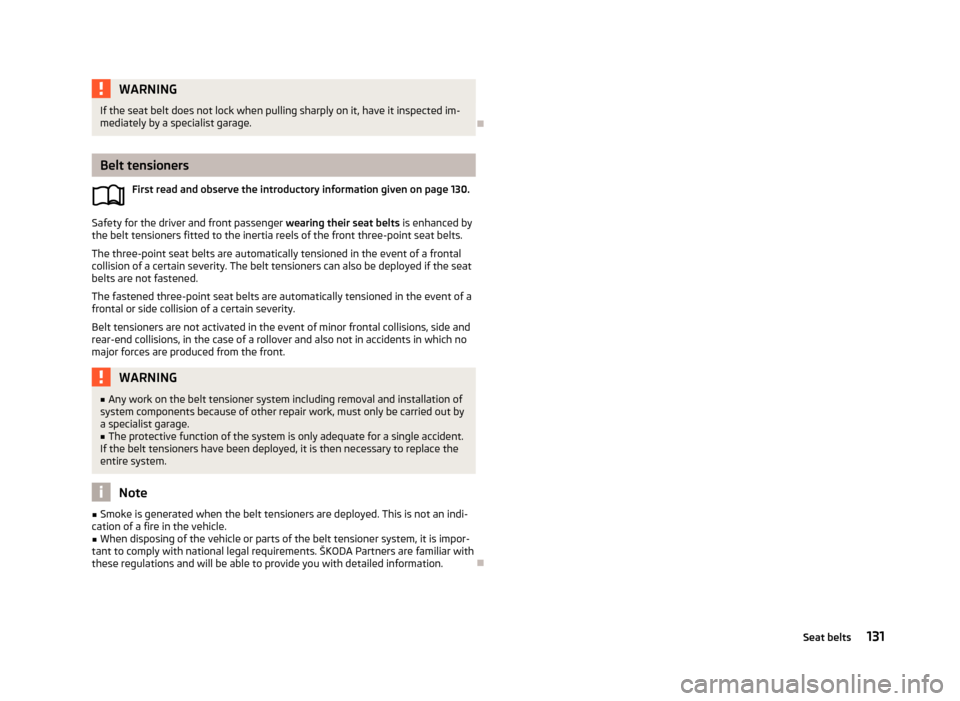
Seat belt height adjuster on the front seatsFig. 114
Front seat: Seat belt height ad-
juster
First read and observe the introductory information and safety warn-
ings on page 127.
The seat belt height adjuster makes it possible to adjust the routing of the front
seat belts in the area of the shoulder to the body size.
›
Press the height adjuster and move up or down in the desired direc- tion » Fig. 114 .
›
Then pull firmly on the belt to ensure that the seat belt height adjuster has cor-
rectly locked in place.
Seat belt for the rear middle seat
First read and observe the introductory information and safety warn-
ings
on page 127.
The seat belt for the rear middle seat is anchored in the area of the boot on the
left side of the headliner.
Fastening
›
Pull the belt with both lock tongues out of the headliner mount.
›
Insert the lock tongue at the end of the belt into the belt buckle on the left side
until it is heard to lock in place.
›
Pull the second lock tongue, which is moveable on the seat belt, over the chest
and insert it into the belt buckle on the right side until it is heard to lock in place.
›
Pull on the seat belt to check that both lock tongues are securely engaged inthe locks.
The belt tongues for the rear middle seat are shaped differently so that they only
fit into the correct belt buckle. If you are not able to insert a lock tongue into the
wrong belt lock you probably tried to put it into the wrong buckle.
Release›
Take off the safety belt in the reverse order to how you fasten it.
›
Guide the belt back by hand so that the webbing rolls up easily, the seat belt is not twisted and the trim panel is not damaged.
WARNING■ After releasing the seat belt, hold it tight and let it slowly reel up until both
locking tongues lock into the headliner mounting and are secured with a mag-
net - risk of injury.■
Never unlock both lock tongues simultaneously.
Inertia reels and belt tensioners
Introduction
This chapter contains information on the following subjects: Inertia reels
130
Belt tensioners
131
Inertia reels
First read and observe the introductory information given on page 130.
Each seat belt is equipped with an inertia reel.
When pulling slowly on the seat belt, the belt can move freely. When pulling
sharply on the seat belt, the movement is locked by the inertia reel.
The belts also lock when full braking, when the car accelerates, when driving downhill and when cornering.
130Safety
Page 134 of 219

WARNINGIf the seat belt does not lock when pulling sharply on it, have it inspected im-
mediately by a specialist garage.
Belt tensioners
First read and observe the introductory information given on page 130.
Safety for the driver and front passenger wearing their seat belts is enhanced by
the belt tensioners fitted to the inertia reels of the front three-point seat belts.
The three-point seat belts are automatically tensioned in the event of a frontal
collision of a certain severity. The belt tensioners can also be deployed if the seat
belts are not fastened.
The fastened three-point seat belts are automatically tensioned in the event of a frontal or side collision of a certain severity.
Belt tensioners are not activated in the event of minor frontal collisions, side andrear-end collisions, in the case of a rollover and also not in accidents in which no
major forces are produced from the front.
WARNING■ Any work on the belt tensioner system including removal and installation of
system components because of other repair work, must only be carried out by
a specialist garage.■
The protective function of the system is only adequate for a single accident.
If the belt tensioners have been deployed, it is then necessary to replace the
entire system.
Note
■ Smoke is generated when the belt tensioners are deployed. This is not an indi-
cation of a fire in the vehicle.■
When disposing of the vehicle or parts of the belt tensioner system, it is impor-
tant to comply with national legal requirements. ŠKODA Partners are familiar with
these regulations and will be able to provide you with detailed information.
131Seat belts