2013 SKODA ROOMSTER lock
[x] Cancel search: lockPage 75 of 219
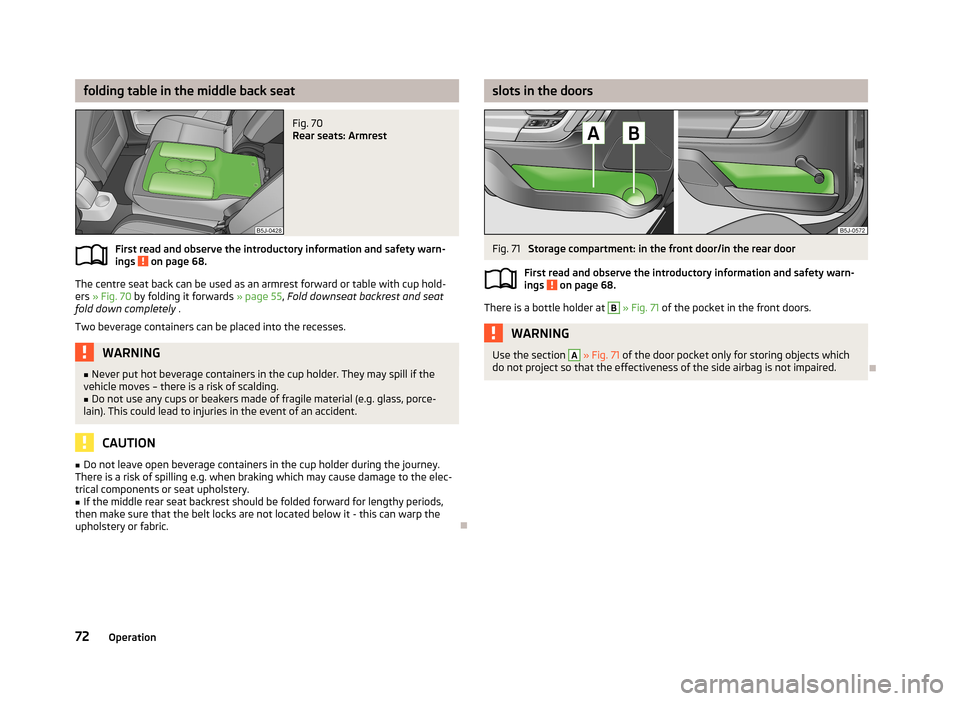
folding table in the middle back seatFig. 70
Rear seats: Armrest
First read and observe the introductory information and safety warn-ings on page 68.
The centre seat back can be used as an armrest forward or table with cup hold-
ers » Fig. 70 by folding it forwards » page 55, Fold downseat backrest and seat
fold down completely .
Two beverage containers can be placed into the recesses.
WARNING■ Never put hot beverage containers in the cup holder. They may spill if the
vehicle moves – there is a risk of scalding.■
Do not use any cups or beakers made of fragile material (e.g. glass, porce-
lain). This could lead to injuries in the event of an accident.
CAUTION
■ Do not leave open beverage containers in the cup holder during the journey.
There is a risk of spilling e.g. when braking which may cause damage to the elec- trical components or seat upholstery.■
If the middle rear seat backrest should be folded forward for lengthy periods,
then make sure that the belt locks are not located below it - this can warp the
upholstery or fabric.
slots in the doorsFig. 71
Storage compartment: in the front door/in the rear door
First read and observe the introductory information and safety warn- ings
on page 68.
There is a bottle holder at
B
» Fig. 71 of the pocket in the front doors.
WARNINGUse the section A » Fig. 71 of the door pocket only for storing objects which
do not project so that the effectiveness of the side airbag is not impaired.
72Operation
Page 76 of 219
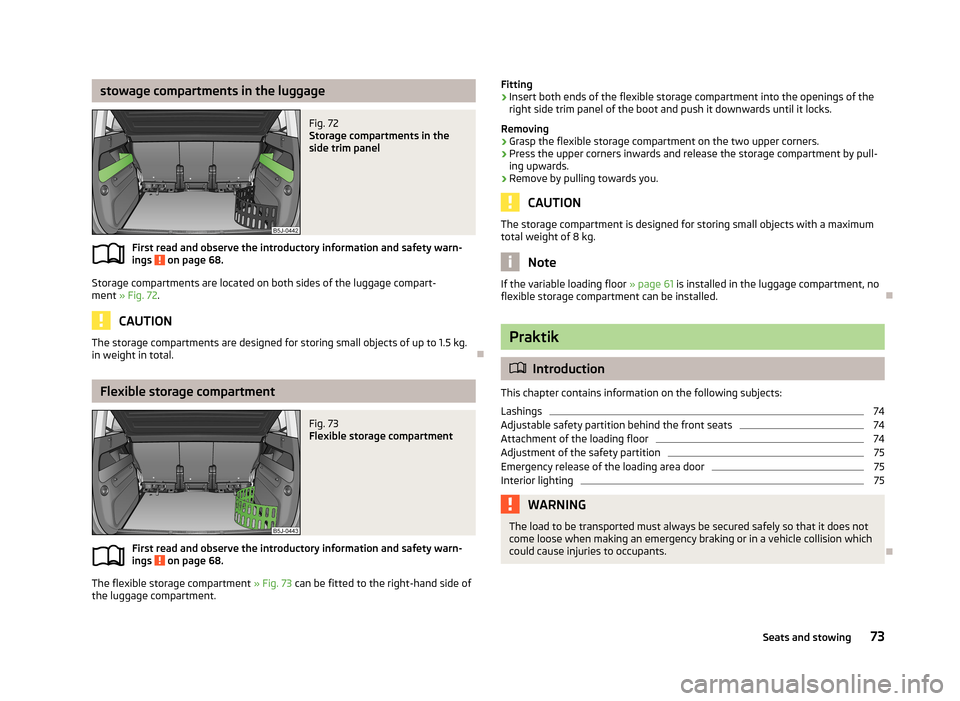
stowage compartments in the luggageFig. 72
Storage compartments in the
side trim panel
First read and observe the introductory information and safety warn-
ings on page 68.
Storage compartments are located on both sides of the luggage compart-
ment » Fig. 72 .
CAUTION
The storage compartments are designed for storing small objects of up to 1.5 kg.
in weight in total.
Flexible storage compartment
Fig. 73
Flexible storage compartment
First read and observe the introductory information and safety warn-
ings on page 68.
The flexible storage compartment » Fig. 73 can be fitted to the right-hand side of
the luggage compartment.
Fitting›Insert both ends of the flexible storage compartment into the openings of the
right side trim panel of the boot and push it downwards until it locks.
Removing›
Grasp the flexible storage compartment on the two upper corners.
›
Press the upper corners inwards and release the storage compartment by pull-
ing upwards.
›
Remove by pulling towards you.
CAUTION
The storage compartment is designed for storing small objects with a maximum
total weight of 8 kg.
Note
If the variable loading floor » page 61 is installed in the luggage compartment, no
flexible storage compartment can be installed.
Praktik
Introduction
This chapter contains information on the following subjects:
Lashings
74
Adjustable safety partition behind the front seats
74
Attachment of the loading floor
74
Adjustment of the safety partition
75
Emergency release of the loading area door
75
Interior lighting
75WARNINGThe load to be transported must always be secured safely so that it does not
come loose when making an emergency braking or in a vehicle collision which
could cause injuries to occupants.
73Seats and stowing
Page 78 of 219
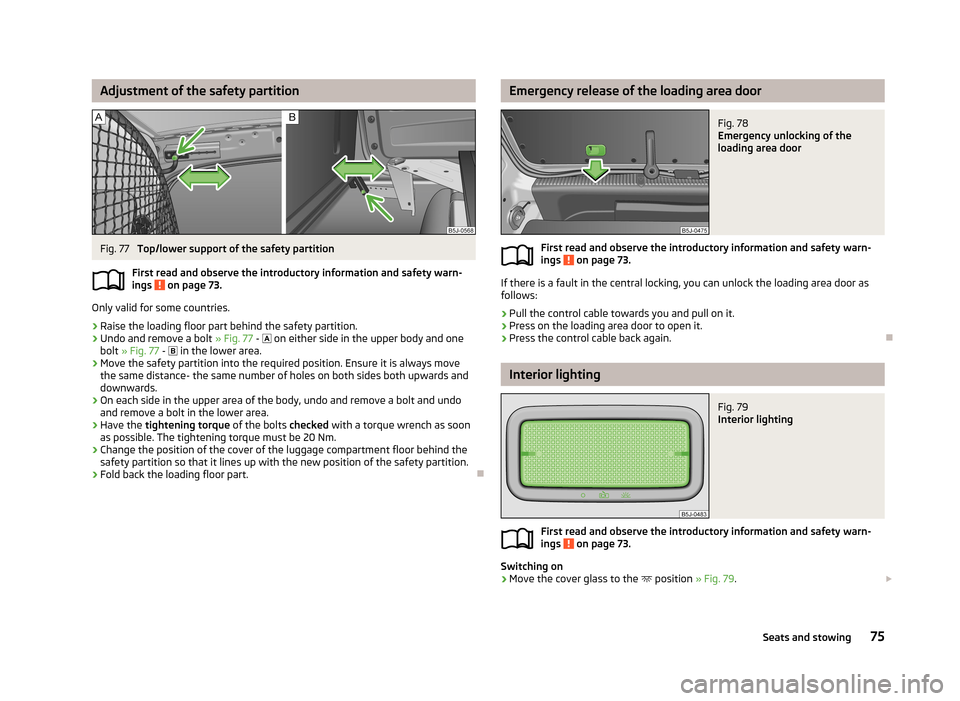
Adjustment of the safety partitionFig. 77
Top/lower support of the safety partition
First read and observe the introductory information and safety warn-
ings
on page 73.
Only valid for some countries.
›
Raise the loading floor part behind the safety partition.
›
Undo and remove a bolt » Fig. 77 -
on either side in the upper body and one
bolt » Fig. 77 -
in the lower area.
›
Move the safety partition into the required position. Ensure it is always move
the same distance- the same number of holes on both sides both upwards anddownwards.
›
On each side in the upper area of the body, undo and remove a bolt and undoand remove a bolt in the lower area.
›
Have the tightening torque of the bolts checked with a torque wrench as soon
as possible. The tightening torque must be 20 Nm.
›
Change the position of the cover of the luggage compartment floor behind the safety partition so that it lines up with the new position of the safety partition.
›
Fold back the loading floor part.
Emergency release of the loading area doorFig. 78
Emergency unlocking of the
loading area door
First read and observe the introductory information and safety warn-
ings on page 73.
If there is a fault in the central locking, you can unlock the loading area door as
follows:
›
Pull the control cable towards you and pull on it.
›
Press on the loading area door to open it.
›
Press the control cable back again.
Interior lighting
Fig. 79
Interior lighting
First read and observe the introductory information and safety warn- ings on page 73.
Switching on
›
Move the cover glass to the position
» Fig. 79.
75Seats and stowing
Page 91 of 219

Button/wheel
» Fig. 84ActionOperation
1Press brieflyAccept call, terminate call, entry in the main menu of the telephone, list of selected numbers1Press button for a long period of timeReject call, last number dialled a)
, switch voice control on/off b)2Press brieflySwitch on/off voice control2Turn upwardsIncrease the volume2Turn downwardsDecrease volumea)
Valid for vehicles with the Amundsen+ navigation system.
b)
Valid for vehicles without the Amundsen+ navigation system.
Inserting the mobile phone and adapterFig. 85
Universal telephone preinstalla-
tion
First read and observe the introductory information given on page 86.
Only one telephone mount is factory-fitted. An adapter for the mobile phone can
be purchased from ŠKODA Original Accessories.
Fitting
›
First of all push adapter
A
in the direction of the arrow » Fig. 85 into the mount
as far as the stop. Then press the adapter slightly downwards, until it locks se-
curely into position.
›
Insert the mobile phone into the adapter
A
(as specified in the instructions
from the manufacturer of the adapter).
Removing
›
Press the side locks on the mount » Fig. 85 at the same time and remove the
adapter with the mobile phone.
CAUTIONTaking the mobile phone out of the adapter during the call can lead to interrup-
tion of the connection. When removing the mobile phone, the connection to the factory-fitted antenna is interrupted, which reduces the quality of the transmit-
ting and receiving signal. The charging of the mobile phone battery is also inter- rupted.
88Operation
Page 94 of 219

■Media Player
■ Active device
■ Paired devices
■ Search
■ Phone name - option to change the name of the phone (default SKODA_BT)
Settings
The following menu items can be selected from the Settings menu item.
■ Phone book
■ Update 1)
■ List
■ Surname
■ First name
■ Ring tone
Back
Return in the Start menu of the telephone.
Voice control
Introduction
This chapter contains information on the following subjects:
Dialogue
91
Voice commands
92
Dialogue
First read and observe the introductory information given on page 91.
The period of time during which the system is ready to receive voice commands
and to carry them out is called a dialogue. The system gives audible feedback and
guides you if necessary through the relevant functions.
Optimum understanding of the voice commands depends on several factors.
› Speak with a normal tone of voice without intonation and excessive pauses.
› Avoid a bad pronunciation.
› Close the doors, windows and sliding roof, to reduce or stop disturbing exterior
noise.
› It is recommended to speak louder at higher speeds, so that the tone of your
voice is louder than the increased surrounding noise.
› During the dialogue, limit additional noise in the vehicle, e.g. passengers talking
at the same time.
› Do not speak, if the system makes an announcement.
The microphone for voice control is inserted in the moulded headliner and direc- ted to the driver and front passenger. Therefore the driver and the front passen- ger can operate the equipment.
Entering a phone number
The telephone number can be entered as a continuous series of individually spo-
ken digits (the whole number at once) or in the form of digital blocks (separated
by short pauses). After each order of digits (separation through brief voice pause)
all of the digits detected up to now are repeated by the system.
The digits 0 - 9, symbols +,
, # are permitted. The system detects no continuous
digit combinations such as twenty-three, but only individually spoken digits (two,
three).
Switching on voice control › Press the
button on the adapter
» Fig. 86 on page 89 briefly.
› Press the
1
button on the multifunction steering wheel briefly
» page 87, Op-
erating the phone on the multifunction steering wheel .
Switching off voice control
If the system is currently playing a message, the message that is currently being played will have to be stopped as follows:
› Press the
button on the adapter briefly.
› Press the
1
button on the multifunction steering wheel briefly.
If the system is expecting a voice command, you can end the dialogue yourself as
follows.
› with the
CANCEL voice command.
› Press the
button on the adapter.
› Press the
1
button on the multifunction steering wheel briefly.
1)
On vehicles fitted with the Amundsen+ navigation system, this function can be accessed via the navi-
gation system menu; refer to the » Operating instructions for the Amundsen+ navigation system .
91Communication and multimedia
Page 98 of 219
Driving
Starting-off and Driving
Steering
Introduction
This chapter contains information on the following subjects:
Adjusting the steering wheel position
95
Power steering
95WARNING■ When driving, hold the steering wheel with both hands firmly on the outer
edge in the 9 o'clock and 3 o'clock position. Never hold the steering wheel in
the 12 o'clock position or in any other way (e.g. in the middle or inner edge of
the steering wheel). In such cases, you could severely injure the arms, hands
and head when the driver airbag is deployed.■
Never adjust the steering wheel when the vehicle is moving only when the
vehicle is stationary!
■
Adjust the steering wheel so that the distance
1
» Fig. 88 on page 95
between the steering wheel and your chest is at least 25 cm. Not maintaining
this minimum distance will mean that the airbag system will not be able to
properly protect you - there is a risk that you could be killed.
■
If the steering wheel is adjusted further towards the head, the protection
provided by the driver airbag in the event of an accident is reduced. Check
that the steering wheel is aligned to the chest.
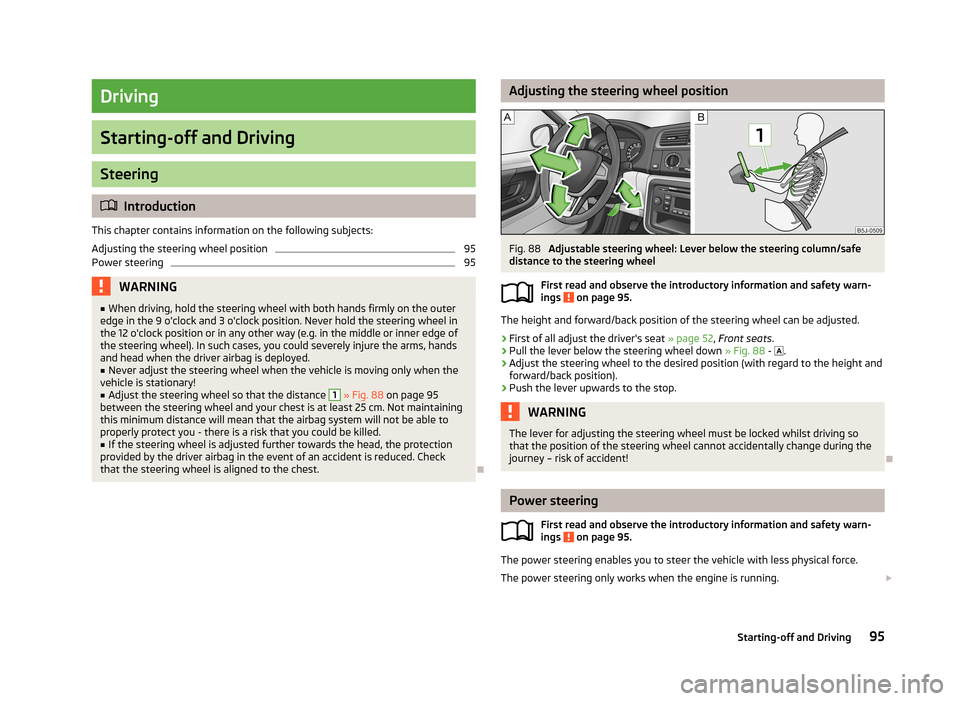
Adjusting the steering wheel positionFig. 88
Adjustable steering wheel: Lever below the steering column/safe
distance to the steering wheel
First read and observe the introductory information and safety warn-
ings
on page 95.
The height and forward/back position of the steering wheel can be adjusted.
›
First of all adjust the driver's seat » page 52, Front seats .
›
Pull the lever below the steering wheel down » Fig. 88 -
.
›
Adjust the steering wheel to the desired position (with regard to the height and
forward/back position).
›
Push the lever upwards to the stop.
WARNINGThe lever for adjusting the steering wheel must be locked whilst driving so
that the position of the steering wheel cannot accidentally change during the
journey – risk of accident!
Power steering
First read and observe the introductory information and safety warn-ings
on page 95.
The power steering enables you to steer the vehicle with less physical force.
The power steering only works when the engine is running.
95Starting-off and Driving
Page 99 of 219

It is still fully possible to steer the vehicle if the power steering fails or if the en-gine is not running (e.g. when towing). However, greater physical effort is re-
quired to turn the steering wheel.
CAUTION
You will place great stresses on the power steering system if the steering is
turned to full lock when the vehicle is stationary. Turning the steering to full lock
in such a situation will be accompanied by noises. Never leave the steering wheel at full lock for more than 15 seconds when the engine is running - there is a risk of
damaging the power steering.
Starting and stopping the engine
Introduction
This chapter contains information on the following subjects:
Electronic immobilizer
97
Ignition lock
97
Engine
97
Switching off the engine
98
The engine can only be started using a correctly coded original key. The engine running noises may louder at first be louder for a short time afterstarting the cold engine. This is quite normal and is not an operating problem.
WARNING■ When the vehicle is travelling with the engine off, the ignition key must al-
ways be in position 2 » Fig. 89 on page 97 (ignition switched on). This posi-
tion is indicated by the warning lights coming on. If this is not the case, this
could result in unexpected locking of the steering wheel – risk of accident!■
Only pull the ignition key from the ignition lock when the vehicle has come
to a complete stop (by applying the handbrake). Otherwise, the steering could
be blocked – risk of accident!
■
When leaving the vehicle, the ignition must always be removed. This is par-
ticularly important if children are left in the vehicle. Children could otherwise
start the engine for example – risk of accident or injury!
WARNING (Continued)■ Never leave the vehicle unattended with the engine running.■Never switch off the engine before the vehicle is stationary – risk of acci-
dent!WARNING■ Never leave the engine running in unventilated or closed rooms. The ex-
haust gases from the engine contain substances such as odourless and col-
ourless carbon monoxide (a poisonous gas) – risk to life! ■ Carbon monoxide can cause unconsciousness and death.
CAUTION
■The starter must only be operated when the engine is not running and the vehi-
cle is at a standstill. The starter or engine can be damaged if the starter is activa-
ted when the engine is running 3
» Fig. 89 on page 97.
■
If the engine does not start up after a second attempt, the fuse for the fuel
pump may have a fault. Check the fuse and replace if necessary » page 191, or
seek assistance from a specialist garage.
■
Let go of the ignition key as soon as the engine starts otherwise the starter
could be damaged.
■
Do not tow start the engine – there is a risk of damaging the engine and the
catalytic converter. The battery from another vehicle can be used as a jump-start
aid » page 186 , Jump-starting .
CAUTION
■
Avoid high engine revolutions, full throttle and high engine loads before the en-
gine has reached its operating temperature – risk of damaging the engine!■
Do not switch the engine off immediately at the end of your journey after the
engine has been operated over a prolonged period at high loads but leave it to
run at an idling speed for about 1 minute. This prevents any possible accumulation
of heat when the engine is switched off.
For the sake of the environment
Do not warm up the engine while the vehicle is stationary. If possible, start your
journey as soon as the engine has started. Through this the engine reaches its
operating temperature more rapidly and the pollutant emissions are lower. 96Driving
Page 100 of 219
NoteAfter switching off the ignition, the radiator fan can intermittently continue to op-
erate for approx. 10 minutes.
Electronic immobilizer
First read and observe the introductory information and safety warn-ings
on page 96.
An electronic chip is integrated in the head of the key. The immobiliser is deacti-
vated with the aid of this chip when the key is inserted in the ignition lock. The
electronic immobiliser is automatically activated when the ignition key is with-
drawn from the lock.
The engine will not start if a non-authorized ignition key is used.
The MAXI DOT display shows the following: Immobilizer active.
Ignition lock
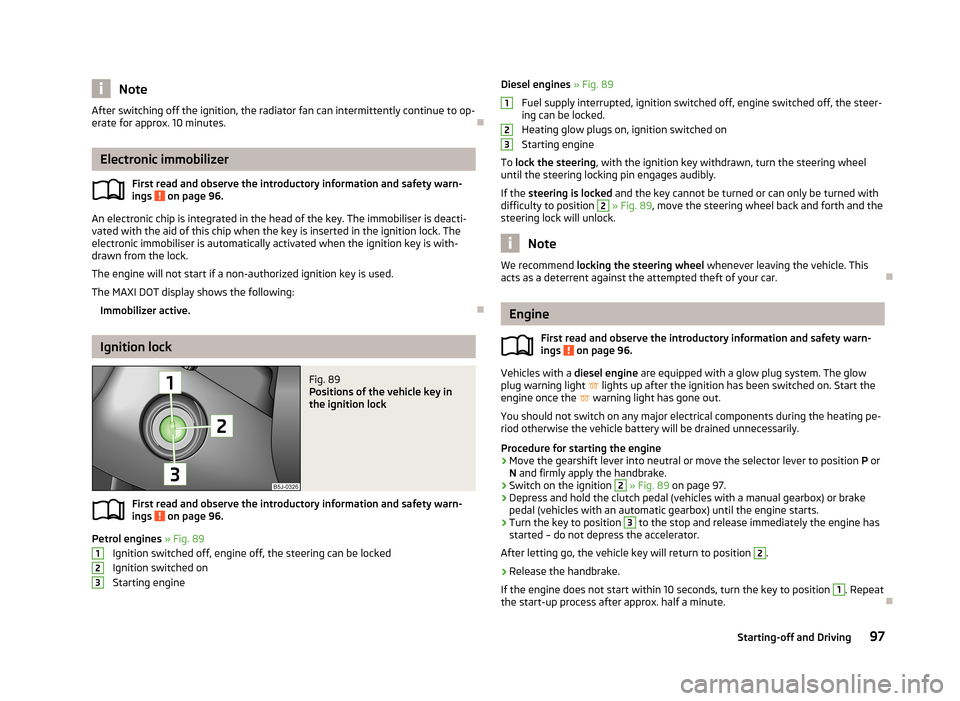
Fig. 89
Positions of the vehicle key in
the ignition lock
First read and observe the introductory information and safety warn-
ings on page 96.
Petrol engines » Fig. 89
Ignition switched off, engine off, the steering can be locked
Ignition switched on Starting engine
123Diesel engines » Fig. 89
Fuel supply interrupted, ignition switched off, engine switched off, the steer-
ing can be locked.
Heating glow plugs on, ignition switched on
Starting engine
To lock the steering , with the ignition key withdrawn, turn the steering wheel
until the steering locking pin engages audibly.
If the steering is locked and the key cannot be turned or can only be turned with
difficulty to position 2
» Fig. 89 , move the steering wheel back and forth and the
steering lock will unlock.
Note
We recommend locking the steering wheel whenever leaving the vehicle. This
acts as a deterrent against the attempted theft of your car.
Engine
First read and observe the introductory information and safety warn-
ings
on page 96.
Vehicles with a diesel engine are equipped with a glow plug system. The glow
plug warning light
lights up after the ignition has been switched on. Start the
engine once the
warning light has gone out.
You should not switch on any major electrical components during the heating pe- riod otherwise the vehicle battery will be drained unnecessarily.
Procedure for starting the engine
›
Move the gearshift lever into neutral or move the selector lever to position P or
N and firmly apply the handbrake.
›
Switch on the ignition
2
» Fig. 89 on page 97.
›
Depress and hold the clutch pedal (vehicles with a manual gearbox) or brake
pedal (vehicles with an automatic gearbox) until the engine starts.
›
Turn the key to position
3
to the stop and release immediately the engine has
started – do not depress the accelerator.
After letting go, the vehicle key will return to position
2
.
›
Release the handbrake.
If the engine does not start within 10 seconds, turn the key to position
1
. Repeat
the start-up process after approx. half a minute.
12397Starting-off and Driving