2013 SKODA ROOMSTER AUX
[x] Cancel search: AUXPage 95 of 219

Note■The dialogue of an incoming call is immediately interrupted.■The voice control is only possible in vehicles fitted with a multifunction steering
wheel with telephone control or a phone mount and adapter.
Voice commands
First read and observe the introductory information given on page 91.
Basic voice commands
Voice commandActionHELPAfter this command the system repeats all possible
commands.CALL XYZThis command calls up the contact from the phone book.PHONE BOOKAfter this command, for example, the phone book
can be repeated back to you, a voice entry for the
contact can be updated or deleted, etc.CALL HISTORYLists of dialled numbers, missed calls, etc.DIAL NUMBERAfter this command, a telephone number can be en- tered to establish a connection with the requested
party.REDIALAfter this command the system calls the last dialled number.MUSIC a)Play music from the mobile phone or another paired
device.FURTHER OPTIONSAfter this command the system offers additional
context-dependent commands.SETTINGSSelection for setting Bluetooth ®
, dialogue etc.CANCELThe dialogue is ended.a)
On vehicles fitted with the Amundsen+ navigation system, this function can be accessed via the navi-
gation system menu; refer to the » Operating instructions for the Amundsen+ navigation system .
If a voice command is not detected, the system answers with “ Sorry?”, and a new
entry can be made. After the 2nd error the system repeats the aid. After the 3rd attempt the answer “ Cancelled” is given and the dialogue is ended.
Store voice recording of a contact
If automatic name recognition does not work reliably for some contacts, you can
choose to save your own voice tag for the contact in the Phone book - Voice tag -
Record menu item.
Your own voice tag can also be saved using the voice control in the FURTHER OP-
TIONS menu.
Multimedia
Introduction
This chapter contains information on the following subjects:
Music playback via Bluetooth ®
92
Operating the radio and navigation system on the multifunction steering
wheel
93
AUX and MDI inputs
94
Music playback via Bluetooth ®
First read and observe the introductory information given on page 92.
The universal telephone preinstallation GSM II makes it possible to play back mu-
sic via Bluetooth ®
from the devices such as MP3 player, mobile phone or note-
book.
To ensure the music can be played back via Bluetooth ®
, you must first pair the de-
vice with the hands-free system in the Phone - Bluetooth - Media player menu.
The music playback process is performed on the connected device.
The universal telephone preinstallation GSM II ensures that the music played back via the hands-free system can be controlled with the remote control » page 92,
Voice commands .
Note
The device being connected must support the Bluetooth ®
A2DP profile; refer to
the operating instructions for the relevant device being connected.
92Operation
Page 97 of 219

Note■The functions of button 1 are different for vehicles fitted with a universal tele-
phone preinstallation GSM II » page 87.■
The loudspeakers in the vehicle are adjusted to the power output of the radio
and navigation system of 4x20°W.
AUX and MDI inputs
First read and observe the introductory information given on page 92.
The AUX input is located below the front armrest and is marked with
.
The MDI input (AUX and USB) is located at the front under the storage compart-
ment on the passenger side.
The AUX- and MDI inputs are used to connect external audio sources (e.g. iPod or
MP3 player) and to play back music from these devices via the factory-fitted radio
or navigation system.
For a description of use, refer to the operating instructions for the relevant radio
or navigation system.
94Operation
Page 160 of 219

Inspecting and replenishing
Fuel
Introduction
This chapter contains information on the following subjects:
Refuelling
157
Unleaded petrol
158
Diesel fuel
159
The correct grades of fuel for your vehicle are stated on a sticker affixed to the
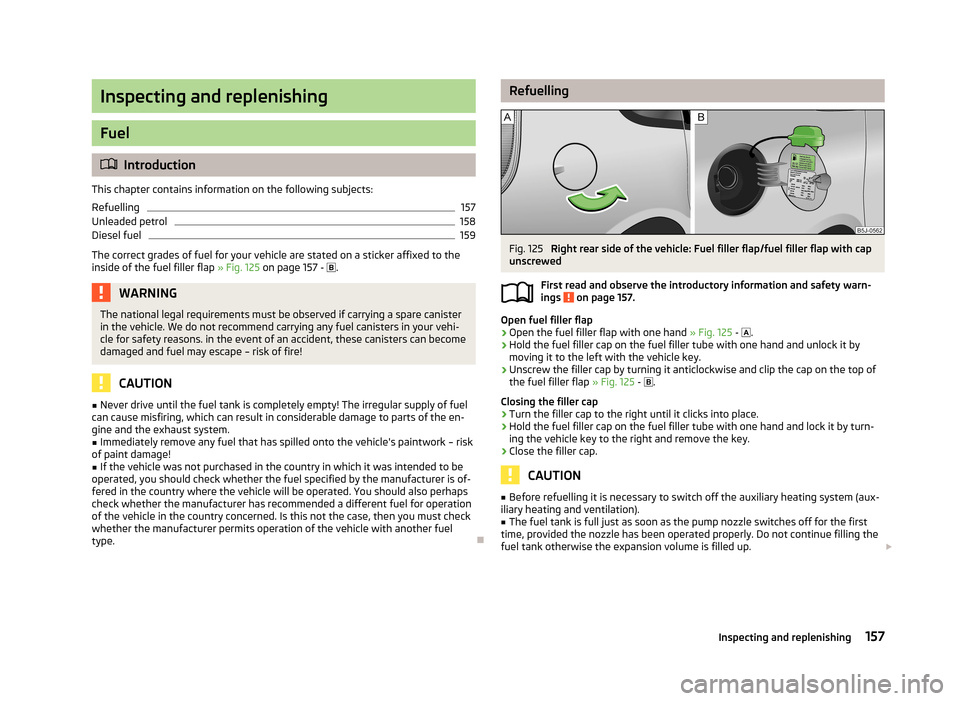
inside of the fuel filler flap » Fig. 125 on page 157 -
.
WARNINGThe national legal requirements must be observed if carrying a spare canister
in the vehicle. We do not recommend carrying any fuel canisters in your vehi-
cle for safety reasons. in the event of an accident, these canisters can become damaged and fuel may escape – risk of fire!
CAUTION
■ Never drive until the fuel tank is completely empty! The irregular supply of fuel
can cause misfiring, which can result in considerable damage to parts of the en-
gine and the exhaust system.■
Immediately remove any fuel that has spilled onto the vehicle's paintwork – risk
of paint damage!
■
If the vehicle was not purchased in the country in which it was intended to be
operated, you should check whether the fuel specified by the manufacturer is of-
fered in the country where the vehicle will be operated. You should also perhaps
check whether the manufacturer has recommended a different fuel for operation
of the vehicle in the country concerned. Is this not the case, then you must check
whether the manufacturer permits operation of the vehicle with another fuel
type.
RefuellingFig. 125
Right rear side of the vehicle: Fuel filler flap/fuel filler flap with cap
unscrewed
First read and observe the introductory information and safety warn-
ings
on page 157.
Open fuel filler flap
›
Open the fuel filler flap with one hand » Fig. 125 -
.
›
Hold the fuel filler cap on the fuel filler tube with one hand and unlock it by
moving it to the left with the vehicle key.
›
Unscrew the filler cap by turning it anticlockwise and clip the cap on the top ofthe fuel filler flap » Fig. 125 -
.
Closing the filler cap
›
Turn the filler cap to the right until it clicks into place.
›
Hold the fuel filler cap on the fuel filler tube with one hand and lock it by turn- ing the vehicle key to the right and remove the key.
›
Close the filler cap.
CAUTION
■ Before refuelling it is necessary to switch off the auxiliary heating system (aux-
iliary heating and ventilation).■
The fuel tank is full just as soon as the pump nozzle switches off for the first
time, provided the nozzle has been operated properly. Do not continue filling the fuel tank otherwise the expansion volume is filled up. 157Inspecting and replenishing
Page 169 of 219

■A coolant additive that does not comply with the correct specifications can sig-
nificantly reduce the corrosion protection.■
Any faults resulting from corrosion may cause a loss of coolant and can conse-
quently result in major engine damage!
■
Do not fill the coolant above the mark
A
» Fig. 131 on page 166.
■
If a fault causes the engine to overheat, we recommend visiting a specialist ga-
rage, as otherwise serious engine damage may occur.
Capacity
First read and observe the introductory information and safety warn-
ings
on page 165.
Coolant capacity (in litres) 1)
Petrol enginesCapacity1.2 litres/51 kW5.51.2 litres/63 kW TSI7.71.2 litres/77 kW TSI7.71.4 litres/63 kW5.51.6 litres/77 kW5.5Diesel enginesCapacity1.2 ltr./55 kW TDI CR DPF6.61.6 litres/66 kW TDI CR DPF8.41.6 litres/77 kW TDI CR DPF8.4
Checking the coolant levelFig. 131
Engine compartment: Coolant
expansion reservoir
First read and observe the introductory information and safety warn-
ings on page 165.
The coolant expansion bottle is located in the engine compartment.
›
Switch off the engine.
›
Open the bonnet » page 161.
›
Check the level of coolant at the coolant expansion vessel » Fig. 131. The cool-
ant level when the engine is cold must lie between the
B
(MIN) and
A
(MAX)
markings. The level may also rise slightly above the
A
(MAX) marking when the
engine is warm.
If the coolant level in the coolant expansion tank is too low, this is indicated by
the warning light
lighting up in the instrument cluster » page 22,
Coolant .
We still recommend inspecting the coolant level directly at the reservoir from
time to time.
Loss of coolant
A loss of coolant is first and foremost an indication of a leak in the system. Do
not merely top up the coolant. Have the cooling system checked by a specialist
garage.
1)
The coolant capacity is approximately 1 Litre greater on vehicles that are fitted with an auxiliary heat-
er (auxiliary heating and ventilation).
166General Maintenance
Page 196 of 219

No.Consumer32High pressure fuel pump, pressure valve33Engine control unit34Engine control unit, vacuum pump35Daytime running lights/radio for vehicles with START-STOP36Main beam37Rear fog light, DC/DC converter START-STOP38Fog lights39Air blower for heating40-41Not assigned42Rear window heater43Horn44Windscreen wipers45Central control unit for convenience system46Engine control unit, fuel pump47Cigarette lighter, power socket in the luggage compartment48ABS, START-STOP (DC/DC) converter ESP49Turn signal lights, brake lights50START-STOP (DC/DC) transformer, radio51Electrical power window (front and rear) - left side52Electrical power window (front and rear) - right side53Parking light = left side, electrical sliding/tilting roof54START-STOP (instrument cluster), alarm55Automatic gearbox control unit56Headlight cleaning system, parking light - right side57Left low beam, headlight range adjustment58Low beam on the right
Fuses in the engine compartmentFig. 155
Vehicle battery: Distribution board cover.
Fig. 156
Schematic representation of
fuse box in engine compartment
First read and observe the introductory information and safety warn-
ings on page 191.
› Press the securing clips on the fuse box cover together at the same time in the
direction of arrow
A
» Fig. 155 and remove the cover in the direction of arrow
B
.
› Release the fixtures in the openings
C
using a flat screwdriver and fold the
cover upwards in direction of arrow
D
.
Fuse assignment in engine compartment
No.Consumer1Alternator2Not assigned3Interior4Electrical auxiliary heating system 193Fuses and light bulbs
Page 197 of 219

No.Consumer5Interior6Glow plugs, radiator fan7Electrohydraulic power steering8ABS or TCS or ESC9Radiator fan10Automatic gearbox11ABS or TCS or ESC12Central control unit13Electrical auxiliary heating system
Note
Fuses 1-7 are replaced by a specialist garage.
Bulbs
Introduction
This chapter contains information on the following subjects:
Headlights
195
Changing the low beam and high beam bulb (halogen headlights)
195
Changing the high beam bulb (halogen projector headlights)
195
Changing the high beam bulb (halogen projector headlights)
196
Changing the front turn signal bulb
196
Changing the front parking light bulb
196
Fog lights and daytime running lights
196
Fog light, Roomster Scout
197
Replacing the bulb for the licence plate light
197
Tail light
198
Some manual skills are required to change a bulb. For this reason, we recommend
having bulbs replaced by a specialist garage or seeking other expert help in the
event of any uncertainties.
› Switch off the ignition and all of the lights before replacing a bulb.
› Faulty bulbs must only be replaced with the same type of bulbs. The designa-
tion is located on the light socket or the glass bulb.
› A stowage compartment for replacement bulbs is located in a plastic box in the
spare wheel or underneath the floor covering in the boot.WARNING■ Accidents can be caused if the road in front of the vehicle is not sufficiently
illuminated and the vehicle cannot or can only be seen with difficulty by other
road users.■
Always read and observe the warnings before completing any work in the
engine compartment » page 159, Engine compartment .
■
Bulbs H7 and H4 are pressurised and may burst when changed - there is a
risk of injury. We therefore recommended wearing gloves and safety glasses
when changing a bulb.
CAUTION
■ Do not take hold of the glass bulb with naked fingers (even the smallest
amount of dirt reduces the working life of the light bulb). Use a clean cloth, nap-
kin, or similar.■
When removing and installing the number plate light and tail light make sure
that the paintwork of the vehicle and the tail light are not damaged.
Note
■ This Owner's Manual only describes the replacement of bulbs where it is possi-
ble to replace the bulbs on your own without any complications arising. Other bulbs must be replaced by a specialist garage.■
We recommend that a box of replacement bulbs always be carried in the vehi-
cle. Replacement bulbs can be purchased from ŠKODAOriginal Accessories.
■
We recommend having the headlight settings checked by a specialist garage af-
ter replacing a bulb in the main or low beam.
■
Visit a specialist garage if an LED is faulty.
194Do-it-yourself
Page 209 of 219

Index
A
Abroad Driving abroad
109
Unleaded petrol109
ABS111
Warning light24
Accessories146
Adjusting Exterior mirrors
51
Seat53
Steering wheel95
Adjusting the seats124
Aerial150
See windows152
Airbag132
Deactivating137
Deactivating the front passenger airbag137
Deployment132
Front airbag134
Head airbag136
Modifications and damage to the airbag system 148
Side airbag
135
Airbag system132
Air conditioning Operation
81
Air conditioning system Air outlets
77
Climatronic83
Manual air conditioning system80
Air outlets77
Alarm35
Anti-theft alarm system35
Operation36
Trailer122
Antilock Braking System111
Armrest71
Ashtray66
ASR111
warning light23
Assist systems ABS
24, 111
ASR23, 111
Cruise Control System113
EDS and XDL111
ESC23, 110
Parking aid112
START-STOP115
Auto Check Control19
Automatic gearbox Selector lever-emergency unlocking
103
Starting-off and driving102
Tiptronic102
Automatic load deactivation171
Automatic transmission100
Kickdown102
Malfunction103
Selector lever lock101
Using the selector lever101
AUX94
Avoiding damage to the vehicle Driving through water
108
Avoiding damage to your vehicle108
B
Ball head Check fitting
119
Fitting118
Ready position118
Removing119
Belts127
Belt tensioners131
Bicycle carrier63
Bonnet Closing
161
Opening161
Boot Cover60
Emergency unlocking38
Fastening elements58
Fixing nets59
Folding hooks59
see Boot lid37
Unlocking the boot lid38
Boot lid37
Automatic locking37
Brake assist110
Brake booster99
Brake fluid167
Changing168
Checking167
Display messages20
Brakes Brake booster
99
Brake fluid167
Handbrake99
Indicator light20
Running in104
Braking Information on braking
98
Breakdown kit185
Bulbs In the tail light
198
Replacing194
Button in the driver's door Electrical power windows
38
C
Car care
144
Car computer see Multifunction display
13
Car park ticket holder68
Carrier65
Cavity protection153
Central locking button33
206Index