Page 105 of 176

We recommend that you ask a ŠKODA service partner to deactivate any other air-bags.
Monitoring the airbag system
The operational capability of the airbag system is monitored electronically, includ-
ing when one of the airbags is switched off.
Airbag deactivated using diagnostic equipment
› The warning light
lights up for approx. 3 seconds after switching on the igni-
tion and then flashes again for approx. 12 seconds.
Front passenger airbag deactivated using the key switch in the storage com- partment
› The warning light
lights up for approx. 3 seconds after switching on the igni-
tion.
› The warning light
3
» Fig. 93 on page 102 lights up after
the ignition has been turned on.
Note
■ The national regulations for switching off airbags must be observed.■A ŠKODA service partner will be able to inform you which, if any, of your vehi-
cle's airbags can or must be deactivated.
Deactivating the front passenger airbag
Fig. 93
Key switch for front passenger airbag/warning light for front pas-
senger airbag activation/deactivation
First read and observe the introductory information given on page 101.
Only the front passenger airbag is deactivated with the key switch.
Switching off›Switch off the ignition.›
Use the key to turn the slot of the key switch into position
2
» Fig. 93 OFF .
›
Check that warning light
3
in the middle of the dash panel
lights up after the ignition is switched on.
Switching on
›
Switch off the ignition.
›
Use the key to turn the slot of the key switch into position
1
» Fig. 93 ON .
›
Check that warning light
3
in the middle of the dash panel
does not light up after the ignition is switched on.
WARNING■ The driver is responsible for whether the airbag is switched on or switched
off.■
Only switch off the airbag when the ignition is switched off! Otherwise a
fault can occur in the system for deactivating the airbag.
■
If the warning light flashes, the front passenger airbag
will not be deployed in the event of an accident! Have the airbag system checked by a specialist garage immediately.
102Safety
Page 106 of 176

Transporting children safely
Child seat
Introduction
This chapter contains information on the following subjects:
Use of a child seat on the front passenger seat
104
Child safety and side airbag
104
Classification of child seats
105
Use of child seats fastened with a seat belt
105
Children are generally safer on the rear seats than on the front passenger seat.
In contrast to adults, the muscles and bone structure of children are not yet fully developed. Thus children are exposed to increased risk of injury.
Children should be transported in accordance with the relevant statutory provi-sions.
Child seats that comply with the ECE-R 44 standard must be used. The ECE-R
standard stands for: Economic Commission for Europe – Regulation.
Child seats that comply with the ECE-R 44 standard are identified with a test
mark that cannot be removed: a large E within a circle with the test number be-
low.
WARNING■ The national legal requirements must be observed when using child seats.■One should never carry children, and also not babies! - on one's lap.■
Never leave children unattended in the vehicle. Certain outside climatic con-
ditions can cause life-threatening temperatures in the vehicle.
■
The child must be secured in the vehicle during the entire journey! Other-
wise, the child would be thrown through the vehicle in the event of an acci-
dent, causing fatal injuries to both the child and other occupants.
WARNING (Continued)■ Children are exposed to an increased risk of injury in the event of an acci-
dent if they lean forward or adopt an incorrect seated position when the vehi-
cle is moving. This particularly applies to children who are transported on the
front passenger seat as they can suffer severe, or even fatal injuries if the air-
bag system is deployed!■
Pay particular attention to the information provided by the manufacturer of
the child safety seat regarding the correct routing of the belt. Seat belts which are not correctly adjusted can themselves cause injuries even in minor
accidents.
■
Safety belts must be checked to ensure that they are running properly. One
should also ensure that the belt is not damaged by sharp-edged fittings.
■
The front passenger airbag must be deactivated if using a rear-facing child
seat on the front passenger seat. Further information » page 104, Use of a
child seat on the front passenger seat .
Note
We recommend that you use child seats from ŠKODA Original Accessories. These
child seats were developed and also tested for use in ŠKODA vehicles. They meet
the ECE-R 44 standard.
103Transporting children safely
Page 107 of 176

Use of a child seat on the front passenger seat
Never use a backwards-facing child restraint system on a seat that is protected by an active airbag installed in front of it. This could cause the child severe injury
or even death.Fig. 94
Sticker on the B column on the
front passenger side.
First read and observe the introductory information and safety warn- ings on page 103.
For safety reasons, we recommend that you install child seats on the rear seats
whenever possible.
The following instructions must be followed when using a child seat on the front passenger seat.
› The front passenger airbag must be deactivated if using a rear-facing child
seat »
.
› If possible, adjust the front passenger seat backrest so that it is as vertical, so
as to ensure secure contact between the passenger seat backrest and the back
of the child seat.
› If possible, move the front passenger seat backwards so that there is no con-
tact between the front passenger seat and the child seat behind it.
› With child safety seats in groups 2 or 3, make sure that the loop-around fittings
attached to the child seat headrest is positioned in front of or at the same
height as the loop-around fittings on the B pillar on the passenger side.
› Set the height-adjustable front passenger seat as high up as possible.
› Place and fasten the child seat on the seat and the child in the child seat ac-
cording to the specifications in the manufacturer's user manual of the child
seat .
WARNING■ The front passenger airbag must be deactivated if using a rear-facing child
seat on the front passenger seat » page 101, Deactivating airbags .■
Never use a rear-facing child seat on the front passenger seat if the passen-
ger airbag is activated. This child safety seat is positioned in the deployment
area of the front passenger airbag. The airbag may cause the child severe, or
even fatal injuries, in the event of it being deployed.
■
This is also clearly stated on the sticker which is located on the B column on
the front passenger side » Fig. 94. The sticker is visible upon opening the
front passenger door. In some countries, the sticker is affixed to the front pas-
senger sun visor.
■
With child safety seats in groups 2 or 3, make sure that the loop-around fit-
tings attached to the child seat headrest is positioned in front of or at the
same height as the loop-around fittings on the B pillar on the passenger side.
■
As soon as the rear-facing child seat is no longer being used on the passen-
ger seat, the front passenger airbag should be re-activated again.
Child safety and side airbag
Fig. 95
Incorrect seated position of a child who is not properly secured – risk
from the side airbag/child properly protected by child seat
First read and observe the introductory information and safety warn-
ings
on page 103.
The child must not be positioned in the deployment area of the side air-
bag » Fig. 95 –
.
104Safety
Page 108 of 176

There must be sufficient room between the child and the deployment area of the
side airbag that the airbag can provide as much protection as possible » Fig. 95 –
.WARNING■
Children must never be seated with their head in the deployment area of
the side airbag – risk of injury!■
Do not place any objects within the deployment area of the side airbags –
risk of injury!
Classification of child seats
First read and observe the introductory information and safety warn-
ings
on page 103.
Classification of child seats according to the ECE-R 44 standard.
GroupWeight of the childApproximate age0up to 10 kgup to 9 months0+up to 13 kgup to 18 months19-18 kgup to 4 years215-25 kgup to 7 years322-36 kgover 7 years
Use of child seats fastened with a seat belt
First read and observe the introductory information and safety warn-ings
on page 103.
Overview of the usability of child seats fastened with a seat belt on each of the
seats in accordance with the ECE-R 16 standard.
GroupFront passenger seatRear seats0
up to 10 kgUU0+
up to 13 kgUUGroupFront passenger seatRear seats1
9-18 kgUU2
15-25 kgUU3
22-36 kgUU
Child seat category “Universal” - a child seat designed to be attached to the seat using the seat belt.
Fastening systems
Introduction
This chapter contains information on the following subjects:
Anchor eyelets for the ISOFIX system
106
Use of child seats with the ISOFIX system
106
Anchor eyelets for the TOP TETHER system
107U105Transporting children safely
Page 109 of 176

Anchor eyelets for the ISOFIX systemFig. 96
Identification versions of anchor eyelets for child safety seats
First read and observe the introductory information given on page 105.
There are two lashing eyes between the rear exterior seat backrest and the sur-
face of the seat itself on both sides for fixing the ISOFIXsystem » Fig. 96child seat
in place.
WARNING■ Always refer to the instructions from the manufacturer of the child seat
when installing and removing a child seat with the ISOFIX system.■
Never attach other child seats, belts or objects to the anchor eyelets inten-
ded for the installation of a child seat with the ISOFIX system – risk to life!
Note
■ A child seat fitted with the ISOFIX system can only be mounted in a vehicle fit-
ted with an ISOFIX system if the child seat has been approved for this type of ve-
hicle. Further information is available from a ŠKODA Partner.■
Child seats with the ISOFIX system can be purchased from ŠKODA Original Ac-
cessories.
Use of child seats with the ISOFIX system
First read and observe the introductory information given on page 105.
Overview of the usability of child seats with the ISOFIX system on each of the
seats in accordance with the ECE-R 16 standard.
GroupSize class of
the child seat a)Front passenger seatRear seats0
up to 10 kgEXIL-SU0+
up to 13 kgE
XIL-SU
DC 106Safety
Page 110 of 176
Front passenger seatRear seats
1
9-18 kg
D
XIL-SU IUF
CBB1Aa)
The size category is shown on the label attached to the child seat.
The seat is suited for installatio")
GroupSize class of
the child seat a)Front passenger seatRear seats
1
9-18 kg
D
XIL-SU IUF
CBB1Aa)
The size category is shown on the label attached to the child seat.
The seat is suited for installation of an ISOFIX child seat with “Semi-
Universal” approval. The category “Semi-Universal” means that the child seat with the ISOFIX system is approved for your vehicle. Observe the list
of vehicles that comes with the child seat.
The seat is suitable for the installation of an ISOFIX child seat with
“Universal” approval and attachment with the TOP TETHER belt.
The seat is not fitted with fixing eyes for the ISOFIX system.
Anchor eyelets for the TOP TETHER system
Fig. 97
Rear seat: TOP TETHER
First read and observe the introductory information given on page 105.
The anchor eyelets for attaching the belt of a child seat with the TOP TETHER
system are located on the back of the rear seat backrests » Fig. 97.
IL-SU
IUFXWARNING■
Always refer to the instructions from the manufacturer of the child seat
when installing and removing a child seat with the TOP TETHER system.■
Only use child seats with the TOP TETHER system on the seats with the
locking eyes.
■
Only ever attach one belt from the child seat to a locking eye.
■
On no account should you equip your vehicle, e.g. mount screws or other an-
chorage points.
107Transporting children safely
Page 111 of 176

General Maintenance
Vehicle care
Service intervals
Introduction
This chapter contains information on the following subjects:
Overview of service intervals
108
Fixed service intervals QI1 - QI4
109
Variable service interval QI6
109
Information about the ŠKODA service
109
The Service Interval Display in the instrument cluster will remind you to carry out
every service stipulated by the manufacturer at the right time, in order to avoid
forgetting any.
A timely and adequate performance of servicing works is one of the requirements
for the settlement of possible warranty claims.
The completion of services can be verified through the service schedule and the
respective receipts.
The service intervals are matched to normal operating conditions. In case of difficult operating conditions, it is necessary to have some servicingwork performed before the date of the next service or between the service inter-
vals stated. This applies mainly to the cleaning or the replacement of the air filter
insert in regions with heavy dust pollution as well as checking and replacing the
toothed belt, but also vehicles with diesel particle filter which can use the engine
oil more intensely.
These severe conditions are:
› Fuel containing sulphur
› Frequent short trips
› Longer idling mode of the engine (e.g. taxi vehicles)
› Operation in areas with heavy dust pollution
› Frequent trailer operation
›
Predominantly stop-and-go traffic as tends to occur in city driving, for example
› Operation predominantly during winter.
A service consultant at the specialist garage will tell you whether the operating conditions of your vehicle make it necessary for such work to be carried out be-
tween the normal service intervals.
Different service charges may apply, depending on the scope of necessary works
as well as the model, features and condition of your vehicle.
Note
■ The customer is responsible for covering the cost of all services including
changing or replenishing the operating fluid, even during the warranty period, un-
less the ŠKODA AUTO a.s. warranty terms or other agreements state otherwise.■
You will be informed about the scope of the service with regard to a particular
service event by the specialist garage.
Overview of service intervals
Fig. 98
Vehicle data sticker: Service in-
terval
First read and observe the introductory information given on page 108.
The service interval specified by the manufacturer is indicated on the vehicle data sticker » Fig. 98 under the floor covering in the boot.
One of the following service intervals applies for your vehicle: › Fixed service interval QI1;
› Fixed service interval QI2;
› Fixed service interval QI3;
› Fixed service interval QI4;
› Variable service interval QI6.
108General Maintenance
Page 112 of 176

In order to be able to operate a vehicle with a variable service interval, it must
only be filled and topped up with the specified engine oil.
If this engine oil is not available, the oil change is subject to a fixed service inter-val. In this case, the vehicle must be changed to the fixed service interval.
Note
■
The corresponding motor oil specifications » page 130.■A changeover from the variable service interval to the fixed service interval, or
from the fixed service interval to the variable service interval, can be carried out
by a specialist garage.
Fixed service intervals QI1 - QI4
First read and observe the introductory information given on page 108.
InspectionQI1 - QI4First inspection after 2 years or 30,000 km a)
, fol-
lowed by one every year or 30,000 km a)
.After 1 year or 15,000 km a)b)
Oil change service
QI1After 5,000 km or 1 yeara)
.QI2After 7,500 km or 1 year a)
.QI3After 10,000 km or 1 year a)
.QI4After 15,000 km or 1 year a)
.Brake fluid
changeQI1 - QI4First change after 3 years, then every 2 years.a)
(Whichever comes first).
b)
Applies to Russia
WARNINGThe brake fluid must always be changed after the first 3 years and then every
2 years. When the brake fluid becomes too old, vapour bubbles may form in
the brake system when the brakes are used hard. The efficiency of the brakes is then seriously affected – risk of accident!NoteFor diesel operation with a high sulphur content, the interval of engine oil change
will be every 7,500 km. Please ask your specialist garage for information on the
countries where diesel fuel has a high sulphur content.
Variable service interval QI6
First read and observe the introductory information given on page 108.
The service intervals depend on how the vehicle is driven and the local conditions
in which the vehicle is used. For example, your vehicle is subjected to different
loads when driven over short distances than long distances. The service intervals
are also variable.
InspectionFirst inspection after 2 years or 30,000 km a)
, followed by
one every year or 30,000 km a)
.Oil change serviceAccording to the service interval display (at the latest after 2
years or 30,000 km a)
).Brake fluid
changeFirst change after 3 years, then every 2 years.a)
(Whichever comes first).
WARNINGThe brake fluid must always be changed after the first 3 years and then every
2 years. When the brake fluid becomes too old, vapour bubbles may form in
the brake system when the brakes are used hard. The efficiency of the brakes is then seriously affected – risk of accident!
Information about the ŠKODA service
First read and observe the introductory information given on page 108.
There is an extensive servicing network made up of ŠKODA service partners at
your disposal, for the maintenance of your vehicle.
109Vehicle care
 1
1 2
2 3
3 4
4 5
5 6
6 7
7 8
8 9
9 10
10 11
11 12
12 13
13 14
14 15
15 16
16 17
17 18
18 19
19 20
20 21
21 22
22 23
23 24
24 25
25 26
26 27
27 28
28 29
29 30
30 31
31 32
32 33
33 34
34 35
35 36
36 37
37 38
38 39
39 40
40 41
41 42
42 43
43 44
44 45
45 46
46 47
47 48
48 49
49 50
50 51
51 52
52 53
53 54
54 55
55 56
56 57
57 58
58 59
59 60
60 61
61 62
62 63
63 64
64 65
65 66
66 67
67 68
68 69
69 70
70 71
71 72
72 73
73 74
74 75
75 76
76 77
77 78
78 79
79 80
80 81
81 82
82 83
83 84
84 85
85 86
86 87
87 88
88 89
89 90
90 91
91 92
92 93
93 94
94 95
95 96
96 97
97 98
98 99
99 100
100 101
101 102
102 103
103 104
104 105
105 106
106 107
107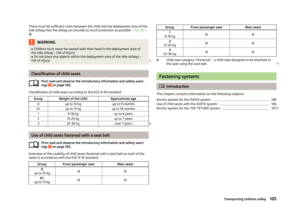 108
108 109
109 110
110 111
111 112
112 113
113 114
114 115
115 116
116 117
117 118
118 119
119 120
120 121
121 122
122 123
123 124
124 125
125 126
126 127
127 128
128 129
129 130
130 131
131 132
132 133
133 134
134 135
135 136
136 137
137 138
138 139
139 140
140 141
141 142
142 143
143 144
144 145
145 146
146 147
147 148
148 149
149 150
150 151
151 152
152 153
153 154
154 155
155 156
156 157
157 158
158 159
159 160
160 161
161 162
162 163
163 164
164 165
165 166
166 167
167 168
168 169
169 170
170 171
171 172
172 173
173 174
174 175
175