Page 169 of 258

167
Driving the vehicle with a trailer
Towing bracket device Introduction
If the vehicle is equipped with a towing bracket device from the factory or
consisting of genuine SEAT accessories, it meets all the national technical
and legal requirements for towing.
Your vehicle is fitted with a 13-pin power socket for the electrical connection
between the trailer and the vehicle. If the towing bracket is equipped with a
7-pin connector, the corresponding available adaptor may be used as a
genuine SEAT accessory.
The towing device has a maximum vertical load of 50 kg.
WARNING
● Before driving with the ball-headed bar fitted, verify its correct as-
sembly and placement in the clamping bush.
● Do not use the ball-headed bar if it is not correctly placed and fixed in
the clamping bush.
● Do not use the towing device for towing if it is damaged or missing
parts.
● Do not modify or adapt the towing device for towing.
● Never disengage the ball-headed bar with the trailer still hitched.
CAUTION
Be careful not to damage the paint on the bumper when handling the ball-
headed bar. Description
Fig. 114 Towing bracket device support for hitching/ball-headed bar
The ball-headed bar is detachable. It is located in the spare wheel space or
in the spare wheel compartment in the luggage compartment ⇒ page 207,
Vehicle tool kit*.
Key to ⇒ Fig. 114
13-pin socket
Safety flange
Clamping bush
Clamping bush cap
Ball head cover
Ball-headed bar
Locking balls
Centred
Red marking on the manual regulator
Manual regulator
Key
Key slot cover
1
23456789101112
Safety FirstOperating instructionsPractical TipsTechnical specifications
Page 170 of 258

168Driving the vehicle with a trailer
Red marking on the manual regulator
White marking on the ball-headed bar
Note
Contact an Authorised Service Partner if you lose your key.
Placing in service position
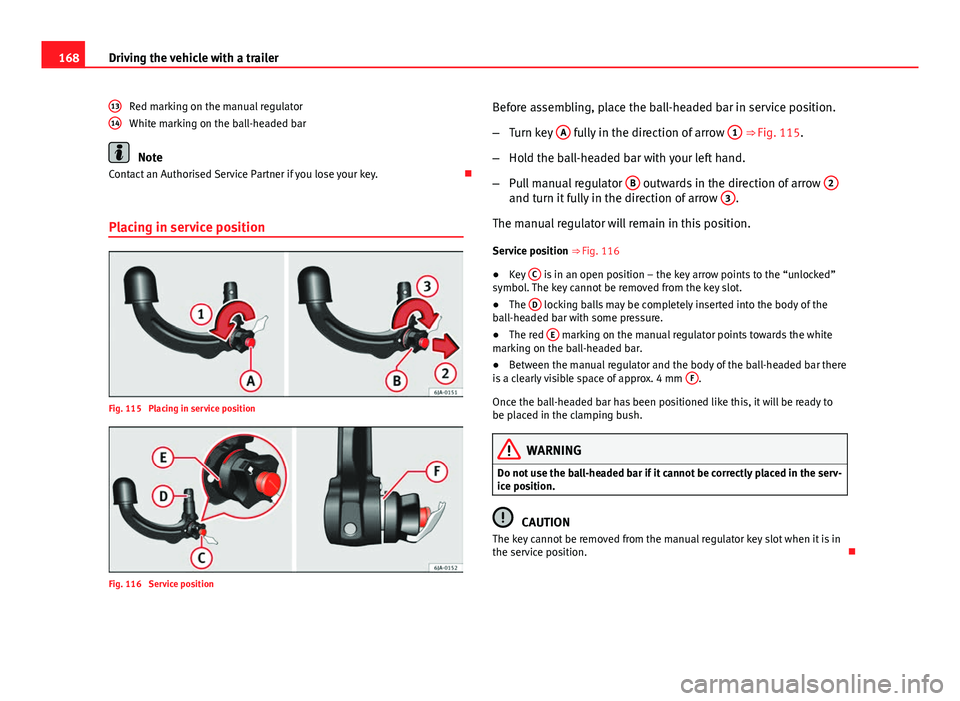
Fig. 115 Placing in service position
Fig. 116 Service position 13
14Before assembling, place the ball-headed bar in service position.
–
Turn key A
fully in the direction of arrow 1 ⇒ Fig. 115.
– Hold the ball-headed bar with your left hand.
– Pull manual regulator B
outwards in the direction of arrow 2and turn it fully in the direction of arrow 3.
The manual regulator will remain in this position.
Service position ⇒ Fig. 116
● Key C
is in an open position – the key arrow points to the “unlocked”
symbol. The key cannot be removed from the key slot.
● The D
locking balls may be completely inserted into the body of the
ball-headed bar with some pressure.
● The red E
marking on the manual regulator points towards the white
marking on the ball-headed bar.
● Between the manual regulator and the body of the ball-headed bar there
is a clearly visible space of approx. 4 mm F
.
Once the ball-headed bar has been positioned like this, it will be ready to
be placed in the clamping bush.
WARNING
Do not use the ball-headed bar if it cannot be correctly placed in the serv-
ice position.
CAUTION
The key cannot be removed from the manual regulator key slot when it is in
the service position.
Page 171 of 258

169
Driving the vehicle with a trailer
Assembling the ball-headed bar
Fig. 117 Placing the ball-headed bar/locking and removing the key
Fig. 118 Placing the key
slot cover
– Remove the cap from the clamp-type bulb holder 4
⇒ Fig. 114
by pulling downwards.
– Place the ball-headed bar in service position ⇒ page 168.
– Hold the ball-headed bar from underneath ⇒ Fig. 117 and place
it in the clamping bush as far as possible until you hear it click
into place ⇒
. The manual regulator
A
automatically turns in the opposite direc-
tion, adjusting to the ball-headed bar ⇒ .
– Switch off the manual regulator lock with key B
by turning the
key fully to the right in the direction of arrow 1 – the arrow in
the key represents the “locked” symbol.
– Remove the key in the direction of arrow 2
.
– Place cover C
over the manual regulator lock in the direction of
arrow 3 ⇒ Fig. 118.
– Verify the correct placement of the ball-headed bar
⇒ page 170.
WARNING
● Do not hold the manual regulator with your hand when fitting the
ball-headed bar since you could sustain injuries to your fingers.
● When mounting the ball-headed bar, always lock it with a key and re-
move the key from the slot.
● The ball-headed bar must not be in service position with the key in
the key slot.
● If the ball-headed bar is not placed in service position you will not be
able to place it in the clamping bush.
CAUTION
When removing the key, always place the cover over the key slot of the man-
ual regulator to prevent dirt from entering.
Note
Once removed, place the clamping bush cap in an appropriate location in
the luggage compartment.
Safety FirstOperating instructionsPractical TipsTechnical specifications
Page 172 of 258

170Driving the vehicle with a trailer
Verification of correct placement
Fig. 119 Correct place-
ment of the ball-headed
bar
Before using the ball-headed bar, ensure it is correctly fitted.
Ensure that:
● The ball-headed bar does not come out of the clamping bush with a
strong “shake”.
● The red mark A
⇒ Fig. 119 on the manual regulator signals towards the
white mark on the ball-headed bar.
● The manual regulator is adjusted to the ball-headed bar, with no space
between them.
● The regulator is locked and the key has been removed.
● Cover B
has been placed over the manual regulator lock.
WARNING
Only use the towing bracket device when the ball-headed bar is properly
fitted!
Disassembly of the ball-headed bar
Fig. 120 Remove the key slot cover/unlock
Fig. 121 Unblock the
ball-headed bar
– Remove cover A
from over the regulator key slot in the direc-
tion of arrow 1 ⇒ Fig. 120.
– Insert key B
in the key slot.
– Open the manual regulator lock by turning key B
fully to the
left in the direction of arrow 2. The arrow on the key points to
the “unlocked” symbol.
Page 173 of 258

171
Driving the vehicle with a trailer
– Hold the ball-headed bar from underneath ⇒ Fig. 121 and re-
move manual regulator C
with your other hand in the direction
of arrow 3.
– Turn the removed regulator fully in the direction of arrow 4
and
firmly hold it in this position.
– Remove the ball-headed bar from the clamping bush, pulling
downwards in the direction of arrow 5
.
The ball-headed bar should be placed in service position so that it
is ready to be inserted in the clamping bush ⇒
.
– Place the cover over the clamping bush 4
⇒ Fig. 114.
WARNING
● Never leave the ball-headed bar unsecured in the luggage compart-
ment. It could be damaged in the event of sudden braking, putting the
safety of passengers at risk!
● Never disassemble the ball-headed bar with the trailer still hitched.
CAUTION
● If you do not turn the manual regulator fully, it will return to its original
position when the ball-headed bar is removed. The manual regulator will be
stuck to the ball-headed bar and you will not be able to put it in the service
position. Therefore, before you assemble it again, you must place the ball-
headed bar in this position.
● When disassembling, place the cap on the clamp-type bulb holder’s key
slot. You will thus prevent dirt from entering the key slot.
Note
● Before disassembling the ball-headed bar, we recommend placing the
cover on the ball head.
● Clean the ball-headed bar thoroughly before returning it to the on-board
toolbox.
Use and maintenance
Cover the clamping bush with the cap to prevent dirt from entering.
Before hooking on the trailer, check the ball head and, if necessary, lubri-
cate it with adequate lubricant.
Place the protective cover over the ball head when storing the bar. This way,
you will avoid getting the luggage compartment dirty.
If it gets dirty, clean and dry the clamping bush thoroughly with an appro-
priate product.
CAUTION
The top part of the clamping bush opening is lubricated. Be careful not to
remove this lubrication.
Safety FirstOperating instructionsPractical TipsTechnical specifications
Page 174 of 258

172Care of the vehicle and cleaning
Care of the vehicle and cleaning
Care of the vehicle
Introduction
Regular and suitable care helps to maintain the useful life of your vehicle.
This may also be one of the requirements for upholding any warranty claims
in the event of corrosion or paint defects.
We recommend you use cleaning products from the SEAT Original Accesso-
ries programme available in SEAT dealers. Please follow the instructions for
use on the packaging.
WARNING
● Cleaning products and other materials used for car care can damage
the health if misused.
● Always keep car care materials in a safe place out of the reach of chil-
dren. Risk of poisoning!
● When washing the car during the winter season: Moisture and ice on
the brakes may affect braking efficiency. Risk of accident!
● The ignition must always be switched off when the car is washed.
Risk of accident!
● Do not clean the underside of the car or inside the wheel arches with-
out protecting your hands and arms. You may cut yourself on sharp metal
parts!
● Perfumes and air fresheners inside the vehicle may be harmful to
health at high temperatures in the interior.
CAUTION
● Check the colour stability of your clothing to avoid damaging or visibly
staining the fabric (leather), upholstery and fabric trim.
● Cleaning products containing solvents may damage the material being
cleaned.
● Do not wash the vehicle in direct sunlight. Risk of damage to paintwork.
● If washing the vehicle with a hose in winter, do not direct the jet of water
directly at the locks or at the door seals or bonnet. Risk of freezing.
● Do not use insect sponges or abrasive household sponges, etc. on pain-
ted surfaces. Risk of damage to the painted surface.
● Do not put stickers on the inner side of the window in areas where heat-
ing elements or the aerial is located. This could cause damage and, in the
case of the aerial, radio and navigation system reception faults.
● Do not clean the inner side of the window with sharp objects or corro-
sive or acidic cleaning products. Risk of damaging the heating elements or
the aerial.
● Do not attach any fragrance or air freshener to the dash panel. Risk of
damage to the dash panel.
● To avoid damaging the parking aid system sensors, spray them only
briefly at a minimum distance of 10 cm when cleaning the vehicle with a
high-pressure or steam cleaner.
● Do not clean the roof panel with a brush. Risk of damage to the panel
surface!
For the sake of the environment
● The packaging of the product used to care for your vehicle is hazardous
waste. It must be disposed of according to current local law.
● Only wash the car in special wash bays.
Page 175 of 258

173
Care of the vehicle and cleaning
Note
● Remove stains from fresh ball-pen and other inks, lipstick, shoe cream
and similar stains on the fabric (leather), upholstery and fabric trim as soon
as possible.
● We recommend that you visit an authorised SEAT dealer to clean and
care for the interior of your vehicle, due to the problems that may arise
when cleaning and caring for the interior of your vehicle and to the utensils
and knowledge required.
Washing the vehicle
The best protection of the vehicle from the harmful influences of the envi-
ronment involves frequent washing and waxing. The frequency with which
the vehicle is washed depends on many different factors, such as:
● Frequency of use
● Type of parking (garage, underneath trees, etc.)
● Time of year
● Weather conditions
● Environmental conditions
The longer substances such as insects, bird droppings, resinous tree sap,
road dirt, industrial deposits, tar, soot or road salt and other aggressive ma-
terials remain on the paintwork, the more damage they do. High tempera-
tures (for instance in strong sunlight) further intensify the corrosive effect.
After the winter season, it is important to have the underside of the vehicle
washed thoroughly. Automatic car washes
Your vehicle can be washed in an automatic car wash.
Before going through a car wash, be sure to take the usual precautions such
as closing the windows, etc.
If the vehicle has special accessories such as spoilers or a roof carrier or
two-way radio aerial, etc., it is advisable to consult the car wash operator
beforehand.
The windscreen wiper rubbers must be degreased after going after the car
wash and waxing.
Washing by hand
When washing the car by hand, use plenty of water to soften the dirt first
and rinse off as well as possible.
Then clean the vehicle with a sponge, glove or brush. Start on the roof and
work down. Use only slight pressure when cleaning the painted surfaces of
the vehicle. A car shampoo should only be used for very persistent dirt.
Rinse the sponge or glove thoroughly and often.
Wheels, sills and underside should be cleaned last. Use a second sponge
for this.
After washing, rinse the vehicle thoroughly and then dry with a chamois.
Safety FirstOperating instructionsPractical TipsTechnical specifications
Page 176 of 258

174Care of the vehicle and cleaning
Washing with high-pressure cleaners
When cleaning the vehicle with a high-pressure cleaner, always follow the
operating instructions for the equipment. This particularly applies to the op-
erating pressure and the distance of the spray from the surface of the vehi-
cle. Do not hold the spray nozzle too close to the parking aid system sen-
sors and soft materials, such as rubber hoses or insulating material.
WARNING
Do no use a nozzle that sprays the water out in a direct stream or one
that has a “rotating jet”!
CAUTION
Do not use water hotter than +60 °C (140 °F). Risk of damage to the vehicle.
Waxing and polishing of the vehicle paintwork
Care
To a great extent, good waxing protects the vehicle surface from the harmful
effects of the environment.
The vehicle must be treated with a high quality, hard wax when water no
longer forms droplets on clean paintwork.
The new coat of high quality, hard wax can be applied to the clean, painted
surface only when it has fully dried. Even if a wax solution is used regularly
in the car wash, it is advisable to protect the paint with a coat of wax at least
twice a year.
Polishing
Polishing is only necessary if the paint has lost its shine, and the gloss can-
not be brought back by applying wax. The vehicle must be waxed after polishing if the polish used does not con-
tain wax compounds to seal the paint.
CAUTION
● Never wax the windows.
● Do not use polishes and hard wax on painted parts with a matt finish or
on plastic parts.
● Do not polish your vehicle in a sandy or dusty environment.
Cleaning chrome
Clean the chrome first with a clean cloth and then buff up with a soft, dry
cloth. If this does not clean the chrome properly, use a special chrome
cleaner.
CAUTION
Do not polish the chrome in a dusty environment or it could be scratched.
Paint damage
Minor damage to the paint, such as scratches or stone chips, should be
touched up without delay using paint.
Suitable touch-up brushes or sprays for the colour of your vehicle can be
purchased from authorised SEAT dealers.
Note
We recommend you leave paint damage repairs to a SEAT Authorised Serv-
ice.