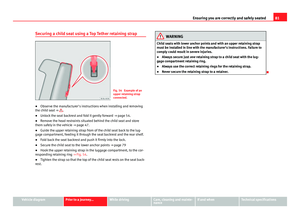
Page 17 of 306

15
Instrument panel
Instrument panel Control and warning lamps
The control and warning lamps are indicators of warnings, ⇒ , faults ⇒ or certain functions. Some control and warning lamps come on when the ig-
nition is switched on, and switch off when the engine starts running, or
while driving.
When certain control and warning lamps are lit, an audible warning is also
heard.
SymbolMeaning ⇒ See
Handbrake applied.
⇒ page 134
Do not continue driving!
The brake fluid level is too low or there is a
fault in the brake system.
lights: Do not continue driving!
The liquid coolant level is too low,
the engine liquid coolant temperature is too
high or
there is a fault in the liquid coolant system.
⇒ page 189
flashes: Engine coolant system faulty.⇒ page 189
Do not continue driving!
Engine oil pressure too low.⇒ page 185
lights up or flashes: Do not continue driv-
ing!
Fault in the steering.⇒ page 147
On the instrument panel: Driver or passen-
ger has not fastened seat belt.
⇒ page 56
Instrument panel display: A passenger in
the rear seats has fastened their seatbelt.
SymbolMeaning ⇒ See
A passenger in the rear seats has not fas-
tened their seat belt.⇒ page 56
Faulty generator.⇒ page 193Vehicles with the Start-Stop system: it is
necessary to start the engine manually.⇒ page 160
flashes in addition to the rest of the seg-
ments of the fuel gauge: Fuel tank almost
empty.⇒ page 171
flashes quickly: The City Safety Assist sys-
tem* function brakes automatically or has
braked automatically. Or:
flashes slowly: City Safety Assist function is
not currently available.
⇒ page 155
The City Safety Assist* function has been
connected manually. It switches off after 5
seconds.
flashes: The City Safety Assist* function has
been manually disconnected.
after the ignition is switched on: Indication
for the approach of the end of the period for
an inspection to be carried out.⇒ page 17
lights: ESC* faulty or disconnected by the
system. ALTERNATIVELY:
flashes: ESC* or ASR regulating.
⇒ page 134
lights: Traction Control faulty or switched off
by the system. ALTERNATIVELY:
flashes: Traction Control regulator operat-
ing.
ABS faulty or does not work.
Vehicle diagramPrior to a journey...While drivingCare, cleaning and mainte-
nanceIf and whenTechnical specifications
Page 18 of 306

16Instrument panel
SymbolMeaning ⇒ See
Rear fog light switched on.⇒ page 82
lights up or flashes: Fault in catalytic con-
verter.
⇒ page 237
Fault in engine management.
lights up or flashes: Fault in the steering
system.⇒ page 147
Fuel tank almost empty.⇒ page 171
Fault in airbag system and seat belt tension-
ers.⇒ page 65
lights: the Start-Stop system is enabled. AL-
TERNATIVELY:
flashes: the Start-Stop system is not availa-
ble.
⇒ page 160
The Start-Stop system is enabled but the en-
gine cannot be automatically stopped.
Left or right turn signal.⇒ page 82Hazard warning lights on.⇒ page 241
Cruise control operating.⇒ page 152
Main beam on or flasher on.⇒ page 82
The natural gas engine coolant temperature
is too low.
WARNING
If the warning lamps are ignored, the vehicle may stall in traffic, or may
cause accidents and severe injuries.
● Never ignore the warning lamps.
● Stop the vehicle safely as soon as possible.
● Park the vehicle away from the traffic, ensuring that there are no easi-
ly inflammable materials under the vehicle which could come into contact
with the exhaust system (e.g. dry grass, fuel).
● A faulty vehicle represents a risk of accident for the driver and for oth-
er road users. If necessary, switch on the hazard warning lamps and put
out the warning triangle to advise other drivers.
● Before opening the bonnet, switch off the engine and allow it to cool.
● In any vehicle, the engine compartment is a hazardous area and could
cause severe injuries ⇒ page 180.
CAUTION
Failure to heed the warning lamps when they appear may result in faults in
the vehicle.
Page 19 of 306
17
Instrument panel
Instruments Introduction
Additional information and warnings:
● Control and warning lamps ⇒ page 15
● Gear engaged display (automatic gearbox) ⇒ page 124.
● Instructions for inspection intervals ⇒ Booklet Maintenance Programme
WARNING
Any distraction may lead to an accident, with the risk of injury.
● Do not operate the instrument panel controls when driving.
Vehicle diagramPrior to a journey...While drivingCare, cleaning and mainte-
nanceIf and whenTechnical specifications
Page 20 of 306
18Instrument panel
Detail of instrument panel
Fig. 9 Instrument panel, on dash panel: variant 1
Fig. 10 Instrument panel, on dash panel: variant 2
Details of the instruments ⇒ Fig. 9 or ⇒ Fig. 10:
Speedometer. Depending on the vehicle in km/h or in mph.
Displays on the screen . . . . . . . . . . . . . . . . . . . . . . . . . . . . . . . . . . . . 19
1
2
Reset knob
for trip recorder (trip).
– Press the button 0.0/SET briefly to switch between trip re-
corder and odometer.
– Press the button 0.0/SET
for approximately. 5 seconds
to
reset the odometer to zero and, where necessary, other
signals of the multifunction display. . . . . . . . . . . . . . . . . . . . . .22
Fuel reserve display . . . . . . . . . . . . . . . . . . . . . . . . . . . . . . . . . . . . . . . 171
3
4
Page 21 of 306

19
Instrument panel
Rev counter (with the engine running, in thousands of revo-
lutions per minute).
The beginning of the red zone of the rev counter indicates
the maximum speed in any gear after running-in and with
the engine hot. However, it is advisable to change up a gear
or move the selector lever to D (or lift your foot off the accel-
erator) before the needle reaches the red zone ⇒
.
Clock set button .
– If necessary, change the time display by pressing the top
and bottom buttons of the rocker switch ⇒ Fig. 11 B
.
– Press the button to change the hour, so that it is flash-
ing.
– To continue setting the time, press button 0.0/SET
. Hold
button down to scroll through the numbers quickly.
– Press the button
again to change the minutes, so that
it is flashing.
– To continue setting the time, press button 0.0/SET
. Hold
button down to scroll through the numbers quickly.
– Press button
again to end the clock setting.
CAUTION
● When the engine is cold, avoid high revs and heavy acceleration and do
not make the engine work hard.
● To prevent damage to the engine, the rev counter needle should only re-
main in the red zone for a short period of time.
For the sake of the environment
Changing up a gear in time reduces fuel consumption and noise. 5
6
Note
On the screen of the SEAT Portable System (supplied by SEAT) ⇒ page 222
the other instruments can be seen, such as an outside temperature indica-
tor.
Display messages
A variety of information can be viewed on the instrument panel display
⇒ Fig. 9 and ⇒ Fig. 10 2, depending on the vehicle equipment:
● Warning and information messages
● Odometer
● Time
● Outside temperature
● Selector lever positions ⇒ page 124
● Recommended gear (manual gearbox) ⇒ page 124
● Multifunction display (MFI) ⇒ page 22
● Service interval display ⇒ page 21
● Start-Stop system status display ⇒ page 160
● Fuel gauge ⇒ page 171
● Seat belt status display for rear seats ⇒ page 56
Warning and information messages
The system runs a check on certain components and functions when the ig-
nition is switched on and while the vehicle is moving. Faults in the opera-
tion are displayed on the screen using red and yellow symbols on the in-
strument panel display ( ⇒ page 15) and, in some cases, with audible warn-
ings. The display may vary according to the type of instrument panel fitted.
Vehicle diagramPrior to a journey...While drivingCare, cleaning and mainte-
nanceIf and whenTechnical specifications
Page 22 of 306

20Instrument panel
Type of mes-
sageSymbol
colourDescription
Priority 1
warning.Red
Symbol flashing or lit; partly combined with
audible warnings.
Stop the vehicle! It is dangerous ⇒
!
Check the function that is faulty and repair it. If
necessary, request assistance from specialised
personnel.
Priority 2
warning.Yellow
Symbol flashing or lit; partly combined with
audible warnings.
A faulty function, or fluids which are below the
correct levels may cause damage to the vehi-
cle! ⇒
Check the faulty function as soon as possible.
If necessary, request assistance from special-
ised personnel.
Odometer
The odometer registers the total distance travelled by the car.
The odometer (trip) shows the distance travelled since the last odometer re- set. The last figure indicates 100 m.
Outside temperature indicator
When the outside temperature is below +4 °C (+39 °F), the symbol “ice crys-
tal” (warning of risk of freezing) is also displayed next to the temperature.
At first this symbol flashes and then it remains lit until the outside tempera-
ture rises above +6 °C (+43 °F) ⇒
.
When the vehicle is stationary or travelling at very low speeds, the tempera-
ture displayed may be slightly higher than the actual outside temperature
as a result of heat coming from the engine.
The temperatures measured range from -40 °C to +50 °C (-40 °F to +122 °F). Selector lever positions
The range of engaged gears of the selector lever is shown on the side of the
lever, and on the instrument panel display. In positions
D and M, and with
the Tiptronic, the corresponding gear is also indicated on the display.
Recommended gear* (manual gearbox)
The recommended gear to save fuel can be displayed on the instrument
panel display while you are driving ⇒ page 124.
Seat belt status display for rear seats *
The seat belt status display on the instrument panel display informs the
driver, when the ignition is switched on, whether any passengers in the rear
seats have fastened their seat belts ⇒ page 56.
Start-Stop system status display
The instrument panel display shows information on the current status
⇒ page 160.
WARNING
If the warning lamps are ignored, the vehicle may stall in traffic, or may
cause accidents and severe injuries.
● Never ignore the warning lamps.
● Stop the vehicle safely as soon as possible.
● A faulty vehicle represents a risk of accident for the driver and for oth-
er road users. If necessary, switch on the hazard warning lamps and put
out the warning triangle to advise other drivers.
● Park the vehicle away from the traffic, ensuring that there are no easi-
ly inflammable materials under the vehicle which could come into contact
with the exhaust system (e.g. dry grass, fuel).
Page 23 of 306

21
Instrument panel
WARNING
Although the outside temperature is above freezing, some roads and
bridges may be frozen.
● At an outside temperature of above +4 °C (+39 °F), even when the
“ice crystal” is not visible, there may still be ice on the road.
● Never rely on the outside temperature indicator!
CAUTION
Failure to heed the warning lamps when they appear may result in faults in
the vehicle.
Note
Different versions of the instrument panel are available and therefore the
versions and instructions on the display may vary.
Note
When several warnings are active at the same time, the symbols are shown
successively for a few seconds. The symbols will stay on until the fault is
rectified.
Service interval display
The inspection display appears on the instrument panel display ⇒ Fig. 9
or ⇒ Fig. 10 2.
SEAT makes a difference between services with engine oil change (Interval
Service) and services without engine oil change (Inspection Service). The
service interval display only gives information for service dates which in-
volve an engine oil change. The dates of the remaining services (for exam-
ple, the next Inspection Service or change of brake fluid) are listed on the
label attached to the door strut, or even in the Maintenance Programme. The set service intervals have been specified with
the service dependent on
time/distance travelled.
Inspection reminder
If the inspection period is due to expire shortly, Inspection reminder ap-
pears when starting the ignition abbreviated to and a warning in km. The
number of kilometres shown is the maximum number that may be driven
until the next service.
Service due
After the service date, an audible warning is given when the ignition is
switched on and the abbreviation displayed on the screen flashes for a
few seconds.
Note
The service message disappears after a few seconds, when the engine is
started or when OK
is pressed on the windscreen wiper lever.
Note
In vehicles in which the battery has been disconnected for a long period of
time, it is not possible to calculate the date of the next service. Therefore
the service interval display may not be correct. In this case, please check
the maximum permitted service intervals ⇒ Booklet Maintenance Pro-
gramme.
Vehicle diagramPrior to a journey...While drivingCare, cleaning and mainte-
nanceIf and whenTechnical specifications
Page 24 of 306

22Instrument panel
SEAT information system
Introduction
With the ignition switched on it is possible to access different messages via
the display on the instrument panel display.
The number of messages displayed on the instrument panel display will
vary according to the vehicle electronics and equipment.
A specialised dealer will be able to programme or modify additional func-
tions, according to the vehicle equipment. SEAT recommends visiting a
Technical Service.
Additional information and warnings:
● Instrument panel ⇒ page 18
● Exterior mirrors ⇒ page 93
● Driver assistance systems ⇒ page 149
● Radio ⇒ Booklet Radio
WARNING
Any distraction may lead to an accident, with the risk of injury.
● Do not consult the messages on the instrument panel screen when
driving.
Note
On the screen of the SEAT Portable System (supplied by SEAT) ⇒ page 222
other functions of the vehicle can be seen. Control functions of the instrument panel display
Fig. 11 Windscreen wip-
er lever: button
A to
confirm the options and
rocker switch B
to
change the options
Calling up options
● Switch the ignition on.
● If a message or vehicle symbol is displayed, press OK/RESET
(⇒ Fig. 11
A).
● Press the top or bottom part of the rocker switch B until the desired op-
tion appears.
Multifunction display (MFI)
The multifunction display (MFI) has two automatic memories: 1 - Partial
memory and 2 - Total memory . The selected memory will be shown in the
lower right-hand corner of the display.