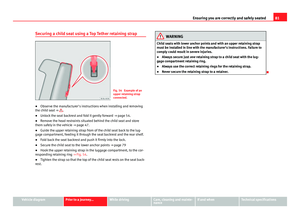
Page 217 of 306

215
Vehicle care and maintenance
Checking tyre pressures
Check tyre pressures only when the vehicle has not been driven for more
than a few kilometres at low speeds in the past three hours.
● The tyre pressures should be checked regularly, and only when the tyres
are cold. Always check all tyres, including the spare wheel. Tyre pressures
should be checked more often in colder regions, and only when the vehicle
has not been driven recently. Always use a correctly-operating tyre gauge.
● Adjust tyre pressures to the loads carried in the vehicle.
● After adjusting the tyre pressure, check that the caps are properly
screwed.
The spare wheel or temporary spare wheel must be at the maximum pres-
sure specified.
WARNING
If tyre pressures are too high or too low, the tyre may deflate or burst
suddenly while driving. This could result in a serious accident.
● If the tyre pressure is too low, the tyres could overheat, resulting in
tread detachment or even burst tyres.
● When driving at high speeds and/or fully loaded, the tyre could sud-
denly overheat, burst or be subject to tread detachment, with the resul-
tant loss of control of the vehicle.
● Tyre pressures which are too high or too low reduce the service life of
the tyre, affecting the vehicle's performance.
● Tyre pressures should be checked regularly, at least once a month
and before long journeys.
● Adjust the pressures of all the tyres to the vehicle load.
● Never deflate excess pressure from hot tyres.
CAUTION
● Take care not to tilt the manometer when placing it on the valve. Other-
wise, the valve may be damaged.
● To avoid damage to the valves, always replace valve caps correctly.
Check that the caps are identical to the standard caps and have been cor-
rectly tightened.
For the sake of the environment
Under-inflated tyres will increase the fuel consumption.
Tread depth and wear indicators
Fig. 125 Tyre tread:
tread wear indicators
Tread depth
Certain driving conditions require a deeper tread, as well as needing the
tread to be approximately the same on the front and rear tyres. This is par-
ticularly important when driving in winter, in cold temperatures and on wet
roads ⇒
.
Vehicle diagramPrior to a journey...While drivingCare, cleaning and mainte-
nanceIf and whenTechnical specifications
Page 218 of 306

216Vehicle care and maintenance
The minimum tread depth required by law in the majority of cases is
1.6 mm, measured in the tread grooves next to the tread wear indicators.
Observe legal requirements in each country.
The performance of winter tyres is much reduced when the tread has worn
to 4 mm (5/32 inch).
The tread depth of new tyres may vary, according to the type and make of
tyre and the tread pattern.
Wear indicators on the tyre
The original tyres on your vehicle have 1.6 mm high ⇒ Fig. 125 tread wear
indicators running across the tread. A number of these indicators are equal-
ly spaced around the tyre tread. Certain marks on the tyre walls (for exam-
ple, the letters “TWI” or other symbols) indicate the position of the wear in-
dicators.
Tread wear indicators indicate if a tyre is worn. Tyres must always be re-
placed before the tyre tread has worn to the level of the indicator.
WARNING
Driving with worn tyres is dangerous, and may lead to loss of control of
the vehicle with serious consequences.
● Tyres must be replaced before the wear indicators are at the same lev-
el as the tread pattern.
● Worn tyres have significantly reduced grip, especially on wet surfa-
ces, increasing the risk of “aquaplaning”.
● Worn tyres make control of the vehicle more difficult in normal or dif-
ficult driving conditions, increasing the braking distance and the risk of
skidding.
Damaged tyres
Damage to wheels and tyres is often not immediately visible. If you notice
unusual
vibration or the car pulling to one side, this may indicate that one
of the tyres is damaged ⇒
.
● Slow down immediately if you think you have a damaged wheel.
● Check the wheels and tyres for damage.
● If tyres are worn, stop driving and seek qualified assistance.
● If there is no visible exterior damage, drive slowly and carefully to the
nearest specialised workshop and have the vehicle checked.
Foreign bodies in the tyre
● Do not remove foreign bodies if they have penetrated through the tyre
wall!
● You should obtain professional assistance immediately.
Wear of tyres
The wear of tyres depends on a number of factors, for example:
● Driving style.
● Unbalanced wheels.
● Running gear settings.
Driving style : driving round bends fast or sudden acceleration or braking
speed up the wear of tyres. When the driving style is normal, if the tyres
wear too quickly, have the running gear settings checked at a specialised
workshop.
Wheel run-out: The wheels on new vehicles are balanced. However, certain
circumstances may lead to imbalance (run-out), which is detected as vibra-
tions in the steering wheel. Run-out leads to wear of the steering and sus-
pension. In the event of run out, the wheels should be balanced again.
When a new wheel is fitted, it should be balanced again.
Page 219 of 306

217
Vehicle care and maintenance
Running gear settings : an incorrectly positioned running gear increases the
wear of tyres and affects your safety while driving. If tyres wear too quickly,
have the wheel alignment checked at a specialised workshop.
WARNING
If you notice unusual vibration or the car pulls to one side while driving,
this may indicate that one of the tyres is damaged.
● Reduce speed immediately and stop, while observing the highway
code.
● Check the wheels and tyres for damage.
● Never carry on driving on worn tyres or wheels. Request qualified as-
sistance immediately.
● If there is no visible exterior damage, drive slowly and carefully to the
nearest specialised workshop and have the vehicle checked.
Spare wheel or temporary spare wheel*
Fig. 126 In the luggage
compartment: hand con-
trolled wheel for securing
the spare wheel Removing the spare wheel
●
Open the rear lid and lift the luggage compartment shelf ⇒ page 98.
● If necessary, remove the luggage compartment variable floor ⇒ page 98.
● Lift up the carpet from the recess and remove it from the luggage com-
partment.
● If necessary, take out the vehicle tool kit with the container.
● Completely remove the hand controlled wheel from the centre of the
spare wheel ⇒ Fig. 126 by turning it in an anticlockwise direction, and take
out the spare wheel.
Storing the replaced wheel
● Pull back the carpet.
● With the wheel rim facing downwards, situate the replaced wheel in the
spare wheel well so that the wheel rim central hole coincides with the open-
ing.
● Turn the hand controlled wheel with the shank screwed clockwise until
the replaced wheel is secured.
● If necessary, store the vehicle tool in the container, inside the luggage
compartment.
● Replace the carpet on the luggage compartment floor.
● Lower the rear shelf.
● Close the rear lid.
If the spare wheel is different to the rest of the vehicle tyres
If the spare tyre is not the same as the tyres that are mounted on the vehicle
- for example with winter tyres or the temporary spare wheel - you should
only use the spare tyre for a short period of time and drive with extra care
⇒
.
Refit the normal road wheel as soon as possible.
Please observe driving advice:
Vehicle diagramPrior to a journey...While drivingCare, cleaning and mainte-
nanceIf and whenTechnical specifications
Page 220 of 306

218Vehicle care and maintenance
● Do not drive faster than 80 km/h (50 mph).
● Avoid heavy acceleration, hard braking and fast cornering.
● Snow chains on the temporary spare wheel are not permitted
⇒ page 220.
● After mounting the spare wheel or the temporary spare wheel, check the
tyre pressure as soon as possible ⇒ page 214.
It is advisable to check the spare wheel or temporary spare wheel tyre pres-
sure when checking the rest of the vehicle wheels at least once a month.
The spare wheel should have the highest pressure allowed for the vehicle
⇒ page 214. The sticker situated on the temporary spare wheel shows the
tyre pressure.
WARNING
Incorrect handling of the spare wheel or the temporary spare wheel can
cause loss of vehicle control, producing collisions or other serious acci-
dents and injury.
● Never use the spare wheel or the temporary spare wheel if it is dam-
aged or worn to the wear indicator.
● In some vehicles the spare wheel is smaller than the original tyres.
This can be seen on a sticker showing the text “80 km/h” and “50 mph”.
This text indicates the maximum velocity permitted for this type of tyre.
● Never drive faster than 80 km/h (50 mph). Avoid powerful accelera-
tion, hard braking and taking corners at high speed.
● Never drive more than 200 km (120 miles) with a temporary spare
wheel fitted to the drive axle.
● Replace the temporary spare wheel for a normal wheel as soon as
possible. The compact temporary spare wheel is only intended for tempo-
rary use over short distances.
● The temporary spare wheel must always be secured with the factory
supplied wheel bolts.
WARNING (Continued)
● You should never use more than one temporary spare wheel.
● After mounting the temporary spare wheel, check the tyre pressure as
soon as possible ⇒ page 214.
● Snow chains on the temporary spare wheel are not permitted.
Note
Wherever possible, secure the spare wheel, temporary spare wheel or the
replaced wheel safely in the luggage compartment. In vehicles with anti-
puncture kit, it is not possible to secure the defective wheel.
Tyre code
Fig. 127 Universal code on tyres
Page 221 of 306

219
Vehicle care and maintenance
Radial
Rim diameter code
Load index & speed rating
DOT tyre identification number
Severe snow conditions
Tyre ply composition and materials used
Max. load rating
Treadwear, traction and temperature grades
Max. permissible inflation pressure
Passenger car tyre
Nominal width of tyre in millimetres
Ratio of height to width (aspect ratio)
Tyre code (example)MeaningMake, logotypeManufacturerProduct nameName of tyre assigned by manufacturer.P255 / 55 R 18Size:PPassenger vehicle code.255Nominal width between walls, in mm.55Height/width ratio in %RTyre type (R indicates "radial").18Rim diameter in inches109 HLoad index ⇒ page 220 and speed rating
⇒ page 220.
XLReinforced tyres.M+S or M/S or Winter tyres code (mud and snow tyres).RADIAL TUBELESSRadial tyre without inner tube.E4 ...E-mark certifying tyre complies with internation-
al legislation followed by a number denoting the
country granting the authorisation. The authori-
sation number ( several digits) is shown below.
123456789101112
Tyre code (example)MeaningDOT BT RA TY5 1709Tyre identification number (TIN a)
, may be only on
interior wall of wheel) and date of manufacture:
DOTThe tyre complies with the legal require-
ments of the US Department of Trans-
port, responsible for tyre safety regula-
tions.
BTPlace of manufacture code.RAInformation about manufacturer and tyre
size.
TY5Manufacturer's tyre specifications.1709Date of manufacture: Week 17 of 2009.TWIThis identifies the position of the Tread Wear In-
dicator ⇒ page 215.
Made in GermanyCountry of manufacture.MAX LOAD 615 KGUS load rating, indicating maximum permitted
load per tyre.
MAX INFLATION 350 KPA
(51 PSI)US limit, indicating maximum permitted tyre
pressure.
SIDEWALL 1 PLY RAYONInformation about tyre wall components:
1 layer of rayon (artificial silk).
TREAD 4 PLIES
1 RAYON + 2 STEEL +
1 NYLONInformation about tread components:
In the example, there are 4 layers below the
tread: 1 layer of rayon (artificial silk), 2 layers of
steel reinforcement and 1 layer of nylon.
Information for the end consumer concerning the comparative values of
the established base tyres (standardised test procedures) ⇒ page 233:
TREADWEAR 220Relative service life of the tyre, with respect to
specific US standard test.
TRACTION ABraking capacity of tyre on wet surface (AA, A, B
or C).
Vehicle diagramPrior to a journey...While drivingCare, cleaning and mainte-
nanceIf and whenTechnical specifications
Page 222 of 306

220Vehicle care and maintenance
Tyre code (example)MeaningTEMPERATURE ATyre temperature resistance at higher test
speeds (A, B or C).
If the tyre has other markings, these are specific tyre manufacturer codes
or specific national codes, e.g. for Brazil or China.
a)
The letters TIN refer to the tyre serial number.
Tyres with directional tread pattern
Tyres with directional tread pattern have been designed to operate best
when rotating in only one direction. An arrow on the tyre sidewall indicates
the direction of rotation on tyres with directional tread. Always observe the
direction of rotation indicated when mounting the wheel. This guarantees
optimum grip and helps to avoid aquaplaning, excessive noise and wear.
If the tyre is mounted in the opposite direction of rotation, drive with ex-
treme caution, as the tyre is no longer being used correctly. This is of partic-
ular importance when the road surface is wet. Change the tyre as soon as
possible or remount it with the correct direction of rotation.
Tyre load rating
The load rating code indicates the maximum load in kilogrammes each
wheel can carry (load capacity).
425 Kg
462 Kg
487 Kg
515 Kg
545 Kg
615 Kg
Speed rating
The speed rating indicates the maximum speed permitted for the tyres.
max. 150 km/h (93 mph)
max. 160 km/h (99 mph)
78
81
83
85
87
91
P
Q max. 170 km/h (106 mph)
max. 180 km/h (112 mph)
max. 190 km/h (118 mph)
max. 200 km/h (124 mph)
max. 210 km/h (130 mph)
max. 240 km/h (149 mph)
max. 270 km/h (168 mph)
max. 300 km/h (186 mph)
Some manufacturers use the letters “ZR” for tyres with a maximum author-
ised speed above 240 km/h (149 miles).
Snow chains
When using snow chains, applicable local legislation and maximum permit-
ted speed limits must be observed.
In winter weather, snow chains not only help to improve grip but also im-
prove the braking capacity.
The fitting of chains is permitted only on front wheels and only with the fol-
lowing combinations of wheel trims and tyres :
Tyre sizeWheel rim165/70 R145 J x 14 offset of 35175/65 R14
SEAT recommends you ask a Technical Service for further information on
wheel, tyre and chain sizes.
Wherever possible use fine-link chains measuring less than 15 mm includ-
ing the lock.
R
S
T
U
H
V
Z
W
Y
Page 223 of 306

221
Vehicle care and maintenance
Remove wheel hub covers and trim rings before fitting snow chains ⇒
.
The wheel bolts should be covered with caps for safety reasons. These are
available from Technical Services.
Temporary spare wheel
For technical reasons, snow chains must not be used on the compact tem-
porary spare wheel ⇒ page 217.
If it is necessary to fit chains with the temporary spare wheel in use, install
the temporary spare wheel on the rear axle in the event of a fault in a front
wheel. Then, fit the rear wheel that is free, instead of the damaged front
wheel. In this situation, observe the rotating direction of the wheels. SEAT
recommends attaching the snow chains before fitting the wheel.
WARNING
The use of unsuitable or incorrectly fitted chains could lead to serious ac-
cidents and damage.
● Always the appropriate snow chains.
● Observe the fitting instructions provided by the snow chain manufac-
turer.
● Never exceed the maximum permitted speeds when driving with snow
chains.
CAUTION
● Remove the snow chains to drive on roads without snow. Otherwise they
will impair handling, damage the tyres and wear out very quickly.
● Wheel rims may be damaged or scratched if the chains come into direct
contact with them. SEAT recommends the use of covered snow chains.
Note
Snow chains are available in different sizes according to the vehicle type.
Vehicle diagramPrior to a journey...While drivingCare, cleaning and mainte-
nanceIf and whenTechnical specifications
Page 224 of 306

222Vehicle care and maintenance
Accessories, replacements, repairs and
modifications
Introduction
Additional information and warnings:
● Seat belts ⇒ page 56
● Airbag system ⇒ page 65
● Roof carrier ⇒ page 104
● Ashtray and cigarette lighter ⇒ page 115
● Power socket ⇒ page 117
● Braking, stopping and parking ⇒ page 134
● Parking sensor system ⇒ page 149
● Cruise control system (CCS) ⇒ page 152
● Working in the engine compartment ⇒ page 180
● Engine oil ⇒ page 185
● Engine coolant ⇒ page 189
● Vehicle battery ⇒ page 193
● Caring for and cleaning the vehicle exterior ⇒ page 197
● Care and cleaning of the vehicle interior ⇒ page 205
● Notes for the user ⇒ page 233
● ⇒ Booklet Radio
● Instruction Manual for the Portable Navigation System (supplied by
SEAT) in the equipment.
WARNING
The use of spare parts and accessories, or incorrectly performed modifi-
cations or repairs may result in damage to the vehicle, accidents and se-
rious injury.
● SEAT strongly recommends you to only use SEAT approved accesso-
ries and SEAT ®
original spare parts. These parts and accessories have
been specially tested by SEAT for suitability, reliability and safety.
● Have any repairs or modifications carried out at a specialised work-
shop. Specialised workshops have the necessary tools, diagnostics
equipment, repair information and qualified personnel.
● Only mount parts with the same specifications as the parts fitted at
factory.
● Never mount, fasten or fit objects such as drink holders or telephone
cradles over the covers of the airbag modules or within their deployment
zones.
● Only use wheels and tyre combinations which have been approved by
SEAT for your vehicle type.