Page 25 of 51
NON-SIDE OPENING ELEMENT MECHANISMS
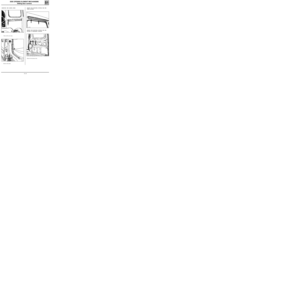
Hinged rear roof flap cross member
Remove blanking cover and securing nut (A).
Release linkage (B) from its location.
Remove mounting fittings for cross member (C).
52
PRB5204
REMOVING
13247R
52-6
Page 26 of 51
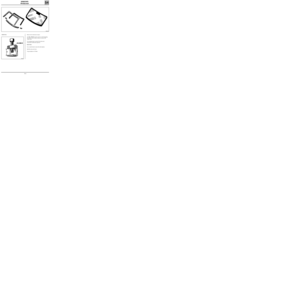
WINDOWS
Windscreen
Remove the windscreen wipers.
Tool Ele. 1294-01 must be used to avoid damaging
the splines and to make it easier to remove the
wiper arms.
Use masking tape to protect the bodywork
around the windscreen aperture.
REFITTING
Use a metal brush to clean the shaft splines.
Refit the arms and nuts.
Torque tighten to 18 N.m.
54
96826R
PRB5401
REMOVING
54-1
Page 27 of 51
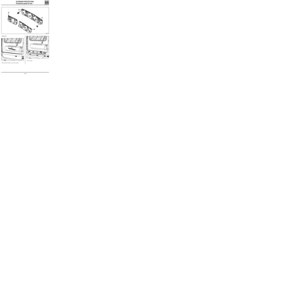
WINDOWS
Windscreen
54
13254R
Unclip the side cover (1).
Remove the seal (2) and bolt (3).
Take off the cowl vent grille.
Disconnect the screen washer pipe.
13069-1R
Remove:
- the lower embellisher strip (4),
- the positioning spacers (5),
- the lower seal (can be reused),
- the exterior embellisher surround (cannot be
reused) for the traditional "wire" cutting
operation.
The exterior embellisher does not have to be
removed when the "EASY CUT" tool is used (see
Technical Note 414A).
REFITTING
Fit the exterior embellisher surround in its correct
position before bonding the windscreen.
Refer to Technical Note 371A for information on
how to prepare and bond the windscreen.
Do not forget to affix the adhesive labels if the
vehicle is equipped with an air bag.
All these labels are available under Part No.
77 01 205 442.
54-2
Page 28 of 51
WINDOWS
Front door window
Move window to fully open position.
Remove mountings for window riser mechanism.
Separate window and mechanism.
Take out the window.
54
12983R1
PRB5402
REMOVING
First remove the trim and then the interior
weather strip.
54-3
Page 29 of 51
WINDOWS
Tilting or fixed windows in sliding door
REFITTING
Seat or clip the exterior embellisher surround in
position before bonding the window or the
frame/window assembly.
See Technical Note 371A for information on
preparation and bonding.
54
REMOVING
FIXED WINDOW
Unclip exterior embellisher surround (1).
Release interior seal (2).
TILTING WINDOW
Unclip exterior embellisher surround (3).
Unclip embellisher (4).
Cut through bead of adhesive mastic.
PRB5403
FIXED WINDOWTILTING WINDOW
54-4
Page 30 of 51
WINDOWS
Fixed or moving side window
54
REMOVING
FIXED WINDOW
Unclip exterior embellisher surround (1).
Release inside seal (2).
MOVING WINDOW
Unclip exterior embellisher (3).
Unclip embellisher (4).
Cut through bead of adhesive mastic.
PRB5404
REFITTING
Seat or clip the exterior embellisher surround in
position before bonding the window or the
frame/window assembly.
See Technical Note 371A for information on
preparation and bonding.
NOTE: Metal/glass primer (green bottle) must be
applied to the frame when a frame is replaced.
54-5
Page 31 of 51
WINDOWS
Window in rear door and window in tailgate
When the screen wiper arm has been removed,
disconnect the wiring harness for the rear screen
heater.
Remove:
- window (window in rear door),
- exterior embellisher surround for tailgate
window (bonded window).
See Technical Note 371A for information on
preparation and bonding.
54
REMOVING
PRB5405
13256S
54-6
Page 32 of 51
WINDOWS
Moving window/latch
Separate the window and the lip.
54
REMOVING WINDOW
PRB5406
13332R
Unclip embellisher.
Remove screws (A) holding window in position.
13333R
54-7


.
Release linkage (B) from its location.
Remove mounting fittings for cross member (C).")

.
Remove the seal (2) and bolt (3).
Take off the cowl vent grille.
Disconnect the screen washer pipe.
13069-1R
Remove:
- the lower embellisher str")


.
Release inside seal (2).
MOVING WINDOW
Unclip exterior embellisher (3).
Unclip embellisher (4).
C")
,
- exter")
 holding window in position.
13333R
54-7")