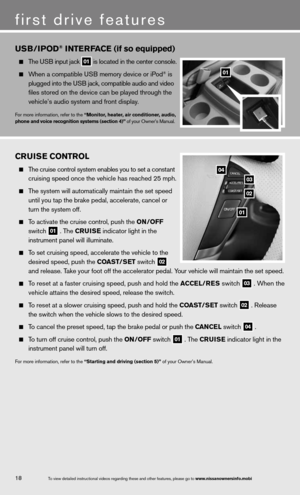
Page 9 of 36

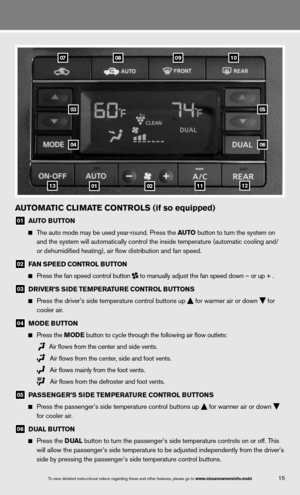
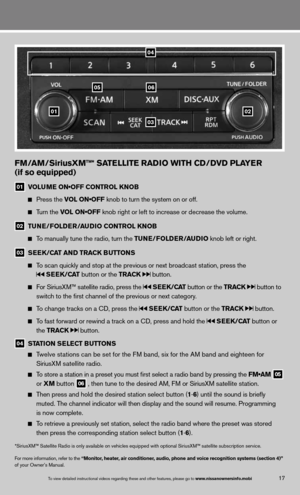
01
03
04
05
06
02
NISSaN INTeLLIGeNT K eY® SYST eM
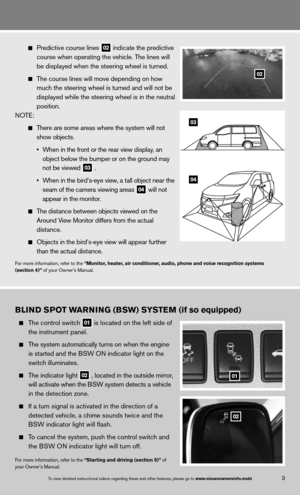
The ni SSAn intelligent k ey® System allows you to lock or
unlock your vehicle, open your liftgate and start the engine.
n OTe: it is important to make sure the intelligent k ey is
with you (that is, in your pocket or purse).
The operating range of the intelligent k ey is within
31.5 in (80 cm) from each request switch.
To lock the vehicle, push either door handle request
switch
01 or the liftgate request switch 02 or press
the
button 03 on the keyfob.
To unlock the vehicle, perform one of the following
procedures:
• Push either door handle request switch
01 or the
liftgate request switch 02 ; the corresponding door
will unlock. Push the request switch again within 1
minute; all other doors will unlock, or
• Press the
button 04 on the keyfob to unlock the
driver’s side door. Press the
button again within
1 minute; all other doors will unlock.
To open the power liftgate (if so equipped), press the
button 05 for more than 1 second.
The intelligent k ey can also be used to activate the
panic alarm by pressing and holding the
button 06
for more than 1 second. Once activated, the panic
alarm and headlights will stay on for 25 seconds.
inTe LLiGenT keY BATTe RY diSc HARG e
if the battery of the intelligent k ey is discharged, or
environmental conditions interfere with the intelligent
k ey operation, start the engine according to the
following procedure:
1. Move the shift lever to the P (Par K) position.
2. firmly apply the foot brake.
3. Touch the ignition switch with the intelligent k ey
and a chime will sound.
4. Within 10 seconds after the chime sounds, push
the ignition switch while depressing the brake pedal
and the engine will start.
for more information, refer to the “Pre-driving checks and adjustments (section 3)”, the “Starting and driving (section 5)”
and the “Maintenance and do-it yourself (section 8)” of your Owner’s Manual.
first drive features
7To view detailed in\fstructional videos\f regarding these a\fnd other features\f \fplease go to www.nissanownersin\Ifo.mobi
Page 10 of 36
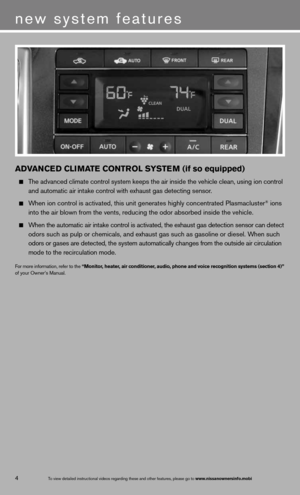
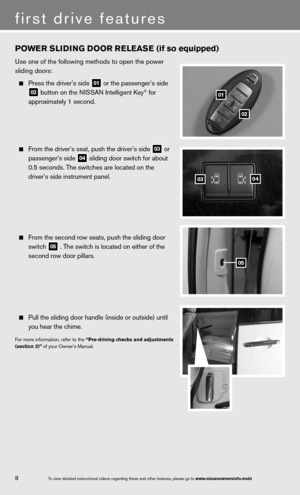
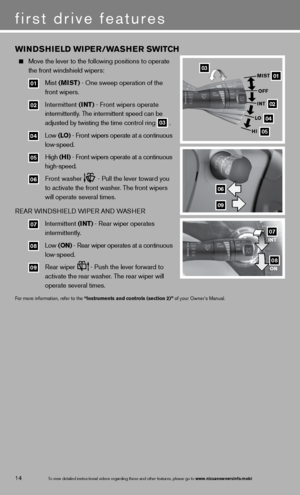
POwer SLIDING DOOr re LeaSe (if so equipped)
use one of the following methods to open the power
sliding doors:
Press the driver’s side 01 or the passenger’s side
02 button on the ni
SSAn intelligent k ey® for
approximately 1 second.
from the driver’s seat, push the driver’s side 03 or
passenger’s side 04 sliding door switch for about
0.5 seconds. The switches are located on the
driver’s side instrument panel.
from the second row seats, push the sliding door
switch
05 . The switch is located on either of the
second row door pillars.
Pull the sliding door handle (inside or outside) until
you hear the chime.
for more information, refer to the “Pre-driving checks and adjustments
(section 3)” of your Owner’s Manual.
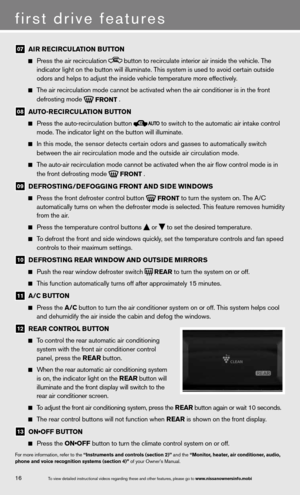
0403
01
02
05
first drive features
8To view detailed in\fstructional videos\f regarding these a\fnd other features\f \fplease go to www.nissanownersin\Ifo.mobi
Page 11 of 36

To slide the seat forward or backward, push the
control switch
01 forward or backward.
To adjust the angle of the seatback, push the sw")
FrONT PO wer SeaT aDJ uSTM eNTS (if so equipped)
To slide the seat forward or backward, push the
control switch
01 forward or backward.
To adjust the angle of the seatback, push the switch
02 forward or backward.
SeAT LifTe R (if so equipped for driver’s seat)
To raise or lower the height of the seat, push the switch 01 up or down.
To raise or lower the front portion of the seat, push the front or back end of the switch 01 up
or down.
Lu MBAR Su PPORT (if so equipped for driver’s seat)
To adjust the seat lumbar area, push the front or back portion of the switch 03 .
f or more information, refer to the “Safety –– Seats, seat belts and supplemental restraint system (section 1)” of your
Owner’s Manual.
010203
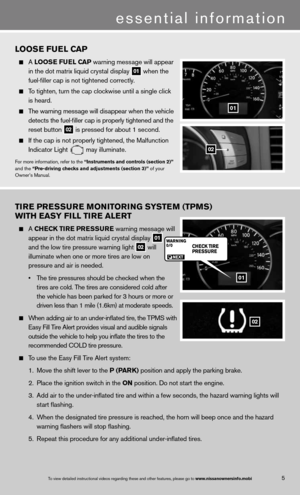
PO wer LIFTGa Te reLeaSe (if so equipped)
use one of the following methods to open the liftgate:
Press thebutton 01 on the ni
SSAn intelligent
key® for more than 1 second.
Once unlocked, push the liftgate opener switch 02
while
carrying the intelligent k ey with you.
from inside the vehicle, push the power liftgate switch
03 located on the instrument panel to the left of the
steering wheel.
for more information, refer to the “Pre-driving checks and adjustments
(section 3)” of your Owner’s Manual.
01
03
02
9To view detailed in\fstructional videos\f regarding these a\fnd other features\f \fplease go to www.nissanownersin\Ifo.mobi
Page 12 of 36

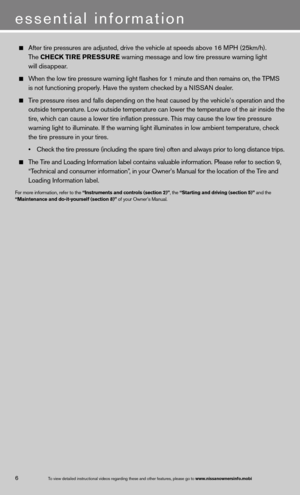
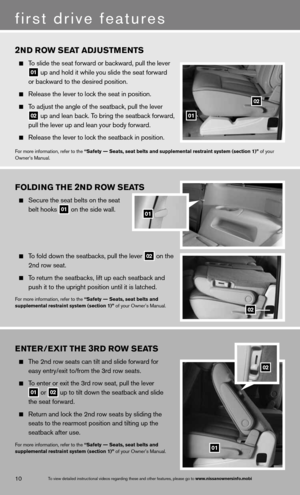
FOLDING THe 2ND rOw S eaTS
Secure the seat belts on the seat
belt hooks
01 on the side wall.
To fold down the seatbacks, pull the lever 02 on the
2nd row seat.
To return the seatbacks, lift up each seatback and
push it to the upright position until it is latched.
for more information, refer to the “Safety –– Seats, seat belts and
supplemental restraint system (section 1)” of your Owner’s Manual.
01
02
2ND r Ow S eaT aDJ uSTM eNTS
To slide the seat forward or backward, pull the lever
01 up and hold it while you slide the seat forward
or backward to the desired position.
Release the lever to lock the seat in position.
To adjust the angle of the seatback, pull the lever
02 up and lean back. To bring the seatback forward,
pull the lever up and lean your body forward.
Release the lever to lock the seatback in position.
for more information, refer to the “Safety –– Seats, seat belts and supplemental restraint system (section 1)”\
of your
Owner’s Manual.
e NTer /e XIT TH e 3rD r Ow S eaTS
The 2nd row seats can tilt and slide forward for
easy entry/exit to/from the 3rd row seats.
To enter or exit the 3rd row seat, pull the lever
01 or 02 up to tilt down the seatback and slide
the seat forward.
Return and lock the 2nd row seats by sliding the
seats to the rearmost position and tilting up the
seatback after use.
for more information, refer to the “Safety –– Seats, seat belts and
supplemental restraint system (section 1)” of your Owner’s Manual.01
02
02
01
10
first drive features
To view detailed in\fstructional videos\f regarding these a\fnd other features\f \fplease go to www.nissanownersin\Ifo.mobi
Page 13 of 36

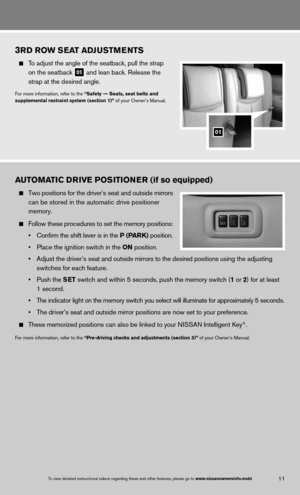
3rD r Ow S eaT aDJ uSTM eNTS
To adjust the angle of the seatback, pull the strap
on the seatback
01 and lean back. Release the
strap at the desired angle.
for more information, refer to the “Safety –– Seats, seat belts and
supplemental restraint system (section 1)” of your Owner’s Manual.
01
11To view detailed in\fstructional videos\f regarding these a\fnd other features\f \fplease go to www.nissanownersin\Ifo.mobi
auTOMa TIC DrIVe POSITION er (if so equipped)
Two positions for the driver’s seat and outside mirrors
can be stored in the automatic drive positioner
memory.
follow these procedures to set the memory positions:
• Confirm the shift lever is in the P (P arK) position.
• Place the ignition switch in the ON position.
• Adjust the driver’s seat and outside mirrors to the desired positions using the adjusting
switches for each feature.
• Push the S eT switch and within 5 seconds, push the memory switch (1 or 2) for at least
1 second.
• The indicator light on the memory switch you select will illuminate for approximately 5 seconds.
• The driver’s seat and outside mirror positions are now set to your preference.
These memorized positions can also be linked to your ni SSAn intelligent key®.
for more information, refer to the “Pre-driving checks and adjustments (section 3)” of your Owner’s Manual.
Page 14 of 36

OuTSIDe MIrrOr CONTr OL SwITCH
To select the right or left side mirror , turn the control
switch
01 right or left.
To adjust the mirror angle, move the control switch
01 up, down, right or left.
To prevent accidentally moving the mirror, turn and
set the switch to the middle “neutral” position.
R eVe RSe Ti LT-d OWn feATu Re (if so equipped)
When backing up the vehicle, the right or left outside mirror can be selected to\
automatically
turn downward to provide better rear visibility.
1. Push the ignition switch to the ON position.
2. Move the shift lever to the r (reVer Se) position.
3. choose the right or left outside mirror by operating the outside mirror c\
ontrol switch
01 .
4. The outside mirror surfaces move downward.
When one of the following conditions has occurred, the outside mirror sur\
faces will return to
their original positions.
• The shift lever is moved to any position other than r (reVer Se).
• The outside mirror control switch is set to the center “neutral” position.
• The ignition switch is pushed to the OFF position.
for more information, refer to the “Pre-driving checks and adjustments (section 3)” of your Owner’s Manual.
01
ST arTING/STOPPING TH e eNGIN e
depress the brake pedal.
• If the \brake pedal i\fs not depressed\f pu\fshing the
ignition switch on\fce enters the ACC mode.
• If the ignition is \fpushed a second ti\fme\f the vehicle
will enter the ON mode.
Press the ignition switch ST arT/STOP button to
start the engine.
n OTe: it is important to make sure the ni SSAn intelligent key
® is with you (that is, in your pocket
or purse).
T uRnin G THe enGine Off
Move the shift lever to the P (P arK) position and apply the parking brake.
Press the ignition switch ST arT/STOP button to turn the engine off.
for more information, refer to the “Starting and driving (section 5)” of your Owner’s Manual.
12
first drive features
To view detailed in\fstructional videos\f regarding these a\fnd other features\f \fplease go to www.nissanownersin\Ifo.mobi
Page 15 of 36

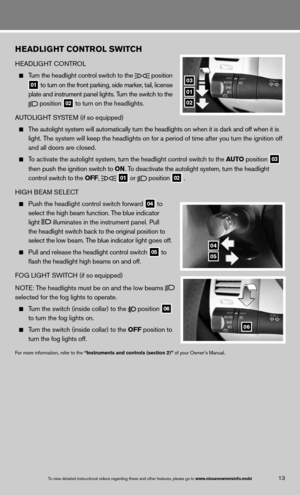
HeaDLIGHT CONTr OL SwITCH
HeAd LiGHT c OnTROL
Turn the headlight control switch to the
position
01 to turn on the front parking, side marker, tail, license
plate and instrument panel lights. Turn the switch to the
position
02 to turn on the headlights.
A uTOLi GHT SYSTe M (if so equipped)
The autolight system will automatically turn the headlights on when it is\
dark and off when it is
light. The system will keep the headlights on for a period of time after you tur\
n the ignition off
and all doors are closed.
To activate the autolight system, turn the headlight control switch to the au TO position
03
then push the ignition switch to ON. To deactivate the autolight system, turn the headlight
control switch to the OFF,
01 or
position
02 .
H iGH B eAM S eLec T
Push the headlight control switch forward
04 to
select the high beam function. The blue indicator
light
illuminates in the instrument panel. Pull
the headlight switch back to the original position to
select the low beam. The blue indicator light goes off.
Pull and release the headlight control switch
05 to
flash the headlight high beams on and off.
fOG Li GHT SW iTc H (if so equipped)
n OTe: The headlights must be on and the low beams
selected for the fog lights to operate.
Turn the switch (inside collar) to the position
06
to turn the fog lights on.
Turn the switch (inside collar)
to the OFF position to
turn the fog lights off.
for more information, refer to the “Instruments and controls (section 2)” of your Owner’s Manual.
01
04
03
02
05
06
13To view detailed in\fstructional videos\f regarding these a\fnd other features\f \fplease go to www.nissanownersin\Ifo.mobi
Page 16 of 36
 \for CD track
2. How to store a rad\fio station")
AUDIO\fSYST\bM
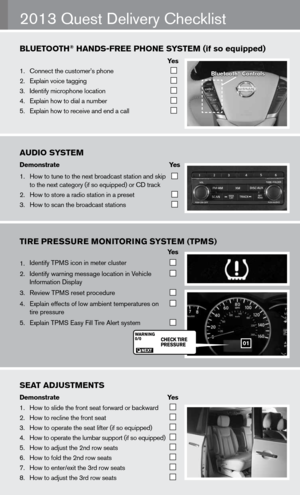
Demonstrate\f \f \f\fYes\f
1. How to tune to the\f next \broadcast sta\ftion and skip
to the next catego\fry (if so equipped) \for CD track
2. How to store a rad\fio station in a pr\feset
3. How to scan the \bro\fadcast stations
BlU\bTOOTh®\fhANDS-fr\b\b\fPhON\b\fS YST\bM\f(if\fso\fequipped)
Ye s
1. Connect the custom\fer’s phone
2. Explain voice tagg\fing
3. Identify microphone\f location
4. Explain how to dia\fl a num\ber
5. Explain how to rec\feive and end a cal\fl
TIre Pre SSure MONITOr ING SYSTeM (TPMS)
Ye s
1. identify TPMS icon in meter cluster
2. identify warning message location in Vehicle
information display
3. Review TPMS reset procedure
4. explain effects of low ambient temperatures on
tire pressure
5. explain TPMS easy fill Tire Alert system
2013 Quest delivery checklist
Bluetooth®\fControls
01
S\bAT\fADjUSTM\bNTS
Demonstrate\f \f \f \fYes
1. How to slide the fr\font seat forward or\f \backward
2. How to recline the\f front seat
3. How to operate the\f seat lifter (if so \fequipped)
4. How to operate the\f lum\bar support (if \fso equipped)
5. How to adjust the \f2nd row seats
6. How to fold the 2nd\f row seats
7. How to enter/exit \fthe 3rd row seats
8. How to adjust the \f3rd row seats


use one of the following methods to open the power
sliding doors:
Press the driver’s side 01 or the passenger’s side
02 button on the ni
SS")