2013 NISSAN LEAF lock
[x] Cancel search: lockPage 171 of 275
![NISSAN LEAF 2013 1.G Navigation Manual 4. Enter key words and then touch [Search]. Alist of search results is displayed. Touch the
preferred information from the list.
5. Detailed information screen is displayed.
INFO:
If the [Call] is dis NISSAN LEAF 2013 1.G Navigation Manual 4. Enter key words and then touch [Search]. Alist of search results is displayed. Touch the
preferred information from the list.
5. Detailed information screen is displayed.
INFO:
If the [Call] is dis](/manual-img/5/324/w960_324-170.png)
4. Enter key words and then touch [Search]. Alist of search results is displayed. Touch the
preferred information from the list.
5. Detailed information screen is displayed.
INFO:
If the [Call] is displayed on the right side of
the screen, it is possible to make a call.The information feeds that were referred to
previously are displayed. A maximum of 3 feeds
are stored in the history.
1. Push the MENUbutton and touch [CARW-
INGS].
2. Touch [History]. An Information feed list is
displayed.
INFO:
. When the number of feeds stored in the
history reaches the limit, the system deletes
the oldest feed and saves a new feed.
. One feed that should not be deleted can be
protected. To protect history of information
feeds visited, display the screen for the
information feed you want to protect and
after auto-play has been paused, touch
[Lock chan.].
“How to view information screen”
(page 5-8)
CARWINGSTM5-11
VIEWING CARWINGSTMRECORDS
Page 185 of 275
![NISSAN LEAF 2013 1.G Navigation Manual VIEWING MAINTENANCE INFOR-
MATION
The maintenance intervals can be displayed for
your preferred maintenance items.
1. Push theMENUbutton and touch [Info.].
2. Touch [Maintenance].
3. Select the mainte NISSAN LEAF 2013 1.G Navigation Manual VIEWING MAINTENANCE INFOR-
MATION
The maintenance intervals can be displayed for
your preferred maintenance items.
1. Push theMENUbutton and touch [Info.].
2. Touch [Maintenance].
3. Select the mainte](/manual-img/5/324/w960_324-184.png)
VIEWING MAINTENANCE INFOR-
MATION
The maintenance intervals can be displayed for
your preferred maintenance items.
1. Push theMENUbutton and touch [Info.].
2. Touch [Maintenance].
3. Select the maintenance interval for the battery, air conditioner filter, tire and other
reminders.
You can also set the system to display a
message to remind you that the maintenance
needs to be performed.
The following example shows how to set the
battery maintenance information. Use the same
steps to set the other maintenance information
items.
1. Reset the driving distance to the new maintenance schedule.
2. Set the interval (mileage) of the maintenance schedule. To determine the recommended
maintenance interval, refer to the "NISSAN
Service and Maintenance Guide".
3. To display the reminder automatically when the set trip distance is reached, touch
[Reminder].
4. To return the display to MAINTENANCE INFO., touch [BACK].
The unit can be converted between "US" and
"Metric".
“Unit settings” (page 1-17)
The Reminder will be automatically displayed as
shown when both of the following conditions are
met:
. the vehicle is driven the set distance and the
power switch is pushed to the "LOCK"
position.
. the power switch is pushed to the "ACC" or
"ON" position the next time you drive the
vehicle after the set value has been reached.
To return to the previous screen after the
maintenance reminder screen is displayed,
touch [OK].
The maintenance reminder screen is displayed
each time the power switch is pushed to the ON
position unless one of the following operations is
performed:
. [Reset Distance] is touched.
. [Reminder] is set to OFF.
Viewing technical information6-3
VIEWING VEHICLE INFORMATION
Page 186 of 275
6-4Viewing technical information
.the maintenance interval is set again.
COMFORT & CONVENIENCE SET-
TINGS
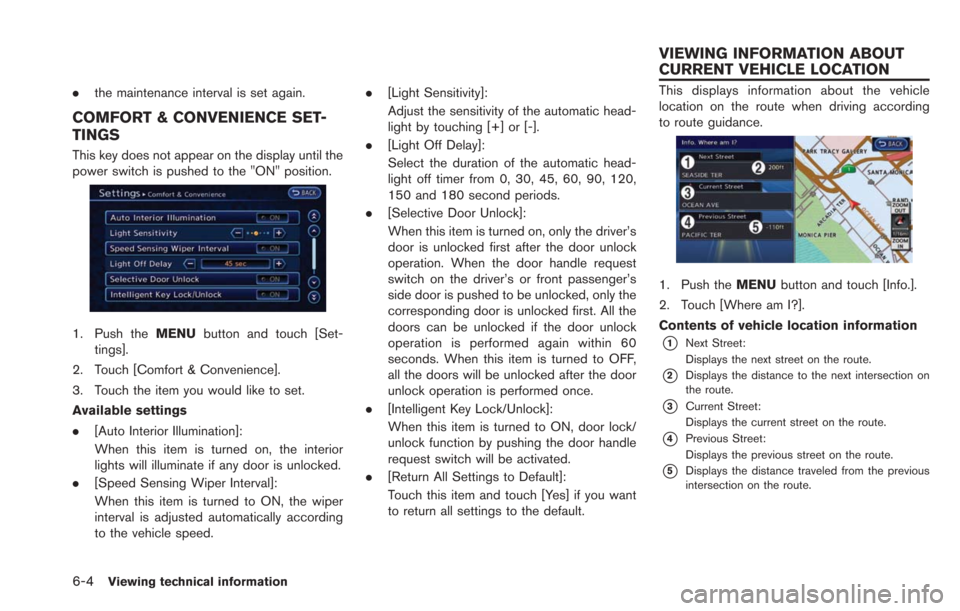
This key does not appear on the display until the
power switch is pushed to the "ON" position.
1. Push the MENUbutton and touch [Set-
tings].
2. Touch [Comfort & Convenience].
3. Touch the item you would like to set.
Available settings
. [Auto Interior Illumination]:
When this item is turned on, the interior
lights will illuminate if any door is unlocked.
. [Speed Sensing Wiper Interval]:
When this item is turned to ON, the wiper
interval is adjusted automatically according
to the vehicle speed. .
[Light Sensitivity]:
Adjust the sensitivity of the automatic head-
light by touching [+] or [-].
. [Light Off Delay]:
Select the duration of the automatic head-
light off timer from 0, 30, 45, 60, 90, 120,
150 and 180 second periods.
. [Selective Door Unlock]:
When this item is turned on, only the driver’s
door is unlocked first after the door unlock
operation. When the door handle request
switch on the driver’s or front passenger’s
side door is pushed to be unlocked, only the
corresponding door is unlocked first. All the
doors can be unlocked if the door unlock
operation is performed again within 60
seconds. When this item is turned to OFF,
all the doors will be unlocked after the door
unlock operation is performed once.
. [Intelligent Key Lock/Unlock]:
When this item is turned to ON, door lock/
unlock function by pushing the door handle
request switch will be activated.
. [Return All Settings to Default]:
Touch this item and touch [Yes] if you want
to return all settings to the default.
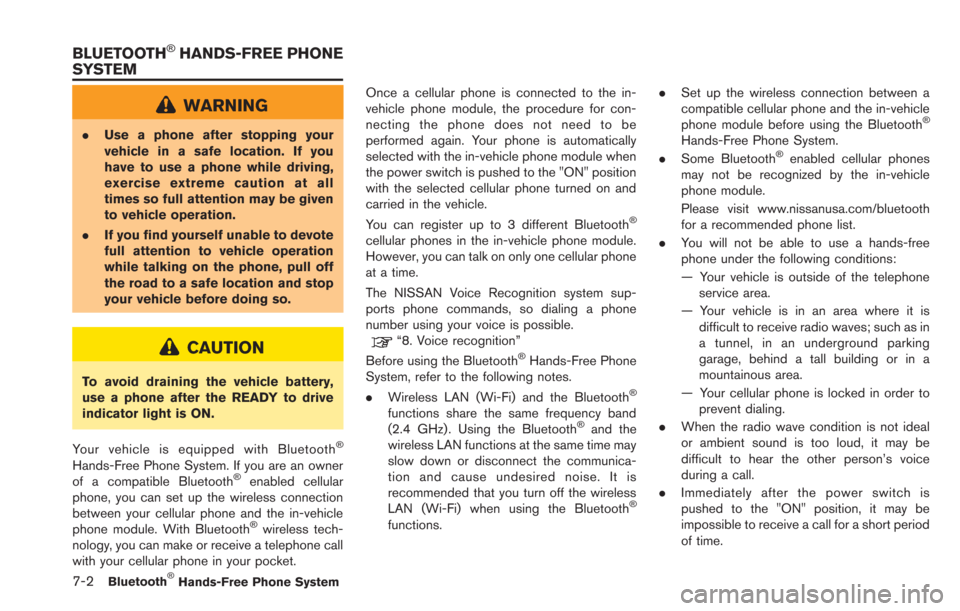
This displays information about the vehicle
location on the route when driving according
to route guidance.
1. Push the MENUbutton and touch [Info.].
2. Touch [Where am I?].
Contents of vehicle location information
*1Next Street:
Displays the next street on the route.
*2Displays the distance to the next intersection on
the route.
*3Current Street:
Displays the current street on the route.
*4Previous Street:
Displays the previous street on the route.
*5Displays the distance traveled from the previous
intersection on the route.
VIEWING INFORMATION ABOUT
CURRENT VEHICLE LOCATION
Page 196 of 275
7-2Bluetooth®Hands-Free Phone System
WARNING
.Use a phone after stopping your
vehicle in a safe location. If you
have to use a phone while driving,
exercise extreme caution at all
times so full attention may be given
to vehicle operation.
. If you find yourself unable to devote
full attention to vehicle operation
while talking on the phone, pull off
the road to a safe location and stop
your vehicle before doing so.
CAUTION
To avoid draining the vehicle battery,
use a phone after the READY to drive
indicator light is ON.
Your vehicle is equipped with Bluetooth
®
Hands-Free Phone System. If you are an owner
of a compatible Bluetooth®enabled cellular
phone, you can set up the wireless connection
between your cellular phone and the in-vehicle
phone module. With Bluetooth
®wireless tech-
nology, you can make or receive a telephone call
with your cellular phone in your pocket. Once a cellular phone is connected to the in-
vehicle phone module, the procedure for con-
necting the phone does not need to be
performed again. Your phone is automatically
selected with the in-vehicle phone module when
the power switch is pushed to the "ON" position
with the selected cellular phone turned on and
carried in the vehicle.
You can register up to 3 different Bluetooth
®
cellular phones in the in-vehicle phone module.
However, you can talk on only one cellular phone
at a time.
The NISSAN Voice Recognition system sup-
ports phone commands, so dialing a phone
number using your voice is possible.
“8. Voice recognition”
Before using the Bluetooth®Hands-Free Phone
System, refer to the following notes.
. Wireless LAN (Wi-Fi) and the Bluetooth
®
functions share the same frequency band
(2.4 GHz) . Using the Bluetooth®and the
wireless LAN functions at the same time may
slow down or disconnect the communica-
tion and cause undesired noise. It is
recommended that you turn off the wireless
LAN (Wi-Fi) when using the Bluetooth
®
functions. .
Set up the wireless connection between a
compatible cellular phone and the in-vehicle
phone module before using the Bluetooth
®
Hands-Free Phone System.
. Some Bluetooth®enabled cellular phones
may not be recognized by the in-vehicle
phone module.
Please visit www.nissanusa.com/bluetooth
for a recommended phone list.
. You will not be able to use a hands-free
phone under the following conditions:
— Your vehicle is outside of the telephone
service area.
— Your vehicle is in an area where it is difficult to receive radio waves; such as in
a tunnel, in an underground parking
garage, behind a tall building or in a
mountainous area.
— Your cellular phone is locked in order to prevent dialing.
. When the radio wave condition is not ideal
or ambient sound is too loud, it may be
difficult to hear the other person’s voice
during a call.
. Immediately after the power switch is
pushed to the "ON" position, it may be
impossible to receive a call for a short period
of time.
BLUETOOTH®HANDS-FREE PHONE
SYSTEM
Page 233 of 275
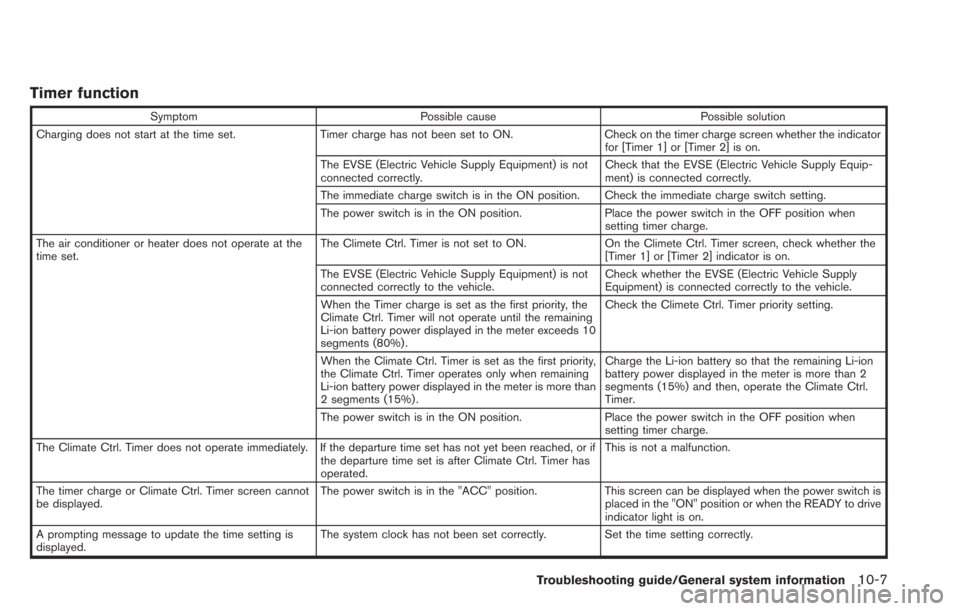
Timer function
SymptomPossible cause Possible solution
Charging does not start at the time set. Timer charge has not been set to ON. Check on the timer charge screen whether the indicator
for [Timer 1] or [Timer 2] is on.
The EVSE (Electric Vehicle Supply Equipment) is not
connected correctly. Check that the EVSE (Electric Vehicle Supply Equip-
ment) is connected correctly.
The immediate charge switch is in the ON position. Check the immediate charge switch setting.
The power switch is in the ON position. Place the power switch in the OFF position when
setting timer charge.
The air conditioner or heater does not operate at the
time set. The Climete Ctrl. Timer is not set to ON.
On the Climete Ctrl. Timer screen, check whether the
[Timer 1] or [Timer 2] indicator is on.
The EVSE (Electric Vehicle Supply Equipment) is not
connected correctly to the vehicle. Check whether the EVSE (Electric Vehicle Supply
Equipment) is connected correctly to the vehicle.
When the Timer charge is set as the first priority, the
Climate Ctrl. Timer will not operate until the remaining
Li-ion battery power displayed in the meter exceeds 10
segments (80%) . Check the Climete Ctrl. Timer priority setting.
When the Climate Ctrl. Timer is set as the first priority,
the Climate Ctrl. Timer operates only when remaining
Li-ion battery power displayed in the meter is more than
2 segments (15%) . Charge the Li-ion battery so that the remaining Li-ion
battery power displayed in the meter is more than 2
segments (15%) and then, operate the Climate Ctrl.
Timer.
The power switch is in the ON position. Place the power switch in the OFF position when
setting timer charge.
The Climate Ctrl. Timer does not operate immediately. If the departure time set has not yet been reached, or if the departure time set is after Climate Ctrl. Timer has
operated.This is not a malfunction.
The timer charge or Climate Ctrl. Timer screen cannot
be displayed. The power switch is in the "ACC" position.
This screen can be displayed when the power switch is
placed in the "ON" position or when the READY to drive
indicator light is on.
A prompting message to update the time setting is
displayed. The system clock has not been set correctly. Set the time setting correctly.
Troubleshooting guide/General system information10-7
Page 249 of 275
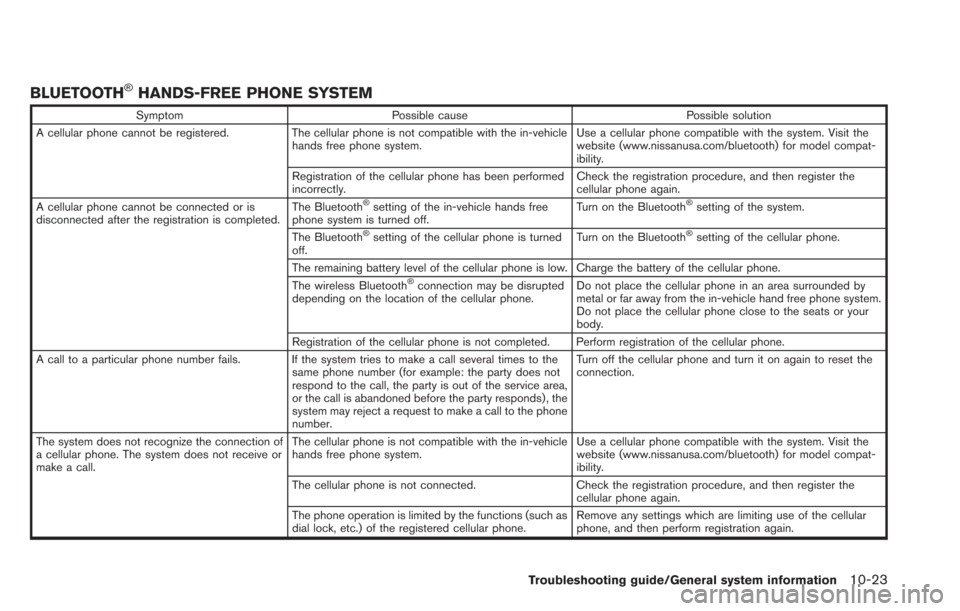
BLUETOOTH®HANDS-FREE PHONE SYSTEM
SymptomPossible cause Possible solution
A cellular phone cannot be registered. The cellular phone is not compatible with the in-vehicle
hands free phone system. Use a cellular phone compatible with the system. Visit the
website (www.nissanusa.com/bluetooth) for model compat-
ibility.
Registration of the cellular phone has been performed
incorrectly. Check the registration procedure, and then register the
cellular phone again.
A cellular phone cannot be connected or is
disconnected after the registration is completed. The Bluetooth
®setting of the in-vehicle hands free
phone system is turned off. Turn on the Bluetooth®setting of the system.
The Bluetooth
®setting of the cellular phone is turned
off. Turn on the Bluetooth®setting of the cellular phone.
The remaining battery level of the cellular phone is low. Charge the battery of the cellular phone.
The wireless Bluetooth
®connection may be disrupted
depending on the location of the cellular phone. Do not place the cellular phone in an area surrounded by
metal or far away from the in-vehicle hand free phone system.
Do not place the cellular phone close to the seats or your
body.
Registration of the cellular phone is not completed. Perform registration of the cellular phone.
A call to a particular phone number fails. If the system tries to make a call several times to the same phone number (for example: the party does not
respond to the call, the party is out of the service area,
or the call is abandoned before the party responds) , the
system may reject a request to make a call to the phone
number. Turn off the cellular phone and turn it on again to reset the
connection.
The system does not recognize the connection of
a cellular phone. The system does not receive or
make a call. The cellular phone is not compatible with the in-vehicle
hands free phone system.
Use a cellular phone compatible with the system. Visit the
website (www.nissanusa.com/bluetooth) for model compat-
ibility.
The cellular phone is not connected. Check the registration procedure, and then register the
cellular phone again.
The phone operation is limited by the functions (such as
dial lock, etc.) of the registered cellular phone. Remove any settings which are limiting use of the cellular
phone, and then perform registration again.
Troubleshooting guide/General system information10-23
Page 259 of 275
of the vehicle icon is automatically
adjusted before recalculating the route.
— There are cases in which the system shows an indirect route to reach the
destination or waypoints, if you set them
from stored or facility information. In
order to correct this, you must be careful
about the traffic direction, especially
when lanes with different travel directions
are shown separately, such as inter-
changes and service areas.
— This system makes no distinction be- tween limited traffic control and total
control (blockage) . It may show an
indirect route even if the road is usable.
— Even if the freeway preference is set to OFF, a route that uses the freeway may
be suggested.
— Even if the ferry preference is set to OFF, a route that uses a ferry line may be
suggested.
— Ferry lines, excluding those that are only for pedestrians, bicycles and motor-
cycles, are stored in this system. Take
into consideration the travel time required
and operational condition before decid-
ing whether to use them or not.ROUTE GUIDANCE
INFO:
The system will only announce street names
when the system language is set to English.
Street names are not announced when the
system is set to Franc¸ ais (French).
Basics of voice guidance
Voice guidance announces which direction to
turn when approaching an intersection in which
a turn is necessary.
INFO:
. There may be some cases in which voice
guidance and actual road conditions do not
correspond. This may occur because of
discrepancies between the actual road and
the information on the map data, or it is due
to the vehicle’s speed.
. In case voice guidance does not correspond
to the actual road conditions, follow the
information obtained from traffic signs or
notices on the road.
. Route guidance provided by the navigation
system does not take carpool lane driving
into consideration, especially when carpool
lanes are separated from other road lanes.
Directions provided and distances
to guide points
Directions will differ, depending on the road
type.
INFO:
Distances may vary, depending on the vehicle
speed.
Notification of intersection on ordinary
road:
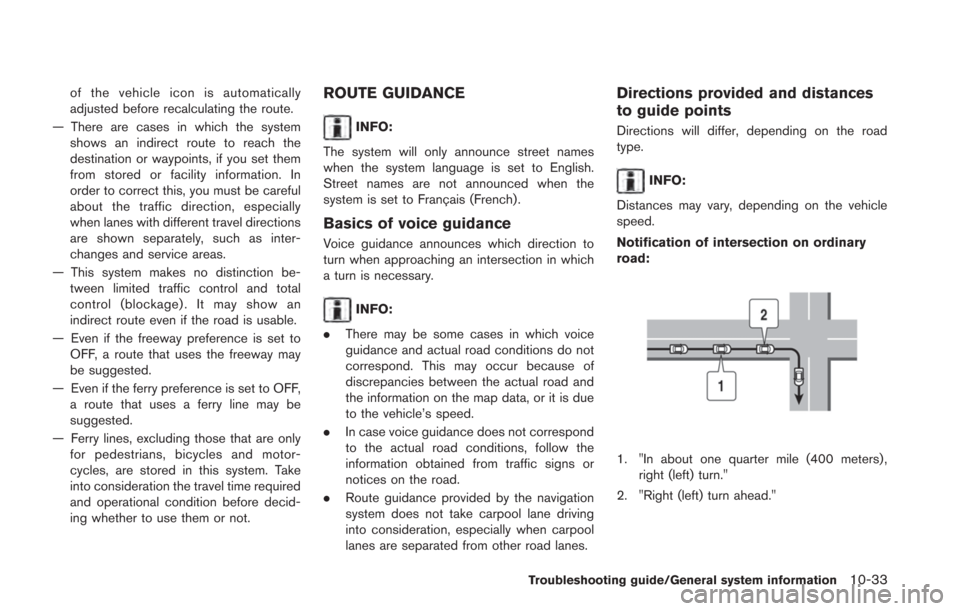
1. "In about one quarter mile (400 meters) , right (left) turn."
2. "Right (left) turn ahead."
Troubleshooting guide/General system information10-33
Page 271 of 275
11 Index
A
About route guidance ................................................ 3-41
Adjusting volume and others...................................... 1-7
Audio operation precautions...................................... 4-2
Auxiliary input jack....................................................... 4-23
B
Basic operation.............................................................. 1-7
Battery and power information ................................ 2-16
Bluetooth
®Hands-Free Phone System .................. 7-2
Bluetooth®streaming audio ..................................... 4-11
Bluetooth®streaming audio operation .................. 4-20
C
Camera settings ............................................................ 9-9
Canceling/reactivating route .................................... 3-47
Car phone or CB radio ............................................. 7-10
CARWINGS
TMoverview............................................. 5-4
CARWINGSTMsettings............................................. 5-12
CD·AUX screen ........................................................... 1-10
Changing map view...................................................... 3-8
Changing region.......................................................... 3-18
Changing scale of map ............................................... 3-7
Character (letters and numbers) input screen ...... 1-7
Charge recommendation guidance ........................ 2-16
Charging station information...................................... IT-2
Clock settings.............................................................. 1-16
Comfort & convenience settings............................... 6-4
Compact Disc (CD) player......................................... 4-3
Compact Disc (CD) player operation.................... 4-14
Compressed Audio Files (MP3/WMA) ................... 4-7
Confirming route.......................................................... 3-52
Connecting cellular phone........................................ 1-13 Connecting procedure................................................. 7-4
Control button and microphone................................ 7-3
Control buttons and functions................................... 1-2
Control panel.................................................................. 1-2
Current vehicle location.......................................... 10-28
Customer assistance.................................................. 10-2
D
Data communication settings................................... 5-20
Deleting phone information......................................... 7-9
Deleting stored item................................................... 3-68
Destination screen...................................................... 3-17
Display adjustment...................................................... 1-14
Display urgent traffic information .............................. 6-8
Displaying CARWINGS
TMinformation screen...... 5-7
Displaying charging station icons on map ............. 2-5
Displaying command list ............................................. 8-6
Displaying current vehicle location........................... 3-5
Displaying estimated driving range........................... 2-3
Displaying unit ID information .................................. 5-18
Downloading phonebook memory ............................ 7-8
Driving range.................................................................. IT-2
During a call ................................................................... 7-6
E
Editing address book................................................. 3-62
Editing route................................................................. 3-48
Energy information display................................. IT-3, 2-8
Error message on communication.......................... 5-19
F
Features of LEAF Navigation ..................................... IT-2
Finding address........................................................... 3-20
Finding charging station............................................ 3-25
Finding nearby Points of Interest ............................ 3-29
Finding points of interest .......................................... 3-21
FM·AM radio screen................................................... 1-10
FM-AM-SAT radio operation .................................... 4-12
Functions disabled while driving............................... 1-6
G
Giving voice commands.............................................. 8-2
Guidance screen settings......................................... 3-43
H
How to handle CD and USB memory................ 10-42
How to handle display............................................ 10-41
How to handle the Map SD card ........................ 10-37
How to handle the SD card.................................. 10-42
How to set Climate Ctrl. Timer ............................... 2-12
How to set Climate Ctrl. Timer and remote
climate control temperature...................................... 2-14
How to view information screen................................ 5-8
I
Info on route................................................................... 6-7
Information feed setting............................................. 5-15
Information screen ........................................................ 6-2
Inputting user ID and password.............................. 1-11
iPod
®player and iPhone®........................................... 4-6
iPod®player operation............................................... 4-16