2013 NISSAN LEAF USB port
[x] Cancel search: USB portPage 138 of 275
4-4Audio system
.During cold weather or rainy days, the player
may malfunction due to the humidity. If this
occurs, remove the CD and dehumidify or
ventilate the player completely.
. The player may skip while driving on rough
roads.
. The CD player sometimes cannot function
when the passenger compartment tempera-
ture is extremely high. Decrease the tem-
perature before use.
. Only use high quality 4.7 in (12 cm) round
discs that have the "COMPACT disc DIGI-
TAL AUDIO" logo on the disc or packaging.
. Do not expose the CD to direct sunlight.
. CDs that are of poor quality, dirty, scratched,
covered with fingerprints, or that have pin
holes may not work properly.
. The following CDs may not work properly:
— Copy control compact discs (CCCD)
— Recordable compact discs (CD-R)
— Rewritable compact discs (CD-RW)
. Do not use the following CDs as they may
cause the CD player to malfunction.
— 3.1 in (8 cm) discs
— CDs that are not round
— CDs with a paper label — CDs that are warped, scratched, or have
abnormal edges
. This audio system can only play prerecorded
CDs. It has no capabilities to record or burn
CDs.
. If the CD cannot be played, one of the
following messages will be displayed.
CHECK DISC:
— Confirm that the CD is inserted correctly
(the label side is facing up, etc.).
— Confirm that the CD is not bent or warped and it is free of scratches.
PUSH EJECT:
This is an error due to the temperature inside
the player being too high. Remove the CD
by pushing the
button, and after a short
time reinsert the CD. The CD can be played
when the temperature of the player returns
to normal.
UNPLAYABLE:
The file is unplayable in this audio system
(the system only supports CDs containing
MP3 or WMA files) .
USB (Universal Serial Bus)
WARNING
Do not connect or disconnect the USB
device while driving. Doing so can be a
distraction. If distracted you could lose
control of your vehicle and cause an
accident or serious injury.
CAUTION
. Do not force the USB device into the
USB port. Inserting the USB device
tilted or up-side-down into the port
may damage the USB device and
the port. Make sure that the USB
device is connected correctly into
the USB port.
. Do not grab the USB port cover (if
so equipped) when pulling the USB
device out of the port. This could
damage the port and the cover.
. Do not leave the USB cable in a
place where it can be pulled unin-
tentionally. Pulling the cable may
break the wire, USB device or the
port.
Page 139 of 275
.To avoid damage and loss of func-
tion when using a USB device, note
the following precautions.
— Do not bend the cable exces-
sively 1.6 in (40 mm) radius
minimum.
— Do not twist the cable exces- sively (more than 180 degrees) .
— Do not pull or drop the cable.
— Do not hit or press the USB port or USB device with hands, feet,
or objects.
— Do not store objects with sharp edges in the storage area where
the cable is stored.
— Do not leave the USB device and attached devices in the vehicle
compartment. When not in use
for extended periods of time,
store the cable and USB device
in a clean, dust free environment
at room temperature and with-
out direct sun exposure.
— Do not use the cable for any other purposes than its intended
use in the vehicle. The vehicle is not equipped with a USB device.
USB devices should be purchased separately
as necessary.
This system cannot be used to format USB
devices. To format a USB device, use a personal
computer.
In some states/area, the USB device for the
front seats plays only sound without images for
regulatory reasons, even when the vehicle is
parked.
This system supports various USB memory
devices, USB hard drives, iPhone
®and iPod®
players. Some USB devices may not be
supported by this system.
.
Partitioned USB devices may not play
correctly.
. Some characters used in other languages
(Chinese, Japanese, etc.) may not appear
properly in the display. Using English lan-
guage characters with a USB device is
recommended.
General notes for USB use:
. The USB device may not function when the
passenger compartment temperature is ex-
tremely high. Lower the temperature before
use. .
During cold weather or rainy days, the player
may malfunction due to humidity. If this
occurs, remove the USB device and dehu-
midify or ventilate the USB player comple-
tely.
. Do not connect a USB device if a connector,
cable or USB port is wet. Allow the
connector, cable, and USB port to dry
completely before connecting the USB
device. (Wait for 24 hours or more until it
is dry.) If the connector and USB port are
exposed to fluids other than water, evapora-
tive residue may cause a short circuit
between the connector pins and USB port.
In this case, replace the cable and USB port.
Otherwise damage to the USB device and a
loss of function may occur.
. If the cable is damaged (insulation cut,
connectors cracked, contamination such as
liquids, dust, dirt, etc. in the connectors) , do
not use the cable. Replace the cable with a
new one.
. Do not put a USB device in a location where
static electricity occurs, electrical noise is
generated or hot air from the air conditioner
blows directly on it. Doing so may cause the
data stored on the USB device to be
corrupted.
Audio system4-5
Page 140 of 275
4-6Audio system
Notes for iPod®use:
iPod®is a trademark of Apple Inc., registered in
the U.S. and other countries.
. Improperly plugging in the iPod
®may cause
a checkmark to be displayed on and off
(flickering) . Always make sure that the iPod
®
is connected properly.
. An iPod nano®(1st Generation) may remain
in fast forward or rewind mode if it is
connected during a seek operation. In this
case, please manually reset the iPod
®.
. An iPod nano®(2nd Generation) will con-
tinue to fast-forward or rewind if it is
disconnected during a seek operation.
. An incorrect song title may appear when the
Play Mode is changed while using an iPod
nano
®(2nd Generation)
. Audiobooks may not play in the same order
as they appear on an iPod
®.
. Large video files cause slow responses in an
iPod
®. The vehicle display may momentarily
black out, but will soon recover.
. If an iPod
®automatically selects large video
files while in the shuffle mode, the vehicle
display may momentarily black out, but will
soon recover.
iPod®PLAYER AND iPhone®
This system supports iPod®and iPhone®
models.
. A USB cable for connecting an iPod®or
iPhone®is not included with this system.
Use your own USB cable to connect an
iPod
®or iPhone®.
. Once connected to the system, operation
will not be possible from an iPod
®or
iPhone®.
. Some functions may be limited depending
on the model of iPod
®or iPhone®and/or the
version of the firmware currently installed.
. When connected to the system, the battery
of an iPod
®or iPhone®will be recharged.
. Do not use headphones or other acces-
sories when an iPod
®or iPhone®is con-
nected to the system. Doing so could
prevent the system from operating properly.
. NISSAN does not accept any responsibility
for any data that may be lost from an iPod
®
or iPhone®while it is connected to the
system.
. Please refer to the Owner’s Manual of the
iPod
®or iPhone®that is connected to the
system. .
Large video files cause slow responses in an
iPod
®. The vehicle center display may
momentarily black out, but it will soon
recover.
. If an iPod
®automatically selects large video
files while in the shuffle mode, the vehicle
center display may momentarily black out,
but it will soon recover.
. An iPod nano
®(1st Generation) may remain
in fast forward or rewind mode if it is
connected during a seek operation. In this
case, please manually reset the iPod
®.
. After the Album Shuffle setting has been set
when an iPod touch
®1G is connected, if the
USB cable is pulled out and inserted again,
or if the power switch is placed in the "ACC"
or "OFF" positions from the "ON" position,
the song that was last played will not be
saved.
. Songs that are being played back cannot be
cued using the track down operation of an
iPod touch
®1G. To use this function,
update the firmware of the iPod®that is
being used (version 2.2.1 or later) .
. After the Album Shuffle setting has been set
when an iPod touch
®2G is connected, if the
USB cable is pulled out and inserted again,
or if the power switch is placed in the "ACC"
or "OFF" positions from the "ON" position,
Page 144 of 275
4-10Audio system
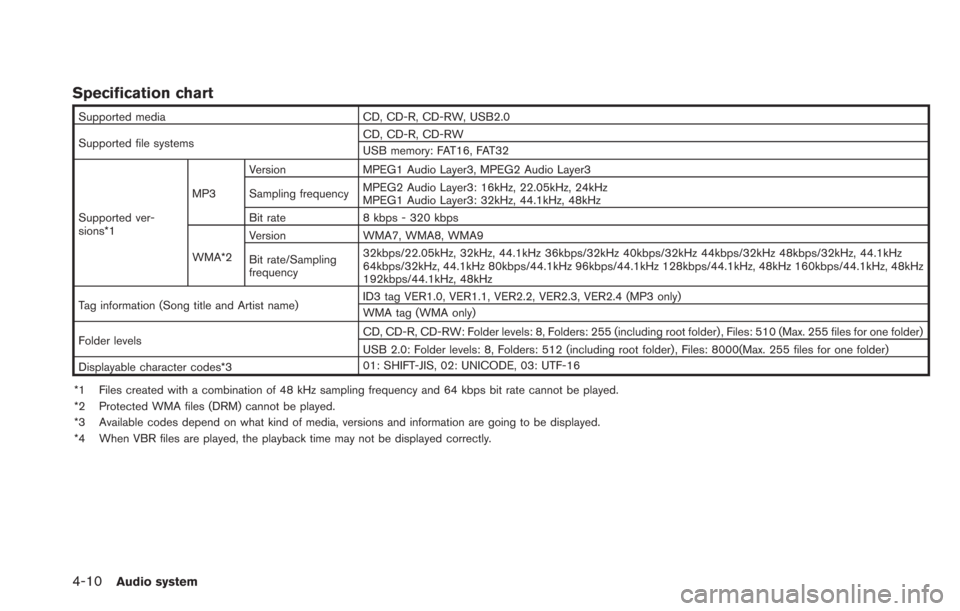
Specification chart
Supported mediaCD, CD-R, CD-RW, USB2.0
Supported file systems CD, CD-R, CD-RW
USB memory: FAT16, FAT32
Supported ver-
sions*1 MP3
Version
MPEG1 Audio Layer3, MPEG2 Audio Layer3
Sampling frequency MPEG2 Audio Layer3: 16kHz, 22.05kHz, 24kHz
MPEG1 Audio Layer3: 32kHz, 44.1kHz, 48kHz
Bit rate 8 kbps - 320 kbps
WMA*2 Version
WMA7, WMA8, WMA9
Bit rate/Sampling
frequency 32kbps/22.05kHz, 32kHz, 44.1kHz 36kbps/32kHz 40kbps/32kHz 44kbps/32kHz 48kbps/32kHz, 44.1kHz
64kbps/32kHz, 44.1kHz 80kbps/44.1kHz 96kbps/44.1kHz 128kbps/44.1kHz, 48kHz 160kbps/44.1kHz, 48kHz
192kbps/44.1kHz, 48kHz
Tag information (Song title and Artist name) ID3 tag VER1.0, VER1.1, VER2.2, VER2.3, VER2.4 (MP3 only)
WMA tag (WMA only)
Folder levels CD, CD-R, CD-RW: Folder levels: 8, Folders: 255 (including root folder) , Files: 510 (Max. 255 files for one folder)
USB 2.0: Folder levels: 8, Folders: 512 (including root folder) , Files: 8000(Max. 255 files for one folder)
Displayable character codes*3 01: SHIFT-JIS, 02: UNICODE, 03: UTF-16
*1 Files created with a combination of 48 kHz sampling frequency and 64 kbps bit rate cannot be played.
*2 Protected WMA files (DRM) cannot be played.
*3 Available codes depend on what kind of media, versions and information are going to be displayed.
*4 When VBR files are played, the playback time may not be displayed correctly.
Page 145 of 275
BLUETOOTH®STREAMING AUDIO
.Some Bluetooth®audio devices may not be
recognized by the in-vehicle audio system.
. It is necessary to set up the wireless
connection between a compatible Blue-
tooth
®audio device and the in-vehicle
Bluetooth®module before using the Blue-
tooth®streaming audio.
. The Bluetooth®streaming audio may be
stopped under the following conditions:
— Receiving a hands-free call.
— Checking the connection to the hands-
free phone.
— Connecting the hands-free phone or the audio device.
— Downloading the phonebook memory from the connected cellular phone.
. Do not place a Bluetooth
®audio device in
an area surrounded by metal or far away
from the in-vehicle Bluetooth
®module to
prevent tone quality degradation and wire-
less connection disruption.
. While an audio device is connected through
a Bluetooth
®wireless connection, the bat-
tery of the device may discharge quicker
than usual. .
This system supports the Bluetooth
®Audio
Distribution Profile (A2DP, AVRCP).
. Wireless LAN (Wi-Fi) and the Bluetooth
®
functions share the same frequency band
(2.4 GHz) . Using the Bluetooth®and the
wireless LAN functions at the same time may
slow down or disconnect the communica-
tion and cause undesired noise. It is
recommended that you turn off the wireless
LAN (Wi-Fi) when using the Bluetooth
®
functions.
. Bluetooth®trademark:
Bluetooth®is a trademark owned
by Bluetooth SIG, Inc., and
licensed to Clarion.
AUDIO MAIN OPERATION
Turning audio system on/off
Push the power switch to the "ACC" or "ON"
position, and then push thebutton while the
system is off to turn on the last audio source,
that was playing immediately before the system
was turned off. While the system is on, pushing
the
button turns the system off.
Switching audio screen
. FM/AM radio band select:
Pushing the FM·AMbutton will change the
band as follows:
AM ?FM1 ?FM2 ?AM
. SiriusXM satellite radio band select:
Pushing the XMbutton will change the
band as follows:
XM1 ?XM2 ?XM3 ?XM1
. Audio mode select:
Pushing the CD·AUXbutton will switch the
displays as follows:
USB memory/iPod
®player*1/Pandora® *1*2
? CD ?Bluetooth®streaming audio*1?
AUX ?USB memory/iPod®player*1/Pan-
dora®*1*2
*1 Screen only displays when a device capable of
playback is connected.
Audio system4-11
FM-AM-SAT RADIO WITH
COMPACT DISC (CD) PLAYER
Page 150 of 275
4-16Audio system
iPod®PLAYER OPERATION
Connecting iPod
®
Connect the iPod®cable to the USB connector.
If the iPod®supports charging via USB, the
battery of the iPod®will be charged while
connected to the vehicle.
Depending on the model and firmware version of
the iPod
®, the display on the iPod®shows a
NISSAN or Accessory Attached screen when
the connection is completed. When the iPod
®is
connected to the vehicle, the iPod®music library
can only be operated by the vehicle audio
controls.
iPod
®and iPhone®are a trademark of Apple
Inc., registered in the U.S. and other countries.
CAUTION
. Do not force the iPod®cable into
the USB port. Inserting the iPod®
cable tilted or up-side-down into the
port may damage the iPod®cable
and the port. Make sure that the
iPod
®cable is connected correctly
into the USB port. (Some iPod®
cable come with amark as a
guide. Make sure that the mark is
facing the correct direction before
inserting the iPod
®cable.)
. Do not locate objects near the iPod®
cable to prevent the objects from
leaning on the iPod®cable and the
port. Pressure from the objects may
damage the iPod
®cable and the
port.
Playing iPod®
Push the power switch to the "ACC" or "ON"
position. Then, push the CD·AUXbutton
repeatedly to switch to the iPod
®mode. If the
system has been turned off while the iPod®was
playing, pushing thebutton will start the
iPod®.
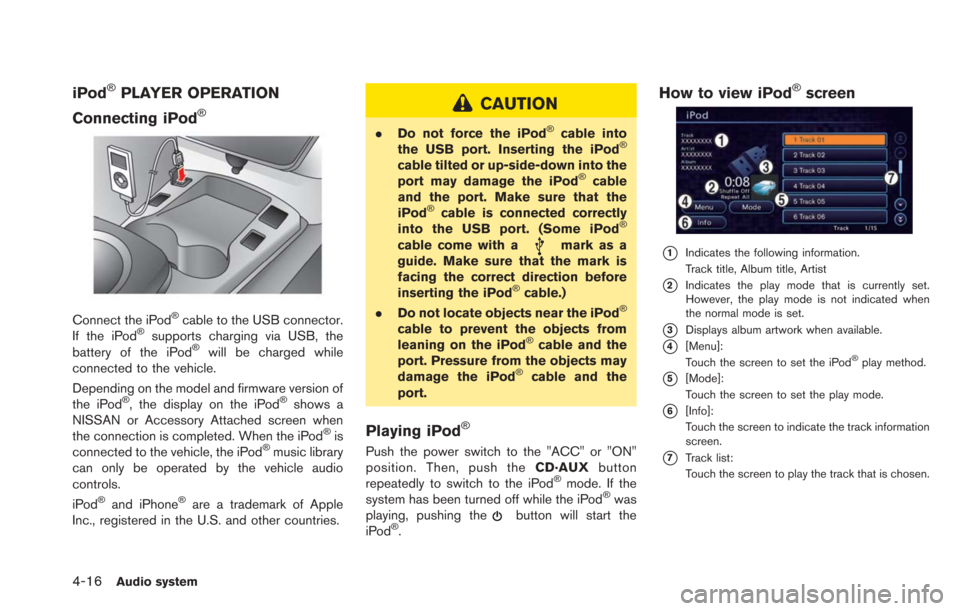
How to view iPod®screen
*1Indicates the following information.
Track title, Album title, Artist
*2Indicates the play mode that is currently set.
However, the play mode is not indicated when
the normal mode is set.
*3Displays album artwork when available.
*4[Menu]:
Touch the screen to set the iPod®play method.
*5[Mode]:
Touch the screen to set the play mode.
*6[Info]:
Touch the screen to indicate the track information
screen.
*7Track list:
Touch the screen to play the track that is chosen.
Page 151 of 275
Next/Previous Track and Fast For-
ward/Rewind
Push theTUNE SEEK CH button for more than
1.5 seconds while an iPod®is playing to fast
forward or rewind through the current track.
When the button is released, the iPod
®will
return to the normal play speed.
When the TUNE SEEK CH button is pushed for
less than 1.5 seconds while an iPod
®is playing,
the next track or the beginning of the current
track on the iPod
®will be played.
Select play mode
The play mode setting display will appear when
[Mode] is touched.
Select the preferred play mode from the
following items.
. Shuffle
Choose "Off", "Songs" or "Albums".
. Repeat
Choose "One" or "All".
iPod®settings
The following items can be chosen from the
menu list screen. For further information about
each item, see the iPod
®Owner’s Manual.
. Now Playing .
Playlists
. Artists
. Albums
. Songs
. Podcasts
. Genres
. Composers
PANDORA®OPERATION (if so
equipped)
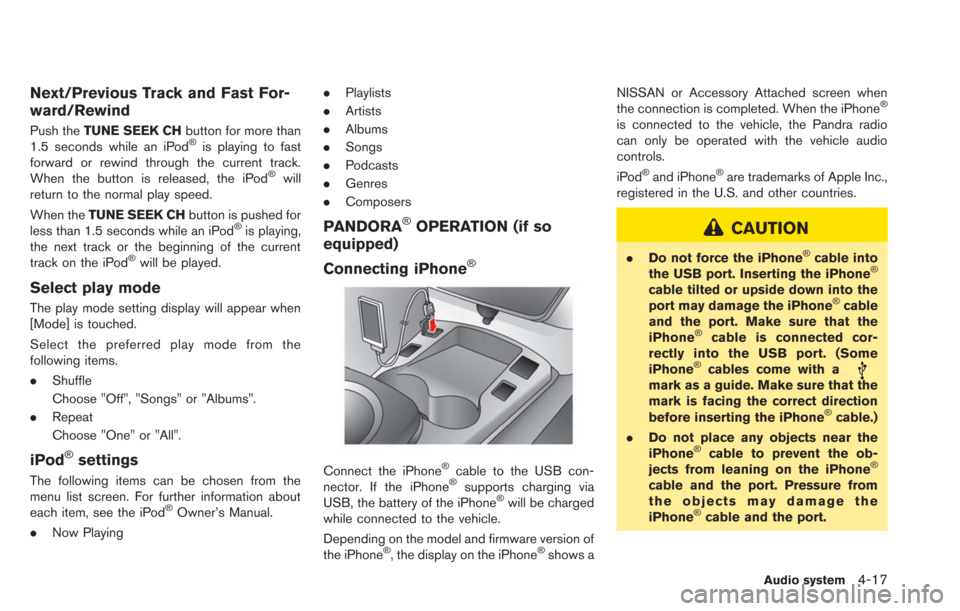
Connecting iPhone
®
Connect the iPhone®cable to the USB con-
nector. If the iPhone®supports charging via
USB, the battery of the iPhone®will be charged
while connected to the vehicle.
Depending on the model and firmware version of
the iPhone
®, the display on the iPhone®shows a NISSAN or Accessory Attached screen when
the connection is completed. When the iPhone
®
is connected to the vehicle, the Pandra radio
can only be operated with the vehicle audio
controls.
iPod
®and iPhone®are trademarks of Apple Inc.,
registered in the U.S. and other countries.
CAUTION
. Do not force the iPhone®cable into
the USB port. Inserting the iPhone®
cable tilted or upside down into the
port may damage the iPhone®cable
and the port. Make sure that the
iPhone
®cable is connected cor-
rectly into the USB port. (Some
iPhone
®cables come with amark as a guide. Make sure that the
mark is facing the correct direction
before inserting the iPhone
®cable.)
. Do not place any objects near the
iPhone
®cable to prevent the ob-
jects from leaning on the iPhone®
cable and the port. Pressure from
the objects may damage the
iPhone
®cable and the port.
Audio system4-17
Page 153 of 275
USB MEMORY OPERATION
Connecting USB memory
Connect a USB memory as shown in the
illustration. The USB screen is displayed.
CAUTION
.Do not force the USB device into the
USB port. Inserting the USB device
tilted or up-side-down into the port
may damage the USB device and
the port. Make sure that the USB
device is connected correctly into
the USB port. (Some USB devices
come with a
mark as a guide.
Make sure that the mark is facing
the correct direction before insert-
ing the device.) .
Do not locate objects near the USB
device to prevent the objects from
leaning on the USB device and the
port. Pressure from the objects may
damage the USB device and the
port.
Playing USB memory
Push the power switch to the "ACC" or "ON"
position. Then, push the CD·AUXbutton
repeatedly to switch to the USB memory mode.
If the system has been turned off while the USB
memory was playing, pushing the
button will
start the USB memory.
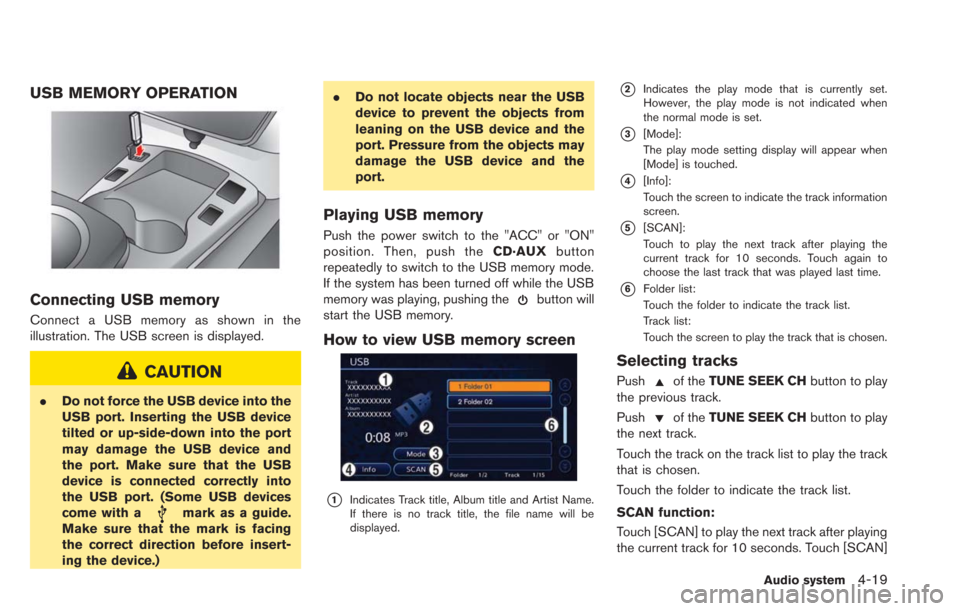
How to view USB memory screen
*1Indicates Track title, Album title and Artist Name.
If there is no track title, the file name will be
displayed.
*2Indicates the play mode that is currently set.
However, the play mode is not indicated when
the normal mode is set.
*3[Mode]:
The play mode setting display will appear when
[Mode] is touched.
*4[Info]:
Touch the screen to indicate the track information
screen.
*5[SCAN]:
Touch to play the next track after playing the
current track for 10 seconds. Touch again to
choose the last track that was played last time.
*6Folder list:
Touch the folder to indicate the track list.
Track list:
Touch the screen to play the track that is chosen.
Selecting tracks
Pushof the TUNE SEEK CH button to play
the previous track.
Push
of the TUNE SEEK CH button to play
the next track.
Touch the track on the track list to play the track
that is chosen.
Touch the folder to indicate the track list.
SCAN function:
Touch [SCAN] to play the next track after playing
the current track for 10 seconds. Touch [SCAN]
Audio system4-19