2013 MITSUBISHI iMiEV air condition
[x] Cancel search: air conditionPage 151 of 258

Important operation tips for the
air conditioning E00708301020
l Park the vehicle in the shade.
Parking
in the hot sun will make the vehicle
inside extremely hot, and it will require more
time to cool the interior.
If it is necessary to park in the sun, open the
windows for the first few minutes of air con-
ditioning operation to expel the hot air.
l Close the windows when the air conditioning
is in use.
The entry of outside air through open win-
dows will reduce the cooling efficiency.
l Too much cooling is not good for the health.
Keep the difference between the vehicle inte-
rior temperature and outside temperature to 5
to 6 °C.
l When operating the system, make sure the
air intake, which is located in front of the
windscreen, is free of obstructions such as
leaves and snow. Leaves collected in the air-
intake plenum may reduce air flow and plug
the plenum water drains.
l Too much cooling/heating can affect the cruis-
ing range, so maintain an appropriate temper-
ature to extend the cruising range.
Air conditioning system refrigerant
and lubricant recommendations
If the air conditioning seems less effective than usu-
al, the cause might be a refrigerant leak. We recom-
mend you to have the system inspected.
The air conditioning system in your vehicle must
be charged with the refrigerant HFC-134a and the
lubricant POE MA68EV. Use of any other refrigerant or lubricant will cause
severe
damage which will result in the need to re-
place your vehicle’s entire air conditioning system.
The release of refrigerant into the atmosphere is
not recommended.
The new refrigerant HFC-134a in your vehicle will
not harm the ozone layer.
We recommend you to recover and recycle the re-
frigerant for reuse.
During a long period of disuse
The air conditioning should be operated for at least
five minutes each week, even in cold weather. This
is to prevent the compressor from seizing and to
maintain the air conditioning in the best operating
condition. Air purifier
E00708400561
An
air filter has been incorporated into the air con-
ditioning so that pollen and dust are cleaned from
the air.
Replace the air filter periodically as its ability to
clean the air will be reduced as it collects pollen
and dirt. For the maintenance interval, refer to the
“SERVICE BOOKLET”.
NOTE
l Operation in certain conditions such as driv-
ing on a dusty road and frequent use of the
air conditioning can lead to reduction of serv-
ice life of the filter. When you feel that the
air flow is lower than normal or when the
windscreen or windows start to fog up easily,
replace the air filter.
We recommend you to have it checked. For pleasant driving
6-09 6
OHAE13E1
Page 152 of 258

Remote Climate Control
E00735400035
You
can run the air conditioning in advance of us-
ing the vehicle.
For details, refer to “Remote Climate Control” on
page 1-28. LW/MW/FM electronic tuning
radio with CD player* E00708502250
The
audio system can be used when the electric mo-
tor switch is in the “ON” or “ACC” position.
NOTE
l To listen to the audio system while the elec-
tric motor unit is stopped, turn the electric mo-
tor switch to the “ACC” position.
l If a cellular phone is used inside the vehicle,
it may create noise from the audio equip-
ment. This does not mean that anything is
wrong with your audio equipment. In such a
case, use the cellular phone at a place as far
away as possible from the audio equipment.
l If foreign objects or water get into the audio
equipment, or if smoke or a strange odour
comes from it, immediately turn off the au-
dio system. We recommend you to have it
checked. Never try to repair it by yourself.
Avoid continuous usage without inspection
by a qualified person. Volume and tone control panel
E00708601153 1- VOLUME (Volume control) knob
2-
SEEK (Audio adjust) button
3- Display
4- POWER (On-Off) button
5- (Mode change) button
To adjust the volume E00708700678
Turn the VOLUME knob clockwise to increase the
volume; anticlockwise to decrease the volume.
The status will be displayed in the display. For pleasant driving
6-10
6
OHAE13E1
Page 185 of 258

If the vehicle breaks down
............................................................ 7-02
Emergency starting ....................................................................... 7-02
Tyre repair kit ............................................................................... 7-04
Towing.......................................................................................... 7-10
Operation under adverse driving conditions .................................7-12For emergencies
7
OHAE13E1
Page 190 of 258

l
Use the tyre sealant only at ambient tempera-
tures of -30 °C to + 60 °C.
l Effect an emergency repair without pulling
out the object (nail, screw, etc.) that is stuck
in the tyre.
l Do not use the tyre sealant if the tyre has
been damaged by being driven when insuffi-
ciently inflated (e.g. bumps, cuts, cracks etc.
on the tyre).
l Wipe tyre sealant off the paintwork immedi-
ately with a damp cloth.
l Immediately wash clothes contaminated with
tyre sealant.
Before repairing a tyre, first stop your vehicle in a
safe, flat location. 1. Park the vehicle on level and stable ground.
2. Set the parking brake firmly.
3. Move the selector lever to the “P” (PARK)position and turn the electric motor switch to
the “LOCK” position.
4. Turn on the hazard warning flashers and set up a warning triangle, flashing signal lamp,
etc., at an adequate distance from the vehi-
cle, and have all your passengers leave the ve-
hicle.
5. Take out the tyre repair kit.
6. Shake the tyre sealant bottle well. NOTE
l In
cold conditions (when the ambient temper-
ature is 0 °C or lower), thickening of the tyre
sealant can make the tyre sealant hard to
squeeze out of the bottle. Warm the bottle in-
side the vehicle.
7. Take the cap (C) off the tyre sealant bottle (D). Do not remove the seal (E). Screw the
filler hose (D) onto the bottle (E). As you
screw the filler hose onto the bottle, the seal
will break, allowing the sealant to be used. CAUTION
l
If
you shake the bottle after screwing on
the hose, sealant may spray out of the hose.
8. Take the valve cap (G) off the tyre valve (H), then
press the valve remover (I) onto the
valve as illustrated. Allow all of the air in the
tyre to escape. 9. Remove
the valve insert (J) by turning it anti-
clockwise using the valve remover (I). Put
the removed valve insert in a clean place so
it does not get dirty. For emergencies
7-06
7
OHAE13E1
Page 193 of 258

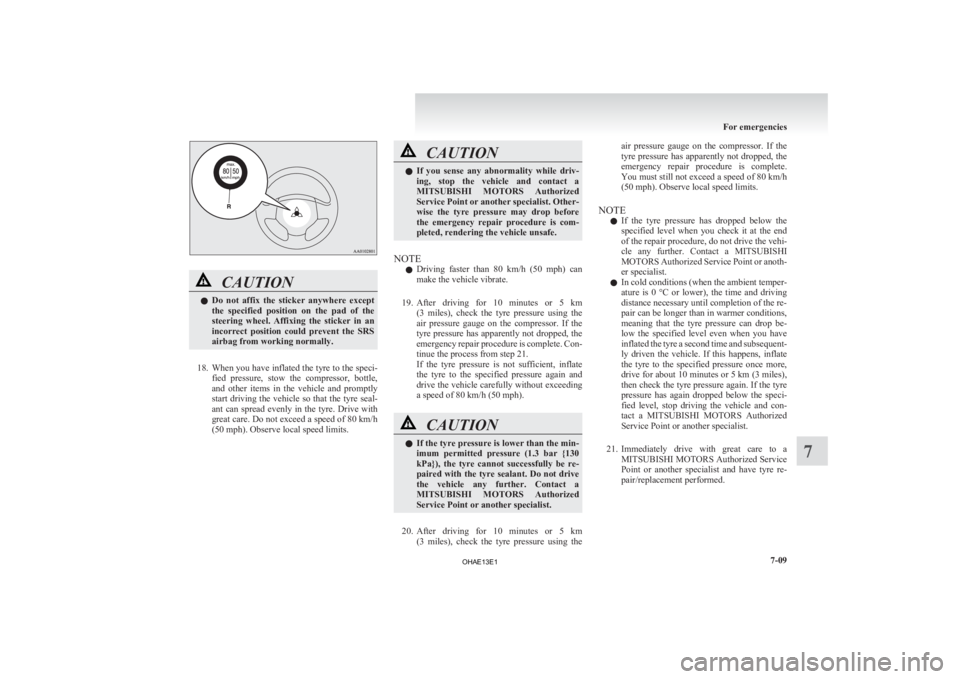
CAUTION
l
Do not affix the sticker anywhere except
the specified position on the pad of the
steering wheel. Affixing the sticker in an
incorrect position could prevent the SRS
airbag from working normally.
18. When
you have inflated the tyre to the speci- fied pressure, stow the compressor, bottle,
and other items in the vehicle and promptly
start driving the vehicle so that the tyre seal-
ant can spread evenly in the tyre. Drive with
great care. Do not exceed a speed of 80 km/h
(50 mph). Observe local speed limits. CAUTION
l
If
you sense any abnormality while driv-
ing, stop the vehicle and contact a
MITSUBISHI MOTORS Authorized
Service Point or another specialist. Other-
wise the tyre pressure may drop before
the emergency repair procedure is com-
pleted, rendering the vehicle unsafe.
NOTE l Driving
faster than 80 km/h (50 mph) can
make the vehicle vibrate.
19. After driving for 10 minutes or 5 km (3 miles), check the tyre pressure using the
air pressure gauge on the compressor. If the
tyre pressure has apparently not dropped, the
emergency repair procedure is complete. Con-
tinue the process from step 21.
If the tyre pressure is not sufficient, inflate
the tyre to the specified pressure again and
drive the vehicle carefully without exceeding
a speed of 80 km/h (50 mph). CAUTION
l
If
the tyre pressure is lower than the min-
imum permitted pressure (1.3 bar {130
kPa}), the tyre cannot successfully be re-
paired with the tyre sealant. Do not drive
the vehicle any further. Contact a
MITSUBISHI MOTORS Authorized
Service Point or another specialist.
20. After
driving for 10 minutes or 5 km (3 miles), check the tyre pressure using the air pressure gauge on the compressor. If the
tyre
pressure has apparently not dropped, the
emergency repair procedure is complete.
You must still not exceed a speed of 80 km/h
(50 mph). Observe local speed limits.
NOTE l If the tyre pressure has dropped below the
specified level when you check it at the end
of the repair procedure, do not drive the vehi-
cle any further. Contact a MITSUBISHI
MOTORS Authorized Service Point or anoth-
er specialist.
l In cold conditions (when the ambient temper-
ature is 0 °C or lower), the time and driving
distance necessary until completion of the re-
pair can be longer than in warmer conditions,
meaning that the tyre pressure can drop be-
low the specified level even when you have
inflated the tyre a second time and subsequent-
ly driven the vehicle. If this happens, inflate
the tyre to the specified pressure once more,
drive for about 10 minutes or 5 km (3 miles),
then check the tyre pressure again. If the tyre
pressure has again dropped below the speci-
fied level, stop driving the vehicle and con-
tact a MITSUBISHI MOTORS Authorized
Service Point or another specialist.
21. Immediately drive with great care to a MITSUBISHI MOTORS Authorized Service
Point or another specialist and have tyre re-
pair/replacement performed. For emergencies
7-09 7
OHAE13E1
Page 204 of 258

Service precautions
E08401700050
Adequate
care of your vehicle at regular intervals
serves to preserve the value and appearance as long
as possible.
Maintenance items as described in this owner’s man-
ual can be performed by the owner.
We recommend you to have the periodic inspection
and maintenance performed by a MITSUBISHI
MOTORS Authorized Service Point or another spe-
cialist.
In the event a malfunction or a problem is discov-
ered, we recommend you to have it checked and re-
paired. Follow the instructions and cautions for
each of the various procedures. WARNING
l Do
not touch any components in the elec-
tric motor unit room other than the re-
serve tank. There are no components re-
quiring inspection other than the reserve
tank. Never remove or disassemble the
component which generates high voltage,
high voltage wire (orange), its connector,
EV charging cable, charge connector,
plug and an outlet. Doing so could result
in a serious injury that may risk your life.
These components are affixed with the la-
bel indicating precautions for handling.
Follow the instructions on the label. Take
your vehicle to a MITSUBISHI
MOTORS Authorized Service Point for
any necessary maintenance. High voltage components and wiring cables are lo-
cated as shown in the figure below.
1- Regular charge port
2-
Inverter
3- Traction battery
4- Heater
5- Air conditioner compressor
6- High voltage connector
7- Service plug
8- Electric motor (Electric motor unit)
9- On board charger/DC-DC converter
10- Quick charge port WARNING
l Never
touch the service plug (A) under
the front seat. Doing so could result in se-
rious injury that may risk your life, in-
cluding an electric shock. The service
plug (A) is used to shut off high voltage
from the traction battery for repair of the
vehicle at a MITSUBISHI MOTORS Au-
thorized Service Point or another special-
ist. WARNING
l When
the ready indicator is illuminated,
and the charging indicator is illuminated
or blinking, never perform maintenance
because the high voltage system is operat-
ing.
l When servicing the vehicle, make sure
that the electric motor switch is in the
“LOCK” position and the charging cable
is disconnected. Failure to do so could re-
sult in an electric shock.
l When checking or servicing the inside of
the bonnet room and coolant reserve
tank, make sure the electric motor unit is
switched off and has had a chance to cool
down. Vehicle care and Maintenance
8-06
8
OHAE13E1
Page 210 of 258

The brake fluid in the master cylinder should be
checked
when doing other work under the bonnet.
The brake system should also be checked for leak-
age at the same time.
If the brake fluid level falls markedly in a short
length of time, it indicates leaks from the brake sys-
tem.
If this occurs, we recommend you to have the vehi-
cle checked.
Fluid type
Use brake fluid conforming to DOT3 or DOT4
from a sealed container. The brake fluid is hygro-
scopic. Too much moisture in the brake fluid will
adversely affect the brake system, reducing the per-
formance. CAUTION
l
Take
care in handling brake fluid as it is
harmful to the eyes, may irritate your
skin and also damage painted surfaces.
l Use only the specified brake fluid.
Do not mix or add different brands of
brake fluid to prevent chemical reactions.
Do not let any petroleum-based fluid
touch, mix with, or get into the brake fluid.
This will damage the seals.
l Keep the reservoir tank cap closed to pre-
vent the brake fluid from deteriorating ex-
cept maintenance.
l Clean the filler cap before removing and
close the cap securely after maintenance. Auxiliary battery
E08402300011
The
condition of the auxiliary battery is very impor-
tant to keep the vehicle’s electrical system working
properly. Regular inspection and care are especial-
ly important in cold weather.
Removing and installing the auxiliary
battery upper cover E08402400012
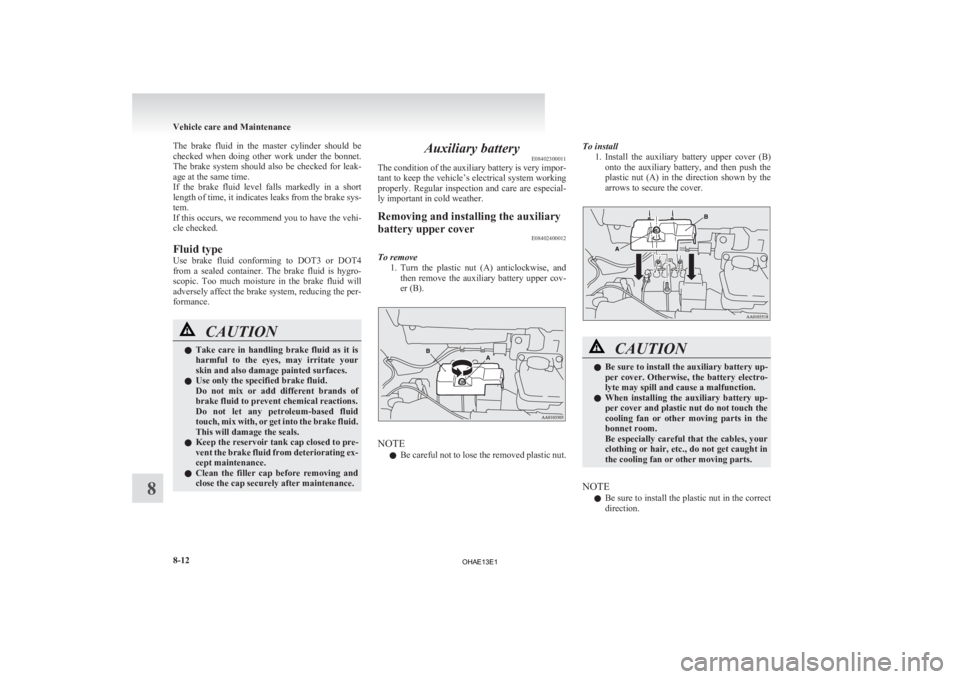
To remove 1. Turn
the plastic nut (A) anticlockwise, and
then remove the auxiliary battery upper cov-
er (B). NOTE
l Be
careful not to lose the removed plastic nut. To install
1. Install
the auxiliary battery upper cover (B)
onto the auxiliary battery, and then push the
plastic nut (A) in the direction shown by the
arrows to secure the cover. CAUTION
l
Be sure to install the auxiliary battery up-
per
cover. Otherwise, the battery electro-
lyte may spill and cause a malfunction.
l When installing the auxiliary battery up-
per cover and plastic nut do not touch the
cooling fan or other moving parts in the
bonnet room.
Be especially careful that the cables, your
clothing or hair, etc., do not get caught in
the cooling fan or other moving parts.
NOTE l Be
sure to install the plastic nut in the correct
direction. Vehicle care and Maintenance
8-12
8
OHAE13E1
Page 241 of 258
![MITSUBISHI iMiEV 2013 Owners Manual (in English) Electric energy consumption
E01101800017Item Combined
Electric energy consumption [NEDC]
*
135 Wh/kmElectric range (Cruising range) [NEDC]
*
150 km (93 miles)
* : NEDC stands for New European Dr MITSUBISHI iMiEV 2013 Owners Manual (in English) Electric energy consumption
E01101800017Item Combined
Electric energy consumption [NEDC]
*
135 Wh/kmElectric range (Cruising range) [NEDC]
*
150 km (93 miles)
* : NEDC stands for New European Dr](/manual-img/19/34894/w960_34894-240.png)
Electric energy consumption
E01101800017Item Combined
Electric energy consumption [NEDC]
*
135 Wh/kmElectric range (Cruising range) [NEDC]
*
150 km (93 miles)
* : NEDC stands for New European Driving Cycle. The values of electric energy consumption and electric range are based on ECE R101. These values vary
depending on driving style, road and traffic conditions, ambient temperature, use of air conditioners and so forth. NOTE
l The results given do not express or imply any guarantee of the electric energy consumption of the particular vehicle.
The
vehicle itself has not been tested and there are inevitably differences between individual vehicles of the same model. In addition, this vehicle may incor-
porate particular modifications. Furthermore, the driver’s style and road and traffic conditions, as well as the extent to which the vehicle has been driven and
the standard of maintenance, will all affect its electric energy consumption.
l All mentioned values are referring to a new, driven in vehicle.
l The consumption, but mainly the driving distance depends on the condition of the traction battery.
l Parameters on traction battery are depending on temperature, climate, charging and charging history and age of the traction battery etc.
l A bigger influence as known by combustion engine are the energy consumptive consumers of the vehicle like heating, air conditioning, etc. Specifications
9-07 9
OHAE13E1