2013 MERCEDES-BENZ SL-CLASS ROADSTER center console
[x] Cancel search: center consolePage 10 of 572

Indicator lamp ................................ 126
Maximum cooling
.......................... 128
Notes on
using automatic climate
control ........................................... 124
Overview of systems ...................... 122
Problems with cooling with air
dehumidification ............................ 126
Problem with the rear window
defroster ........................................ 129
Setting the air distribution .............127
Setting the airflow ......................... 127
Setting the air vents ......................131
Setting the climate mode (AIR
FLOW) ............................................ 126
Setting the temperature ................ 127
Switching air-recirculation mode
on/off ............................................ 130
Switching on/off ........................... 125
Switching residual heat on/off ...... 130
Switching the rear window
defroster on/off ............................ 129
Switching the ZONE function on/
off .................................................. 128
Cockpit
see Instrument cluster
Color, setting (TV, video) ..................453
COMAND Active multicontour seat ................ 287
Basic functions .............................. 275
Calling up drive status regulator
(ABC) ............................................. 291
Display ........................................... 271
Examples of operation ................... 273
Importing POIs ............................... 392
Multicontour seat .......................... 286
Seat functions ............................... 286
Settings ......................................... 410
Switching on/off ........................... 275
System settings ............................. 289
COMAND controller ...........................273
COMAND display Cleaning ......................................... 504
Cleaning instructions ..................... 272
Driving conditions menu (AMG
vehicles) ........................................ 183
Driving conditions menu (except
AMG vehicles) ................................ 180Setting ...........................................
289
Switching on/off
........................... 272
Combination switch ..........................112
Compass function ............................. 352
Connecting a USB device .................424
Consumption statistics (on-board
computer) .......................................... 209
Contacts Deleting ......................................... 384
Importing ....................................... 383
Contrast, setting (TV, video) ............453
Convenience closing feature ..............85
Convenience opening feature see Side windows
Coolant (engine)
Checking the level ......................... 498
Display message ............................ 238
Filling capacity ............................... 564
Notes ............................................. 563
Temperature (on-board computer) . 220
Temperature gauge ........................ 205
Warning lamp ................................. 263
Cooling
see Climate control
Copy protection (CD/DVD) ...............432
Cornering light function Display message ............................ 235
Function/notes ............................. 113
Crash-responsive emergency
lighting ............................................... 116
Cruise control Cruise control lever .......................162
Deactivating ................................... 164
Display message ............................ 246
Driving system ............................... 162
Function/notes ............................. 162
Important safety notes .................. 162
Setting a speed .............................. 163
Storing and maintaining current
speed ............................................. 163
Cup holder
Center console .............................. 478
Important safety notes .................. 478
Customer Assistance Center (CAC) ...32
Customer Relations Department .......328
Index
Page 24 of 572

SRS (Supplemental Restraint
System)
Introduction
..................................... 37
Warning lamp ................................. 262
Warning lamp (function) ................... 37
Standing lamps
Display message ............................ 237
Switching on/off ........................... 111
Starting (engine) ................................ 137
Station search ................................... 413
STEER CONTROL .................................. 65
Steering (display message) ..............252
Steering wheel Adjusting (electrically) ...................101
Buttons (on-board computer) ......... 206
Cleaning ......................................... 505
Important safety notes .................. 101
Paddle shifters ............................... 148
Storing settings (memory
function) ........................................ 105
Steering wheel paddle shifters ........148
Stop function Audio DVD ..................................... 426
Video DVD ..................................... 455
Stopwatch (RACETIMER) ................... 220
Storing stations Radio ............................................. 414
Stowage areas ................................... 474
Stowage compartments Armrest (under) ............................. 475
Center console .............................. 475
Cup holders ................................... 478
Display message) ........................... 252
Eyeglasses compartment ............... 475
Glove box ....................................... 474
Important safety information ......... 474
Rear ............................................... 476
Stowage net ................................... 476
Stowage net ....................................... 476
Stowage space Center console (rear) ..................... 476
Umbrella holder ............................. 475
Stowage well beneath the trunk
floor .................................................... 478
Summer tires ..................................... 528
Sun visor ............................................ 479Supplemental Restraint System
see SRS (Supplemental Restraint
System)
Surround lighting (on-board
computer) .......................................... 217
Surround sound ................................. 278
Surround sound (harman/
kardon ®
surround sound system)
Notes ............................................. 278
Switching on/off ........................... 279
Suspension tuning
Active Body Control (AMG
vehicles) ........................................ 182
Active Body Control (except AMG
vehicles) ........................................ 180
SETUP (on-board computer) .......... 220
Switching air-recirculation mode
on/off ................................................. 130
Switching between picture
formats (TV, video) ............................453
Switching between summer time
and standard time ............................. 290
Switching off the alarm (ATA) ............65
Switching the hands-free
microphone on/off ............................ 366
Switching wavebands (radio) ...........413
System settings
Bluetooth ®
..................................... 292
Date ............................................... 289
Language ....................................... 292
Text reader speed ..........................291
Time ............................................... 289
Time zone ...................................... 290
Voice Control System .................... 291 T
Tachometer ........................................ 206
Tail lamps Display message ............................ 236
see Lights
Tank
see Fuel tank
Tank content
Fuel gauge ..................................... 205
Technical data
Capacities ...................................... 560
Notes ............................................. 55822
Index
Page 43 of 572

The lighter the passenger side occupant, the
higher the vehicle deceleration rate required
(predicted at the start of the impact) for
second-stage
inflation
of the front-passenger
front air bag. In the second stage, the front
air bags are inflated with the maximum
amount of propellant gas available.
The front air bags are not deployed in
situations where a low impact severity is
predicted. You will then be protected by the
fastened seat belt.
Front-passenger front air bag ; will only
deploy if:
R the system, based on the OCS weight
sensor readings, has detected that the
front-passenger seat is occupied.
R the ^a indicator lamp on the center
console is not lit, (Y page 43)
R the air bag control unit predicts a high
impact severity.
Knee bags The driver's knee bag
: deploys
underneath
the steering column and front-passenger
knee bag ; underneath the glove box. They
deploy together with the front air bags. They
are designed to operate together with the
front air bags in frontal impacts if certain
thresholds are exceeded. The knee bags
operate at best in conjunction with correctly
positioned and fastened seat belts. Knee bags provide increased protection for
the
driver
and front passenger against the risk
of:
R knee injuries
R thigh injuries
R lower leg injuries
Side impact air bags G
WARNING
The pressure sensors for side impact air bag
control are located in the doors. Do not
modify any components of the doors or door
trim panels including, for example, the
addition of door speakers.
Improper repair work on the doors or the
modification or
addition of components to the
doors create a risk of rendering the side
impact air bags inoperative or causing
unintended air bag deployment. Work on the
doors must therefore only be performed by
qualified technicians. Contact an authorized
Mercedes-Benz Center. G
WARNING
Only use seat covers which have been tested
and approved by Mercedes-Benz for your
vehicle model. Using other seat covers may
interfere with or prevent the deployment of
the side impact air bags. Contact an
authorized Mercedes-Benz Center for
availability. Example: side impact air bag on the driver's side
side impact air bags
: deploy next to the
outer side bolsters of the seat backrest. Occupant safety
41
Safety Z
Page 86 of 572

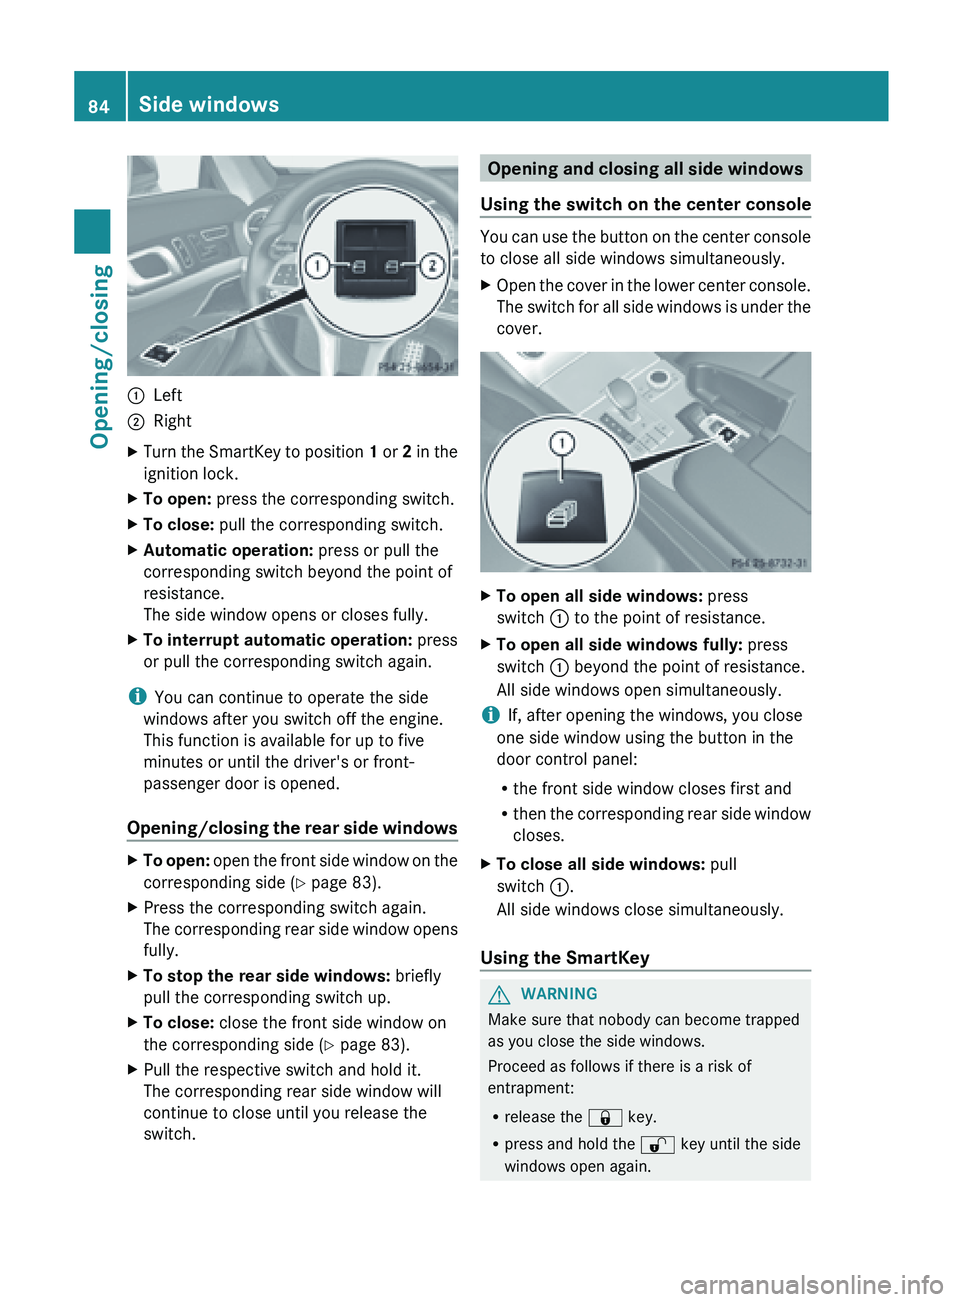
:
Left
; Right
X Turn the SmartKey to position 1 or 2 in the
ignition lock.
X To open: press the corresponding switch.
X To close: pull the corresponding switch.
X Automatic operation: press or pull the
corresponding switch beyond the point of
resistance.
The side window opens or closes fully.
X To interrupt automatic operation: press
or pull the corresponding switch again.
i You can continue to operate the side
windows after you switch off the engine.
This function is available for up to five
minutes or until the driver's or front-
passenger door is opened.
Opening/closing the
rear side windowsX
To open: open the front side window on the
corresponding side ( Y
page 83).
X Press the corresponding switch again.
The corresponding
rear side window opens
fully.
X To stop the rear side windows: briefly
pull the corresponding switch up.
X To close: close the front side window on
the corresponding side (Y page 83).
X Pull the respective switch and hold it.
The corresponding rear side window will
continue to close until you release the
switch. Opening and closing all side windows
Using the switch on the center console You can use the button on the center console
to close all side windows simultaneously.
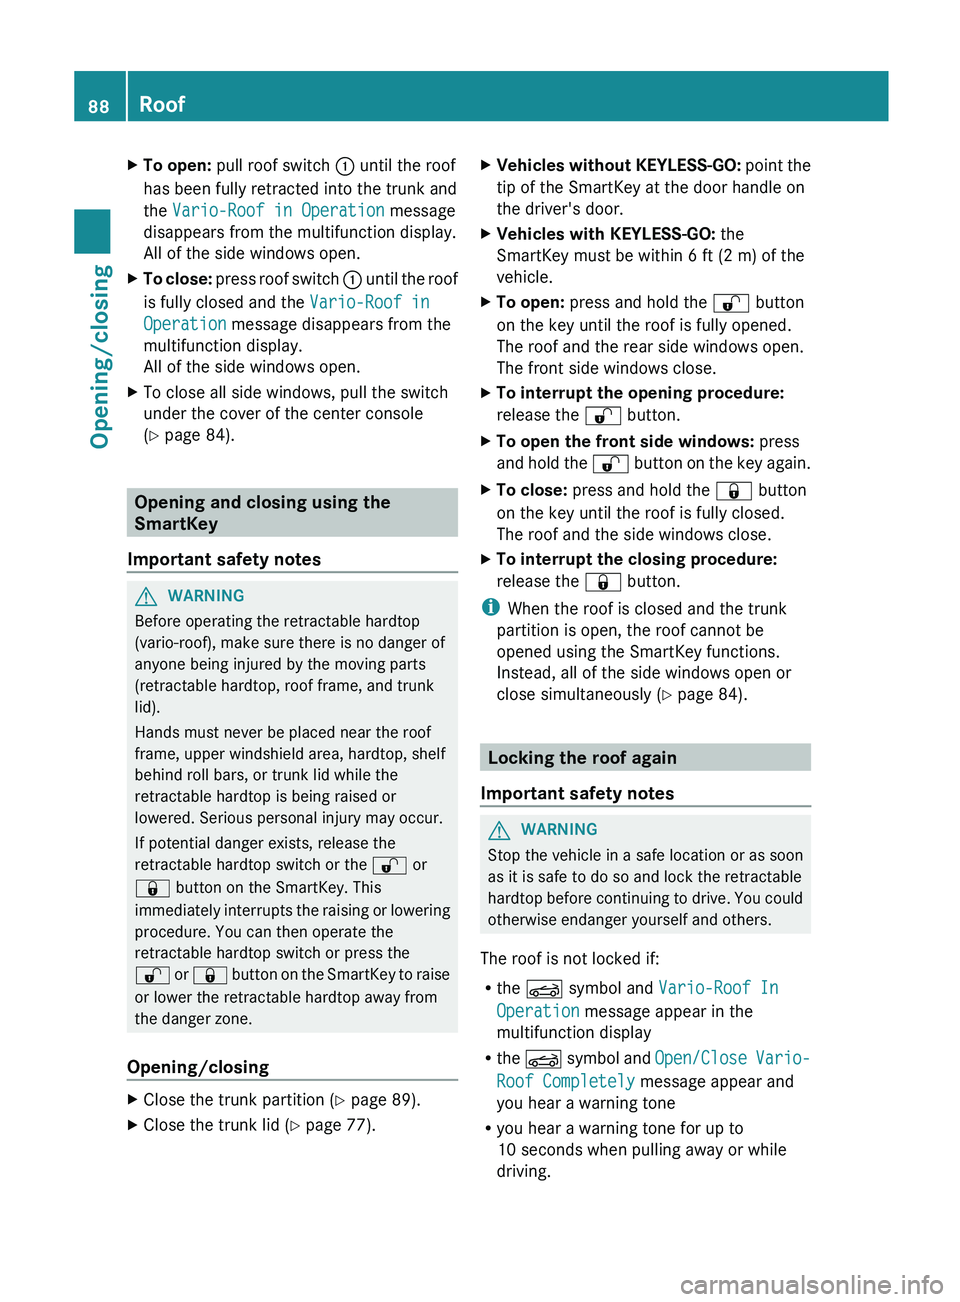
X
Open the cover in the lower center console.
The switch
for all side windows is under the
cover. X
To open all side windows: press
switch : to the point of resistance.
X To open all side windows fully: press
switch : beyond the point of resistance.
All side windows open simultaneously.
i If, after opening the windows, you close
one side window using the button in the
door control panel:
R the front side window closes first and
R then the
corresponding rear side window
closes.
X To close all side windows: pull
switch :.
All side windows close simultaneously.
Using the SmartKey G
WARNING
Make sure that nobody can become trapped
as you close the side windows.
Proceed as follows if there is a risk of
entrapment:
R release the & key.
R press and hold the % key until the side
windows open again. 84
Side windows
Opening/closing
Page 89 of 572

Attempting to manually close the roof may
cause damage to the roof and/or injury.
For this reason, the manual closing process
should only be carried out at a qualified
specialist workshop.
! Never sit
on the rear compartment trim or
stow heavy objects there. You will
otherwise damage the roof and rear
compartment trim of the vehicle.
! Do not forget that the weather can
change abruptly. Make certain that the roof
is closed when you leave the vehicle. The
vehicle electronics can be damaged if
water enters the vehicle interior.
! When opening and closing the roof, make
sure that:
R there is sufficient clearance, as the roof
swings upwards.
R there is sufficient clearance behind the
vehicle, as the trunk lid swings
backwards beyond the bumper.
R the trunk is only loaded to below the
trunk partition.
R the trunk partition is not pushed up by
the load.
R the trunk partition is closed.
R the trunk lid is closed.
R the outside temperature is above 5 ‡
(Ò15 †).
You could otherwise damage the roof,
trunk and other parts of the vehicle.
i Make sure that the roof and rear window
are clean and dry before opening the roof.
Otherwise, water or dirt could enter the
vehicle interior or trunk. Opening and closing using the roof
switch
Important safety notes G
WARNING
Before operating the retractable hardtop
(vario-roof), make sure there is no danger of
anyone being injured by the moving parts
(retractable hardtop, roof frame, and trunk
lid).
Hands must never be placed near the roof
frame, upper windshield area, hardtop, shelf
behind roll bars, or trunk lid while the
retractable hardtop is being raised or
lowered. Serious personal injury may occur.
If potential danger exists, release the
retractable hardtop switch or the
% or
& button on the SmartKey. This
immediately interrupts
the raising or lowering
procedure. You can then operate the
retractable hardtop switch or press the
% or & button on the SmartKey to raise
or lower the retractable hardtop away from
the danger zone.
Opening/closing X
Secure the vehicle against rolling away
(
Y page 154).
X Close the trunk partition (Y page 89).
X Close the trunk lid.
X Turn the SmartKey to position 2 in the
ignition lock.
X Open the cover in the lower center console.
Roof switch : is located under the cover. Roof
87
Opening/closing Z
Page 90 of 572

X
To open: pull roof switch : until the roof
has been fully retracted into the trunk and
the Vario-Roof in Operation message
disappears from the multifunction display.
All of the side windows open.
X To close: press roof
switch : until the roof
is fully closed and the Vario-Roof in
Operation message disappears from the
multifunction display.
All of the side windows open.
X To close all side windows, pull the switch
under the cover of the center console
(Y page 84). Opening and closing using the
SmartKey
Important safety notes G
WARNING
Before operating the retractable hardtop
(vario-roof), make sure there is no danger of
anyone being injured by the moving parts
(retractable hardtop, roof frame, and trunk
lid).
Hands must never be placed near the roof
frame, upper windshield area, hardtop, shelf
behind roll bars, or trunk lid while the
retractable hardtop is being raised or
lowered. Serious personal injury may occur.
If potential danger exists, release the
retractable hardtop switch or the % or
& button on the SmartKey. This
immediately interrupts
the raising or lowering
procedure. You can then operate the
retractable hardtop switch or press the
% or & button on the SmartKey to raise
or lower the retractable hardtop away from
the danger zone.
Opening/closing X
Close the trunk partition (Y page 89).
X Close the trunk lid ( Y page 77). X
Vehicles without KEYLESS-GO: point
the
tip of the SmartKey at the door handle on
the driver's door.
X Vehicles with KEYLESS-GO: the
SmartKey must be within 6 ft (2 m) of the
vehicle.
X To open: press and hold the % button
on the key until the roof is fully opened.
The roof and the rear side windows open.
The front side windows close.
X To interrupt the opening procedure:
release the % button.
X To open the front side windows: press
and hold
the % button on the key again.
X To close: press and hold the & button
on the key until the roof is fully closed.
The roof and the side windows close.
X To interrupt the closing procedure:
release the & button.
i When the roof is closed and the trunk
partition is open, the roof cannot be
opened using the SmartKey functions.
Instead, all of the side windows open or
close simultaneously (Y
page 84). Locking the roof again
Important safety notes G
WARNING
Stop the vehicle in a safe location or as soon
as it is safe to do so and lock the retractable
hardtop before
continuing to drive. You could
otherwise endanger yourself and others.
The roof is not locked if:
R the K symbol and Vario-Roof In
Operation message appear in the
multifunction display
R the K symbol and Open/Close Vario-
Roof Completely message appear and
you hear a warning tone
R you hear a warning tone for up to
10 seconds when pulling away or while
driving.88
Roof
Opening/closing
Page 94 of 572

X
Hold wind screen = at an angle and then
remove from the rear brackets.
X Slide covers : and ; of the rear brackets
against the direction of the arrow until they
are fully closed.
Electrical wind screen Important safety notes
G
WARNING
If you use the wind screen in darkness or in
other conditions offering poor visibility, your
view to
the rear is further impaired. As a result
of the visibility impairment, you could cause
an accident and injure yourself or others. For
this reason, retract the wind screen as soon
as it is dark or if your vision is otherwise
restricted.
! When extending or retracting the wind
screen, make sure there are no objects on
the rear compartment trim. Otherwise, the
objects could damage the wind screen.
The wind screen offers protection from the
wind when driving with the roof down. The
roof must be fully open before the wind
screen can be extended.
Extending and retracting
X Open the roof (Y page 86).
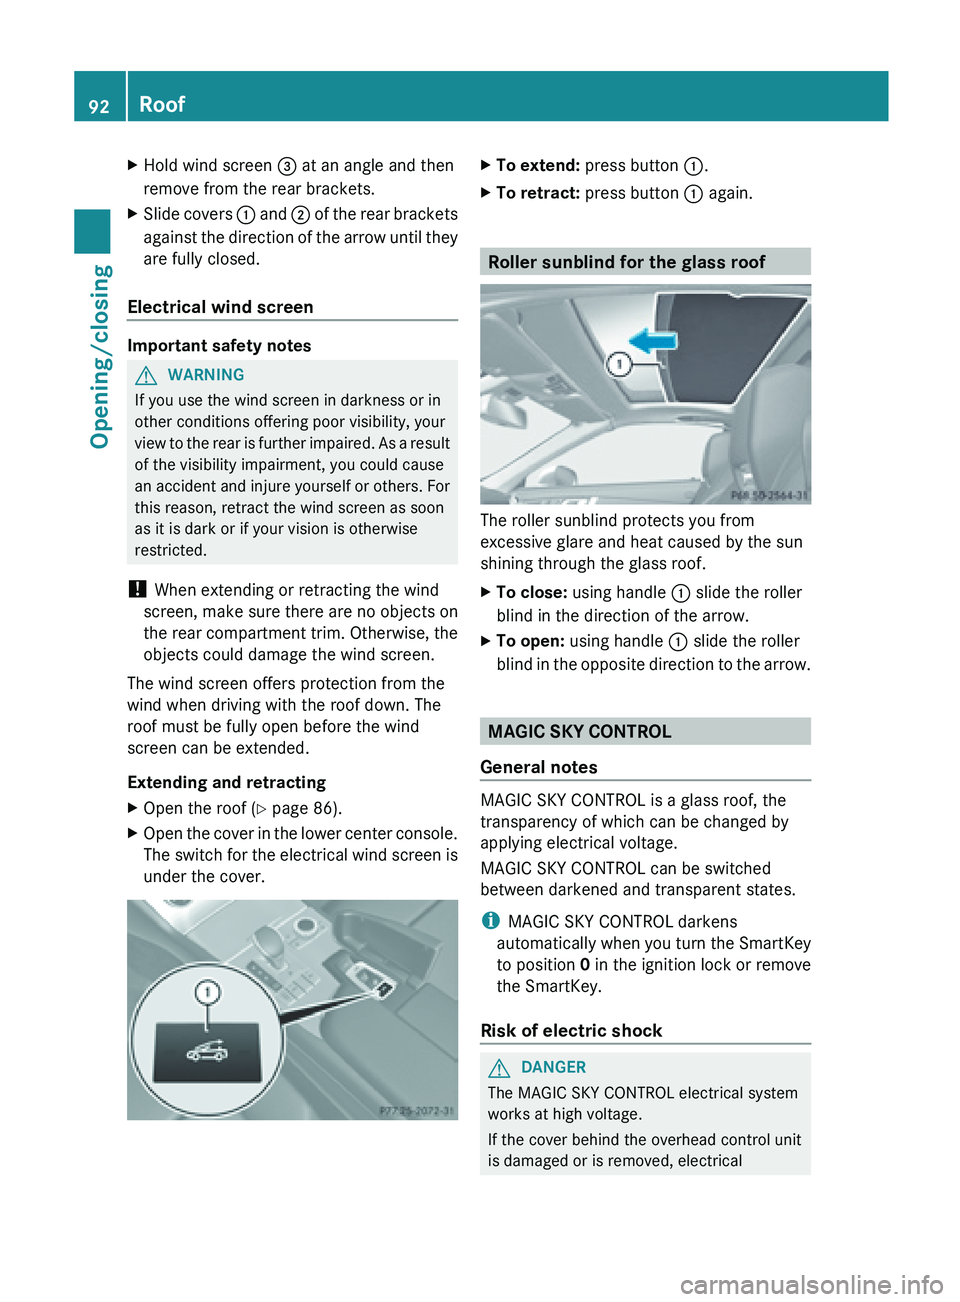
X Open the cover in the lower center console.
The switch
for the electrical wind screen is
under the cover. X
To extend: press button :.
X To retract: press button : again. Roller sunblind for the glass roof
The roller sunblind protects you from
excessive glare and heat caused by the sun
shining through the glass roof.
X
To close: using handle : slide the roller
blind in the direction of the arrow.
X To open: using handle : slide the roller
blind in
the opposite direction to the arrow. MAGIC SKY CONTROL
General notes MAGIC SKY CONTROL is a glass roof, the
transparency of which can be changed by
applying electrical voltage.
MAGIC SKY CONTROL can be switched
between darkened and transparent states.
i
MAGIC SKY CONTROL darkens
automatically when
you turn the SmartKey
to position 0 in the ignition lock or remove
the SmartKey.
Risk of electric shock G
DANGER
The MAGIC SKY CONTROL electrical system
works at high voltage.
If the cover behind the overhead control unit
is damaged or is removed, electrical 92
Roof
Opening/closing
Page 146 of 572

i
Neutral
h Drive
When you select a transmission position, the
selector lever subsequently returns to its
original position.
The current transmission position P, R, N or
D appears in the transmission position
display in the multifunction display.
Engaging park position P X
When the vehicle is stationary, depress the
brake pedal.
X Press the P button in the center console.
i If you depress the brake pedal and push
the selector lever forwards or back to the
first point of resistance, park position P is
disengaged. The transmission shifts to
neutral N.
Park position P
is engaged automatically and
the electric parking brake applied:
R if you remove the SmartKey from the
ignition lock
R if you switch off the engine using the Start/
Stop button and open the driver's or front-
passenger door
R if you open the driver's door while traveling
at low speed in transmission position D or
R
R when HOLD ( Y page 175) or DISTRONIC
PLUS (Y page 164) brakes your vehicle
until it is stationary and at least one of the
following conditions is fulfilled:
- the engine is switched off.
- the driver's door is open and the seat belt
is not fastened.
- there is a system malfunction.
- the power supply is insufficient.
Engaging reverse gear R !
Only shift the automatic transmission to
R when the vehicle is stationary. X
When the vehicle is stationary, depress the
brake pedal.
X Push the selector lever forwards past the
first point of resistance.
i When reverse gear is engaged and the
ECO start/stop
function is switched on, the
engine starts up automatically
(Y page 138).
Shifting to neutral N X
When the vehicle is stationary, depress the
brake pedal.
X Push the selector lever forwards or back to
the first point of resistance.
i If the
vehicle is braked to a standstill when
in neutral N and the brake pedal continues
to be depressed, the ECO start/stop
function switches the engine off
automatically ( Y page 138).
Remaining in neutral N G
WARNING
When leaving the SmartKey in the starter
switch, do not leave children unattended in
the vehicle.
It is possible for children to switch
on the ignition which could result in
unsupervised use of vehicle equipment.
Unsupervised use of vehicle equipment could
result in an accident and/or serious personal
injury.
Using the SmartKey:
R make sure that the ignition is switched on.
R when the vehicle is stationary, depress the
brake pedal and keep it depressed.
R shift to neutral N.
R release the brake pedal.
R if the electric parking brake is applied,
release it.
R switch off the ignition and leave the
SmartKey in the ignition lock.144
Automatic transmissionDriving and parking