2013 MERCEDES-BENZ SL-CLASS ROADSTER oil level
[x] Cancel search: oil levelPage 13 of 572

Selecting a media type ..................
426
Selecting a track
............................ 427
Sound settings (balance, bass,
treble) ............................................ 278
DVD audio
Operating (on-board computer) ..... 212
DVD video
Operating (on-board computer) ..... 212E
EASY-ENTRY feature Activating/deactivating
.................219
Function/notes ............................. 102
EASY-EXIT feature
Crash-responsive ........................... 102
Function/notes ............................. 102
Switching on/off ........................... 219
EBD (electronic brake force
distribution)
Display message ............................ 226
Function/notes ................................ 62
ECO start/stop function
Deactivating/activating ................. 139
General information ....................... 139
Electrical fuses
see Fuses
Electronic Stability Program
see ESP ®
(Electronic Stability Program)
Emergency release
Driver's door .................................... 76
Trunk ............................................... 83
Vehicle ............................................. 76
Emergency Tensioning Devices
Function ........................................... 53
Safety guidelines ............................. 38
Emissions control
Service and warranty information .... 28
Engine
Check Engine warning lamp ........... 263
Display message ............................ 238
ECO start/stop function ................ 138
Engine number ............................... 560
Irregular running ............................ 142
Jump-starting ................................. 516
Starting problems .......................... 142
Starting the engine with the
SmartKey ....................................... 137Starting with KEYLESS-GO .............
137
Switching off .................................. 154
Tow-starting (vehicle) ..................... 520
Engine electronics
Problem (malfunction) ...................142
Engine oil
Adding
........................................... 498
Additives ........................................ 563
Checking the oil level ..................... 497
Checking the oil level using the
dipstick .......................................... 497
Display message ............................ 240
Filling capacity ............................... 563
Notes about oil grades ................... 562
Notes on oil level/consumption .... 497
Temperature (on-board computer) . 220
Viscosity ........................................ 563
Entering an intersection name ......... 301
Entering a street name ..................... 299
Entering the address (example) ....... 298
Entering the city ................................ 299
Entering the house number .............. 299
Entry Deleting ......................................... 284
Saving ............................................ 282
ESP ®
(Electronic Stability
Program) AMG menu (on-board computer) ... 220
Deactivating/activating (AMG
vehicles) .......................................... 61
Deactivating/activating (notes;
except AMG vehicles) ...................... 60
Display message ............................ 224
ETS .................................................. 60
Function/notes ................................ 59
Important safety information ........... 59
Warning lamp ................................. 259
ETS (Electronic Traction System) ....... 60
Example display Audio CD mode .............................. 425
MUSIC REGISTER ........................... 436
Exhaust check ................................... 158
Exhaust tail pipe (cleaning
instructions) ...................................... 504
Exterior lighting see Lights Index
11
Page 242 of 572
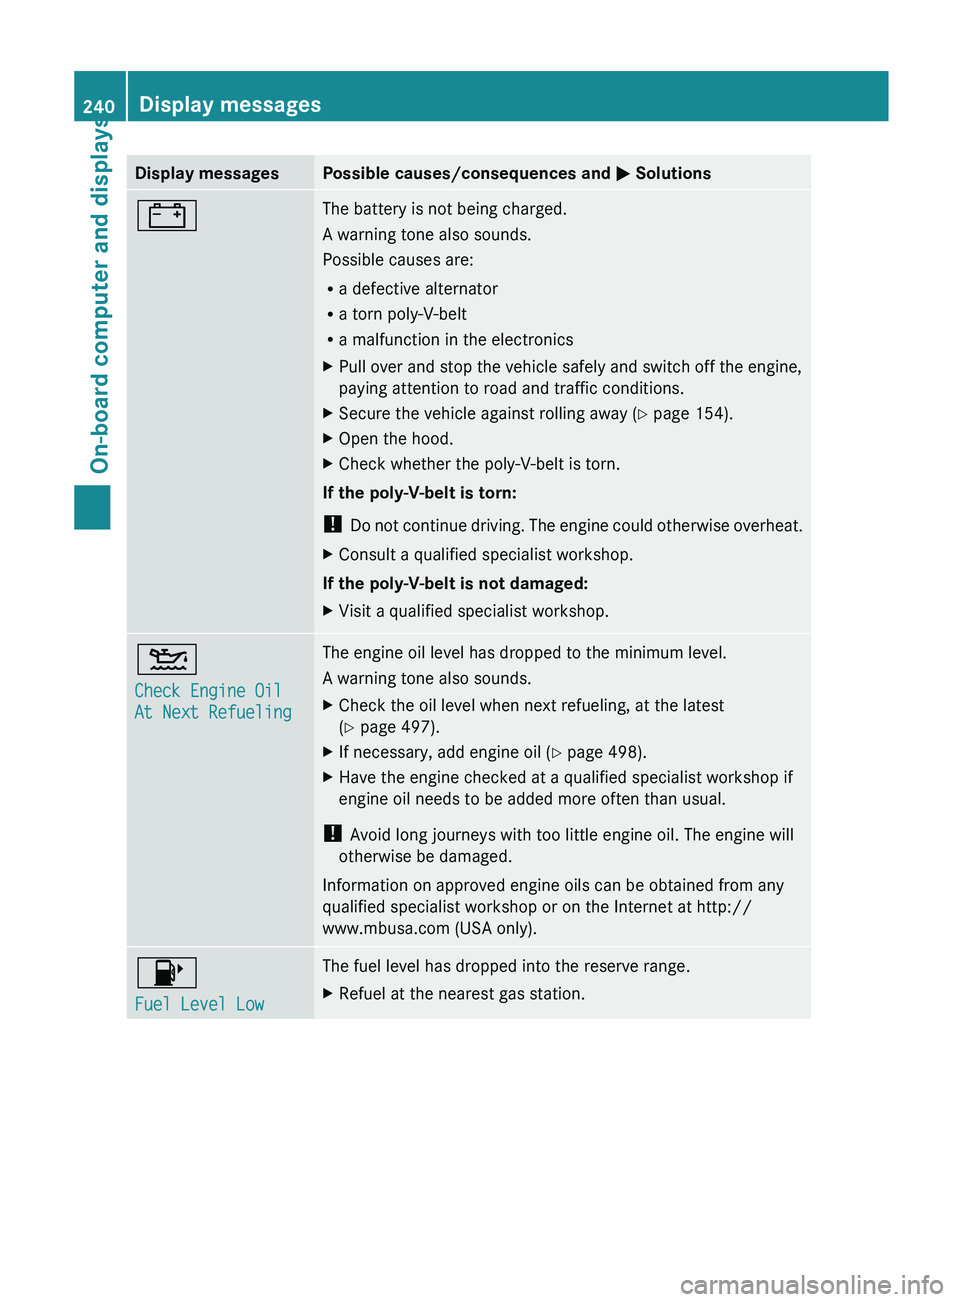
Display messages Possible causes/consequences and
M Solutions# The battery is not being charged.
A warning tone also sounds.
Possible causes are:
R
a defective alternator
R a torn poly-V-belt
R a malfunction in the electronics
X Pull over and stop the vehicle safely and switch off the engine,
paying attention to road and traffic conditions.
X Secure the vehicle against rolling away ( Y page 154).
X Open the hood.
X Check whether the poly-V-belt is torn.
If the poly-V-belt is torn:
! Do not
continue driving. The engine could otherwise overheat.
X Consult a qualified specialist workshop.
If the poly-V-belt is not damaged:
X Visit a qualified specialist workshop. 4
Check Engine Oil
At Next Refueling The engine oil level has dropped to the minimum level.
A warning tone also sounds.
X
Check the oil level when next refueling, at the latest
(Y page 497).
X If necessary, add engine oil ( Y page 498).
X Have the engine checked at a qualified specialist workshop if
engine oil needs to be added more often than usual.
! Avoid long journeys with too little engine oil. The engine will
otherwise be damaged.
Information on approved engine oils can be obtained from any
qualified specialist workshop or on the Internet at http://
www.mbusa.com (USA only). 8
Fuel Level Low The fuel level has dropped into the reserve range.
X
Refuel at the nearest gas station.240
Display messages
On-board computer and displays
Page 243 of 572
Display messages Possible causes/consequences and
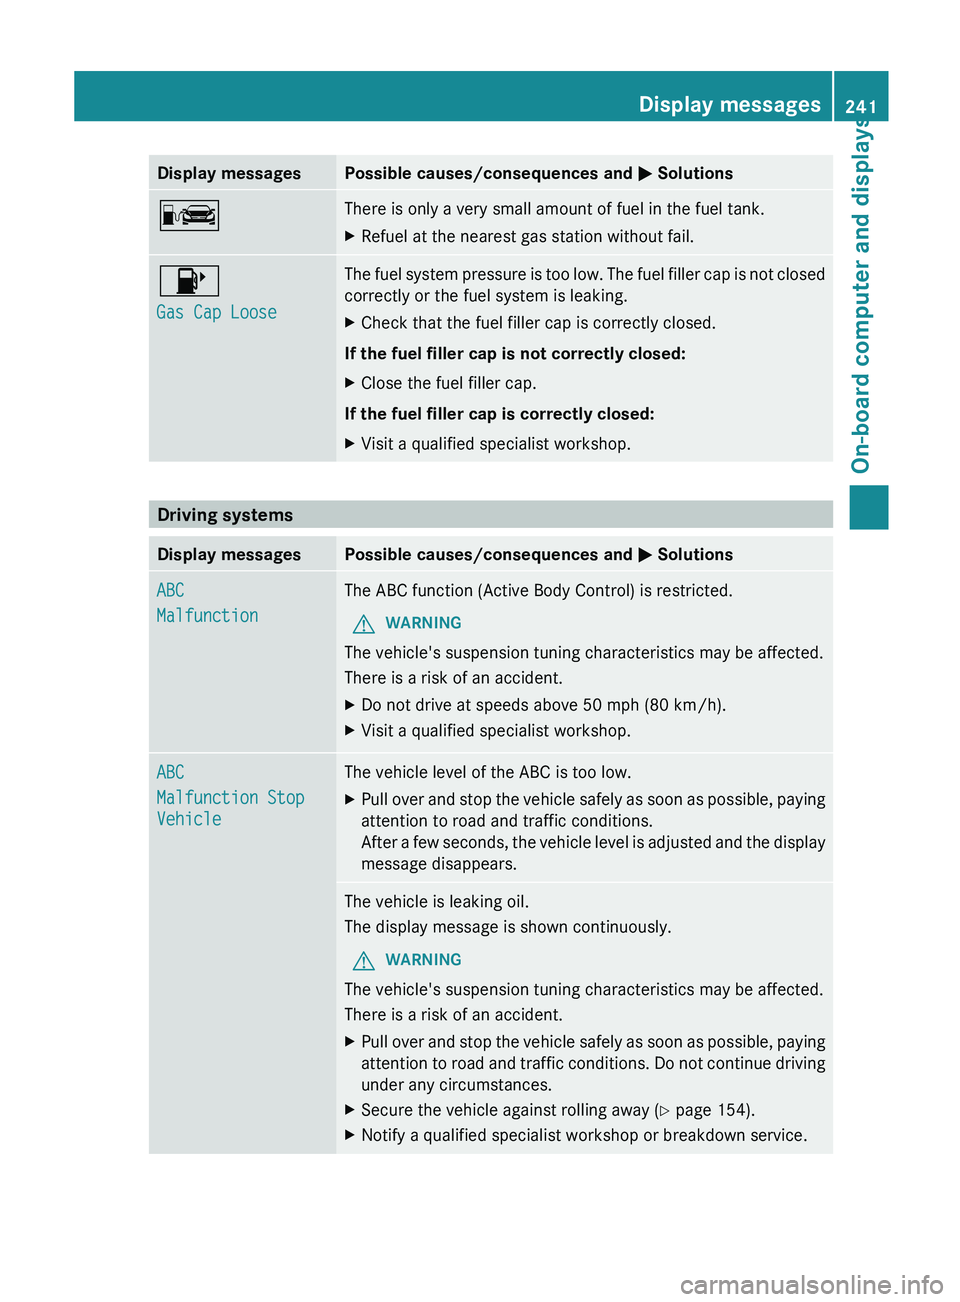
M SolutionsC There is only a very small amount of fuel in the fuel tank.
X
Refuel at the nearest gas station without fail. 8
Gas Cap Loose The fuel system pressure is too low. The fuel filler cap is not closed
correctly or the fuel system is leaking.
X
Check that the fuel filler cap is correctly closed.
If the fuel filler cap is not correctly closed:
X Close the fuel filler cap.
If the fuel filler cap is correctly closed:
X Visit a qualified specialist workshop. Driving systems
Display messages Possible causes/consequences and
M SolutionsABC
Malfunction The ABC function (Active Body Control) is restricted.
G WARNING
The vehicle's suspension tuning characteristics may be affected.
There is a risk of an accident.
X Do not drive at speeds above 50 mph (80 km/h).
X Visit a qualified specialist workshop. ABC
Malfunction Stop
Vehicle The vehicle level of the ABC is too low.
X
Pull over and stop the vehicle safely as soon as possible, paying
attention to road and traffic conditions.
After a
few seconds, the vehicle level is adjusted and the display
message disappears. The vehicle is leaking oil.
The display message is shown continuously.
G WARNING
The vehicle's suspension tuning characteristics may be affected.
There is a risk of an accident.
X Pull over and stop the vehicle safely as soon as possible, paying
attention to
road and traffic conditions. Do not continue driving
under any circumstances.
X Secure the vehicle against rolling away ( Y page 154).
X Notify a qualified specialist workshop or breakdown service. Display messages
241
On-board computer and displays Z
Page 494 of 572
Vehicle remote malfunction diagnosis
With the vehicle remote malfunction
diagnosis (Vehicle Health Check), the
Customer Assistance center can provide
improved support for problems with your
vehicle. During an existing call, vehicle data
is transferred to the Customer Assistance
center. The customer service representative
can
use
the received data to decide what kind
of assistance is required. You are then, for
example, guided to the nearest Mercedes-
Benz Service center or a recovery vehicle is
called.
If vehicle data needs to be transferred during
an MB Info call or a Roadside Assistance call,
this is initiated by the Customer Assistance
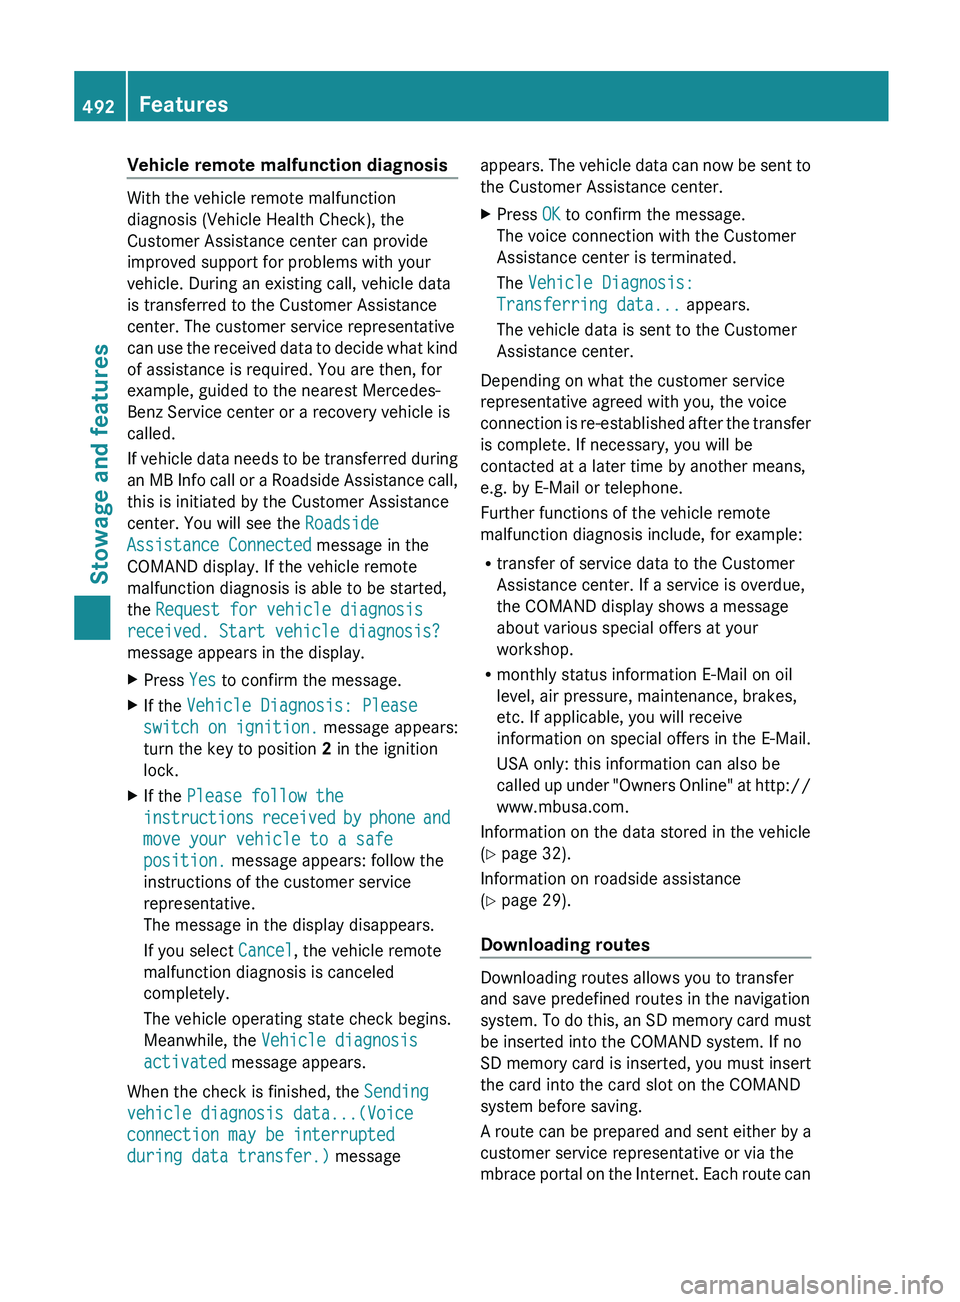
center. You will see the Roadside
Assistance Connected message in the
COMAND display. If the vehicle remote
malfunction diagnosis is able to be started,
the Request for vehicle diagnosis
received. Start vehicle diagnosis?
message appears in the display.
X Press Yes to confirm the message.
X If the Vehicle Diagnosis: Please
switch on ignition. message appears:
turn the key to position 2 in the ignition
lock.
X If the Please follow the
instructions received
by phone and
move your vehicle to a safe
position. message appears: follow the
instructions of the customer service
representative.
The message in the display disappears.
If you select Cancel, the vehicle remote
malfunction diagnosis is canceled
completely.
The vehicle operating state check begins.
Meanwhile, the Vehicle diagnosis
activated message appears.
When the check is finished, the Sending
vehicle diagnosis data...(Voice
connection may be interrupted
during data transfer.) message appears. The vehicle data can now be sent to
the Customer Assistance center.
X
Press OK to confirm the message.
The voice connection with the Customer
Assistance center is terminated.
The Vehicle Diagnosis:
Transferring data... appears.
The vehicle data is sent to the Customer
Assistance center.
Depending on what the customer service
representative agreed with you, the voice
connection is
re-established after the transfer
is complete. If necessary, you will be
contacted at a later time by another means,
e.g. by E-Mail or telephone.
Further functions of the vehicle remote
malfunction diagnosis include, for example:
R transfer of service data to the Customer
Assistance center. If a service is overdue,
the COMAND display shows a message
about various special offers at your
workshop.
R monthly status information E-Mail on oil
level, air pressure, maintenance, brakes,
etc. If applicable, you will receive
information on special offers in the E-Mail.
USA only: this information can also be
called up under "Owners Online" at http://
www.mbusa.com.
Information on the data stored in the vehicle
(Y page 32).
Information on roadside assistance
(Y page 29).
Downloading routes Downloading routes allows you to transfer
and save predefined routes in the navigation
system.
To
do this, an SD memory card must
be inserted into the COMAND system. If no
SD memory card is inserted, you must insert
the card into the card slot on the COMAND
system before saving.
A route can be prepared and sent either by a
customer service representative or via the
mbrace portal on the Internet. Each route can 492
Features
Stowage and features
Page 499 of 572
X
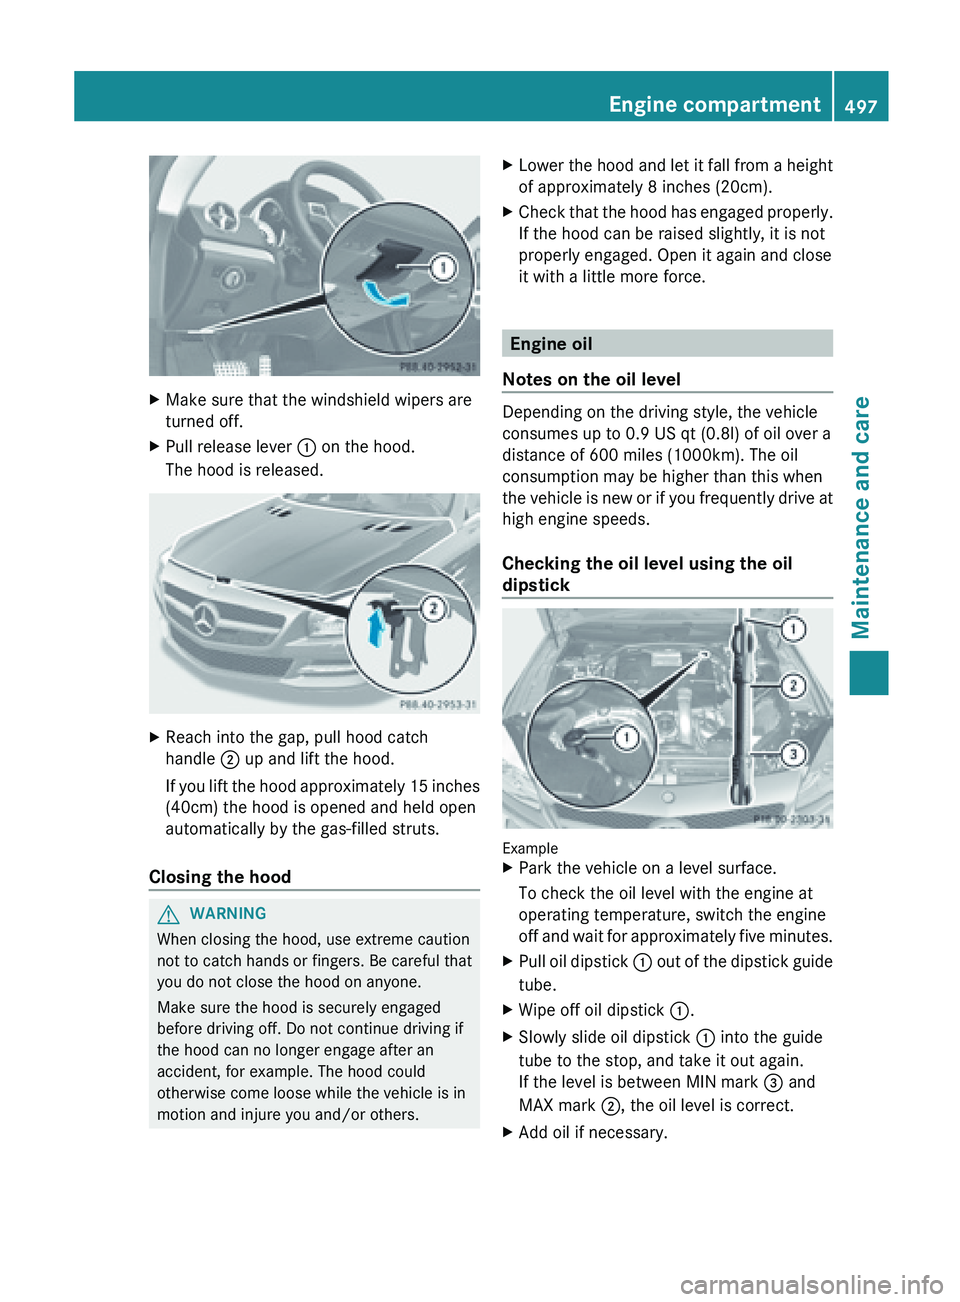
Make sure that the windshield wipers are
turned off.
X Pull release lever : on the hood.
The hood is released. X
Reach into the gap, pull hood catch
handle ; up and lift the hood.
If you
lift the hood approximately 15 inches
(40cm) the hood is opened and held open
automatically by the gas-filled struts.
Closing the hood G
WARNING
When closing the hood, use extreme caution
not to catch hands or fingers. Be careful that
you do not close the hood on anyone.
Make sure the hood is securely engaged
before driving off. Do not continue driving if
the hood can no longer engage after an
accident, for example. The hood could
otherwise come loose while the vehicle is in
motion and injure you and/or others. X
Lower the hood and let it fall from a height
of approximately 8 inches (20cm).
X Check
that the hood has engaged properly.
If the hood can be raised slightly, it is not
properly engaged. Open it again and close
it with a little more force. Engine oil
Notes on the oil level Depending on the driving style, the vehicle
consumes up to 0.9 US qt (
0.8l) of oil over a
distance of 600 miles (1000km). The oil
consumption may be higher than this when
the
vehicle is new or if you frequently drive at
high engine speeds.
Checking the oil level using the oil
dipstick Example
X
Park the vehicle on a level surface.
To check the oil level with the engine at
operating temperature, switch the engine
off and
wait for approximately five minutes.
X Pull oil dipstick : out
of the dipstick guide
tube.
X Wipe off oil dipstick :.
X Slowly slide oil dipstick : into the guide
tube to the stop, and take it out again.
If the level is between MIN mark = and
MAX mark ;, the oil level is correct.
X Add oil if necessary. Engine compartment
497
Maintenance and care Z
Page 500 of 572

Adding engine oil
G
WARNING
If engine oil comes into contact with hot
engine parts,
it may ignite and you could burn
yourself. Do not spill any engine oil on hot
engine parts. H
Environmental note
When adding oil, take care not to spill any. If
oil enters the soil or waterways, it is harmful
to the environment.
! Use only engine oils and oil filters that
have been approved for vehicles equipped
with a service system. A list of the engine
oils and oil filters tested and approved in
accordance with the Mercedes-Benz
Specifications for Service Products can be
called up by visiting http://
www.mbusa.com (USA only). More
information about tested and approved
engine oils and oil filters is available from
any authorized Mercedes-Benz Center.
Damage to
the engine or exhaust system is
caused by the following:
R using engine oils and oil filters which
have not been specifically approved for
the service system.
R replacing the engine oil or oil filter after
the replacement interval required by the
service system has elapsed
R using engine oil additives.
! Do not add too much oil. If the oil level is
above the "max" mark on the dipstick, too
much oil has been added. This can lead to
damage to the engine or the catalytic
converter. Have excess oil siphoned off. Example: engine oil cap
X
Turn cap : counter-clockwise and remove
it.
X Add the amount of oil required.
Fill carefully to the maximum mark on the
oil dipstick.
X Replace cap :
on the filler neck and
tighten clockwise.
Ensure that the cap locks into place
securely.
i The difference between the minimum
mark and the maximum mark on the oil
dipstick is approximately 1.4 US qt (
1.3l).
i Further information on engine oil
(Y page 562). Checking and adding other service
products
Checking the coolant level G
WARNING
In order to avoid potentially serious burns:
R use extreme caution when opening the
hood if there are any signs of vapor or
coolant leaking
from the cooling system, or
if the coolant temperature display indicates
that the coolant is overheated.
R do not remove the pressure cap on the
coolant tank if the coolant temperature is
above 158 ‡ (70 †). Allow the engine to
cool down before removing the cap. The
coolant tank contains hot fluid and is under
pressure.498
Engine compartment
Maintenance and care
Page 502 of 572

ASSYST PLUS
The ASSYST PLUS service interval display
informs you of the next service due date.
Information on
the type of service and service
intervals (see separate Maintenance
Booklet).
You can obtain further information from an
authorized Mercedes-Benz Center or at
http://www.mbusa.com (USA only).
i The ASSYST PLUS service interval display
does not show any information on the
engine oil level. Observe the notes on the
engine oil level ( Y page 497).Care
Notes on care
G
WARNING
Many cleaning products can be hazardous.
Some are poisonous, others are flammable.
Always follow the instructions on the
particular container. Always open your
vehicle's doors
or windows when cleaning the
inside.
Never use fluids or solvents that are not
designed for cleaning your vehicle.
Always lock away cleaning products and keep
them out of reach of children. H
Environmental note
Dispose of empty packaging and cleaning
cloths in an environmentally responsible
manner.
! For cleaning your vehicle, do not use any
of the following:
R dry, rough or hard cloths
R abrasive cleaning agents
R solvents
R cleaning agents containing solvents
Do not scrub.
Do not touch the surfaces or protective
films with hard objects, e.g. a ring or ice scraper. You could otherwise scratch or
damage the surfaces and protective film.
! Do not park the vehicle for an extended
period straight
after cleaning it, particularly
after having cleaned the wheels with wheel
cleaner. Wheel cleaners could cause
increased corrosion of the brake discs and
brake pads/linings. For this reason, you
should drive for a few minutes after
cleaning. Braking heats the brake discs and
the brake pads/linings, thus drying them.
The vehicle can then be parked.
Regular care of your vehicle is a condition for
retaining the quality in the long term.
Use care products and cleaning agents
recommended and approved by Mercedes-
Benz. Washing
the vehicle and cleaning the
paintwork
Automatic car wash G
WARNING
Braking efficiency is reduced after washing
the vehicle.
This could cause an accident. For
this reason, you must drive particularly
carefully after washing the vehicle until the
brakes have dried. G
WARNING
The
vehicle is braked when the HOLD function
or DISTRONIC PLUS is activated. Therefore,
deactivate the
HOLD function and DISTRONIC
PLUS before the vehicle is washed in an
automatic car wash.
! It is preferable to use car washes with
adjustable high-pressure pre-cleaning that
corresponds to the specification for the
Cabriolet program. In car washes that use
high water pressures, there is a risk that a
small amount of water may leak into the
vehicle.
! Never clean your vehicle in a Touchless
Automatic Car Wash as these use special 500
Care
Maintenance and care
Page 550 of 572
Rotate front and rear wheels only if the wheels
and tires are of the same dimensions.
! On vehicles
equipped with a tire pressure
monitor, electronic components are
located in the wheel.
Tire-mounting tools should not be used
near the valve. This could damage the
electronic components.
Only have tires changed at a qualified
specialist workshop.
Always pay attention to the instructions and
safety notes when changing a wheel
(Y page 548).
The wear patterns on the front and rear tires
differ, depending on the operating conditions.
Rotate the wheels before a clear wear pattern
has formed on the tires. Front tires typically
wear more on the shoulders and the rear tires
in the center.
If your vehicle's tire configuration allows, you
can rotate the wheels according to the
intervals in the tire manufacturer's warranty
book in your vehicle documents. If this is not
available, the tires should then be replaced
every 3000 to 6000 miles (5000 to
10,000 km), or earlier if the tire wear requires
this. Do not change the direction of wheel
rotation.
Clean the contact surfaces of the wheel and
the brake disc thoroughly every time a wheel
is interchanged. Check the tire pressure and,
if necessary, restart the tire pressure loss
warning system or the tire pressure monitor. Direction of rotation
Tires with a specified direction of rotation
have additional
benefits, e.g. if there is a risk
of hydroplaning. You will only gain these
benefits if the correct direction of rotation is
maintained.
An arrow on the sidewall of the tire indicates
its correct direction of rotation. Storing wheels
Store wheels
that are not being used in a cool,
dry and preferably dark place. Protect the
tires from oil, grease, gasoline and diesel. Cleaning the wheels
G
WARNING
Do not use power washers with circular-jet
nozzles (dirt
grinders) to clean your vehicle, in
particular the tires. You could otherwise
damage the tires and cause an accident. Mounting a wheel
Preparing the vehicle X
Stop the vehicle on solid, non-slippery and
level ground.
X Unload the vehicle. The jack can only be
used when the vehicle is unladen.
X Apply the electric parking brake manually.
X Bring the front wheels into the straight-
ahead position.
X Shift the transmission to position P
.
X Switch off the engine.
X Vehicles without KEYLESS-GO: remove
the SmartKey from the ignition lock.
X Vehicles with KEYLESS-GO: open the
driver's door.
The on-board electronics have status 0,
which is the same as the SmartKey having
been removed.
X Vehicles with KEYLESS-GO: remove the
Start/Stop button from the ignition lock
(Y page 135).
X If included in the vehicle equipment,
remove the tire-change tool kit from the
vehicle.
X Secure the vehicle to prevent it from rolling
away.548
Changing a wheel
Wheels and tires