2013 MERCEDES-BENZ SL-CLASS ROADSTER center console
[x] Cancel search: center consolePage 192 of 572
X
Shift the transmission to position D or R as
required while the vehicle is stationary.
Active Parking Assist immediately steers in
the other direction.
i You will achieve the best results by
waiting for the steering procedure to
complete before pulling away.
If you
back up after activation, the steering
wheel is moved to the straight-ahead
position.
X Drive forwards or back up the vehicle, being
ready to brake at all times.
X Stop as soon as PARKTRONIC sounds the
continuous warning tone, if not before.
X Drive forwards and back up as instructed
by the PARKTRONIC warning displays.
Once you have exited the parking space
completely, the steering wheel is moved to
the straight-ahead position. You hear a tone
and the message Park Assist Finished
appears in
the multifunction display. You will
then have to steer and merge into traffic on
your own. PARKTRONIC is still available.
Canceling Active Parking Assist You can cancel Active Parking Assist at any
time.
X
Stop the movement of the multifunction
steering wheel or steer yourself.
Active Parking Assist will be canceled at
once. The Park Assist canceled
message appears in the multifunction
display.
or
X Press the PARKTRONIC button on the
center console (
Y page 185).
PARKTRONIC is switched off and Active
Parking Assist is immediately canceled.
The Park Assist canceled message
appears in the multifunction display. Active Parking Assist is canceled
automatically if:
R
parking using Active Parking Assist is no
longer possible.
R you are driving faster than 6mph
(10 km/h).
R a wheel
spins, ESP®
intervenes or fails. The
÷ ESP warning lamp lights up in the
instrument cluster.
A warning tone sounds. The parking space
symbol disappears and the multifunction
display shows the Park Assist canceled
message.
When Active Parking Assist is canceled, you
must steer again yourself. Rear view camera
Important safety notes G
WARNING
Make sure that no persons or animals are in
the maneuvering range. Otherwise, they
could be injured. G
WARNING
The rear view camera is only an aid and may
display obstacles
R from a distorted perspective
R inaccurately
R may not display obstacles at all
The rear view camera does not relieve you of
the responsibility to be cautious. Take care
and pay careful attention. The rear view
camera may not show objects which are
R very close to the rear bumper
R under the rear bumper
R above the trunk handle
You are
responsible for safety at all times and
must continue to pay attention to the
immediate surroundings when parking and
maneuvering. This includes the area behind,
in front of, and beside the vehicle. Otherwise
you could endanger yourself and/or others. 190
Driving systems
Driving and parking
Page 222 of 572
AMG menu in AMG vehicles
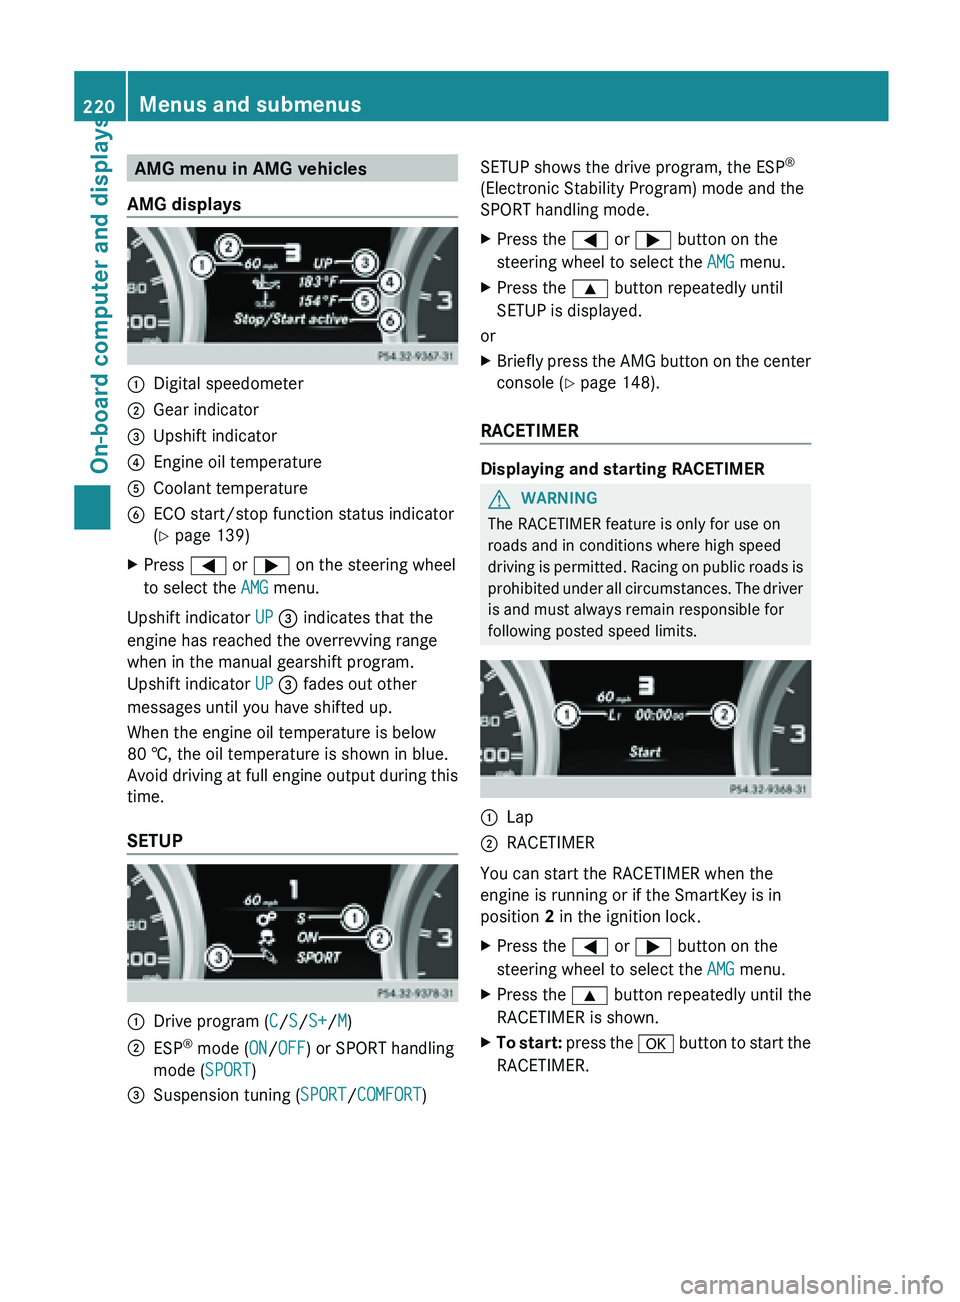
AMG displays :
Digital speedometer
; Gear indicator
= Upshift indicator
? Engine oil temperature
A Coolant temperature
B ECO start/stop function status indicator
( Y page 139)
X Press = or ; on the steering wheel
to select the AMG menu.
Upshift indicator UP = indicates that the
engine has reached the overrevving range
when in the manual gearshift program.
Upshift indicator UP = fades out other
messages until you have shifted up.
When the engine oil temperature is below
80 †, the oil temperature is shown in blue.
Avoid driving
at full engine output during this
time.
SETUP :
Drive program (
C/S/S+/M)
; ESP ®
mode ( ON/OFF) or SPORT handling
mode ( SPORT)
= Suspension tuning (SPORT/COMFORT) SETUP shows the drive program, the ESP
®
(Electronic Stability Program) mode and the
SPORT handling mode.
X Press the = or ; button on the
steering wheel to select the AMG menu.
X Press the 9 button repeatedly until
SETUP is displayed.
or
X Briefly press the AMG button on the center
console (Y page 148).
RACETIMER Displaying and starting RACETIMER
G
WARNING
The RACETIMER feature is only for use on
roads and in conditions where high speed
driving is
permitted. Racing on public roads is
prohibited under all circumstances. The driver
is and must always remain responsible for
following posted speed limits. :
Lap
; RACETIMER
You can start the RACETIMER when the
engine is running or if the SmartKey is in
position
2 in the ignition lock.
X Press the = or ; button on the
steering wheel to select the AMG menu.
X Press the 9 button repeatedly until the
RACETIMER is shown.
X To start: press the a
button to start the
RACETIMER. 220
Menus and submenus
On-board computer and displays
Page 235 of 572
Display messages Possible causes/consequences and
M SolutionsFront Passenger
Airbag Enabled
See Operator's
Manual The front-passenger air bag and front-passenger knee bag are
enabled during the journey, even though:
R
a child, a small adult or an object weighing less than the
system's weight threshold is located on the front-passenger
seat.
or
R the front-passenger seat is unoccupied.
The system may detect objects or forces applying additional
weight on the seat.
G WARNING
The front-passenger front air bag and front passenger knee bag
may be triggered unintentionally.
There is an increased risk of injury.
X Pull over and stop the vehicle safely as soon as possible, paying
attention to road and traffic conditions.
X Secure the vehicle against rolling away ( Y page 154).
X Switch the ignition off.
X Open the front-passenger door.
X Remove the child and the child restraint system from the front-
passenger seat.
X Make sure that there are no objects on the seat adding to the
weight.
The system may otherwise detect the additional weight and
interpret the seat occupant's weight as greater than it actually
is.
X Keep the seat unoccupied, close the front-passenger door and
switch on the ignition.
X Observe the ^a
indicator lamp in the center console and
the multifunction display and check the following:
Seat unoccupied and ignition switched on:
R the ^a indicator
lamp must light up and remain lit. When
the indicator lamp is on, OCS (Occupant Classification System)
has disabled the front-passenger air bag and front-passenger
knee bag ( Y page 43).
R the Front Passenger Airbag Enabled See Operator's
Manual or Front Passenger Airbag Disabled See
Operator's Manual display messages must not be shown in
the multifunction display. Display messages
233
On-board computer and displays Z
Page 236 of 572
Display messages Possible causes/consequences and
M SolutionsX
Wait for a period of at least 60 seconds until the necessary
system checks have been completed.
X Make sure that the display messages do not appear in the
multifunction display.
If these conditions are fulfilled, the front-passenger seat can be
occupied again.
Whether the ^a indicator lamp remains lit
or goes out depends on how OCS classifies the occupant.
If the conditions are not fulfilled, the system is not operating
correctly.
X Visit a qualified specialist workshop immediately.
For further information about the Occupant Classification System,
see ( Y page 43). Front Passenger
Airbag Disabled
See Operator's
Manual The front-passenger air bag and front-passenger knee bag are
deactivated during the journey, although:
R
an adult
or
R a person larger than a certain size is occupying the front-
passenger seat.
If additional forces are applied to the seat, the system may
interpret the occupant's weight as lower than it actually is.
G WARNING
The front-passenger front air bag and front passenger knee bag
may not be triggered in the event of an accident.
There is an increased risk of injury.
X Pull over and stop the vehicle safely as soon as possible, paying
attention to road and traffic conditions.
X Secure the vehicle against rolling away ( Y page 154).
X Switch the ignition off.
X Have the occupant get out of the vehicle.
X Keep the seat unoccupied, close the front-passenger door and
switch on the ignition.
X Observe the ^a indicator
lamp in the center console and
the multifunction display and check the following:
Seat unoccupied and ignition switched on:
R the ^a indicator
lamp must light up and remain lit. When
the indicator lamp is on, OCS has disabled the front-passenger
air bag and front-passenger knee bag ( Y page 43).
R the Front Passenger Airbag Enabled See Operator's
Manual or Front Passenger Airbag Disabled See 234
Display messages
On-board computer and displays
Page 426 of 572
X
To exit the menu: press the V eject/
load button again or press the % back
button.
or
X Select Back by sliding VÆ and turning
cVd the COMAND controller and press
W to confirm.
Inserting and ejecting an SD memory
card General information
COMAND supports SD memory cards
(Secure Digital) and SDHC memory cards
(Secure Digital
High Capacity).
i Not all memory cards available on the
market are designed for the temperatures
which may be reached in the vehicle.
If the SD memory card is no longer in use,
you should remove it from COMAND. High
temperatures can damage the card.
Due
to the wide range of SD memory cards
available on the market, playback cannot
be guaranteed for all brands of SD memory
card.
The readable storage capacity depends on
the memory card used. You can obtain
further information at any authorized
Mercedes-Benz Center.
Inserting an SD memory card
X Insert the memory card into the slot on the
control panel until it engages in place. The
side with the contacts must face
downwards and point towards the slot.
COMAND loads the memory card and
shows a message to this effect. If no MP3
tracks can
be found, you will see a message
to this effect.
Ejecting an SD memory card
X Press the memory card.
The memory card is ejected.
X Remove the memory card from slot. Connecting a USB device The USB port is located in the stowage
compartment in the center console.
Electrical consumption at this connection
must not exceed a continuous current of
500 mA
. If the electrical consumption is
higher, use a separate source to provide
power for the USB device (e.g.
12 V power supply
).
X Connect the USB device (e.g. USB stick) to
the USB port.
i Due to the wide range of USB devices
available on the market, playback cannot
be guaranteed
for all brands of USB device.
Information about suitable USB devices
can be obtained from an authorized
Mercedes-Benz Center.
MP3 players must support Media Transfer
Protocol (MTP).
Activating audio CD/DVD or MP3 mode Automatic switching
X
Insert/eject CDs/DVDs (Y page 421)
or
X Insert an SD memory card (Y page 424)
or
X Connect a USB device ( Y page 424).
COMAND loads the medium inserted and
starts to play it.
Switching modes using the function
button
X Press the h
function
button one or more
times.
i By pressing the function button
repeatedly, you can change the operating
mode in the following order:
R audio CD/DVD/video DVD/MP3 CD/
MP3 DVD in the DVD changer or single
DVD drive (disc mode)
R memory card mode
R MUSIC REGISTER424
Audio
COMAND
Page 447 of 572

Selecting a track
This function is not supported by all
Bluetooth
®
audio devices.
X To skip forwards or backwards to a
track: press the E or F button on
COMAND.
or
X Press the 9 or : button briefly on
the multifunction steering wheel.
X Rapid scroll: press and hold the 9
or : button on the multifunction
steering wheel until the desired track is
reached.
If you press and hold the 9 or :
button, the rapid scrolling speed is
increased.
Selecting playback options If the Bluetooth
®
audio device supports the
corresponding function,
the following options
are available:
R Normal Track Sequence
The tracks are played in the normal order
(e.g. track 1, 2, 3, etc.).
Audio data playback is determined by the
order in which the tracks are written to the
data carrier. Alphabetical order is the most
common. Once all the tracks in a folder
have been played, the tracks in the next
folder are played.
R Random Tracks
All the tracks on the medium are played in
random order (e.g. track 3, 8, 5 etc.).
X Select BT Audio
by sliding VÆ and turning
cVd the COMAND controller and press
W to confirm.
The # dot indicates the option selected.
X Select the option by turning cVd the
COMAND controller and press W to
confirm.
If you select Random Tracks, you will see
a corresponding symbol in the display/
selection window. Adjusting the sound settings Information about sound settings
(Y page 278).
Increasing the volume using COMAND
X
Select BT Audio
by sliding VÆ and turning
cVd the COMAND controller and press
W to confirm.
X Select Volume and press W to confirm.
A menu appears. The # dot indicates the
current setting.
X Select Standard or Boost and
press W to
confirm.
You will find further information in the "Audio
AUX mode" section (Y page 451). Media Interface mode
Connection options Overview
The connection sockets are located in the
stowage
compartment
in the center console.
Device-specific adapter cables are required
to connect external devices to the Media
Interface. Country-specific versions are
supplied with the Media Interface.
You can connect the following data carriers
to COMAND via the Media Interface:
R iPod ®
R iPhone ®
R certain MP3 players Audio
445
COMAND Z
Page 453 of 572

X
Select an option and press W to confirm.
The following options are available:
R Normal Track Sequence
Normal track sequence: you hear the
tracks in
their normal order (e.g. numerical
or alphabetical).
R Random Medium
All the tracks on the medium are played in
random order.
R Random Track List
The tracks in the currently active category
or folder, including any subfolders, are
played in random order.
i For MP3 players, the random playlists
offer a maximum of 300 tracks chosen at
random.
MP3 player instructions General notes
Up to 30,000 tracks per medium are
supported.
You can speed up some functions and
improve the search results by:
R
making sure the names of tracks, albums
and artists, for example, are written the
same way
R labeling albums
featuring various artists as
“compilations”
i Multiple entries of tracks in playlists are
filtered out for some players.
Data formats
MP3 and WMA are supported as data formats
with fixed and variable bit rates (up to
320 kbits/s).
Special notes about MP3 players
Up to eight directory levels with up to 1,000
tracks per directory are supported.
Do not use USB extension leads or adapters.
They can impair functionality. i
DRM (Digital Rights Management)
protected files are not supported by the
Media Interface. Audio AUX mode
Notes on audio AUX mode You can connect an external audio source
(AUX) to COMAND. You will find the
necessary socket in the center console
stowage compartment.
If COMAND is equipped with a Media
Interface, external audio sources are
connected using the cable set provided. An
AUX
socket
is not provided. The connections
for the Media Interface are located in the
stowage compartment in the center console.
i You will find further information online at
http://www.mbusa-mobile.com.
Alternatively, call the Mercedes-Benz
Customer Assistance Center at
1-800-FOR-MERCedes (1-800-367-6372)
(for USA) or Customer Relations at
1-800-387-0100 (for Canada).
Activating audio AUX mode G
WARNING
External audio sources may have different
volumes, which can mean that system
messages such
as traffic announcements and
navigation system announcements are much
louder. If necessary, please deactivate the
system messages or adjust their volume
manually.
When you connect an external audio source,
audio AUX is not selected automatically.
X Select Audio in the main function bar by
sliding ZV and
turning cVd the COMAND
controller and press W to confirm.
If AUX mode was the last mode selected, it
will now be active. Audio
451
COMAND Z
Page 460 of 572
X
Select the Back (to movie) menu item in
the menu and press W to confirm.
Setting the language and audio format This function is not available on all DVDs. If it
is available, you can set the DVD menu
language, the audio language or the audio
format.
The
number of settings is determined
by the DVD content. It is possible that the
settings may also be accessed in the DVD
menu (Y page 457).
X Show the DVD menu (Y page 457).
X In full-screen mode, press W the
COMAND
controller to show the menu.
X Select DVD-Video in the menu by turning
cVd the COMAND controller and press
W to confirm.
X Select DVD Functions and press W to
confirm.
X Select Menu Language or Audio
Language and press W to confirm.
In both cases, a menu appears after a few
seconds. The # dot in front of an entry
indicates the currently selected language.
X Select a setting by turning cVd the
COMAND controller and press W to
confirm.
Subtitles and camera angle These functions are not available on all DVDs.
The
number
of subtitle languages and camera
angles available depends on the content of
the DVD. It is possible that the settings may
also be accessed in the DVD menu
(Y page 457).
X Activate the DVD menu (Y page 457).
X Select DVD-Video in the menu by turning
cVd the COMAND controller and press
W to confirm.
X Select DVD Functions and press W to
confirm. X
Select Subtitles or Camera Angle and
press W to confirm.
In both
cases, a menu appears. The # dot
in front of an entry indicates the current
setting.
X Select a setting by turning cVd the
COMAND controller and press W to
confirm.
Interactive content DVDs can contain interactive content (e.g. a
video game). In a video game, for example,
you may be able to influence events by
selecting
and
triggering actions. The type and
number of actions depend on the DVD.
X Select an action by sliding ZVÆ or XVY
the
COMAND controller and press W to
execute it.
A menu appears and the first entry,
Select, is highlighted.
X Press W the COMAND controller. AUX video mode
Connecting external video sources G
WARNING
External video sources may have different
volumes, which can mean that system
messages such
as traffic announcements and
navigation system announcements are much
louder. If necessary, please deactivate the
system messages or adjust their volume
manually.
If your vehicle is equipped with Media
Interface, you can connect an external video
source (AUX video) ( Y page 445).
The 1/8 inch audio/video jacks are in the
center console stowage compartment.
i In vehicles with a rear view camera, the
AUX video jack cannot be used for external
video sources. 458
Video
COMAND