2013 MERCEDES-BENZ SL-CLASS ROADSTER change time
[x] Cancel search: change timePage 451 of 572
R
Artists
R Albums
R Tracks
R Podcasts
R Genres
R Composers
R Audiobooks
R Videos
i Some playback categories contain the
entry All. If this entry has been selected,
the entire
content of the category selected
will be played.
The Videos category is available for
iPods ®
and iPhones ®
.
i The functions are available as soon as the
entire media content has been read and
analyzed. For certain functions, such as
Keyword search, this can take several
minutes. The length of time required for
reading the data depends on the size of the
media content and the device connected.
If the same device is reconnected with
unchanged media content, these functions
are available much more quickly. However,
if you change the media content, it has to
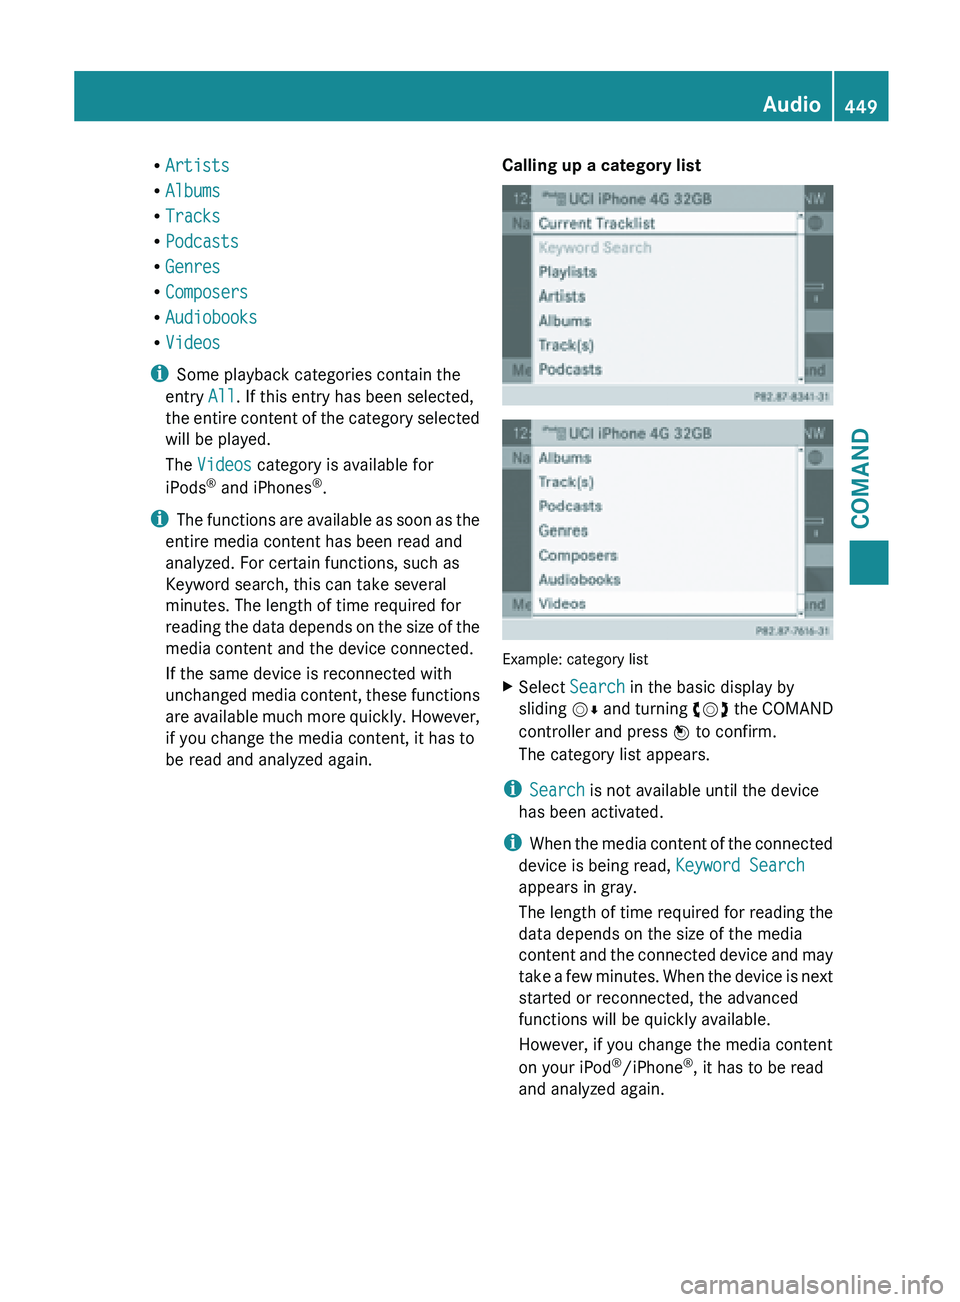
be read and analyzed again. Calling up a category list
Example: category list
X
Select Search in the basic display by
sliding VÆ and
turning cVd the COMAND
controller and press W to confirm.
The category list appears.
i Search is not available until the device
has been activated.
i When the
media content of the connected
device is being read, Keyword Search
appears in gray.
The length of time required for reading the
data depends on the size of the media
content and the connected device and may
take a few minutes. When the device is next
started or reconnected, the advanced
functions will be quickly available.
However, if you change the media content
on your iPod ®
/iPhone ®
, it has to be read
and analyzed again. Audio
449
COMAND Z
Page 456 of 572
COMAND is capable of playing back video
DVDs produced according to the following
standards:
R
region code 1 or region code 0 (no region
code)
R PAL or NTSC standard
You will generally find the relevant details
either on the DVD itself or on the DVD case.
i If you insert a video DVD with a different
region code,
you will see a message to this
effect.
i COMAND is set to region code 1 at the
factory. This setting can be changed at an
authorized Mercedes-Benz Center. This will
allow you to play video DVDs with a
different region code, provided that they
are produced in accordance with the PAL
or NTSC standard. The region code can be
changed up to five times.
Function restrictions Depending on the DVD, it is possible that
certain functions or actions will be
temporarily
blocked
or may not function at all.
As soon as you try to activate these functions
or actions, you will see the K symbol in the
display.
Inserting and removing DVDs X
Proceed as described in the "Inserting and
ejecting CDs and DVDs" section
(Y page 421).
Switching to video DVD mode Option 1
X
Single DVD drive: insert a video DVD.
COMAND loads the medium inserted and
starts to play it. X
DVD changer: insert a video DVD.
X Press h.
or
X Press the % back button.
COMAND loads the medium inserted and
starts to play it.
Option 2
X Press the h function
button one or more
times.
COMAND switches to the previous disc
operating mode.
By pressing the function button repeatedly,
you can change the operating mode in the
following order:
R audio CD/DVD / video DVD/MP3 in the
DVD changer or DVD single drive (disc
mode)
audio CD/DVD, video DVD or MP3 disc in
the DVD changer
R memory card mode
R MUSIC REGISTER
R USB storage device
R Media Interface or audio AUX mode
R Bluetooth ®
audio mode
X DVD changer: select
Media
or Changer by
sliding VÆ and turning cVd the COMAND
controller and press W to confirm.
Single DVD drive: select Media by sliding
VÆ and turning cVd the COMAND
controller and press W to confirm.
X Select a ý video
DVD from the media list
(Y page 456).
Option 3
X Select Video in the main function bar by
sliding ZV and
turning cVd the COMAND
controller and press W to confirm.
Video DVD mode is switched on.
Hiding/showing the navigation menu This function is not available while the DVD's
own menu (Y page 457) is being displayed.454
Video
COMAND
Page 457 of 572
X
To show: in DVD video mode, slide ZVÆ
the COMAND controller.
X To hide: slide ZVÆ the COMAND
controller.
or
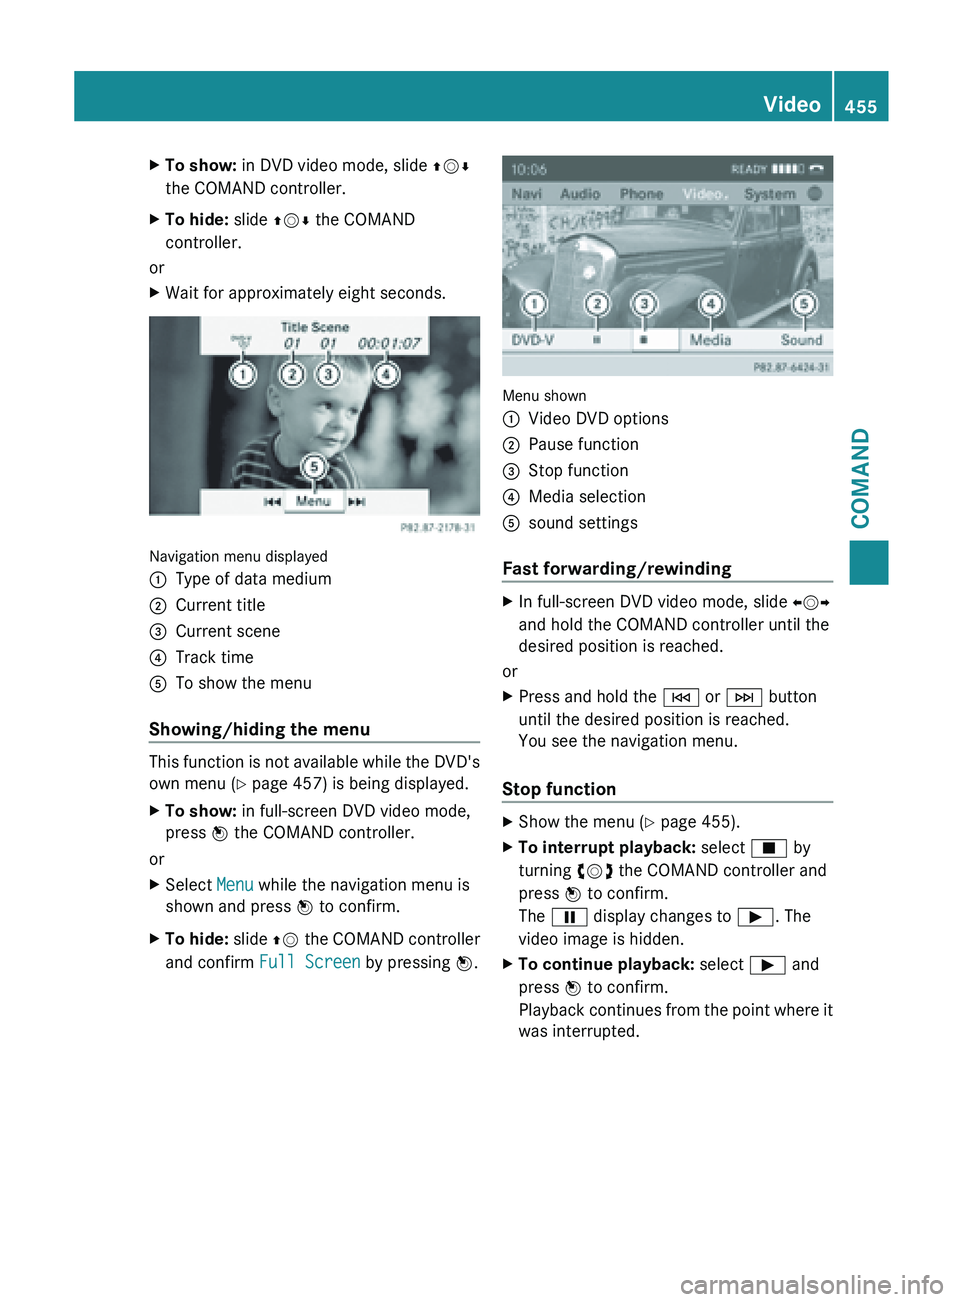
X Wait for approximately eight seconds. Navigation menu displayed
:
Type of data medium
; Current title
= Current scene
? Track time
A To show the menu
Showing/hiding the menu This function is not available while the DVD's
own menu (Y page 457) is being displayed.
X
To show: in full-screen DVD video mode,
press W the COMAND controller.
or
X Select Menu while the navigation menu is
shown and press W to confirm.
X To hide: slide ZV the COMAND controller
and confirm Full Screen by pressing W. Menu shown
:
Video DVD options
; Pause function
= Stop function
? Media selection
A sound settings
Fast forwarding/rewinding X
In full-screen DVD video mode, slide XVY
and hold the COMAND controller until the
desired position is reached.
or
X Press and hold the E or F button
until the desired position is reached.
You see the navigation menu.
Stop function X
Show the menu (Y page 455).
X To interrupt playback: select É by
turning cVd the COMAND controller and
press W to confirm.
The Ë display changes to Ì. The
video image is hidden.
X To continue playback: select Ì and
press W to confirm.
Playback continues
from the point where it
was interrupted. Video
455
COMAND Z
Page 470 of 572
Conditions:
the Storm Characteristics
layer is
active (Y page 466) and weather data
is available.
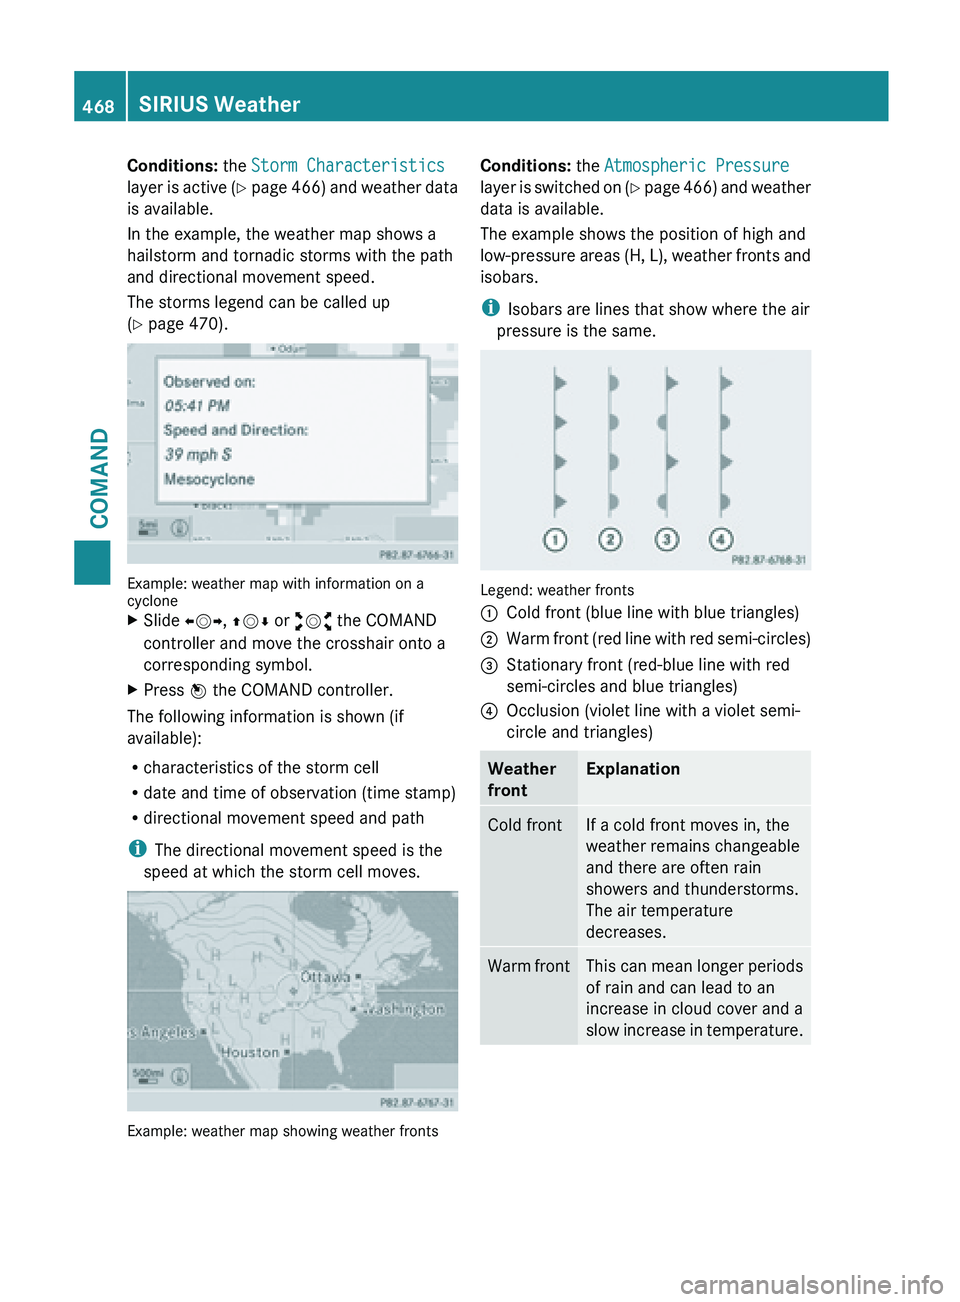
In the example, the weather map shows a
hailstorm and tornadic storms with the path
and directional movement speed.
The storms legend can be called up
(Y page 470). Example: weather map with information on a
cyclone
X
Slide XVY, ZVÆ or aVb the COMAND
controller and move the crosshair onto a
corresponding symbol.
X Press W the COMAND controller.
The following information is shown (if
available):
R characteristics of the storm cell
R date and time of observation (time stamp)
R directional movement speed and path
i The directional movement speed is the
speed at which the storm cell moves. Example: weather map showing weather fronts Conditions:
the Atmospheric Pressure
layer is
switched on (Y page 466) and weather
data is available.
The example shows the position of high and
low-pressure areas (H, L), weather fronts and
isobars.
i Isobars are lines that show where the air
pressure is the same. Legend: weather fronts
:
Cold front (blue line with blue triangles)
; Warm front (red line with red semi-circles)
= Stationary front (red-blue line with red
semi-circles and blue triangles)
? Occlusion (violet line with a violet semi-
circle and triangles) Weather
front Explanation
Cold front If a cold front moves in, the
weather remains changeable
and there are often rain
showers and thunderstorms.
The air temperature
decreases.
Warm front This can mean longer periods
of rain and can lead to an
increase in cloud cover and a
slow
increase
in temperature.468
SIRIUS Weather
COMAND
Page 471 of 572
Weather
front Explanation
Stationary
front The weather front moves
minimally. The weather
remains changeable in this
area.
Occlusion This occurs when a faster cold
front reaches an advancing
warm front and combines
with it. The weather remains
changeable and rainy within
an occlusion.
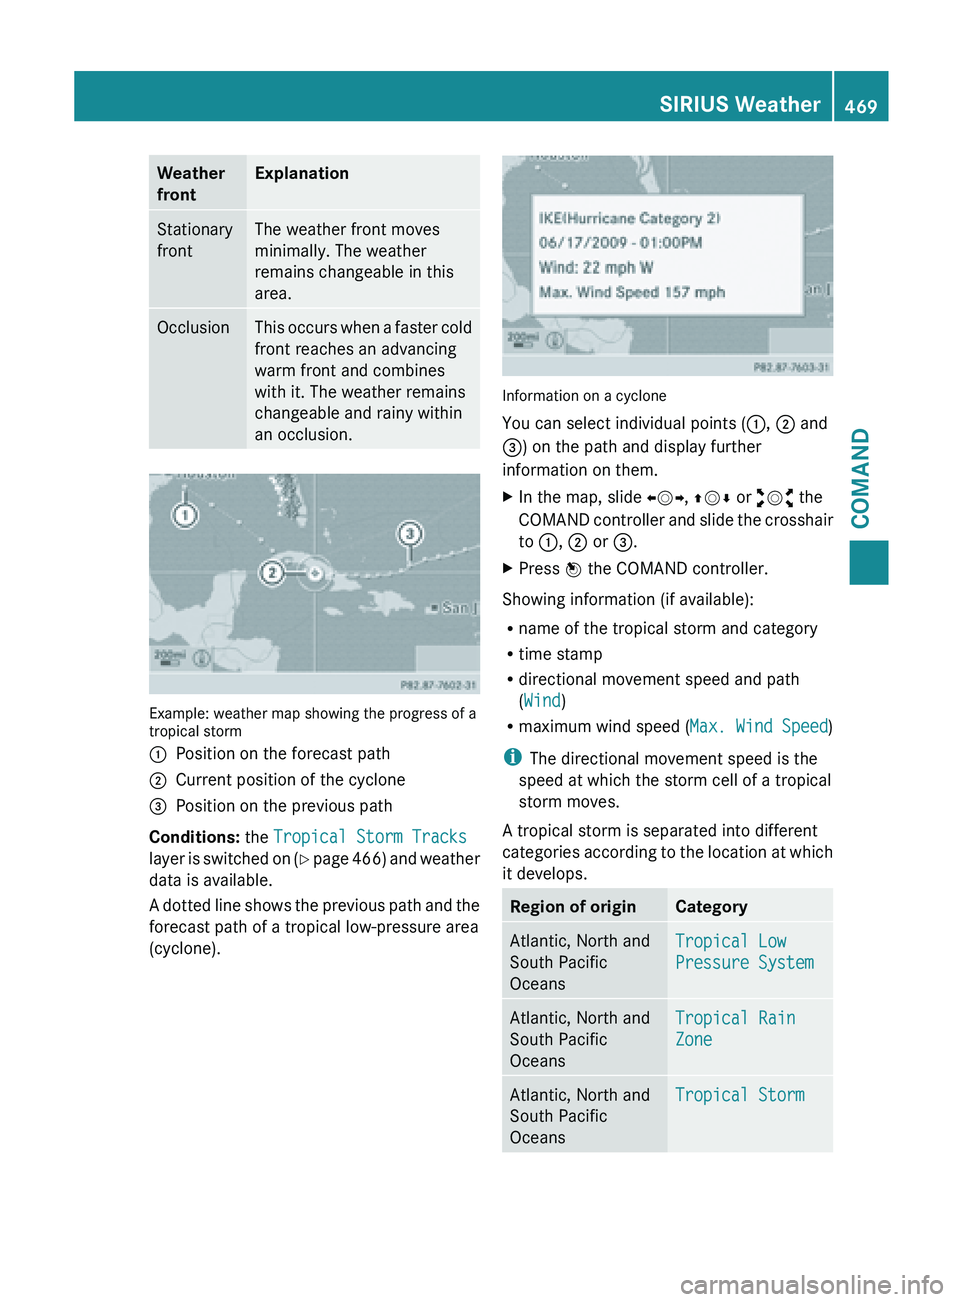
Example: weather map showing the progress of a
tropical storm
:
Position on the forecast path
; Current position of the cyclone
= Position on the previous path
Conditions: the Tropical Storm Tracks
layer is
switched on (Y page 466) and weather
data is available.
A dotted line shows the previous path and the
forecast path of a tropical low-pressure area
(cyclone). Information on a cyclone
You can select individual points (
:, ; and
=) on the path and display further
information on them.
X In the map, slide XVY, ZVÆ or aVb the
COMAND controller
and slide the crosshair
to :, ; or =.
X Press W the COMAND controller.
Showing information (if available):
R name of the tropical storm and category
R time stamp
R directional movement speed and path
(Wind)
R maximum wind speed ( Max. Wind Speed)
i The directional movement speed is the
speed at which the storm cell of a tropical
storm moves.
A tropical storm is separated into different
categories according
to the location at which
it develops. Region of origin Category
Atlantic, North and
South Pacific
Oceans
Tropical Low
Pressure System
Atlantic, North and
South Pacific
Oceans
Tropical Rain
Zone
Atlantic, North and
South Pacific
Oceans
Tropical StormSIRIUS Weather
469
COMAND Z
Page 473 of 572
The time stamp shows when the weather data
was created by the weather station.
A time stamp corresponds to the time at the
vehicle's current position. The changeover
from summer time to standard time is
performed automatically.
X
Display the menu on the weather map
(Y page 465).
X Select Map Options by turning cVd the
COMAND controller and pressing W to
confirm.
X Select Time stamp and press W to
confirm.
Changing to the information chart X
Display the menu on the weather map
(Y page 465).
X Select Display Weather and press W to
confirm. SIRIUS Weather
471COMAND Z
Page 513 of 572
G
WARNING
The tire sealant is harmful and causes
irritation. It must not come into contact with
your skin, eyes or clothing or be swallowed.
Do not
inhale TIREFIT fumes. Keep tire sealant
away from children. There is a risk of injury.
If you come into contact with the tire sealant,
observe the following:
R Rinse off the tire sealant from your skin
immediately with water.
R If the tire sealant comes into contact with
your eyes, immediately rinse them
thoroughly with clean water.
R If tire sealant is swallowed, immediately
rinse your mouth out thoroughly and drink
plenty of water. Do not induce vomiting,
and seek medical attention immediately.
R Immediately change out of clothing which
has come into contact with tire sealant.
R If an allergic reaction occurs, seek medical
attention immediately.
! Do not operate the tire inflation
compressor for longer than eight minutes
at a time without a break. It may otherwise
overheat.
The tire inflation compressor can be
operated again once it has cooled down. X
Do not remove any foreign objects which
have penetrated the tire, e.g. screws or
nails.
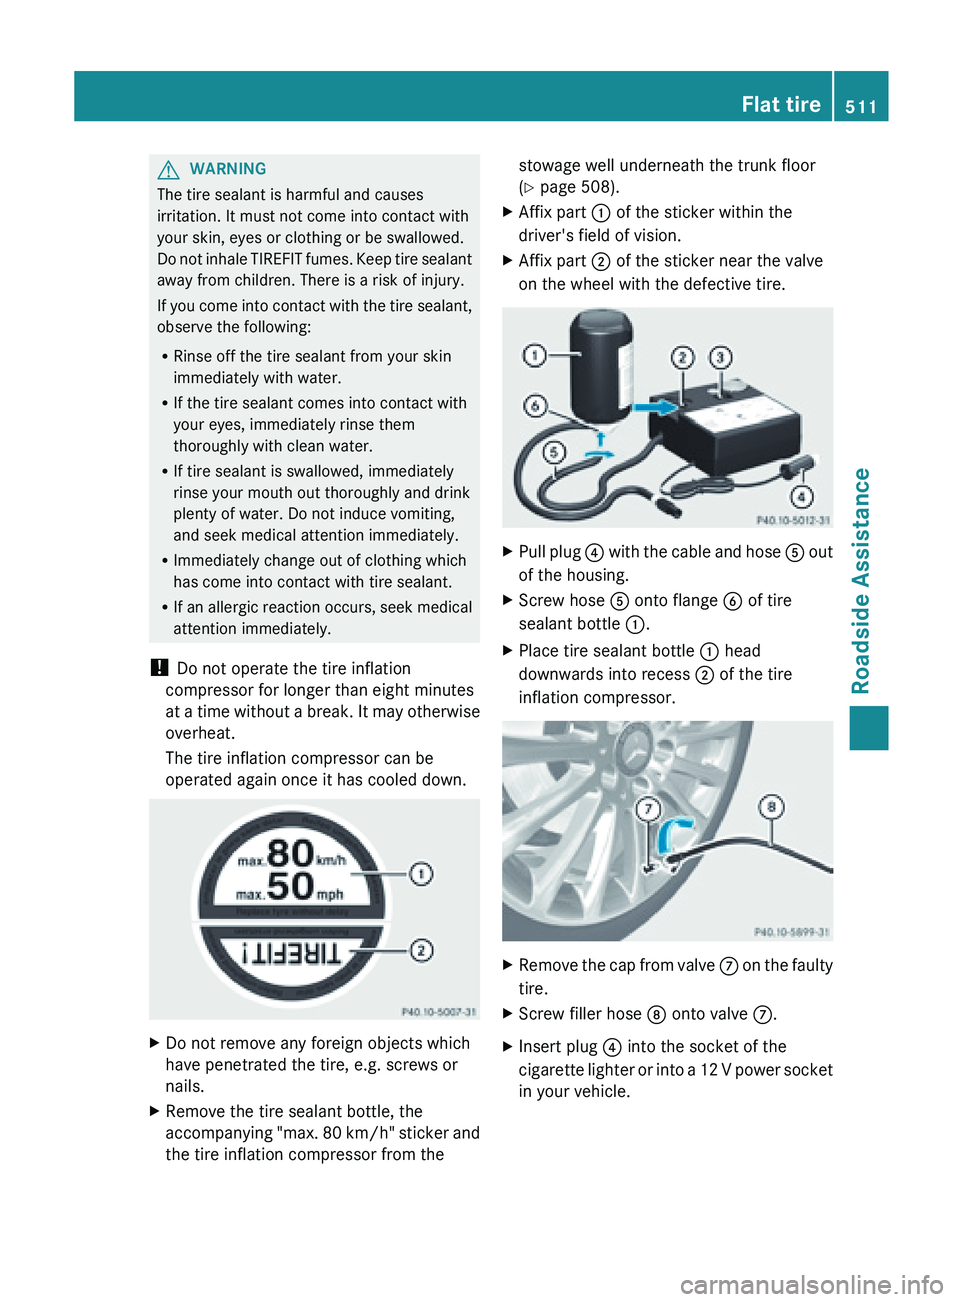
X Remove the tire sealant bottle, the
accompanying "max.
80 km/h" sticker and
the tire inflation compressor from the stowage well underneath the trunk floor
(Y page 508).
X Affix part : of the sticker within the
driver's field of vision.
X Affix part ; of the sticker near the valve
on the wheel with the defective tire. X
Pull
plug
? with the cable and hose A
out
of the housing.
X Screw hose A onto flange B of tire
sealant bottle :.
X Place tire sealant bottle : head
downwards into recess ; of the tire
inflation compressor. X
Remove
the cap from valve
C on
the faulty
tire.
X Screw filler hose D onto valve C.
X Insert plug ? into the socket of the
cigarette lighter
or into a 12 V power socket
in your vehicle. Flat tire
511
Roadside Assistance Z
Page 535 of 572

Checking tire pressures manually
To determine and set the correct tire
pressure, proceed as follows:
X
Remove the valve cap of the tire that is to
be checked.
X Press the tire pressure gauge securely onto
the valve.
X Read the tire pressure and compare it with
the recommended value on the Tire and
Loading Information placard (Y
page 529).
X If the tire pressure is too low, increase it to
the recommended value.
X If the tire pressure is too high, release air
by pressing
down the metal pin in the valve.
Use the tip of a pen, for example. Then,
check the tire pressure again using the tire
pressure gauge.
X Screw the valve cap onto the valve.
X Repeat these steps for the other tires. Tire pressure loss warning system
(Canada only)
Important safety notes While the vehicle is in motion, the tire
pressure loss warning system monitors the
set
tire
pressure using the rotational speed of
the wheels. This enables the system to detect
significant pressure loss in a tire. If the speed
of rotation of a wheel changes as a result of
a loss of pressure, a corresponding warning
message will appear in the multifunction
display.
The tire pressure warning system does not
warn you of an incorrectly set tire pressure.
Observe the notes on the recommended tire
pressure ( Y page 529).
The tire pressure loss warning system does
not replace the need to regularly check your
vehicle's tire pressures, since an even loss of
pressure on several tires at the same time
cannot be detected by the tire pressure loss
warning system. The tire pressure monitor is not able to warn
you of a sudden loss of pressure, e.g. if the
tire is penetrated by a foreign object. In the
event of a sudden loss of pressure, bring the
vehicle to a halt by braking carefully. Avoid
abrupt steering maneuvers.
The
function
of the tire pressure loss warning
system is limited or delayed if:
R snow chains are mounted to your vehicle's
tires.
R road conditions are wintry.
R you are driving on sand or gravel.
R you adopt a very sporty driving style
(cornering at high speeds or driving with
high rates of acceleration).
R you drive with a heavy load.
Restarting the tire pressure loss
warning system Restart the tire pressure loss warning system
if you have:
R
changed the tire pressure
R changed the wheels or tires
R mounted new wheels or tires
X Before restarting, make sure that the tire
pressures are set properly on all four tires
for the respective operating conditions.
The recommended tire pressures can be
found on the Tire and Loading Information
placard on the B-pillar on the driver's side
or the tire pressure table on the fuel filler
flap.
The tire pressure loss warning system can
only give reliable warnings if you have set
the
correct tire pressure. If an incorrect tire
pressure is set, these incorrect values will
be monitored.
X Observe the notes on tire pressure
(Y page 529).
X Make sure that the key is in
position 2(Y page
135) in the ignition lock.
X Press = or ; on the steering wheel
to select the Service menu. Tire pressure
533
Wheels and tires Z