2013 MERCEDES-BENZ SL-CLASS ROADSTER change time
[x] Cancel search: change timePage 255 of 572
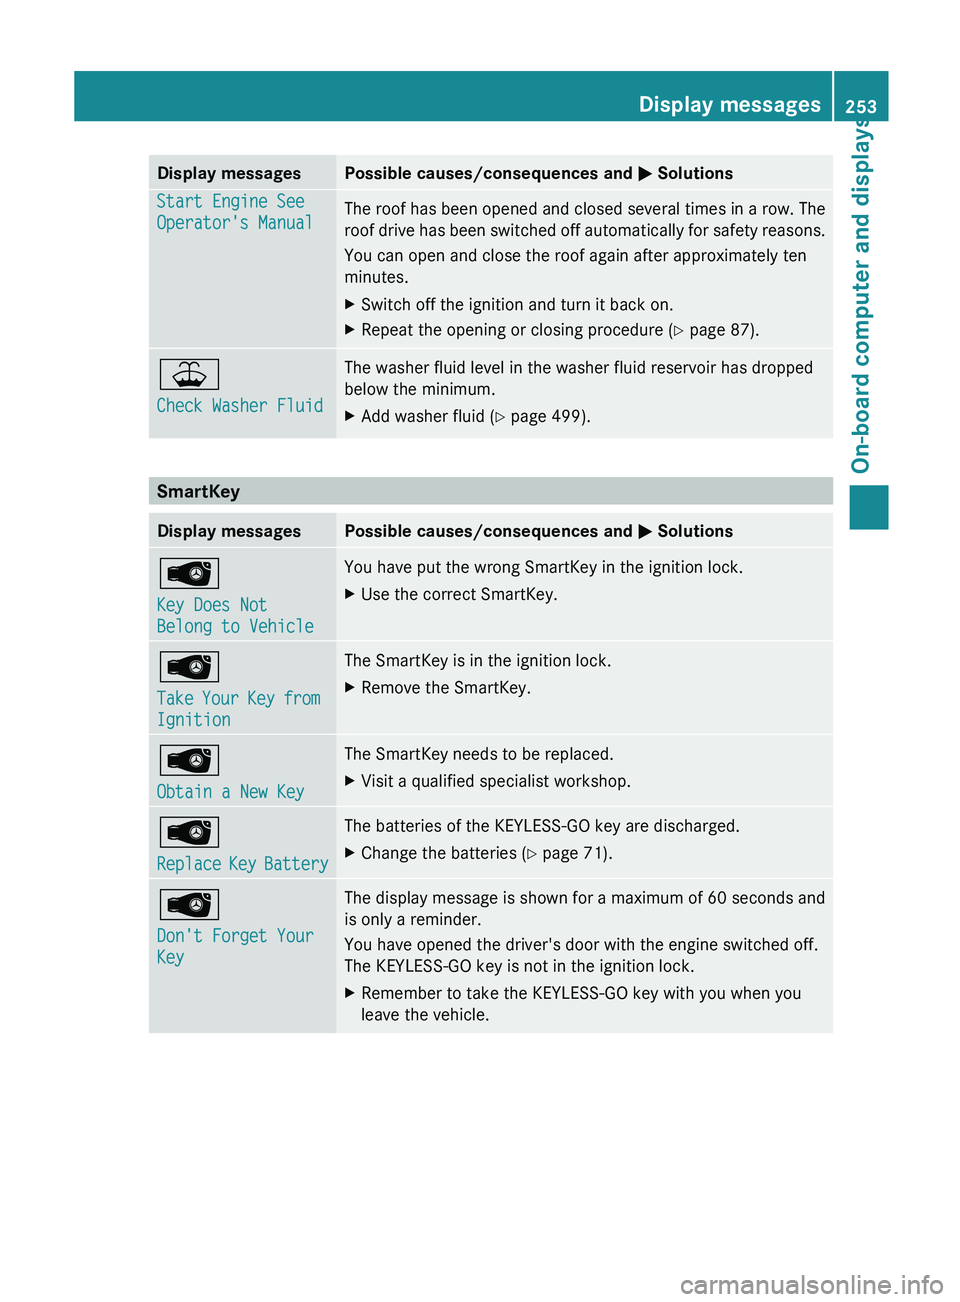
Display messages Possible causes/consequences and
M SolutionsStart Engine See
Operator's Manual
The roof has been opened and closed several times in a row. The
roof
drive
has been switched off automatically for safety reasons.
You can open and close the roof again after approximately ten
minutes.
X Switch off the ignition and turn it back on.
X Repeat the opening or closing procedure ( Y page 87).¥
Check Washer Fluid The washer fluid level in the washer fluid reservoir has dropped
below the minimum.
X
Add washer fluid ( Y page 499).SmartKey
Display messages Possible causes/consequences and
M SolutionsÂ
Key Does Not
Belong to Vehicle You have put the wrong SmartKey in the ignition lock.
X
Use the correct SmartKey. Â
Take
Your
Key from
Ignition The SmartKey is in the ignition lock.
X
Remove the SmartKey. Â
Obtain a New Key The SmartKey needs to be replaced.
X
Visit a qualified specialist workshop. Â
Replace
Key
Battery The batteries of the KEYLESS-GO key are discharged.
X
Change the batteries ( Y page 71).Â
Don't Forget Your
Key The display message is shown for a maximum of 60 seconds and
is only a reminder.
You have opened the driver's door with the engine switched off.
The KEYLESS-GO key is not in the ignition lock.
X
Remember to take the KEYLESS-GO key with you when you
leave the vehicle. Display messages
253
On-board computer and displays Z
Page 270 of 572
Useful information
i These operating instructions describe all
the standard and optional equipment of
your COMAND system, as available at the
time of going to print. Country-specific
differences are possible. Please note that
your COMAND system may not be
equipped with all the features described.
This also applies to safety-related systems
and functions.
i Read the information on qualified
specialist workshops: ( Y page 31).
Operating safety
Important safety notes
G
WARNING
Making alterations to electronic components
can cause malfunctions.
Radio, satellite
radio, amplifier, DVD changer,
navigation module, phone and voice control
are networked. If one component is not
functional or if it has been incorrectly
removed/replaced, this could impair the
operation of other components.
This could seriously jeopardize the
operational safety of your vehicle.
We recommend that you always have
maintenance work on electronic components
carried out at an authorized Mercedes-Benz
Center. G
WARNING
In
order to avoid distraction which could lead
to an accident, the driver should only enter
system settings
with the vehicle at a standstill
and operate the system only when road,
weather and traffic conditions permit.
Bear in mind that at a speed of only 30 mph
(approximately 50 km/h), the vehicle covers
a distance of 44 feet (approximately 14 m) per
second. COMAND delivers information to simplify
your choice of route and guide you
comfortably and safely to your destination.
For safety reasons, we recommend that you
bring your vehicle to a standstill, paying
attention to road and traffic conditions,
before making or accepting a telephone call
or viewing navigation maps, instructions or
downloaded information on the COMAND
screen.
G
WARNING
While the navigation system provides
directional assistance,
the driver must remain
focused on safe driving behavior, especially
attention to traffic and street signs, and
should utilize the system's audio cues while
driving.
The navigation system does not supply any
information on stop signs, yield signs, traffic
regulations or traffic safety rules. Their
observance always remains in the driver's
personal responsibility. DVD maps do not
cover all areas nor all routes within an area. G
WARNING
This equipment complies with FCC radiation
exposure limits set forth for uncontrolled
equipment and meets the FCC radio
frequency (RF) Exposure Guidelines in
Supplement C to OET65.
This equipment has very low levels of RF
energy that is deemed to comply without
maximum permissive exposure evaluation
(MPE). But it is desirable that it should be
installed and operated with at least 8
inches
(20 cm)
and more between the radiator and a
person's body (excluding extremities: hands,
wrists, feet and legs.) 268
Operating safety
COMAND
Page 291 of 572

X
Select the seat ( Y page 286).
X Select Reset All by turning cVd the
COMAND controller and press W to
confirm.
A query appears.
X Select Yes or No and press W to confirm.
If you select No, the process will be
canceled.
After you select Yes, all seat adjustments
are reset to the default values (factory
setting). System settings
Display settings
Setting the brightness The brightness detected by the display light
sensor affects the setting options for this
function.
X
Press W.
X Select Settings by turning cVd the
COMAND controller and press W to
confirm.
X Select Display and press W to confirm.
X Select Brightness and press W to
confirm.
X Adjust the brightness by turning cVd the
COMAND controller and press W to
confirm. Display design Your COMAND display features optimized
designs for operation during daytime and
night-time hours. You can set the design by
manually
selecting
day or night design or opt
for an automatic setting.
X Press W.
X Select Settings by turning cVd the
COMAND controller and press W to
confirm.
X Select Display and press W to confirm.
X Select Day Mode, Night Mode or
Automatic by turning cVd the COMAND
controller and press W to confirm.
A dot indicates the current setting. Design Explanation
Day Mode The display is set
permanently to day
design.
Night Mode The display is set
permanently to night
design.
Automatic If the
Automatic setting
is selected, COMAND
evaluates the readings
from the automatic
vehicle light sensor and
automatically switches
between the display
designs. Time settings
General information If COMAND is equipped with a navigation
system and has GPS reception, COMAND
automatically sets
the time and date. You can
also adjust the time yourself in 30-minute
increments, but the date cannot be changed.
i If you set the time in 30-minute
increments, any time zone settings and
settings for changing between summer and System settings
289
COMAND Z
Page 292 of 572
standard time are lost. Switching between
summer and standard time (
Y page 290).
i The following
navigation system functions
require the time, time zone and summer/
standard time to be set correctly in order
to work properly:
R route guidance on routes with time-
dependent traffic guidance
R calculation of expected time of arrival
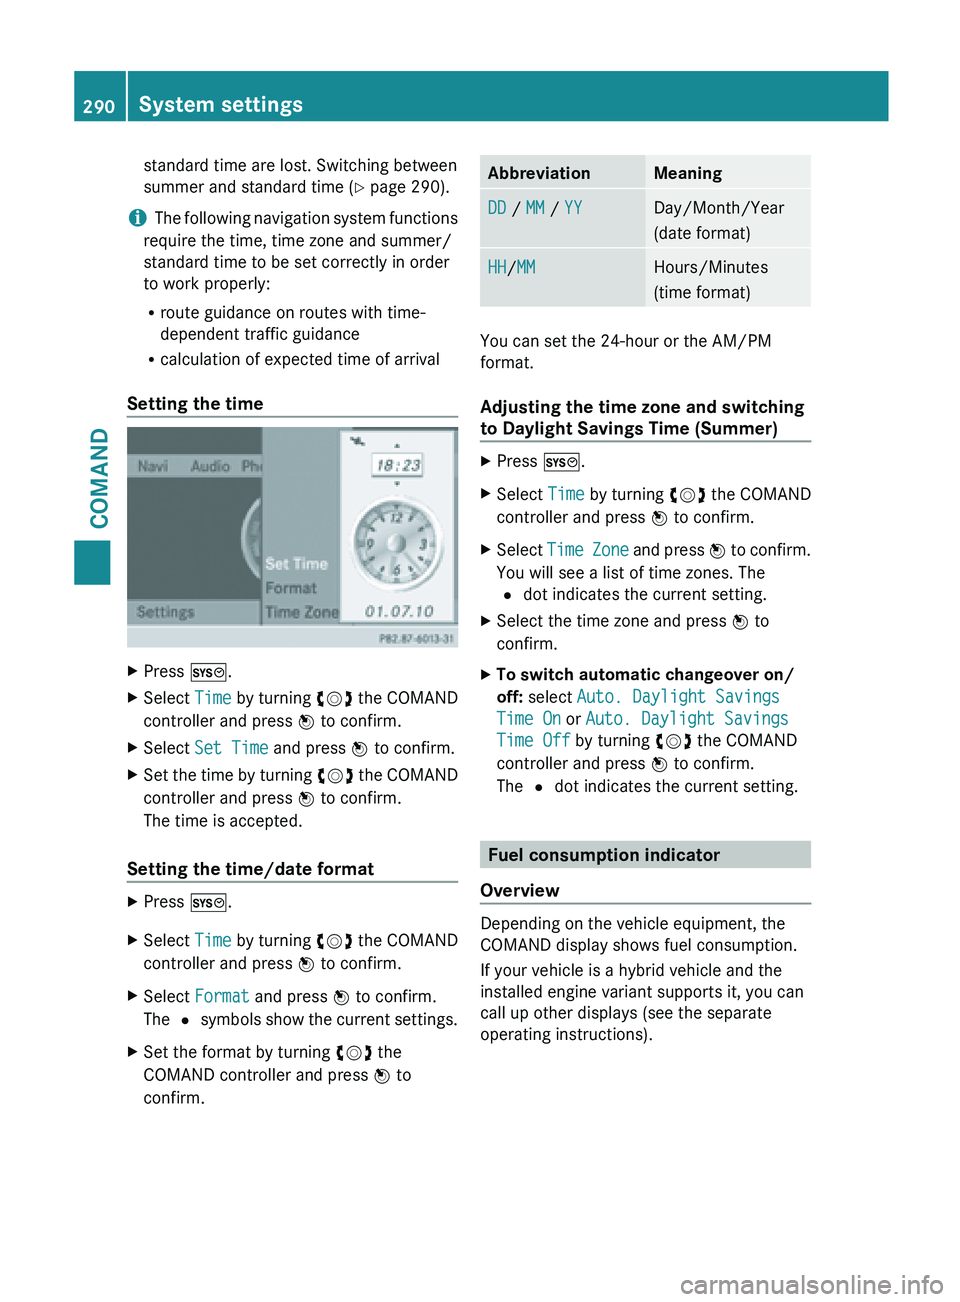
Setting the time X
Press W.
X Select Time by turning cVd the COMAND
controller and press W to confirm.
X Select Set Time and press W to confirm.
X Set the time by turning cVd the
COMAND
controller and press W to confirm.
The time is accepted.
Setting the time/date format X
Press W.
X Select Time by turning cVd the COMAND
controller and press W to confirm.
X Select Format and press W to confirm.
The # symbols
show the current settings.
X Set the format by turning cVd the
COMAND controller and press W to
confirm. Abbreviation Meaning
DD / MM / YY Day/Month/Year
(date format)
HH/MM Hours/Minutes
(time format)
You can set the 24-hour or the AM/PM
format.
Adjusting the time zone and switching
to Daylight Savings Time (Summer)
X
Press W.
X Select Time by turning cVd the COMAND
controller and press W to confirm.
X Select Time Zone
and press W to confirm.
You will see a list of time zones. The
# dot indicates the current setting.
X Select the time zone and press W to
confirm.
X To switch automatic changeover on/
off: select Auto. Daylight Savings
Time On or Auto. Daylight Savings
Time Off by turning cVd the COMAND
controller and press W to confirm.
The # dot indicates the current setting. Fuel consumption indicator
Overview Depending on the vehicle equipment, the
COMAND display shows fuel consumption.
If your vehicle is a hybrid vehicle and the
installed engine variant supports it, you can
call up other displays (see the separate
operating instructions).290
System settings
COMAND
Page 299 of 572
Basic settings
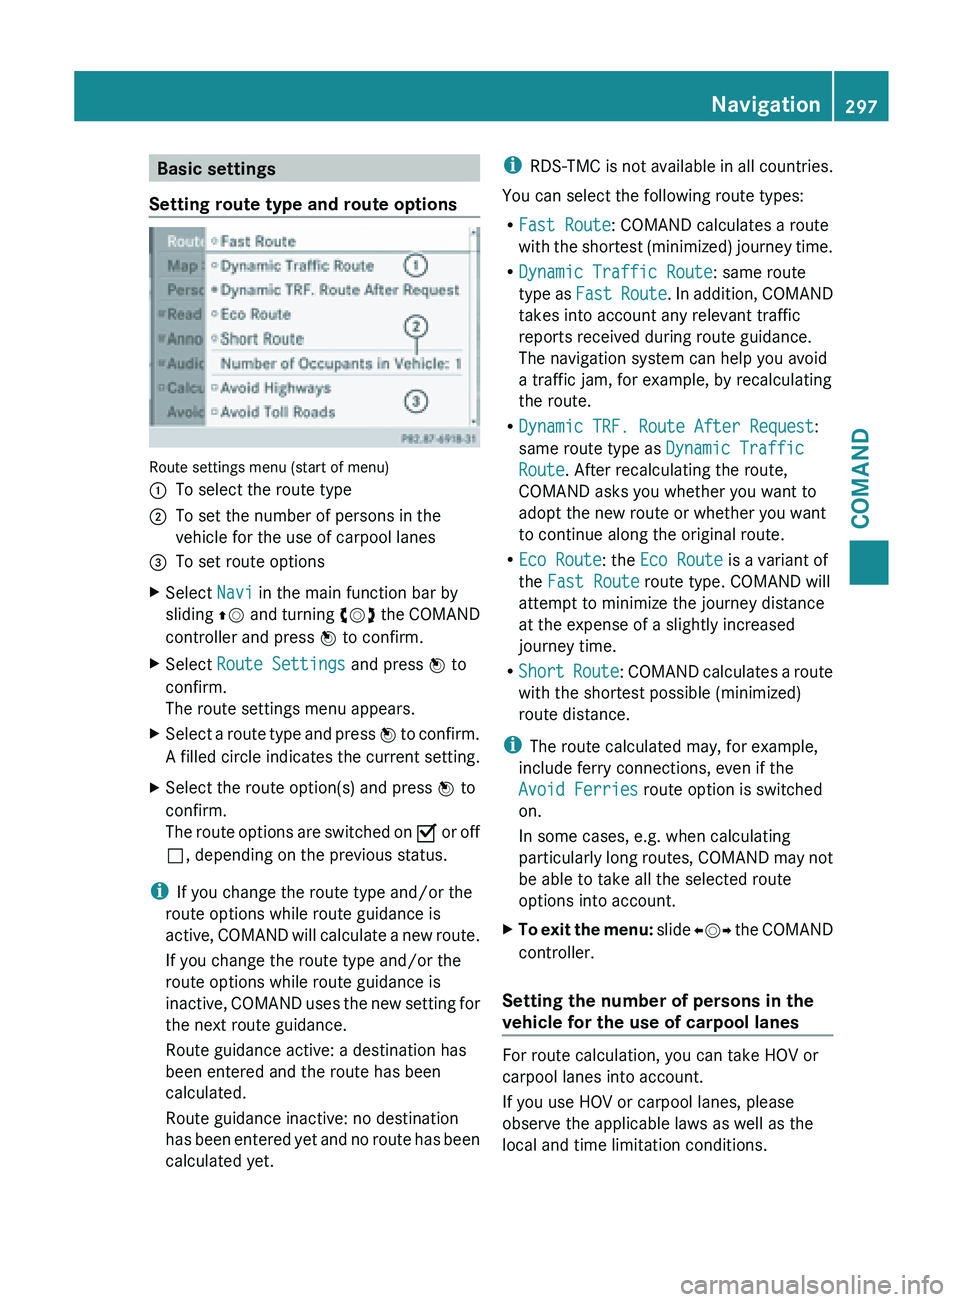
Setting route type and route options Route settings menu (start of menu)
:
To select the route type
; To set the number of persons in the
vehicle for the use of carpool lanes
= To set route options
X Select Navi in the main function bar by
sliding ZV and
turning cVd the COMAND
controller and press W to confirm.
X Select Route Settings and press W to
confirm.
The route settings menu appears.
X Select a route type and press W to
confirm.
A filled circle indicates the current setting.
X Select the route option(s) and press W to
confirm.
The route
options are switched on O or off
ª, depending on the previous status.
i If you change the route type and/or the
route options while route guidance is
active, COMAND
will calculate a new route.
If you change the route type and/or the
route options while route guidance is
inactive, COMAND uses the new setting for
the next route guidance.
Route guidance active: a destination has
been entered and the route has been
calculated.
Route guidance inactive: no destination
has been entered yet and no route has been
calculated yet. i
RDS-TMC is
not available in all countries.
You can select the following route types:
R Fast Route: COMAND calculates a route
with the shortest (minimized) journey time.
R Dynamic Traffic Route: same route
type as Fast Route. In addition, COMAND
takes into account any relevant traffic
reports received during route guidance.
The navigation system can help you avoid
a traffic jam, for example, by recalculating
the route.
R Dynamic TRF. Route After Request:
same route type as Dynamic Traffic
Route. After recalculating the route,
COMAND asks you whether you want to
adopt the new route or whether you want
to continue along the original route.
R Eco Route: the Eco Route is a variant of
the Fast Route route type. COMAND will
attempt to minimize the journey distance
at the expense of a slightly increased
journey time.
R Short Route : COMAND calculates a route
with the shortest possible (minimized)
route distance.
i The route calculated may, for example,
include ferry connections, even if the
Avoid Ferries route option is switched
on.
In some cases, e.g. when calculating
particularly long routes, COMAND may not
be able to take all the selected route
options into account.
X To exit the menu: slide
XVY
the COMAND
controller.
Setting the number of persons in the
vehicle for the use of carpool lanes For route calculation, you can take HOV or
carpool lanes into account.
If you use HOV or carpool lanes, please
observe the applicable laws as well as the
local and time limitation conditions. Navigation
297
COMAND Z
Page 310 of 572
X
To select a category: select a category by
turning cVd the COMAND controller and
press W to confirm.
COMAND first searches in the selected
category for destinations along the route.
If there are no destinations available there,
COMAND searches for destinations within
a radius of 60 miles(100 km) of the vehicle
position.
If COMAND finds destinations, a list
appears on the right-hand side of the
display.
The stopovers along the route are displayed
at the top of the list, sorted by increasing
distance from the vehicle's current position.
Below this, you will see the stopovers that
COMAND finds
in the vicinity of the vehicle's
current position.
i For stopovers that are not located along
the calculated route, the linear distance is
shown.
X Select a stopover by turning cVd the
COMAND controller and press W to
confirm.
The address entry menu appears, showing
the destination address.
X To start route calculation: select Start
and press W to confirm.
If COMAND does not find any destinations,
you will see a message to this effect.
X Confirm OK by pressing W.
X Select a different category.
Deleting a stopover
If a stopover has already been entered, you
can delete it.
X To switch to navigation mode: press the
Ø function button.
X To show the menu: press W
the COMAND
controller.
X Select Destination in the navigation
system menu bar by turning cVd theCOMAND controller and pressing
W to
confirm.
X Select Stopover and press W to confirm.
X Select Delete Stopover and press W to
confirm.
COMAND deletes the intermediate stop
and recalculates the route to the main
destination.
Entering waypoints Introduction
You can map the route yourself by entering
up to two waypoints. The sequence of the
waypoints can be changed at any time.
i
An intermediate stop is always between
the current position of the vehicle and the
first waypoint.
Creating waypoints
X To switch to navigation mode: press the
Ø function button.
X To show the menu:
press W
the COMAND
controller.
X Select Destination in the navigation
system menu bar by turning cVd the
COMAND controller and pressing W to
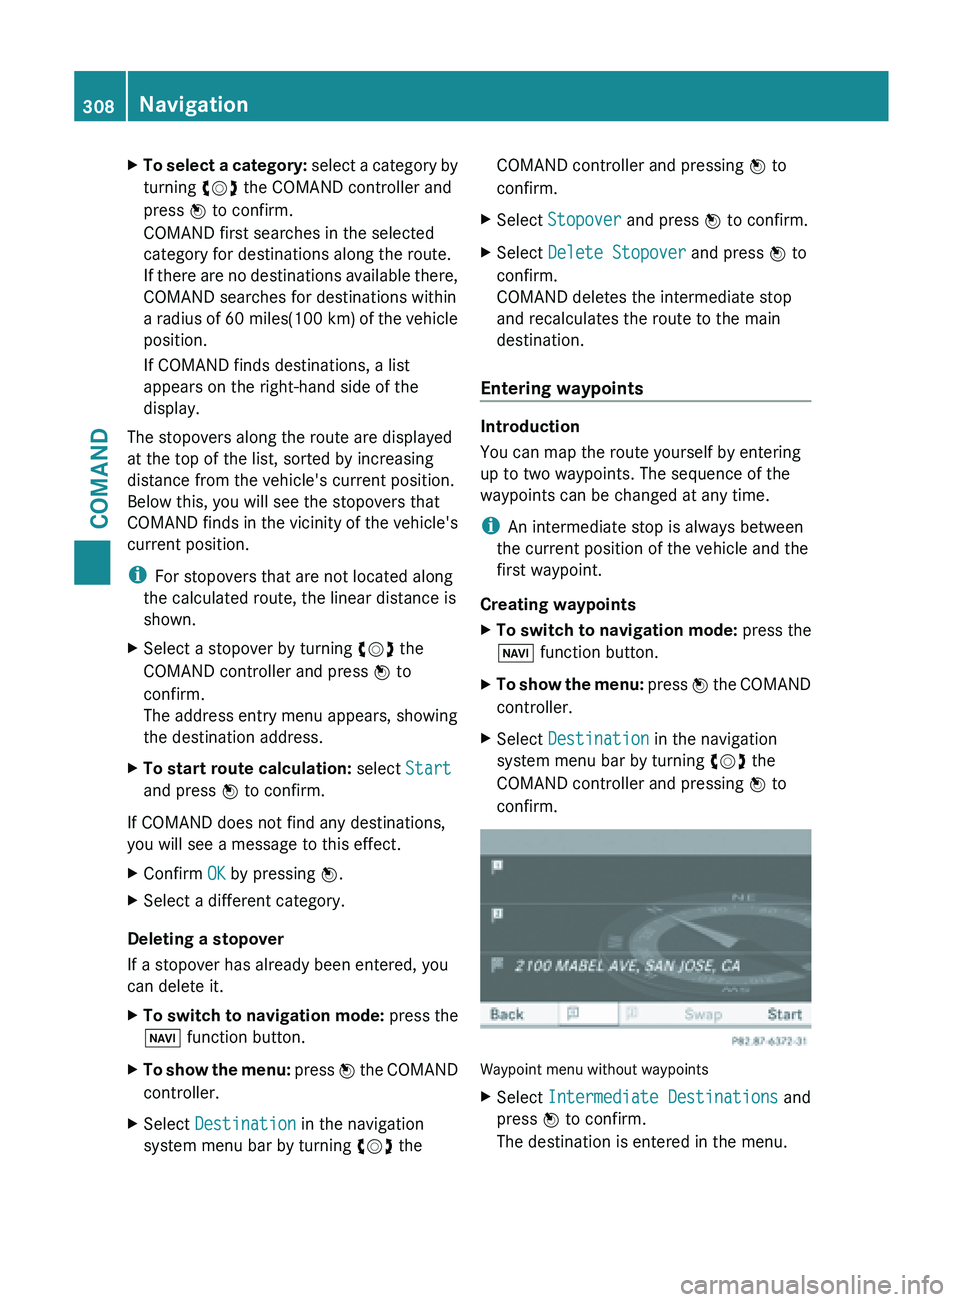
confirm. Waypoint menu without waypoints
X
Select Intermediate Destinations and
press W to confirm.
The destination is entered in the menu. 308
Navigation
COMAND
Page 324 of 572
Route guidance begins once a route has been
calculated
(
Y page 303).
COMAND guides you to your destination by
means of navigation announcements in the
form of audible navigation announcements
and route guidance displays.
The route guidance displays can only be seen
if the display is switched to navigation mode.
If you do not follow the navigation
announcements or if you leave the calculated
route, COMAND automatically calculates a
new route to the destination.
If the digital map contains the corresponding
information, the following applies:
R when selecting a route, COMAND tries to
avoid roads that only have limited access,
e.g. roads closed to through traffic.
R roads that have time restrictions (e.g.
closed on Sundays and public holidays) are
considered for route guidance on days
when they are open. For this purpose, the
relevant times must be correctly stored in
the database.
Displays during route guidance Change of direction
Changes of direction have three phases:
R
preparation phase
R announcement phase
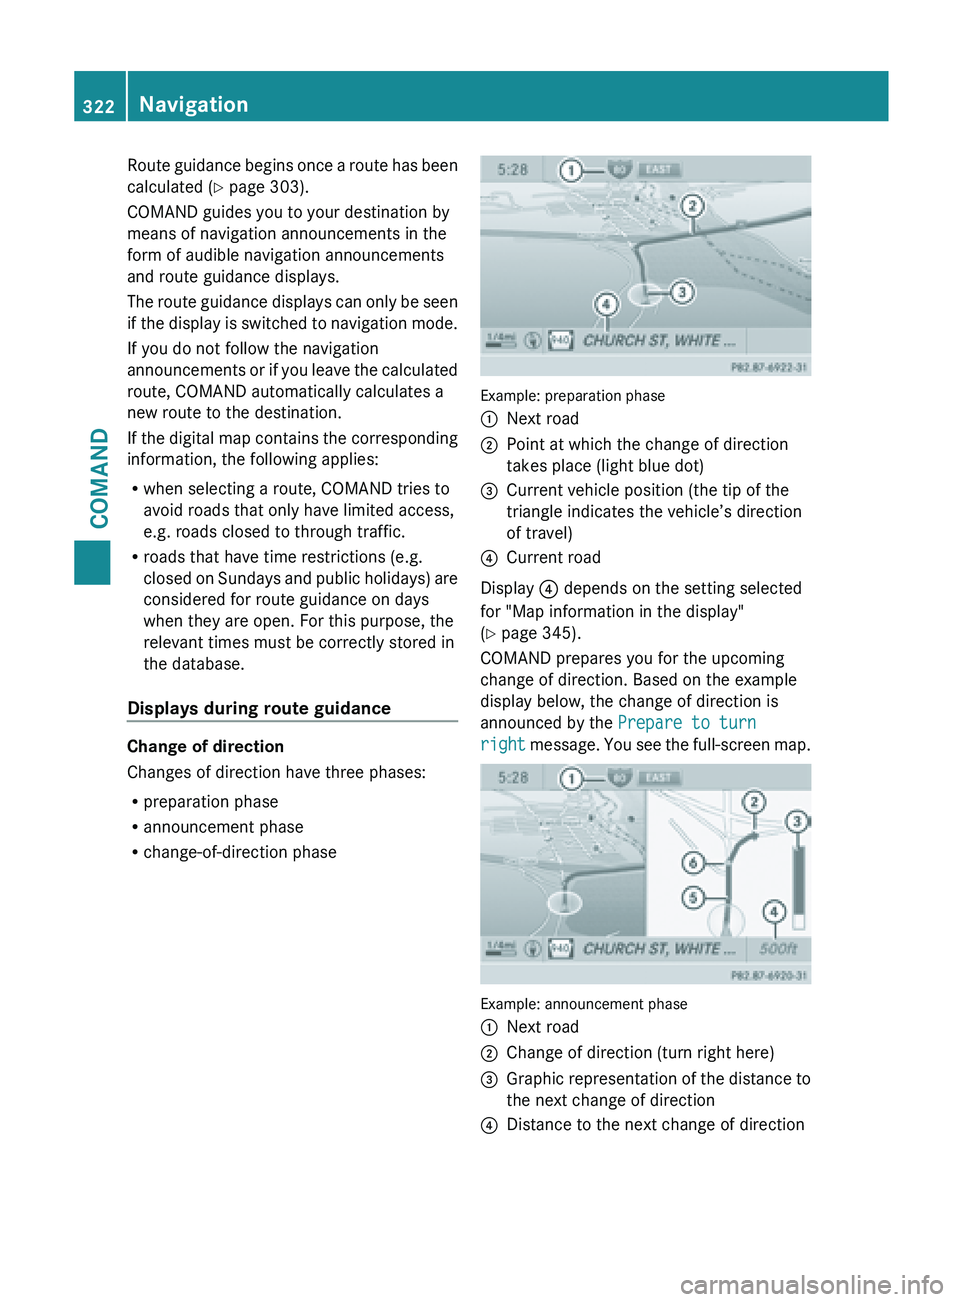
R change-of-direction phase Example: preparation phase
:
Next road
; Point at which the change of direction
takes place (light blue dot)
= Current vehicle position (the tip of the
triangle indicates the vehicle’s direction
of travel)
? Current road
Display ? depends on the setting selected
for "Map information in the display"
(Y page 345).
COMAND prepares you for the upcoming
change of direction. Based on the example
display below, the change of direction is
announced by the Prepare to turn
right message.
You see the full-screen map. Example: announcement phase
:
Next road
; Change of direction (turn right here)
= Graphic representation of the distance to
the next change of direction
? Distance to the next change of direction322
Navigation
COMAND
Page 333 of 572
X
To begin route calculation: select Start
in the menu by turning cVd the COMAND
controller and press W to confirm.
COMAND attempts to align the recorded
route with the digital map. Changing route names and icons
X
Select Edit in the menu by turning cVd
the COMAND controller and press W to
confirm.
X To change the route name: select
Rename and press W to confirm.
i The name cannot be changed while the
vehicle is in motion.
X To change the icon: select Change Icon
and press W to confirm.
X Information for both entries can be found
under "Managing categories for personal
POIs"( Y page 317).
To change direction for route
calculation: you can set the icon for the
route to the starting point or to the
destination, thereby changing the direction
for route calculation.
During route calculation, one-way streets or
turn restrictions, for example, are taken into
account. Therefore, the outward and return
routes may differ from each other.
X Select Swap in the menu by turning cVd
the COMAND controller and press W to
confirm. X
To delete a route: select Delete in the
menu by turning cVd the COMAND
controller and press W to confirm.
A prompt
appears asking whether the route
should be deleted.
X Select Yes or No and press W to confirm.
If you
select Yes, the route will be deleted.
If you select No, the process will be
canceled.
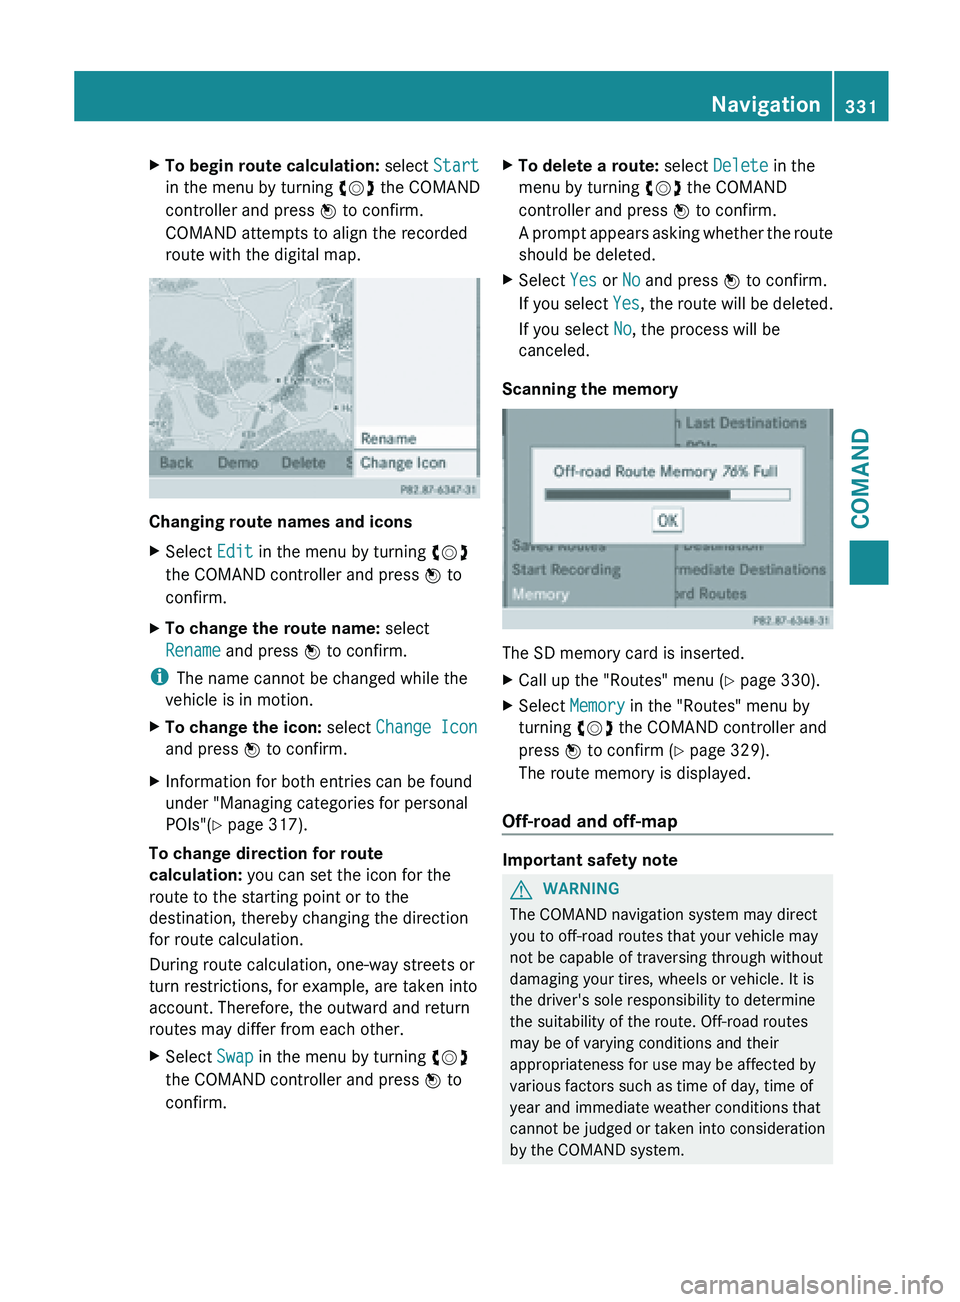
Scanning the memory The SD memory card is inserted.
X
Call up the "Routes" menu ( Y page 330).
X Select Memory in the "Routes" menu by
turning cVd the COMAND controller and
press W to confirm (
Y page 329).
The route memory is displayed.
Off-road and off-map Important safety note
G
WARNING
The COMAND navigation system may direct
you to off-road routes that your vehicle may
not be capable of traversing through without
damaging your tires, wheels or vehicle. It is
the driver's sole responsibility to determine
the suitability of the route. Off-road routes
may be of varying conditions and their
appropriateness for use may be affected by
various factors such as time of day, time of
year and immediate weather conditions that
cannot be
judged or taken into consideration
by the COMAND system. Navigation
331
COMAND Z