2013 MERCEDES-BENZ SL-CLASS ROADSTER change time
[x] Cancel search: change timePage 423 of 572
X
Select Sat Radio in the submenu bar by
turning cVd the COMAND controller and
press W to confirm.
X Select Service and press W to confirm.
The provider's details appear.
X To return to the SatRadio main display:
slide XVY the COMAND controller.
Channel list updates
When receiving
a new channel list, the display
shows the Updating Channels...
message.
The station last selected is switched to mute
until the update has been completed.
Satellite radio mode is not available during
this process.
Once the update has been completed, the
satellite radio main menu appears. The
station last selected is played.
Sound settings
Information on sound settings ( Y page 278).Audio CD/DVD and MP3 mode
Important safety notes G
WARNING
COMAND is classified as a Class 1 laser
product. Never open the housing. There is a
risk of
damage to the eyes due to exposure to
invisible laser radiation if you open the casing,
or if the casing is faulty or damaged.
COMAND does not contain any parts that can
be serviced by the user. For safety reasons,
all maintenance work must be carried out by
qualified aftersales technicians. G
WARNING
Only when the vehicle is stationary should
you:
R insert a data carrier
R eject a disc There is a risk of being distracted from the
road and traffic conditions if you insert or
eject a disc while the vehicle is in motion.
Inserting/ejecting CDs/DVDs Notes
If the CD/DVD has a printed side, this must
face upwards when the CD/DVD is inserted.
If
neither
side is printed, the side to be played
should face downwards. The system may not
be able to play CDs/DVDs with copy
protection.
i If a medium contains other files in
addition to music files, the loading time
before the first track starts to play may be
longer.
Inserting a disc into the single DVD drive
X Press the 8 eject button.
If there is a disc already inserted, it will be
ejected.
X Take the disc out of the slot.
X Insert a disc into the slot.
If the disc is correctly inserted and is a
suitable disc,
it is drawn in by the drive and
played.
Ejecting a disc from the single DVD drive
X Press the 8 eject button.
X Take the disc out of the slot.
If you
do not take the disc out of the slot, it
is drawn in again automatically after a short
while and reloaded.
Inserting discs into the DVD changer
The DVD changer has a fixed magazine with
six trays.
X To insert a CD/DVD into the magazine
tray: press the V load/eject button.
A menu shows the current load status of
the magazine trays. The last tray selected
is identified by a red digit. Audio
421
COMAND Z
Page 424 of 572
X
Select a magazine tray to be filled by
turning cVd the COMAND controller and
press W to confirm.
or
X Press a number key, e.g. j.
The DVD
changer switches to the selected
magazine tray. You see the Please
Wait... message.
You then see the Please insert disc
Insert a disc into the disc slot with the
printed side facing upwards.
The DVD changer loads the disc into the
selected magazine tray. The Loading
disc... message appears.
i It may take some time for the disc to be
loaded, depending
on the type of disc. If no
disc is inserted for approximately 20
seconds, the display returns to the
magazine menu.
The DVD changer plays the disc if:
R it has been inserted correctly.
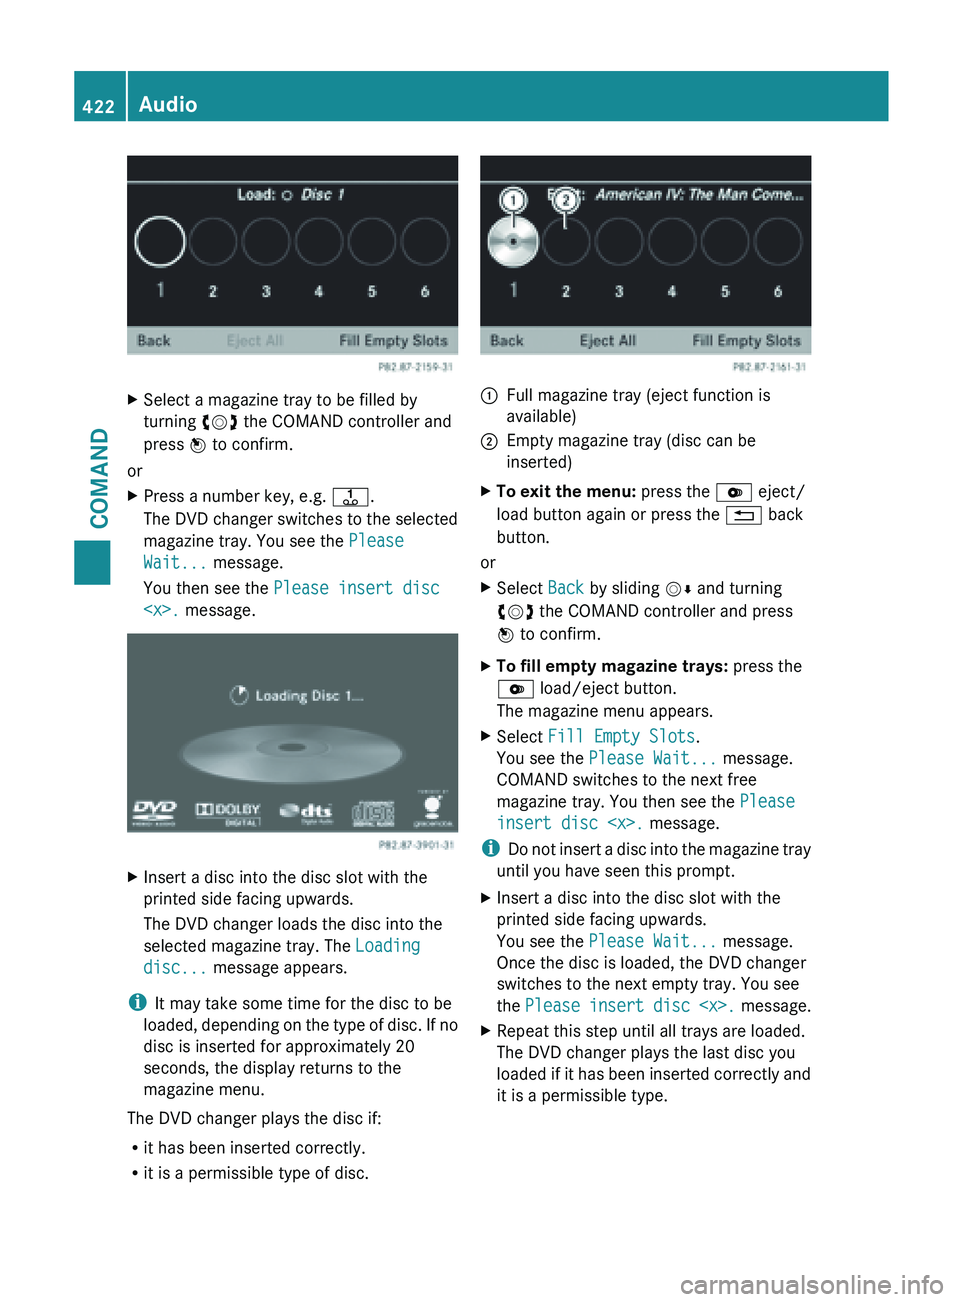
R it is a permissible type of disc. :
Full magazine tray (eject function is
available)
; Empty magazine tray (disc can be
inserted)
X To exit the menu: press the V eject/
load button again or press the % back
button.
or
X Select Back by sliding VÆ and turning
cVd the COMAND controller and press
W to confirm.
X To fill empty magazine trays: press the
V load/eject button.
The magazine menu appears.
X Select Fill Empty Slots.
You see the Please Wait... message.
COMAND switches to the next free
magazine tray. You then see the Please
insert disc
i Do not
insert a disc into the magazine tray
until you have seen this prompt.
X Insert a disc into the disc slot with the
printed side facing upwards.
You see the Please Wait... message.
Once the disc is loaded, the DVD changer
switches to the next empty tray. You see
the Please insert
disc
X Repeat this step until all trays are loaded.
The DVD changer plays the last disc you
loaded if
it has been inserted correctly and
it is a permissible type. 422
Audio
COMAND
Page 426 of 572
X
To exit the menu: press the V eject/
load button again or press the % back
button.
or
X Select Back by sliding VÆ and turning
cVd the COMAND controller and press
W to confirm.
Inserting and ejecting an SD memory
card General information
COMAND supports SD memory cards
(Secure Digital) and SDHC memory cards
(Secure Digital
High Capacity).
i Not all memory cards available on the
market are designed for the temperatures
which may be reached in the vehicle.
If the SD memory card is no longer in use,
you should remove it from COMAND. High
temperatures can damage the card.
Due
to the wide range of SD memory cards
available on the market, playback cannot
be guaranteed for all brands of SD memory
card.
The readable storage capacity depends on
the memory card used. You can obtain
further information at any authorized
Mercedes-Benz Center.
Inserting an SD memory card
X Insert the memory card into the slot on the
control panel until it engages in place. The
side with the contacts must face
downwards and point towards the slot.
COMAND loads the memory card and
shows a message to this effect. If no MP3
tracks can
be found, you will see a message
to this effect.
Ejecting an SD memory card
X Press the memory card.
The memory card is ejected.
X Remove the memory card from slot. Connecting a USB device The USB port is located in the stowage
compartment in the center console.
Electrical consumption at this connection
must not exceed a continuous current of
500 mA
. If the electrical consumption is
higher, use a separate source to provide
power for the USB device (e.g.
12 V power supply
).
X Connect the USB device (e.g. USB stick) to
the USB port.
i Due to the wide range of USB devices
available on the market, playback cannot
be guaranteed
for all brands of USB device.
Information about suitable USB devices
can be obtained from an authorized
Mercedes-Benz Center.
MP3 players must support Media Transfer
Protocol (MTP).
Activating audio CD/DVD or MP3 mode Automatic switching
X
Insert/eject CDs/DVDs (Y page 421)
or
X Insert an SD memory card (Y page 424)
or
X Connect a USB device ( Y page 424).
COMAND loads the medium inserted and
starts to play it.
Switching modes using the function
button
X Press the h
function
button one or more
times.
i By pressing the function button
repeatedly, you can change the operating
mode in the following order:
R audio CD/DVD/video DVD/MP3 CD/
MP3 DVD in the DVD changer or single
DVD drive (disc mode)
R memory card mode
R MUSIC REGISTER424
Audio
COMAND
Page 433 of 572

selection window. See the example of the
display in audio CD mode
(Y
page 425).
The following options are available to you:
R Normal Track Sequence
The tracks are played in the normal order
(e.g. track 1, 2, 3, etc.).
In MP3
mode, the track order is determined
by the order in which the tracks are written
to the MP3 data carrier when it is created.
Alphabetical order is the most common.
Once all the tracks in a folder have been
played, the tracks in the next folder are
played.
R Random Medium
All the tracks on the medium are played in
random order (e.g. track 3, 8, 5 etc.).
R Random Track List (MP3 mode only)
You hear the tracks of the current track list
or the currently active folder (including all
subfolders) in random order.
i The Normal Track Sequence option is
automatically selected when you change
the disc you are currently listening to or
when you select a different medium. If an
option is selected, it remains selected after
COMAND is switched on or off.
Notes on MP3 mode General notes
Depending on the volume and format of the
MP3 data, the length of time required for
reading the data may increase.
Permissible data carriers
R
CD-R and CD-RW
R DVD-R and DVD-RW
R DVD+R and DVD+RW
R SD memory card
R USB storage device Permissible file systems
R
ISO 9660/Joliet standard for CDs
R UDF for audio and video DVDs
R FAT16 or FAT32 for SD memory cards and
USB storage media
Multisession CDs
For multisession
CDs, the content of the first
session determines how COMAND will
process the CD. COMAND plays only one
session and gives priority to the audio CD
session.
If possible, use COMAND to play only CDs
that have been written in one session.
File structure of a data carrier
When you create a disc with compressed
music files, the tracks can be organized in
folders. A folder may also contain subfolders.
The disc may contain no more than eight
directory levels. Files beyond the eighth level
will not be recognized by the system.
Track and file names
When you create a disc with compressed
music files, you can assign names to the
tracks and folders.
COMAND uses these names accordingly for
the display. Folders that contain data other
than MP3 or WMA tracks are not displayed by
COMAND.
If MP3 or WMA files are stored in the root
directory itself, the root directory will also be
treated as a folder. COMAND will then show
the name of the root directory as the folder
name.
You must observe the following when
assigning track names:
R track names must have at least one
character.
R track names must have the extension
"mp3" or "wma".
R there must be a dot between the track
name and the extension.
Example of a correct track name:
"Track1.mp3". Audio
431
COMAND Z
Page 438 of 572
X
Select a track and press W to confirm.
Playback starts and the basic display
appears. MUSIC REGISTER
General notes !
Retain the
original music files in a secure
location. An error in COMAND might result
in the loss of the music files stored in the
MUSIC REGISTER. Mercedes-Benz is not
liable for any loss of data.
You can store music files in a compressed
format in the MUSIC REGISTER
(Y page 437). The memory has a capacity of
10 GB.
Switching to MUSIC REGISTER MUSIC REGISTER basic display
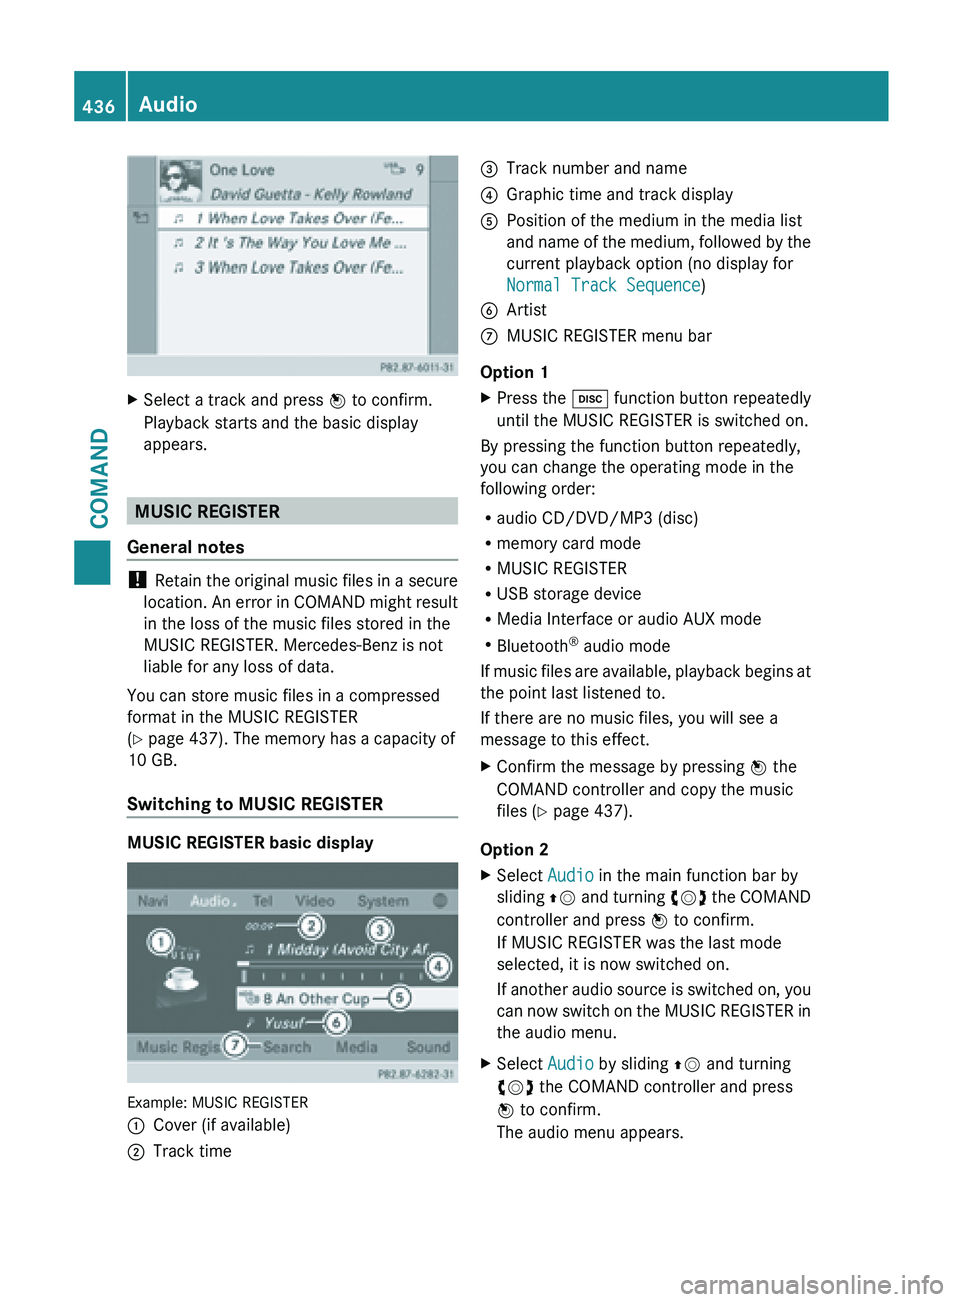
Example: MUSIC REGISTER
:
Cover (if available)
; Track time =
Track number and name
? Graphic time and track display
A Position of the medium in the media list
and name
of the medium, followed by the
current playback option (no display for
Normal Track Sequence)
B Artist
C MUSIC REGISTER menu bar
Option 1
X Press the h function button repeatedly
until the MUSIC REGISTER is switched on.
By pressing the function button repeatedly,
you can change the operating mode in the
following order:
R audio CD/DVD/MP3 (disc)
R memory card mode
R MUSIC REGISTER
R USB storage device
R Media Interface or audio AUX mode
R Bluetooth ®
audio mode
If music
files are available, playback begins at
the point last listened to.
If there are no music files, you will see a
message to this effect.
X Confirm the message by pressing W the
COMAND controller and copy the music
files ( Y page 437).
Option 2
X Select Audio in the main function bar by
sliding ZV and
turning cVd the COMAND
controller and press W to confirm.
If MUSIC REGISTER was the last mode
selected, it is now switched on.
If another audio source is switched on, you
can now switch on the MUSIC REGISTER in
the audio menu.
X Select Audio by sliding ZV and turning
cVd the COMAND controller and press
W to confirm.
The audio menu appears. 436
Audio
COMAND
Page 442 of 572
The Bluetooth
®
audio device must support
the A2DP and AVRCP Bluetooth ®
audio
profiles.
R Bluetooth ®
visibility
Certain Bluetooth ®
audio devices do not
just require activation of the Bluetooth ®
function. In addition, your device must be
made "visible" to other devices.
R Bluetooth ®
device name
This device name is predetermined but can
usually be changed. To make a clear
selection of the Bluetooth ®
device
possible, Mercedes-Benz recommends
that you customize the device name.
i A2DP ( Advanced Audio Distribution
Profile): Bluetooth ®
audio profile for audio
data transmission
AVRCP ( Audio Video Remote Control
Profile): Bluetooth ®
audio profile for audio
data playback
i Not all Bluetooth ®
audio devices available
on the market are equally suitable. To
obtain more information about suitable
Bluetooth ®
audio devices and about
connecting Bluetooth ®
audio devices to
COMAND, visit
http://www.mbusa-mobile.com (USA).
Alternatively, call the Mercedes-Benz
Customer Assistance Center at
1-800-FOR-MERCedes(1-800-367-6372)
(USA) or Customer Relations at
1-800-387-0100 (Canada).
X Activate Bluetooth ®
and Bluetooth ®
visibility on the Bluetooth ®
audio device.
Preconditions in COMAND X
Activate the Bluetooth ®
function in
COMAND (Y page 292). Connecting Bluetooth
®
audio devices General information
Before using your Bluetooth
®
audio device
with COMAND
for the first time, you will need
to authorize it.
When you authorize a new Bluetooth ®
audio
device, it is connected automatically.
Connection involves first searching for a
Bluetooth ®
audio device and then authorizing
it.
You can authorize up to fifteen Bluetooth ®
devices.
i If you authorize a mobile phone that
supports Bluetooth ®
audio, the A2DP and
AVRCP Bluetooth ®
audio profiles are
connected automatically.
The mobile phone is then entered:
R in the Bluetooth ®
telephone list
(Y page 360)
R in the Bluetooth ®
device list
(Y page 440).
Mercedes-Benz recommends authorizing a
mobile phone in Bluetooth ®
telephony
(Y page 360).
Searching for and authorizing a
Bluetooth ®
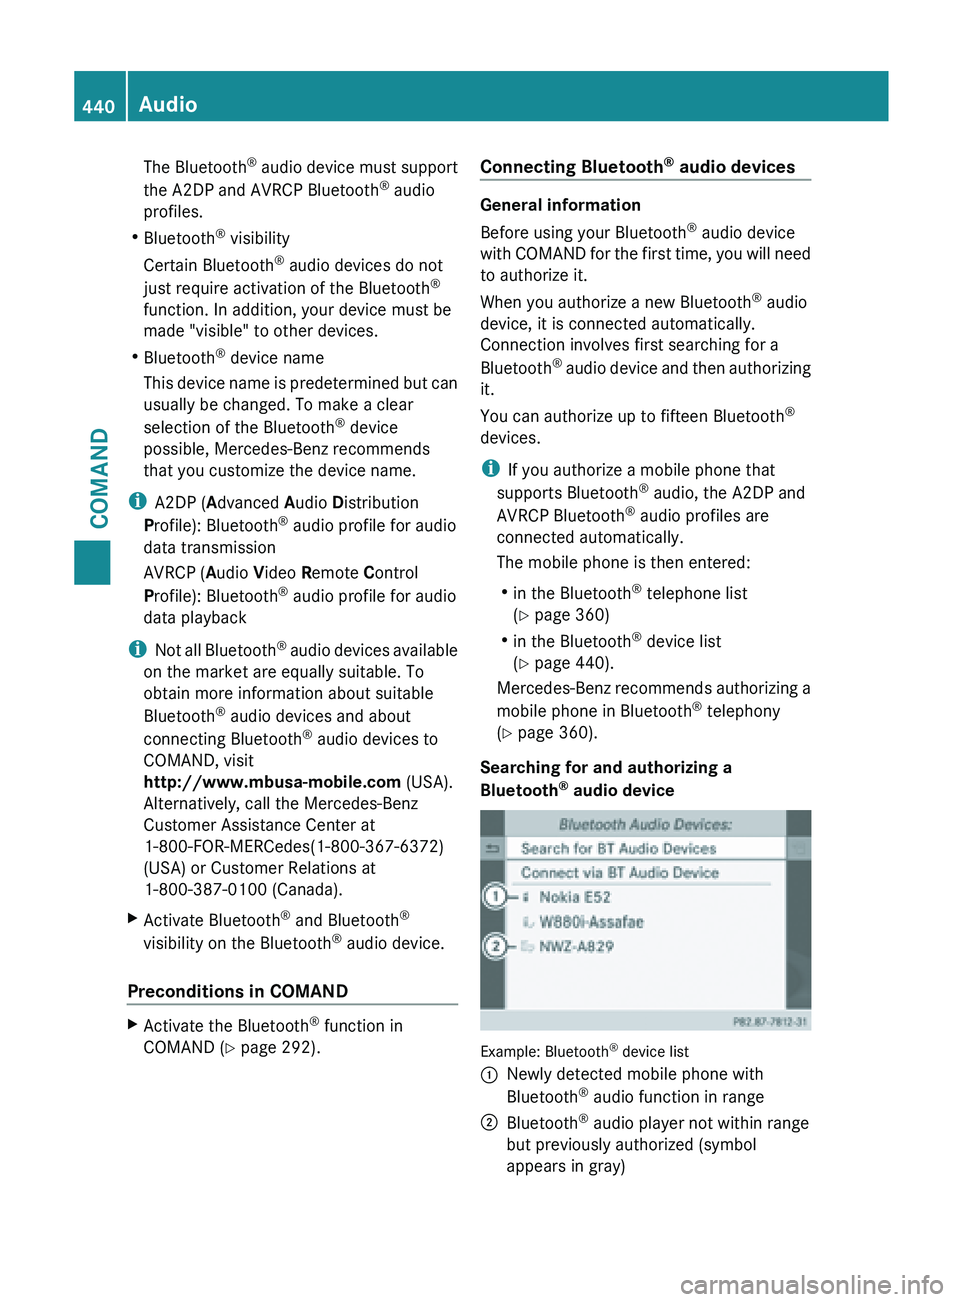
audio device Example: Bluetooth
®
device list
: Newly detected mobile phone with
Bluetooth ®
audio function in range
; Bluetooth ®
audio player not within range
but previously authorized (symbol
appears in gray) 440
Audio
COMAND
Page 446 of 572
Using the function button
X
Press the h function button one or more
times.
By pressing the function button repeatedly,
you can change the operating mode in the
following order:
R audio CD/DVD/MP3 (disc)
R memory card mode
R MUSIC REGISTER
R USB storage device
R Media Interface or audio AUX mode
R Bluetooth ®
audio mode
Using the media list
X Select Bluetooth Audio in the media list
by turning cVd the COMAND controller
and press W to confirm (
Y page 426).
COMAND activates the connected device.
You will see a message to this effect. The
basic display then appears.
Starting/stopping playback X
To start playback: select Ì by sliding
VÆ and turning cVd the COMAND
controller and press W to confirm.
Playback starts. É is selected.
X To stop playback: select É by turning
cVd the COMAND controller and press
W to confirm.
A message appears. Ì is selected.
X To continue playback: select Ì by
turning cVd the COMAND controller and
press W to confirm.
A message appears. É is selected. Restarting playback after stopping
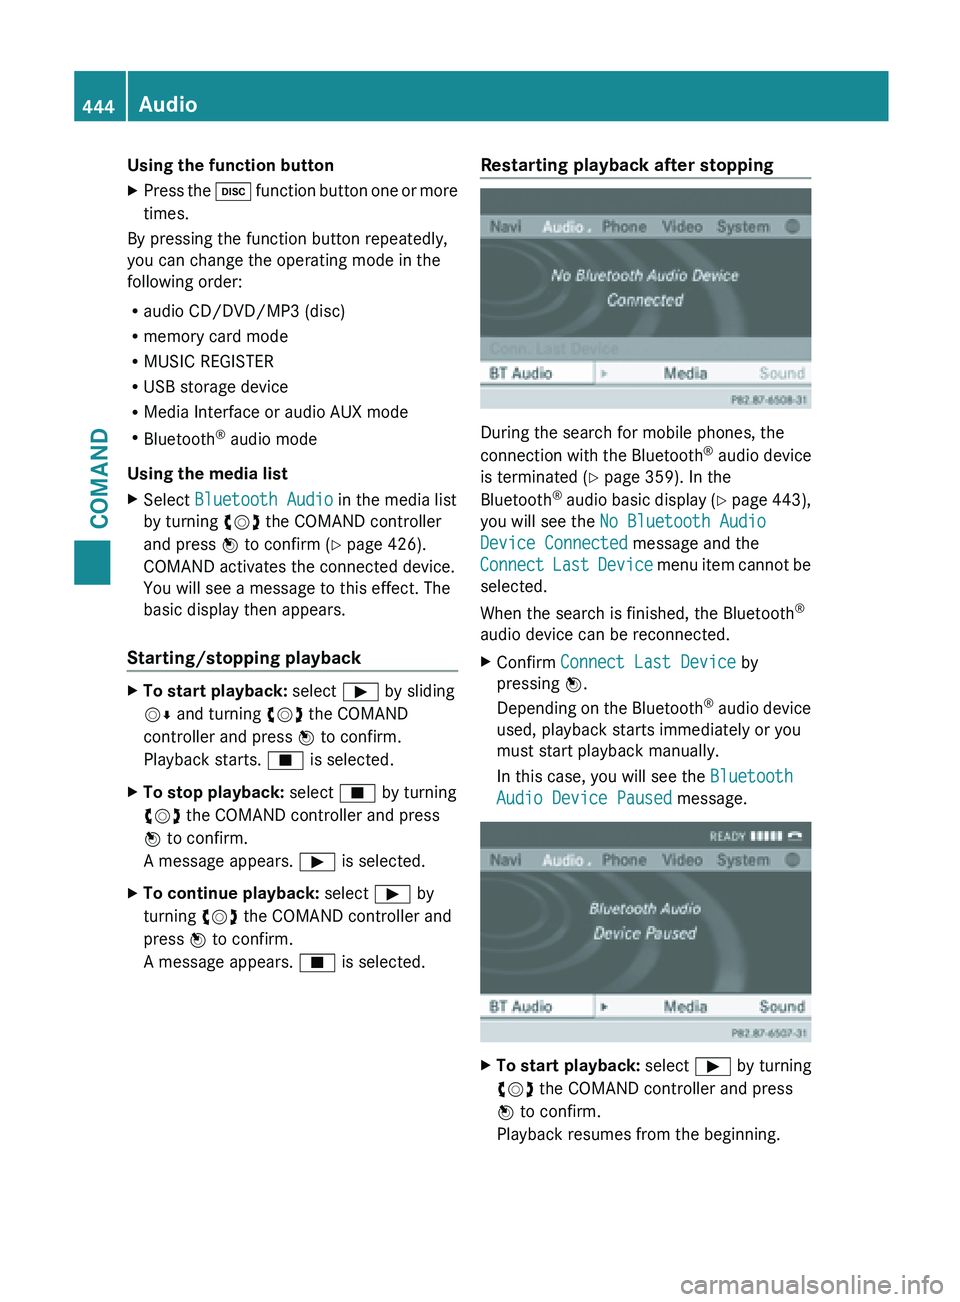
During the search for mobile phones, the
connection
with
the Bluetooth®
audio device
is terminated (Y page 359). In the
Bluetooth ®
audio basic display (Y page 443),
you will see the No Bluetooth Audio
Device Connected message and the
Connect Last Device menu item cannot be
selected.
When the search is finished, the Bluetooth ®
audio device can be reconnected.
X Confirm Connect Last Device by
pressing W.
Depending on
the Bluetooth®
audio device
used, playback starts immediately or you
must start playback manually.
In this case, you will see the Bluetooth
Audio Device Paused message. X
To start playback: select Ì by turning
cVd the COMAND controller and press
W to confirm.
Playback resumes from the beginning. 444
Audio
COMAND
Page 449 of 572

R
the Media Interface connection is faulty.
R a mass
storage device (e.g. a USB memory
stick or USB hard drive) is connected to the
Media Interface.
In this case the message Please
connect the device to the other
USB port appears.
i The separate USB connection ensures
quick access and expanded media content
options.
i Consult an authorized Mercedes-Benz
Center if you have further questions.
Switching to Media Interface mode General notes
In extreme cases, starting up individual
functions can take up to several minutes –
this depends on the external device and its
content (e.g. video podcasts).
Only
use
the original software to save files on
iPods ®
or MP3 players. Otherwise, some or
all functions may not be available.
Automatic switching Media Interface mode (iPod
®
mode) when
equipped with a DVD changer
: Cover (if available) or representation of
device
; Track number
= Elapsed track time (also in format
00:00:00 for audio books)
? Track name
A Graphic time display B
Track position in playlist
C Album name (if available)
D Artist (if available)
E Music search
F Position in the media list
G Type of data medium
H Playback options
The type of device connected is indicated by
the corresponding symbol for iPod ®
,
iPhone ®
or MP3 player G.
The current playback option is shown with a
symbol behind
album name C (no display for
Normal Track Sequence) ( Y page 450).
X Connect an external device (Y page 446).
COMAND activates the device. The basic
display then appears.
i If the device connected does not contain
any playable
tracks, a message appears to
this effect.
Switching modes using the function
button
The external device is connected to the Media
Interface ( Y page 446).
X Press the h function button repeatedly
until the Media Interface basic menu
appears (Y
page 447).
By pressing the function button repeatedly,
you can change the operating mode in the
following order:
R audio CD/DVD/MP3 (disc)
R memory card mode
R MUSIC REGISTER
R USB storage device
R Media Interface or audio AUX mode
R Bluetooth ®
audio mode
Switching on using a number key
The external
device is connected to the Media
Interface ( Y page 446). Audio
447
COMAND Z