2013 MERCEDES-BENZ SL-CLASS ROADSTER window
[x] Cancel search: windowPage 88 of 572
Problems with the side windows
G
WARNING
Closing the side windows with increased force or without the anti-entrapment feature could lead
to serious
or even fatal injury. Make sure that nobody can become trapped when closing the side
windows. G
WARNING
Pulling and holding the switch to close the door window immediately after it had been blocked
two times will cause the door window to close without the anti-entrapment feature for as long
as you hold the switch. Problem Possible causes/consequences and
M
Solutions
A side window cannot
be closed because it is
blocked
by
objects, e.g.
leaves in the window
guide. X
Remove the objects.
X Close the side window. A side window cannot
be closed and you
cannot see the cause. If a side window is obstructed during closing and reopens again
slightly:
X
Immediately after the window blocks, pull the corresponding
switch again until the side window has closed.
The side window is closed with increased force.
If a side window is obstructed again during closing and reopens
again slightly:
X Immediately after the window blocks, pull the corresponding
switch again until the side window has closed.
The side
window is closed without the anti-entrapment feature.Roof
Important safety notes
G
WARNING
Always open or close the roof fully before
driving.
If the roof does not open or close fully, the
roof hydraulic system is depressurized and
the roof is lowered:
R after about seven minutes if the ignition is
switched on
R after about
15 seconds if the ignition is switched off A warning tone sounds shortly beforehand.
The
K symbol and
Vario-Roof
Lowering message appear in the
multifunction display.
Lock the roof again before driving on.
Otherwise, the unlocked roof could open
during the journey and cause you to lose
control of your vehicle. You and/or other
persons could be injured as a result. G
WARNING
Closing the roof manually is a complex,
technically challenging procedure. 86
Roof
Opening/closing
Page 89 of 572

Attempting to manually close the roof may
cause damage to the roof and/or injury.
For this reason, the manual closing process
should only be carried out at a qualified
specialist workshop.
! Never sit
on the rear compartment trim or
stow heavy objects there. You will
otherwise damage the roof and rear
compartment trim of the vehicle.
! Do not forget that the weather can
change abruptly. Make certain that the roof
is closed when you leave the vehicle. The
vehicle electronics can be damaged if
water enters the vehicle interior.
! When opening and closing the roof, make
sure that:
R there is sufficient clearance, as the roof
swings upwards.
R there is sufficient clearance behind the
vehicle, as the trunk lid swings
backwards beyond the bumper.
R the trunk is only loaded to below the
trunk partition.
R the trunk partition is not pushed up by
the load.
R the trunk partition is closed.
R the trunk lid is closed.
R the outside temperature is above 5 ‡
(Ò15 †).
You could otherwise damage the roof,
trunk and other parts of the vehicle.
i Make sure that the roof and rear window
are clean and dry before opening the roof.
Otherwise, water or dirt could enter the
vehicle interior or trunk. Opening and closing using the roof
switch
Important safety notes G
WARNING
Before operating the retractable hardtop
(vario-roof), make sure there is no danger of
anyone being injured by the moving parts
(retractable hardtop, roof frame, and trunk
lid).
Hands must never be placed near the roof
frame, upper windshield area, hardtop, shelf
behind roll bars, or trunk lid while the
retractable hardtop is being raised or
lowered. Serious personal injury may occur.
If potential danger exists, release the
retractable hardtop switch or the
% or
& button on the SmartKey. This
immediately interrupts
the raising or lowering
procedure. You can then operate the
retractable hardtop switch or press the
% or & button on the SmartKey to raise
or lower the retractable hardtop away from
the danger zone.
Opening/closing X
Secure the vehicle against rolling away
(
Y page 154).
X Close the trunk partition (Y page 89).
X Close the trunk lid.
X Turn the SmartKey to position 2 in the
ignition lock.
X Open the cover in the lower center console.
Roof switch : is located under the cover. Roof
87
Opening/closing Z
Page 90 of 572
X
To open: pull roof switch : until the roof
has been fully retracted into the trunk and
the Vario-Roof in Operation message
disappears from the multifunction display.
All of the side windows open.
X To close: press roof
switch : until the roof
is fully closed and the Vario-Roof in
Operation message disappears from the
multifunction display.
All of the side windows open.
X To close all side windows, pull the switch
under the cover of the center console
(Y page 84). Opening and closing using the
SmartKey
Important safety notes G
WARNING
Before operating the retractable hardtop
(vario-roof), make sure there is no danger of
anyone being injured by the moving parts
(retractable hardtop, roof frame, and trunk
lid).
Hands must never be placed near the roof
frame, upper windshield area, hardtop, shelf
behind roll bars, or trunk lid while the
retractable hardtop is being raised or
lowered. Serious personal injury may occur.
If potential danger exists, release the
retractable hardtop switch or the % or
& button on the SmartKey. This
immediately interrupts
the raising or lowering
procedure. You can then operate the
retractable hardtop switch or press the
% or & button on the SmartKey to raise
or lower the retractable hardtop away from
the danger zone.
Opening/closing X
Close the trunk partition (Y page 89).
X Close the trunk lid ( Y page 77). X
Vehicles without KEYLESS-GO: point
the
tip of the SmartKey at the door handle on
the driver's door.
X Vehicles with KEYLESS-GO: the
SmartKey must be within 6 ft (2 m) of the
vehicle.
X To open: press and hold the % button
on the key until the roof is fully opened.
The roof and the rear side windows open.
The front side windows close.
X To interrupt the opening procedure:
release the % button.
X To open the front side windows: press
and hold
the % button on the key again.
X To close: press and hold the & button
on the key until the roof is fully closed.
The roof and the side windows close.
X To interrupt the closing procedure:
release the & button.
i When the roof is closed and the trunk
partition is open, the roof cannot be
opened using the SmartKey functions.
Instead, all of the side windows open or
close simultaneously (Y
page 84). Locking the roof again
Important safety notes G
WARNING
Stop the vehicle in a safe location or as soon
as it is safe to do so and lock the retractable
hardtop before
continuing to drive. You could
otherwise endanger yourself and others.
The roof is not locked if:
R the K symbol and Vario-Roof In
Operation message appear in the
multifunction display
R the K symbol and Open/Close Vario-
Roof Completely message appear and
you hear a warning tone
R you hear a warning tone for up to
10 seconds when pulling away or while
driving.88
Roof
Opening/closing
Page 102 of 572

Adjusting the active multicontour
seat
You can
set the active the active multicontour
seat using COMAND (Y page 287). Adjusting the 4-way lumbar support
You can adjust the 4-way lumbar support
using COMAND (
Y page 287).
Switching the seat heating on/off
Activating/deactivating The three red indicator lamps in the button
indicate the heating level you have selected.
The system automatically switches down
from level
3 to level 2 after approximately
eight minutes.
The system automatically switches down
from level 2
to level 1 after approximately ten
minutes.
The system automatically switches off
approximately 20 minutes after it is set to
level 1.
You can set the distribution of the heated
sections of the seat cushion and backrest
using COMAND (Y page 288).
X Make sure that the SmartKey is in position
1 or 2 in the ignition lock.
X To switch on: press button : repeatedly
until the desired heating level is set.
X To switch off: press button : repeatedly
until all the indicator lamps go out. i
If the battery voltage is too low, the seat
heating may switch off.
Problems with the seat heating The seat heating has switched off
prematurely or cannot be switched on. The
vehicle's electrical system voltage is too low
because too many electrical consumers are
switched on.
X
Switch
off electrical consumers that you do
not need, such as the rear window
defroster or interior lighting. Switching the seat ventilation on/off
Activating/deactivating The three blue indicator lamps in the buttons
indicate the ventilation level you have
selected.
X Make sure that the SmartKey is in position
2 in the ignition lock.
X To switch on: press button : repeatedly
until the desired ventilation level is set.
X To switch off: press button : repeatedly
until all the indicator lamps go out.
i If the battery voltage is too low, the seat
ventilation may switch off.
i If you open the roof with the SmartKey
(Y page 88), the seat ventilation of the
driver's seat
switches on automatically and
the side windows open. 100
Seats
Seats, steering wheel and mirrors
Page 103 of 572
Problems with the seat ventilation
The seat ventilation has switched off
prematurely or cannot be switched on. The
vehicle's electrical system voltage is too low
because too many electrical consumers are
switched on.
X
Switch off electrical consumers which you
do not need, such as the rear window
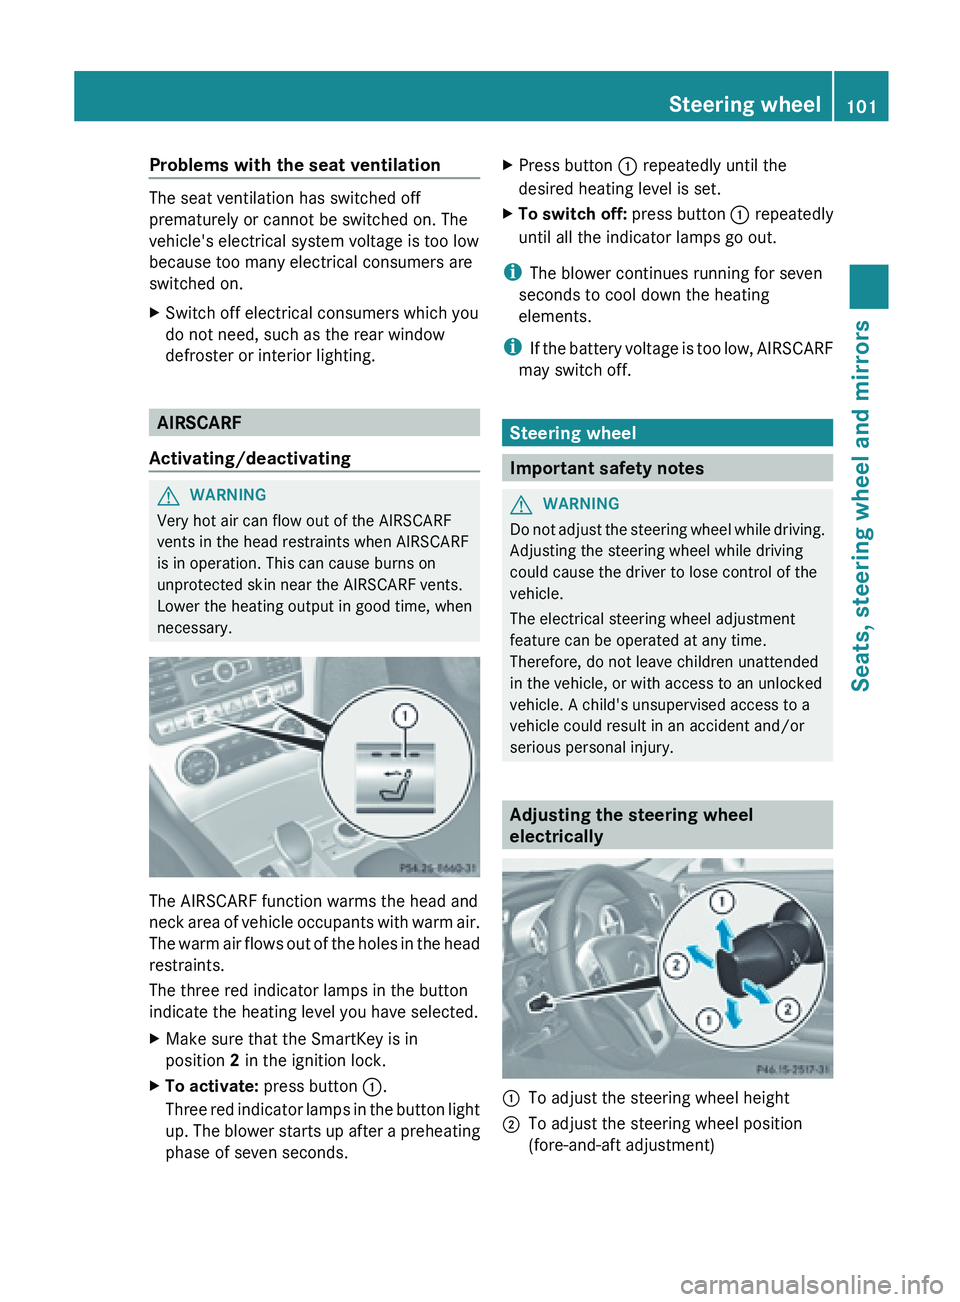
defroster or interior lighting. AIRSCARF
Activating/deactivating G
WARNING
Very hot air can flow out of the AIRSCARF
vents in the head restraints when AIRSCARF
is in operation. This can cause burns on
unprotected skin near the AIRSCARF vents.
Lower the heating output in good time, when
necessary. The AIRSCARF function warms the head and
neck
area
of vehicle occupants with warm air.
The warm air flows out of the holes in the head
restraints.
The three red indicator lamps in the button
indicate the heating level you have selected.
X Make sure that the SmartKey is in
position 2 in the ignition lock.
X To activate: press button :.
Three red
indicator lamps in the button light
up. The blower starts up after a preheating
phase of seven seconds. X
Press button : repeatedly until the
desired heating level is set.
X To switch off: press button : repeatedly
until all the indicator lamps go out.
i The blower continues running for seven
seconds to cool down the heating
elements.
i If the
battery voltage is too low, AIRSCARF
may switch off. Steering wheel
Important safety notes
G
WARNING
Do not adjust the steering wheel while driving.
Adjusting the steering wheel while driving
could cause the driver to lose control of the
vehicle.
The electrical steering wheel adjustment
feature can be operated at any time.
Therefore, do not leave children unattended
in the vehicle, or with access to an unlocked
vehicle. A child's unsupervised access to a
vehicle could result in an accident and/or
serious personal injury. Adjusting the steering wheel
electrically
:
To adjust the steering wheel height
; To adjust the steering wheel position
(fore-and-aft adjustment) Steering wheel
101
Seats, steering wheel and mirrors Z
Page 105 of 572

Mirrors
Rear-view mirror
X
Anti-glare mode: flick anti-glare lever :
forwards or back. Exterior mirrors
Adjusting the exterior mirrors G
WARNING
The exterior mirrors reduce the size of the
image. Objects are actually closer than they
appear. You
could misjudge the distance from
vehicles driving behind and cause an
accident, e.g. when changing lane. For this
reason, make sure of the actual distance from
the vehicle driving behind by glancing over
your shoulder. X
Make
sure that the SmartKey is in position
1 or 2 in the ignition lock.
X Press button : for the left-hand exterior
mirror or button ; for the right-hand
exterior mirror.
The indicator lamp in the corresponding
button lights up in red.
The indicator lamp goes out again after
some time. You can adjust the selected
mirror using adjustment button = as long
as the indicator lamp is lit.
X Press adjustment button = up, down, to
the right or to the left.
The exterior
mirror must be set to a position
that provides you with a good overview of
traffic conditions.
The convex exterior mirrors provide a larger
field of vision.
The exterior
mirrors are automatically heated
if the rear window defroster is switched on
and the outside temperature is low.
Exterior mirror out of position If an exterior mirror has been pushed out of
position, proceed as follows:
X
Move the exterior mirror into the correct
position manually.
The mirror housing is engaged again and
you can
adjust the exterior mirrors as usual
(Y page 103). Automatic anti-glare mirrors
G
WARNING
If incident light from headlamps is prevented
from striking the sensor in the rear-view
mirror, for
instance, by luggage piled too high
in the vehicle, the mirror's automatic anti-
glare function will not operate.
Incident light could then blind you. This may
distract you from the traffic conditions and,
as a result, you may cause an accident. Mirrors
103
Seats, steering wheel and mirrors Z
Page 124 of 572
Useful information
i This Operator's Manual describes all
models and all standard and optional
equipment of your vehicle available at the
time of publication of the Operator's
Manual. Country-specific differences are
possible. Please
note that your vehicle may
not be equipped with all features
described. This also applies to safety-
related systems and functions.
i Read the information on qualified
specialist workshops: ( Y page 31).Overview of climate control systems
Important safety notes
G
WARNING
Observe the settings recommended on the
following pages. The windows could
otherwise fog
up. This could prevent you from
observing the traffic conditions, thereby
causing an accident. G
WARNING
Severe conditions (e.g. strong air pollution)
may require replacement of the filter before
its scheduled
replacement interval. A clogged
filter will reduce the air volume to the interior
and the windows could fog up, impairing
visibility and endangering you and others.
Have a clogged filter replaced as soon as
possible at a qualified specialist workshop.
Climate control regulates the temperature
and the humidity in the vehicle interior and
filters undesirable substances out of the air.
Climate control is only operational when the
engine is running. The system only works
optimally when the side windows and the roof
are closed.
The residual heat function can only be
activated or deactivated with the ignition
switched off (Y page 130). i
Ventilate the vehicle for a brief period
during warm
weather. This will speed up the
cooling process and the desired vehicle
interior temperature will be reached more
quickly.
i It is possible that the residual heat
function may be activated automatically an
hour after the SmartKey is removed. The
vehicle is then ventilated for 30minutes to
dry the air-conditioning system. 122
Overview of climate control systems
Climate control
Page 125 of 572
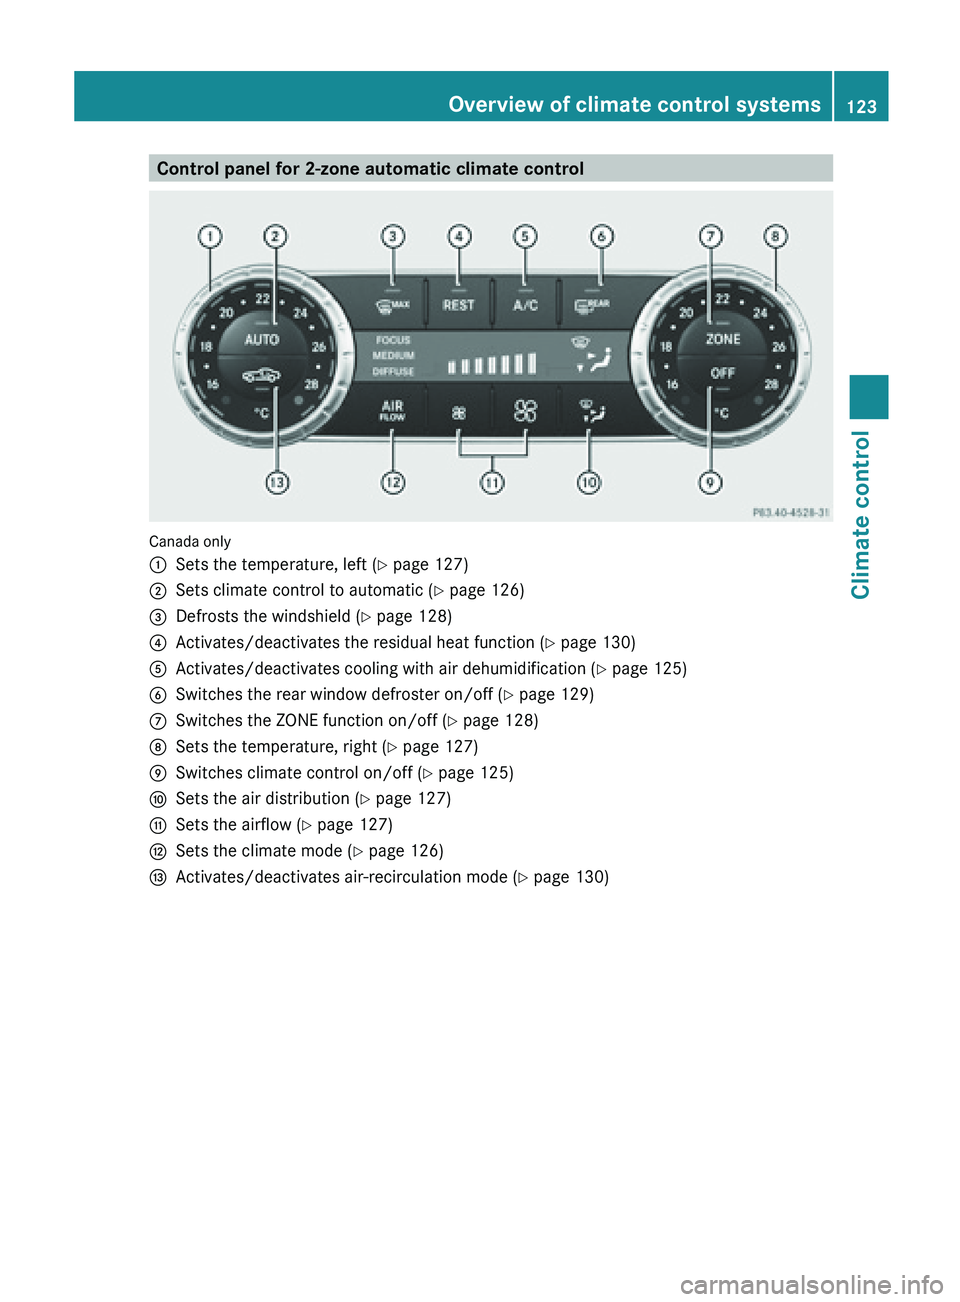
Control panel for 2-zone automatic climate control
Canada only
:
Sets the temperature, left ( Y page 127)
; Sets climate control to automatic (Y page 126)
= Defrosts the windshield ( Y page 128)
? Activates/deactivates the residual heat function (Y page 130)
A Activates/deactivates cooling with air dehumidification ( Y page 125)
B Switches the rear window defroster on/off ( Y page 129)
C Switches the ZONE function on/off ( Y page 128)
D Sets the temperature, right ( Y page 127)
E Switches climate control on/off ( Y page 125)
F Sets the air distribution (Y page 127)
G Sets the airflow ( Y page 127)
H Sets the climate mode (Y page 126)
I Activates/deactivates air-recirculation mode (Y page 130) Overview of climate control systems
123
Climate control Z