2013 MERCEDES-BENZ SL-CLASS ROADSTER ESP
[x] Cancel search: ESPPage 66 of 572

Automatic emergency braking cannot prevent
a collision. There is a risk of an accident.
Always apply the brakes yourself and try to
take evasive action. G
WARNING
PRE-SAFE ®
Brake cannot always clearly
identify objects and complex traffic
conditions.
In these cases, PRE-SAFE ®
Brake may:
R give an unnecessary warning and then
brake the vehicle
R not give a warning or intervene
There is a risk of an accident.
Always pay particular attention to the traffic
situation and be ready to brake, especially if
PRE-SAFE ®
Brake warns you. Terminate the
intervention in
a non-critical driving situation.
In particular, the detection of obstacles can
be impaired if there is:
R dirt on the sensors or anything else
covering the sensors
R snow or heavy rain
R interference by other radar sources
R the possibility of strong radar reflections,
for example in parking garages
R a narrow vehicle traveling in front, e.g. a
motorbike
R a vehicle traveling in front on a different line
relative to the center of your vehicle G
WARNING
PRE-SAFE ®
Brake does not react:
R to people or animals
R to oncoming vehicles
R to crossing traffic
R when cornering
As a result, PRE-SAFE ®
Brake may neither
give warnings nor intervene in all critical
situations. There is a risk of an accident.
Always pay careful attention to the traffic
situation and be ready to brake. In
order to maintain the appropriate distance
to the vehicle in front and thus prevent a
collision, you
must apply the brakes yourself.
X To activate/deactivate: activate or
deactivate PRE-SAFE ®
Brake in the on-
board computer ( Y page 214).
When PRE-SAFE ®
Brake is activated, the
Ä symbol appears in multifunction
display, as long as the HOLD function is
deactivated (Y page
176). On vehicles with
Active Parking Assist, the Ä symbol is
displayed when P is engaged or you are
driving faster than 22 mph (35 km/h).
For PRE-SAFE ®
Brake to assist you when
driving, the radar sensor system must be
switched on (Y page 218) and be
operational.
Following damage to the front end of the
vehicle, have
the configuration and operation
of the radar sensors checked at a qualified
specialist workshop. This also applies to
collisions at low speeds where there is no
visible damage to the front of the vehicle.
i USA only: This device has been approved
by the FCC as a "Vehicular Radar System".
The radar sensor is intended for use in an
automotive radar system only. Removal,
tampering, or altering of the device will void
any warranties, and is not permitted by the
FCC. Do not tamper with, alter, or use the
device in any non-approved way.
Any unauthorized modification to this
device could void the user's authority to
operate the equipment.
i Canada only: This device complies with
RSS-210 of Industry Canada. Operation is
subject to the following two conditions:
1. This device may not cause interference,
and
2. this device must accept any interference
received, including interference that may
cause undesired operation of the device.
Removal, tampering, or altering of the
device will void any warranties and is not 64
Driving safety systems
Safety
Page 67 of 572

permitted. Do not tamper with, alter, or use
the device in any non-approved way.
Any unauthorized modification to this
device could void the user's authority to
operate the equipment.
STEER CONTROL
STEER CONTROL
helps you by transmitting a
noticeable steering force to the steering
wheel in the direction required for vehicle
stabilization.
This steering assistance is provided in
particular if:
R both right wheels or both left wheels are on
a wet or slippery road surface when you
brake
R the vehicle starts to skid
If ESP ®
is malfunctioning, you will not receive
steering support from STEER CONTROL.
Power steering will, however, continue to
function. Theft deterrent locking system
Immobilizer
X To activate with the SmartKey: remove
the SmartKey from the ignition lock.
X To activate with KEYLESS-GO:
switch
the
ignition off and open the driver's door.
X To deactivate: switch on the ignition.
The immobilizer prevents your vehicle from
being started without the correct SmartKey.
When leaving the vehicle, always take the
SmartKey with you and lock the vehicle. The
engine can be started by anyone with a valid
SmartKey that is left inside the vehicle.
i The immobilizer is always deactivated
when you start the engine.
In the event that the engine cannot be
started when the starter battery is fully
charged, the immobilizer may be faulty.
Contact an authorized Mercedes-Benz Center or call 1-800-FOR-MERCedes (in
USA) or 1-800-387-0100
(in Canada). ATA (anti-theft alarm system)
X
To arm: lock the vehicle with the SmartKey
or KEYLESS-GO.
Indicator lamp
: flashes. The alarm
system is armed after approximately
15 seconds.
X To disarm: unlock the vehicle with the
SmartKey or KEYLESS-GO.
A visual and audible alarm is triggered if the
alarm system is armed and you open:
R a door
R the vehicle with the mechanical key
R the trunk
R the hood
R the glove box
R the stowage space under the armrest
R a stowage compartment in the rear
X To turn the alarm off with the
SmartKey: press
the % or & button
on the SmartKey.
The alarm is switched off.
or
X Insert the SmartKey into the ignition lock.
The alarm is switched off. Theft deterrent locking system
65
Safety Z
Page 78 of 572

Automatic locking feature
:
To deactivate
; To activate
X To deactivate: press and hold button :
for about
five seconds until a tone sounds.
X To activate: press and hold button ; for
about five seconds until a tone sounds.
i If you press one of the two buttons and
do not
hear a tone, the relevant setting has
already been selected.
The vehicle is locked automatically when the
ignition is switched on and the wheels are
turning.
You could therefore lock yourself out if:
R the vehicle is being pushed.
R the vehicle is being towed.
R the vehicle is on a roller dynamometer.
You can also switch the automatic locking
function on and off using the on-board
computer (Y page 218). Power closing feature
G
WARNING
To prevent possible personal injury, always
keep hands
and fingers away from the door or
trunk opening when closing a door or the
trunk lid. Be especially careful when small
children are around.
If danger threatens, pull the inside or outside
door handle, or pull the trunk lid handle. To
prevent personal injury, never activate the
closing assist mechanism by tampering with
the door or trunk lid latch. G
WARNING
Only drive with the doors closed. Otherwise,
one or
more of the doors could open while the
vehicle is in motion, putting you and/or
others at risk. G
WARNING
Make sure the trunk lid is closed when the
engine is running and while driving. Among
other dangers, deadly carbon monoxide (CO)
gases may
enter the vehicle interior resulting
in unconsciousness and death.
The power closing feature pulls the doors and
trunk lid into their locks automatically even if
they are only partly closed.
X Power closing feature (doors): push the
door past the first detent position of the
lock.
The power
closing feature will pull the door
fully closed.
X Power closing feature (trunk lid): lightly
push the trunk lid closed.
The power
closing feature will pull the trunk
lid fully closed. Unlocking the driver's door
(mechanical key)
If the
vehicle can no longer be unlocked with
the SmartKey, use the mechanical key.
X Take the mechanical key out of the
SmartKey (Y page 70).
X Insert the mechanical key into the lock of
the driver's door as far as it will go.76
Doors
Opening/closing
Page 81 of 572

load and unload more easily. For this
purpose, you can also open the trunk
partition.
Do not forget to close the trunk partition
again afterwards. Otherwise, it will not be
possible to close the roof.
Closing G
WARNING
To prevent possible personal injury, always
keep hands and fingers away from the trunk
opening when closing the trunk lid. Be
especially careful when small children are
around. X
Pull the trunk lid down using recess :.
X Lock the vehicle if necessary with
the & button on the key or with
KEYLESS-GO.
i If a KEYLESS-GO key is detected in the
trunk, the trunk lid cannot be locked and
then opens again. Opening/closing automatically from
outside
Important safety notes G
WARNING
Make sure the trunk lid is closed when the
engine is running and while driving. Among
other dangers, deadly carbon monoxide (CO)
gases may
enter the vehicle interior resulting
in unconsciousness and death. !
The trunk lid swings upwards when
opened. Therefore,
make sure that there is
sufficient clearance above the trunk lid.
i The opening dimensions of the trunk lid
can be found in the "Vehicle data" section
(Y page 565).
Opening You can open the trunk lid automatically
using
the
SmartKey or the handle in the trunk
lid.
X Press and hold the F button on the
SmartKey until the trunk lid opens.
or
X If the trunk lid is unlocked, pull the trunk lid
handle and let it go again immediately.
Closing G
WARNING
Monitor the closing procedure carefully to
make sure no one is in danger of being
injured. To prevent possible personal injury,
always keep
hands and fingers away from the
trunk opening when closing the trunk lid. Be
especially careful when small children are
around. To stop the closing procedure, do one
of the following:
R Press button F on the SmartKey.
R Press the remote trunk opening/closing
switch (on the driver's door).
R Press the trunk closing switch.
R Press the KEYLESS-GO locking/closing
switch.
R Pull the trunk lid handle.
Even with the SmartKey removed from the
starter switch or the SmartKey with KEYLESS-
GO removed from the vehicle, the remote
trunk opening/closing switch can be
operated. Therefore, do not leave children
unattended in the vehicle, or with access to
an unlocked vehicle. A child's unsupervised
access to a vehicle could result in an accident
and/or serious personal injury. Trunk
79
Opening/closing Z
Page 85 of 572
X
Turn the mechanical key back to position
1 and remove it.
X Insert the mechanical key into the
SmartKey. Trunk emergency release
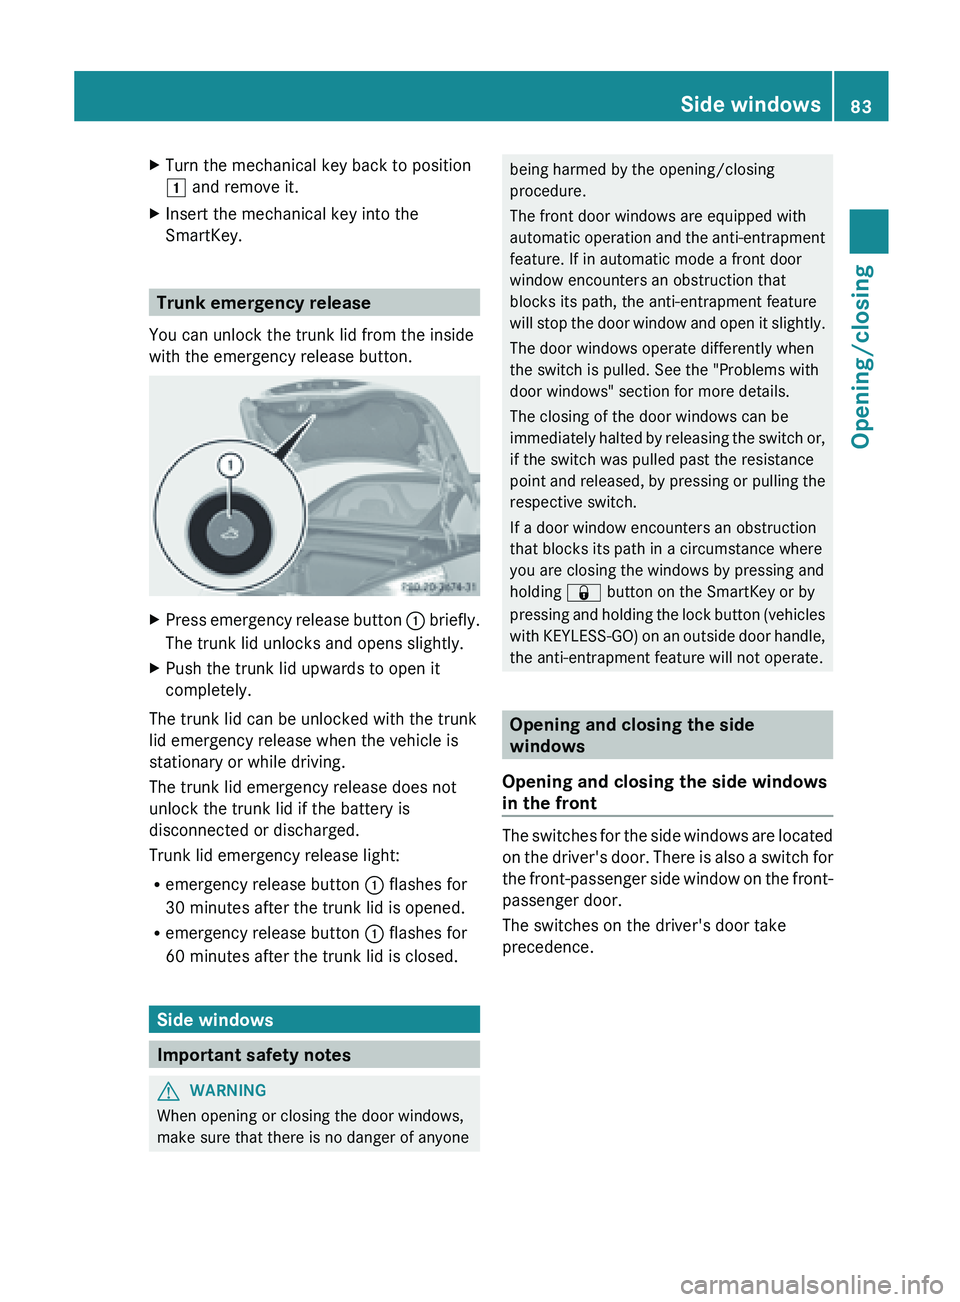
You can unlock the trunk lid from the inside
with the emergency release button. X
Press emergency release button : briefly.
The trunk lid unlocks and opens slightly.
X Push the trunk lid upwards to open it
completely.
The trunk lid can be unlocked with the trunk
lid emergency release when the vehicle is
stationary or while driving.
The trunk lid emergency release does not
unlock the trunk lid if the battery is
disconnected or discharged.
Trunk lid emergency release light:
R emergency release button
: flashes for
30 minutes after the trunk lid is opened.
R emergency release button : flashes for
60 minutes after the trunk lid is closed. Side windows
Important safety notes
G
WARNING
When opening or closing the door windows,
make sure that there is no danger of anyone being harmed by the opening/closing
procedure.
The front door windows are equipped with
automatic
operation
and the anti-entrapment
feature. If in automatic mode a front door
window encounters an obstruction that
blocks its path, the anti-entrapment feature
will stop the door window and open it slightly.
The door windows operate differently when
the switch is pulled. See the "Problems with
door windows" section for more details.
The closing of the door windows can be
immediately halted by releasing the switch or,
if the switch was pulled past the resistance
point and released, by pressing or pulling the
respective switch.
If a door window encounters an obstruction
that blocks its path in a circumstance where
you are closing the windows by pressing and
holding & button on the SmartKey or by
pressing and holding the lock button (vehicles
with KEYLESS-GO) on an outside door handle,
the anti-entrapment feature will not operate. Opening and closing the side
windows
Opening and closing the side windows
in the front The switches for the side windows are located
on
the
driver's door. There is also a switch for
the front-passenger side window on the front-
passenger door.
The switches on the driver's door take
precedence. Side windows
83
Opening/closing Z
Page 86 of 572
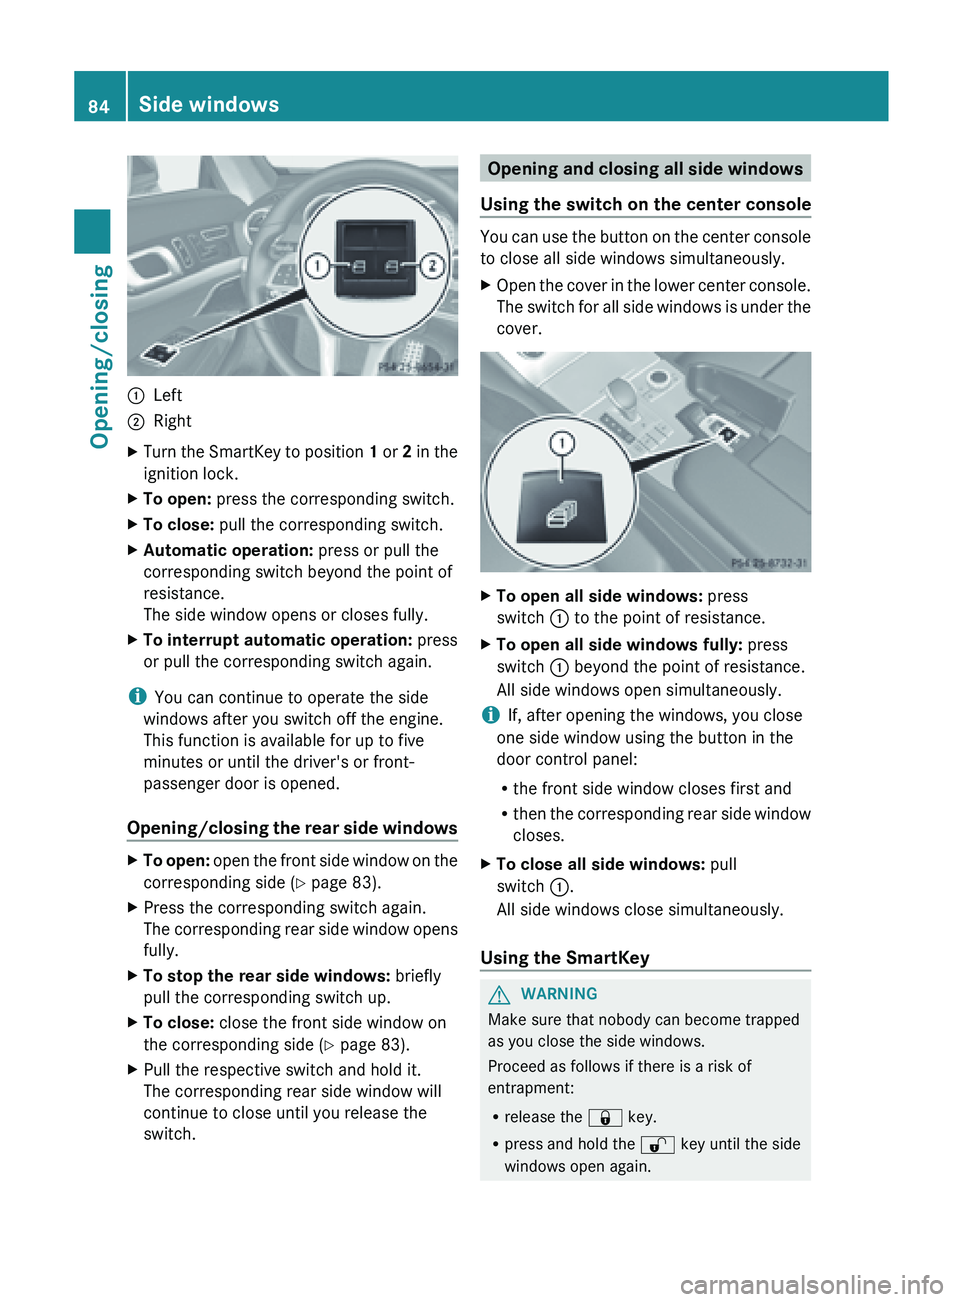
:
Left
; Right
X Turn the SmartKey to position 1 or 2 in the
ignition lock.
X To open: press the corresponding switch.
X To close: pull the corresponding switch.
X Automatic operation: press or pull the
corresponding switch beyond the point of
resistance.
The side window opens or closes fully.
X To interrupt automatic operation: press
or pull the corresponding switch again.
i You can continue to operate the side
windows after you switch off the engine.
This function is available for up to five
minutes or until the driver's or front-
passenger door is opened.
Opening/closing the
rear side windowsX
To open: open the front side window on the
corresponding side ( Y
page 83).
X Press the corresponding switch again.
The corresponding
rear side window opens
fully.
X To stop the rear side windows: briefly
pull the corresponding switch up.
X To close: close the front side window on
the corresponding side (Y page 83).
X Pull the respective switch and hold it.
The corresponding rear side window will
continue to close until you release the
switch. Opening and closing all side windows
Using the switch on the center console You can use the button on the center console
to close all side windows simultaneously.
X
Open the cover in the lower center console.
The switch
for all side windows is under the
cover. X
To open all side windows: press
switch : to the point of resistance.
X To open all side windows fully: press
switch : beyond the point of resistance.
All side windows open simultaneously.
i If, after opening the windows, you close
one side window using the button in the
door control panel:
R the front side window closes first and
R then the
corresponding rear side window
closes.
X To close all side windows: pull
switch :.
All side windows close simultaneously.
Using the SmartKey G
WARNING
Make sure that nobody can become trapped
as you close the side windows.
Proceed as follows if there is a risk of
entrapment:
R release the & key.
R press and hold the % key until the side
windows open again. 84
Side windows
Opening/closing
Page 87 of 572

You can use the key to open or close all side
windows simultaneously.
X
Close the roof ( Y page 87).
X Open the trunk partition ( Y page 89).
X Vehicles without KEYLESS-GO: point the
tip of the SmartKey at the door handle on
the driver's door.
X Vehicles with KEYLESS-GO: the
SmartKey must be within 6 ft (2 m) of the
vehicle.
X To open all side windows: press
the % button on the key until the side
windows are fully opened.
X To interrupt the opening procedure:
release the % button.
X To close all side windows: press the
& button on the key until the side
windows are fully closed.
X To interrupt the closing procedure:
release the & button.
Convenience closing with KEYLESS-GO G
WARNING
When using the convenience closing feature,
make sure
that nobody can become trapped.
Proceed as follows if there is a risk of
entrapment:
R release the locking button on the door
handle.
R pull the door handle immediately and hold
it.
The side windows open.
With KEYLESS-GO you can close all side
windows simultaneously. The KEYLESS-GO
key must be outside the vehicle. All the doors
must be closed. X
Touch recessed sensor surface : on the
door handle
until the side windows are fully
closed.
i Make sure you only touch recessed
sensor surface :.
X Make sure that all the side windows are
closed.
X To interrupt convenience closing:
release recessed
sensor surface : on the
door handle. Resetting the side windows
If a
side window can no longer be closed fully,
you must reset it.
X Close all the doors.
X Turn the SmartKey to position 1 or 2
in the
ignition lock.
X Pull the corresponding switch on the door
control panel until the side window is
completely closed. ( Y page 83)
X Hold the switch for an additional second.
If the side window opens again slightly:
X Immediately pull the corresponding switch
on the door control panel until the side
window is completely closed (Y
page 83).
X Hold the switch for an additional second.
X If the corresponding side window remains
closed after the button has been released,
the side window has been reset correctly.
If this is not the case, repeat the steps
above again. Side windows
85
Opening/closing Z
Page 88 of 572
Problems with the side windows
G
WARNING
Closing the side windows with increased force or without the anti-entrapment feature could lead
to serious
or even fatal injury. Make sure that nobody can become trapped when closing the side
windows. G
WARNING
Pulling and holding the switch to close the door window immediately after it had been blocked
two times will cause the door window to close without the anti-entrapment feature for as long
as you hold the switch. Problem Possible causes/consequences and
M
Solutions
A side window cannot
be closed because it is
blocked
by
objects, e.g.
leaves in the window
guide. X
Remove the objects.
X Close the side window. A side window cannot
be closed and you
cannot see the cause. If a side window is obstructed during closing and reopens again
slightly:
X
Immediately after the window blocks, pull the corresponding
switch again until the side window has closed.
The side window is closed with increased force.
If a side window is obstructed again during closing and reopens
again slightly:
X Immediately after the window blocks, pull the corresponding
switch again until the side window has closed.
The side
window is closed without the anti-entrapment feature.Roof
Important safety notes
G
WARNING
Always open or close the roof fully before
driving.
If the roof does not open or close fully, the
roof hydraulic system is depressurized and
the roof is lowered:
R after about seven minutes if the ignition is
switched on
R after about
15 seconds if the ignition is switched off A warning tone sounds shortly beforehand.
The
K symbol and
Vario-Roof
Lowering message appear in the
multifunction display.
Lock the roof again before driving on.
Otherwise, the unlocked roof could open
during the journey and cause you to lose
control of your vehicle. You and/or other
persons could be injured as a result. G
WARNING
Closing the roof manually is a complex,
technically challenging procedure. 86
Roof
Opening/closing