2013 MERCEDES-BENZ SL-CLASS ROADSTER key battery
[x] Cancel search: key batteryPage 8 of 572

Avoiding an area
................................ 349B
Back button ....................................... 274
Back support see Lumbar support
Balance, adjusting ............................. 278
BAS (Brake Assist System) ................. 58
Basic settings see Settings
BAS PLUS (Brake Assist System
PLUS) .................................................... 58
Bass, setting ...................................... 278
Battery (SmartKey) Checking .......................................... 71
Important safety notes .................... 71
Replacing ......................................... 71
Battery (vehicle)
Charging ........................................ 515
Display message ............................ 240
Important safety notes .................. 513
Jump starting ................................. 516
Overview ........................................ 513
Belt
see Seat belts
Bird's-eye view (navigation) .............344
Blind Spot Assist see Active Blind Spot Assist
Bluetooth ®
Activating/deactivating ................. 292
Activating audio mode ...................443
Conditions (telephone) ..................358
Connecting another mobile phone . 362
Connecting audio devices ..............440
Device list ...................................... 440
Entering the passcode ...................360
External authorization ....................361
General information ....................... 292
Interface ........................................ 357
Introduction ................................... 357
Reconnecting an audio device .......442
Searching for a mobile phone ........359
Settings ......................................... 292
Telephone basic menu ................... 363
Telephony ...................................... 358
Telephony notes ............................ 357
Bluetooth ®
audio basic display ........ 443Bottle holder ......................................
479
Brake Assist System see BAS (Brake Assist System)
Brake fluid
Display message ............................ 230
Notes ............................................. 563
Brake lamps
Display message ............................ 236
Brakes
ABS .................................................. 57
BAS .................................................. 58
BAS PLUS ........................................ 58
Brake fluid (notes) .........................563
Display message ............................ 224
Driving tips .................................... 158
High-performance brake system .... 159
Important safety notes .................. 158
Maintenance .................................. 159
Parking brake ................................ 155
Warning lamp ................................. 257
Breakdown
see Flat tire
see Towing away
Brightness, setting (TV, video) ......... 453
Bulbs see Changing bulbs
Buttons on the COMAND
controller ........................................... 274 C
California Important notice for retail
customers and lessees ....................29
Call
Accepting/ending/rejecting ..........
364
Connecting .................................... 365
see Telephone
Calling up a malfunction
see Display messages
Call lists
Displaying details ........................... 372
Opening and selecting an entry ..... 372
Saving an entry in the address
book .............................................. 372
Car
see Vehicle 6
Index
Page 23 of 572

Service products
Brake fluid ..................................... 563
Coolant (engine) ............................ 563
Engine oil ....................................... 562
Fuel ................................................ 561
Important safety notes
..................560
Washer fluid ................................... 564
Settings
Factory (on-board computer) ......... 219
On-board computer ....................... 215
Picture (COMAND) ......................... 453
Sound settings ............................... 278
System settings ............................. 289
Setting the air distribution ...............127
Setting the airflow ............................ 127
Setting the language COMAND ....................................... 292
Setting the night design ...................289
Setting the text reader speed ..........291
Setting the volume Telephone calls .............................. 277
Video AUX ..................................... 459
SETUP (on-board computer) ............. 220
Side impact air bag ............................. 41
Side windows Cleaning ......................................... 503
Convenience closing feature ............ 85
Important safety information ........... 83
Opening/closing (all) ....................... 84
Opening/closing (front) ................... 83
Opening/closing (rear) .................... 84
Overview .......................................... 83
Problem (malfunction) .....................86
Resetting ......................................... 85
SIRIUS weather display
5-day forecast ................................ 462
Daily forecast ................................. 462
Detail information .......................... 462
Information chart ........................... 462
Selecting the area for the weather
forecast ......................................... 463
Switching on/off ........................... 462
Weather map ................................. 465
SmartKey
Changing the battery ....................... 71
Changing the programming ............. 70
Checking the battery ....................... 71
Convenience opening feature .......... 84Display message
............................ 253
Door central locking/unlocking
.......68
Important safety notes .................... 68
Loss ................................................. 73
Mechanical key ................................ 70
Opening/closing the roof ................88
Overview .......................................... 68
Positions (ignition lock) ................. 135
Problem (malfunction) .....................73
Starting the engine ........................ 137
Snow chains ...................................... 529
Sockets Front-passenger footwell ...............481
General notes ................................ 480
Trunk ............................................. 481
Under the armrest .........................481
Sound
Switching on/off ........................... 277
Sound menu ....................................... 278
Sound Mode ....................................... 280
Sound settings Calling up the sound menu ............ 278
Surround sound ............................. 278
Treble and bass ............................. 278
Spare wheel
see Emergency spare wheel
Specialist workshop ............................ 31
Special seat belt retractor .................. 56
Speed, controlling see Cruise control
Speed dial list
Storing a phone book entry in the
speed dial list ................................ 374
Speedometer
Digital ............................................ 209
In the Instrument cluster ............... 205
Segments ...................................... 206
Selecting the unit of
measurement ................................ 215
see Instrument cluster
SPORT handling mode
Activating/deactivating (AMG
vehicles) .......................................... 61
Warning lamp ................................. 260 Index
21
Page 28 of 572

Raising ...........................................
549
Reporting problems .........................32
Securing from rolling away ............ 549
Towing away
.................................. 518
Tow-starting ................................... 518
Transporting .................................. 520
Unlocking (in an emergency) ........... 76
Unlocking (SmartKey) ......................68
Vehicle data ................................... 565
Vehicle battery
see Battery (vehicle)
Vehicle data ....................................... 565
Vehicle dimensions ...........................565
Vehicle emergency locking ................77
Vehicle identification number see VIN
Vehicle identification plate ..............559
Vehicle level Active Body Control (AMG
vehicles) ........................................ 181
Active Body Control (except AMG
vehicles) ........................................ 179
Display message ............................ 241
Vehicle maintenance
see ASSYST PLUS
Vehicle tool kit .................................. 508
Video Operating the DVD ......................... 212
Overview ........................................ 452
see Video DVD
Video AUX
Setting the picture ......................... 453
Video DVD
Automatic picture shutoff ..............452
DVD menu ..................................... 457
Fast forward/rewind ...................... 455
Function restrictions ...................... 454
Interactive content ........................458
Notes on discs ............................... 453
Operation ....................................... 453
Pause function ............................... 456
Playing conditions .......................... 453
Safety notes .................................. 453
Selecting ........................................ 456
Selecting a film/title ...................... 456
Selecting a scene/chapter ............ 456
Setting the audio format ................ 458
Setting the language ...................... 458Setting the picture .........................
453
Showing/hiding the control menu . 454
Showing/hiding the menu
.............455
Stop function ................................. 455
Subtitles ........................................ 458
Switching to ................................... 454
VIN ...................................................... 559
Voice Control System Settings ......................................... 291
Volume, adjusting
COMAND ....................................... 277
Navigation messages ..................... 277 W
Warning and indicator lamps ABS
................................................ 257
Brakes ........................................... 257
Check Engine ................................. 263
Coolant .......................................... 263
Distance warning ........................... 265
DISTRONIC PLUS ........................... 265
ESP ®
.............................................. 259
ESP ®
OFF ....................................... 260
Fuel tank ........................................ 263
Overview ........................................ 255
PASSENGER AIR BAG OFF
indicator lamp .................................. 43
Reserve fuel ................................... 263
Seat belt ........................................ 256
SPORT handling mode ................... 260
SRS ................................................ 262
Tire pressure monitor .................... 266
Warranty ............................................ 558
Washer fluid Display message ............................ 253
Waypoints
Accepting waypoints for the route . 310
Editing ........................................... 310
Entering ......................................... 308
Weather Band
Searching for a channel ................. 415
Switching on .................................. 414
Weather display (COMAND)
Calling up the weather map ...........395
Information chart ........................... 393
Selecting locations in the
information chart ........................... 39426
Index
Page 38 of 572

Useful information
i This Operator's Manual describes all
models and all standard and optional
equipment of your vehicle available at the
time of publication of the Operator's
Manual. Country-specific differences are
possible. Please
note that your vehicle may
not be equipped with all features
described. This also applies to safety-
related systems and functions.
i Read the information on qualified
specialist workshops: ( Y page 31).Panic alarm
:
!
button
X To activate: press ! button : for at
least one second.
An alarm sounds and the exterior lighting
flashes.
X To deactivate: press ! button
:
again.
or
X Insert the SmartKey into the ignition lock.
or
X Press the KEYLESS-GO Start/Stop button.
The KEYLESS-GO key must be in the
vehicle.
i USA only:
This device complies with Part 15 of the
FCC Rules. Operation is subject to the
following two conditions: 1. This device may not cause interference,
and
2.
this
device must accept any interference
received, including interference that may
cause undesired operation.
Any unauthorized modification to this
device could void the user's authority to
operate the equipment.
The product label with FCC ID and IC
certification number can be found in the
battery case of the SmartKey.
i Canada only:
This device complies with RSS-Gen of
Industry Canada. Operation is subject to
the following two conditions:
1. This device may not cause interference,
and
2. this device must accept any interference
received, including interference that may
cause undesired operation.
Any unauthorized modification to this
device could void the user's authority to
operate the equipment.
The product label with FCC ID and IC
certification number can be found in the
battery case of the SmartKey. Occupant safety
Important safety notes
G
WARNING
Modifications to or work improperly
conducted on restraint system components
or their wiring, as well as tampering with
interconnected electronic systems, can lead
to the
restraint systems no longer functioning
as intended.
Air bags or Emergency Tensioning Devices
(ETDs), for example, could deploy
inadvertently or fail to deploy in accidents
although the deceleration threshold for air
bag deployment is exceeded. Therefore,
never modify the restraint systems. Do not 36
Occupant safety
Safety
Page 67 of 572

permitted. Do not tamper with, alter, or use
the device in any non-approved way.
Any unauthorized modification to this
device could void the user's authority to
operate the equipment.
STEER CONTROL
STEER CONTROL
helps you by transmitting a
noticeable steering force to the steering
wheel in the direction required for vehicle
stabilization.
This steering assistance is provided in
particular if:
R both right wheels or both left wheels are on
a wet or slippery road surface when you
brake
R the vehicle starts to skid
If ESP ®
is malfunctioning, you will not receive
steering support from STEER CONTROL.
Power steering will, however, continue to
function. Theft deterrent locking system
Immobilizer
X To activate with the SmartKey: remove
the SmartKey from the ignition lock.
X To activate with KEYLESS-GO:
switch
the
ignition off and open the driver's door.
X To deactivate: switch on the ignition.
The immobilizer prevents your vehicle from
being started without the correct SmartKey.
When leaving the vehicle, always take the
SmartKey with you and lock the vehicle. The
engine can be started by anyone with a valid
SmartKey that is left inside the vehicle.
i The immobilizer is always deactivated
when you start the engine.
In the event that the engine cannot be
started when the starter battery is fully
charged, the immobilizer may be faulty.
Contact an authorized Mercedes-Benz Center or call 1-800-FOR-MERCedes (in
USA) or 1-800-387-0100
(in Canada). ATA (anti-theft alarm system)
X
To arm: lock the vehicle with the SmartKey
or KEYLESS-GO.
Indicator lamp
: flashes. The alarm
system is armed after approximately
15 seconds.
X To disarm: unlock the vehicle with the
SmartKey or KEYLESS-GO.
A visual and audible alarm is triggered if the
alarm system is armed and you open:
R a door
R the vehicle with the mechanical key
R the trunk
R the hood
R the glove box
R the stowage space under the armrest
R a stowage compartment in the rear
X To turn the alarm off with the
SmartKey: press
the % or & button
on the SmartKey.
The alarm is switched off.
or
X Insert the SmartKey into the ignition lock.
The alarm is switched off. Theft deterrent locking system
65
Safety Z
Page 72 of 572

Changing the settings of the locking
system
You can change the settings of the locking
system. This
means only the driver's door, the
lockable stowage compartments in the
vehicle interior and the fuel filler flap are
unlocked when the vehicle is unlocked. This
is useful if you frequently travel on your own.
X To change the setting: press and hold
down the % and & buttons
simultaneously for approximately six
seconds until the battery check lamp
flashes twice ( Y page 71).
i If the setting of the locking system is
changed within the signal range of the
vehicle, pressing
the & or % button:
R locks or
R unlocks the vehicle
The SmartKey now functions as follows:
X To unlock the driver's door: press the
% button once.
X To unlock centrally: press the %
button twice.
X To lock centrally: press the & button.
The KEYLESS-GO function is changed as
follows:
X To unlock the driver's door: touch the
inner surface of the door handle on the
driver's door.
X To unlock centrally: touch the inner
surface of
the front-passenger door handle.
X To lock centrally: touch the outer sensor
surface on one of the door handles.
X To restore the factory settings: press
and hold
down the % and & buttons
simultaneously for approximately six
seconds until the battery check lamp
flashes twice ( Y page 71). Mechanical key
General notes If the vehicle can no longer be locked or
unlocked with the SmartKey, use the
mechanical key.
If you use the mechanical key to unlock and
open the driver's door or the trunk lid, the
anti-theft alarm system will be triggered
(
Y page 65).
There are several ways to turn off the alarm:
X To turn the alarm off with the
SmartKey: press
the % or & button
on the SmartKey.
or
X Insert the SmartKey into the ignition lock.
or
X To deactivate the alarm with KEYLESS-
GO: press the Start/Stop button in the
ignition lock. The SmartKey must be in the
vehicle.
or
X Lock or unlock the vehicle using KEYLESS-
GO. The SmartKey must be outside the
vehicle.
If you unlock the vehicle using the mechanical
key, the fuel filler flap will not be unlocked
automatically.
X To unlock the fuel filler flap: insert the
SmartKey into the ignition lock.
Removing the mechanical key 70
SmartKeyOpening/closing
Page 73 of 572
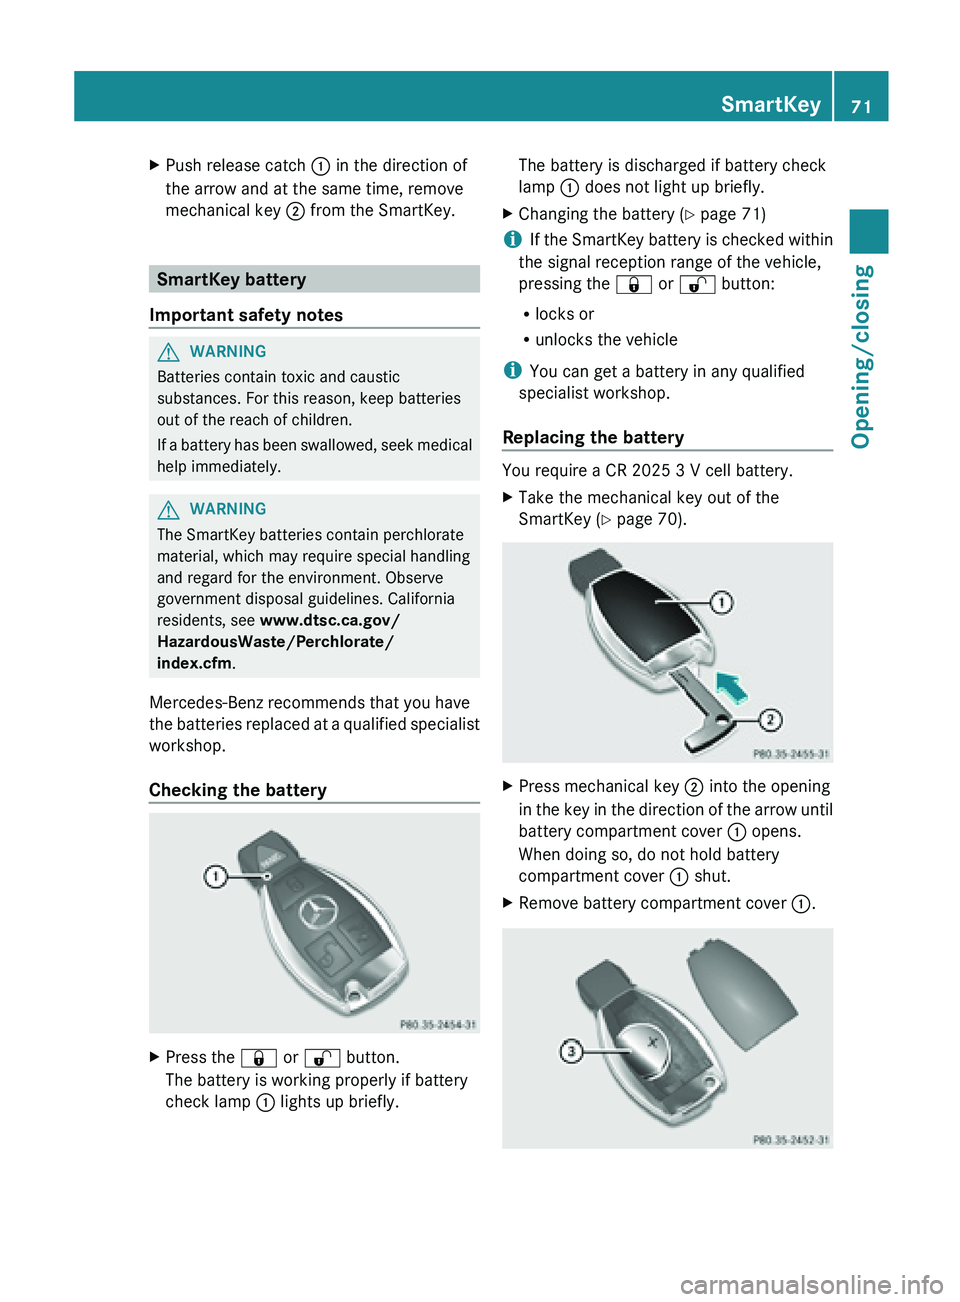
X
Push release catch : in the direction of
the arrow and at the same time, remove
mechanical key ; from the SmartKey.SmartKey battery
Important safety notes G
WARNING
Batteries contain toxic and caustic
substances. For this reason, keep batteries
out of the reach of children.
If a
battery has been swallowed, seek medical
help immediately. G
WARNING
The SmartKey batteries contain perchlorate
material, which may require special handling
and regard for the environment. Observe
government disposal guidelines. California
residents, see www.dtsc.ca.gov/
HazardousWaste/Perchlorate/
index.cfm.
Mercedes-Benz recommends that you have
the batteries
replaced at a qualified specialist
workshop.
Checking the battery X
Press the & or % button.
The battery is working properly if battery
check lamp : lights up briefly. The battery is discharged if battery check
lamp
: does not light up briefly.
X Changing the battery ( Y page 71)
i If
the SmartKey battery is checked within
the signal reception range of the vehicle,
pressing the
& or % button:
R locks or
R unlocks the vehicle
i You can get a battery in any qualified
specialist workshop.
Replacing the battery You require a CR 2025 3 V cell battery.
X
Take the mechanical key out of the
SmartKey (Y page 70). X
Press mechanical key ; into the opening
in the
key in the direction of the arrow until
battery compartment cover : opens.
When doing so, do not hold battery
compartment cover : shut.
X Remove battery compartment cover :. SmartKey
71
Opening/closing Z
Page 74 of 572

X
Repeatedly tap the SmartKey against your
palm until battery = falls out.
X Insert the new battery with the positive
terminal facing upwards. Use a lint-free
cloth to do so.
X Make sure that the surface of the battery is
free from
lint, grease and all other forms of
contamination.
X Insert the front tabs of battery
compartment cover : into the housing
and then press to close it.
X Insert mechanical key ; into the
SmartKey.
X Check the function of all SmartKey buttons
on the vehicle.72
SmartKey
Opening/closing