2013 MERCEDES-BENZ SL-CLASS ROADSTER service indicator
[x] Cancel search: service indicatorPage 20 of 572

Operating safety
Diagnostics connection
...................31
Operating system
see On-board computer
Outside temperature display ...........206P
Paint code number ............................ 559
Paintwork (cleaning instructions) ...501
Panic alarm .......................................... 36
Parking Engaging park position .................. 144
Important safety notes
..................154
Parking brake ................................ 155
Position of exterior mirror, front-
passenger side ............................... 104
Rear view camera .......................... 190
see PARKTRONIC
Parking aid
see PARKTRONIC
Parking brake
Display message ............................ 226
Electric parking brake ....................155
PARKTRONIC
Deactivating/activating ................. 185
Driving system ............................... 183
Function/notes ............................. 183
Important safety notes .................. 183
Problem (malfunction) ...................186
Range of the sensors ..................... 184
Warning display ............................. 185
PASSENGER AIR BAG OFF indicator
lamp ...................................................... 43
Pause function Audio mode (CD, DVD, MP3) .........426
Video DVD ..................................... 456
Pedals ................................................. 157
Personal POIs Acoustic notification ......................317
Calling up the menu .......................316
Displaying on the map ................... 316
Managing categories .....................317
Saving ............................................ 318
Selecting as the destination ..........319
Settings ......................................... 316
Visual information ..........................317Phone book
Adding a number to an address
book entry ..................................... 371
Calling up .......................................
368
Creating a new entry ..................... 370
Deleting an entry ........................... 370
Entering characters .......................281
Icon overview ................................. 369
Searching for an entry ...................369
Picture settings (TV, video) .............. 453
Picture viewer Displaying pictures ........................ 460
Introduction ................................... 459
Plastic trim (cleaning instructions) . 505
Playback options Audio mode (CD, DVD, MP3) .........430
POI (navigation)
Category ........................................ 313
Defining the position for the POI
search ............................................ 312
Entering ......................................... 310
Entering a point of interest using
the map ......................................... 315
List ................................................. 313
ZAGAT ®
survey service ..................315
see Personal POIs
Point of interest icon
Setting ........................................... 344
Point of interest list
With character bar ......................... 314
Power closing feature .........................76
Power washers .................................. 501
Power windows see Side windows
PRE-SAFE ®
(anticipatory occupant
protection) Display message ............................ 230
Operation ......................................... 48
PRE-SAFE ®
Brake
Activating/deactivating ................. 214
Display message ............................ 231
Function/notes ................................ 63
Warning lamp ................................. 265
Previous destinations (navigation) ..341
Product information ............................28
Program selector button .................. 14718
Index
Page 26 of 572

TIREFIT kit ..........................................
510
Tire pressure Calling up (on-board computer)
.....534
Checking manually ........................533
Display message ............................ 247
Maximum ....................................... 532
Notes ............................................. 531
Not reached (TIREFIT) .................... 512
Reached (TIREFIT) .......................... 512
Recommended ............................... 529
Tire pressure loss warning system
Important safety notes .................. 533
Restarting ...................................... 533
Tire pressure monitoring system
Function/notes ............................. 534
Restarting ...................................... 536
Warning lamp ................................. 266
Tires
Aspect ratio (definition) ................. 547
Average weight of the vehicle
occupants (definition) .................... 545
Bar (definition) ............................... 545
Changing a wheel .......................... 547
Characteristics .............................. 545
Checking ........................................ 527
Definition of terms ......................... 545
Direction of rotation ......................548
Display message ............................ 247
Distribution of the vehicle
occupants (definition) .................... 547
DOT, Tire Identification Number
(TIN) ............................................... 544
DOT (Department of
Transportation) (definition) ............ 545
GAWR (Gross Axle Weight Rating)
(definition) ..................................... 546
GVW (Gross Vehicle Weight)
(definition) ..................................... 546
GVWR (Gross Vehicle Weight
Rating) (definition) .........................546
Important safety notes .................. 526
Increased vehicle weight due to
optional equipment (definition) ...... 546
Kilopascal (kPa) (definition) ........... 546
Labeling (overview) ........................ 541
Load bearing index (definition) ...... 547
Load index ..................................... 544
Load index (definition) ...................546Maximum loaded vehicle weight
(definition) .....................................
546
Maximum load on a tire
(definition) ..................................... 546
Maximum permissible tire
pressure (definition) ....................... 546
Maximum tire load
.........................544
Maximum tire load (definition) .......546
MOExtended tires .......................... 528
Optional equipment weight
(definition) ..................................... 547
Overview ........................................ 526
PSI (pounds per square inch)
(definition) ..................................... 546
Replacing ....................................... 547
Service life ..................................... 528
Sidewall (definition) .......................547
Speed rating (definition) ................ 546
Storing ........................................... 548
Structure and characteristics
(definition) ..................................... 545
Temperature .................................. 541
TIN (Tire Identification Number)
(definition) ..................................... 547
Tire bead (definition) ......................547
Tire pressure (definition) ................ 547
Tire pressures (recommended) ...... 545
Tire size (data) ............................... 552
Tire size designation, load-bearing
capacity, speed rating .................... 541
Tire tread ....................................... 527
Tire tread (definition) .....................547
Total load limit (definition) ............. 547
Traction ......................................... 540
Traction (definition) ....................... 547
Tread wear ..................................... 540
Uniform Tire Quality Grading
Standards ...................................... 540
Uniform Tire Quality Grading
Standards (definition) .................... 545
Unladen weight (definition) ............ 546
Wear indicator (definition) .............547
Wheel rim (definition) .................... 546
see Flat tire
Towing
Important safety guidelines ...........518
Installing the towing eye ................ 51824
Index
Page 45 of 572

Roll bar
G
DANGER
If the roll bar is malfunctioning, the
A Malfunction Service Required
message appears
in the multifunction display.
The roll bars will then possibly not be
extended in the event of an accident. This
could result in severe or even fatal injuries to
you and other occupants. In this case, visit a
qualified specialist workshop immediately
and have the roll bar checked. G
WARNING
If
you place objects or clothing on the roll bar
covers, these
could impair roll bar extension.
You and others could be injured by objects
being thrown around when the roll bars are
triggered.
Ensure that the area above the roll bar covers
is kept clear. Stow objects or clothing in a
secure place. The roll bars are located in the rear area of
the vehicle under the two outer rear
compartment trim covers.
The roll bars are extended automatically if
systems detect that the vehicle is in danger
of rolling over. The two rear compartment
trim covers are opened and the roll bars are
extended within fractions of a second.
Once the roll bars are extended, you can no
longer lower them. An open roof can no
longer
be
closed. In this case, visit the nearest
qualified specialist workshop. Occupant Classification System
(OCS)
Method of operation G
WARNING
If the 4
PASSENGER AIR BAG OFF
indicator lamp illuminates when an adult or
someone larger than a small individual is in
the front-passenger seat, have the front
passenger reposition
himself or herself in the
seat until the 4 PASSENGER AIR BAG OFF
indicator lamp goes out.
In the event of a collision, the air bag control
unit will not allow front-passenger front air
bag and front-passenger knee bag
deployment when the OCS has classified the
front-passenger occupant as weighing as
much as or less than a typical 12 month old
child in a standard child restraint or if the
front-passenger seat is classified as being
unoccupied.
When the OCS senses that the front-
passenger seat occupant is classified as
being up to or less than the weight of a typical
12-month-old child in a standard child
restraint, the 4 PASSENGER AIR BAG OFF
indicator lamp will illuminate when the engine
is started and remain illuminated. This
indicates that the front-passenger front air
bag and the front-passenger knee bag are
deactivated.
When the OCS senses that the front-
passenger seat is classified as being empty,
the 4 PASSENGER AIR BAG OFF indicator
lamp will illuminate when the engine is started
and remain illuminated. This indicates that
the front-passenger front air bag and the
front-passenger knee bag are deactivated.
When the OCS senses that the front-
passenger seat occupant is classified as
being heavier than the weight of a typical 12-
month-old child seated in a standard child
restraint or as being a small individual (such
as a young teenager or a small adult), the
4 PASSENGER AIR BAG OFF indicator
lamp will illuminate for approximately 6 Occupant safety
43Safety
Z
Page 206 of 572

Useful information
i This Operator's Manual describes all
models and all standard and optional
equipment of your vehicle available at the
time of publication of the Operator's
Manual. Country-specific differences are
possible. Please
note that your vehicle may
not be equipped with all features
described. This also applies to safety-
related systems and functions.
i Read the information on qualified
specialist workshops: ( Y page 31).Important safety notes
G
WARNING
The driver's concentration must always be
directed primarily at road traffic.
For your safety and the safety of others,
selecting features through the multifunction
steering wheel should only be done by the
driver when
traffic and road conditions permit
it to be done safely.
Bear in mind that at a speed of only 30 mph
(approximately 50 km/h), the vehicle covers
a distance of 44 feet (approximately 14 m) per
second. G
WARNING
No messages will be displayed if either the
instrument cluster or the multifunction
display is inoperative.
As a result, you will not be able to see
information about your driving conditions,
such as
R speed
R outside temperature
R warning/indicator lamps
R malfunction/warning messages
R failure of any systems
Driving characteristics may be impaired. If
you must continue to drive, do so with added
caution. Contact an authorized Mercedes-
Benz Center as soon as possible. G
WARNING
Malfunction and warning messages are only
displayed for certain systems and are
intentionally not very detailed. The
malfunction and warning messages are
simply a reminder with respect to the
operation of certain systems. They do not
replace the owner's and/or driver's
responsibility to maintain the vehicle's
operating safety. Have all required
maintenance services and safety checks
performed on
the vehicle. Bring the vehicle to
an authorized Mercedes-Benz Center to
address the malfunction and warning
messages. G
WARNING
All
categories of messages contain important
information which should be taken note of
and, where a malfunction is indicated,
addressed as soon as possible at an
authorized Mercedes-Benz Center.
Failure to repair the condition noted may
cause damage
not covered by the Mercedes-
Benz Limited Warranty, or result in property
damage or personal injury.
You will find an illustration of the instrument
cluster in the "Displays and operation"
section ( Y page 205).204
Important safety notes
On-board computer and displays
Page 210 of 572

Multifunction display
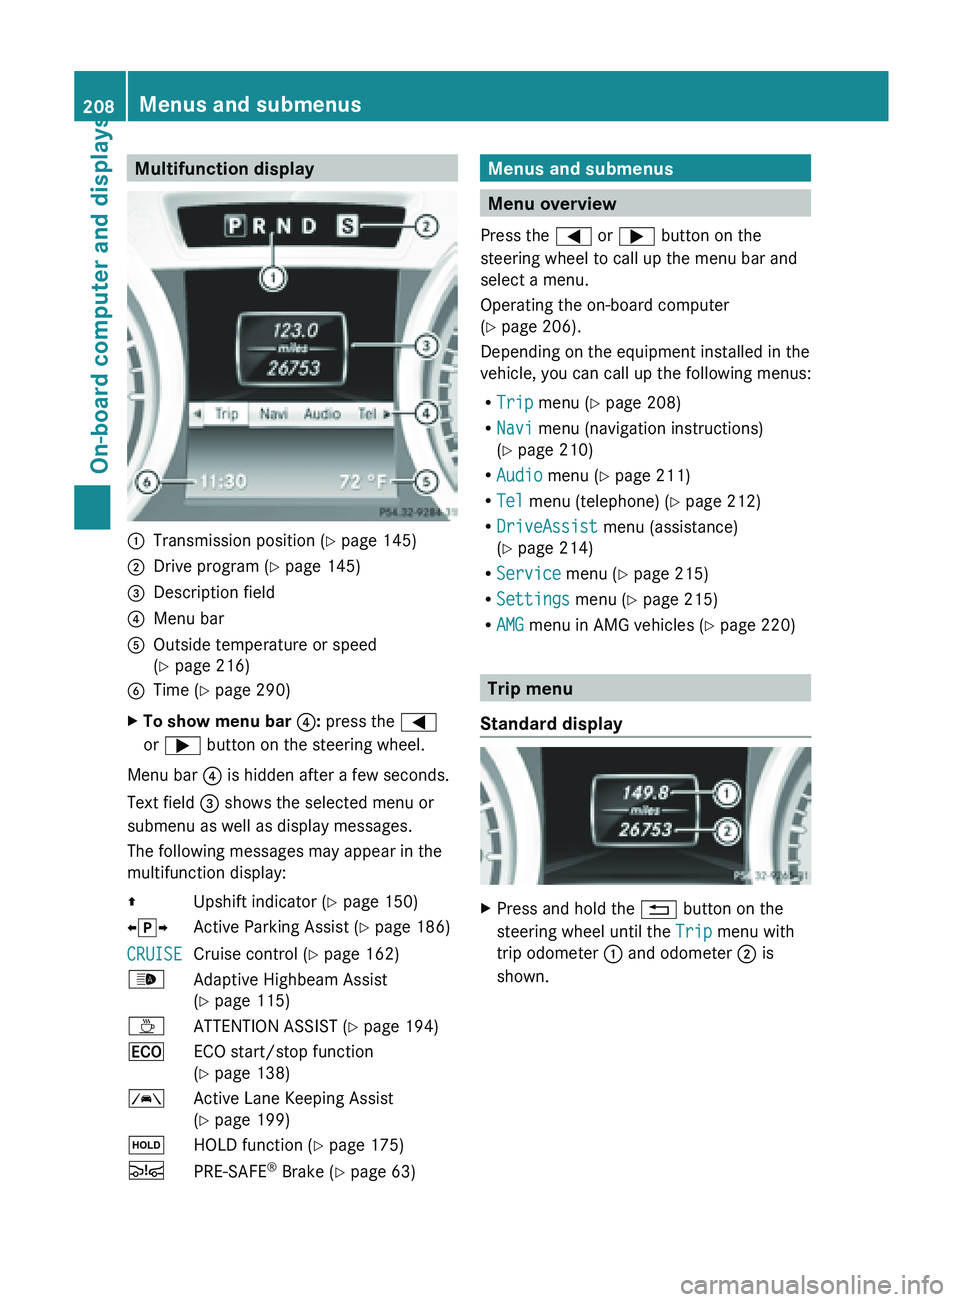
:
Transmission position ( Y page 145)
; Drive program (Y page 145)
= Description field
? Menu bar
A Outside temperature or speed
(Y page 216)
B Time ( Y page 290)
X To show menu bar ?: press the =
or ; button on the steering wheel.
Menu bar ? is hidden after a few seconds.
Text field = shows the selected menu or
submenu as well as display messages.
The following messages may appear in the
multifunction display:
Z Upshift indicator (Y page 150)
XjY Active Parking Assist (Y page 186)
CRUISE Cruise control (
Y page 162)
_ Adaptive Highbeam Assist
(Y page 115)
À ATTENTION ASSIST (Y page 194)
¤ ECO start/stop function
(Y page 138)
à Active Lane Keeping Assist
(Y page 199)
ë HOLD function ( Y page 175)
Ä PRE-SAFE ®
Brake (Y page 63) Menus and submenus
Menu overview
Press the = or ; button on the
steering wheel to call up the menu bar and
select a menu.
Operating the on-board computer
(Y page 206).
Depending on the equipment installed in the
vehicle, you can call up the following menus:
R Trip menu (Y page 208)
R Navi menu (navigation instructions)
(Y page 210)
R Audio menu (Y page 211)
R Tel menu (telephone) ( Y page 212)
R DriveAssist menu (assistance)
(Y page 214)
R Service menu (Y page 215)
R Settings menu (Y page 215)
R AMG menu in AMG vehicles ( Y page 220) Trip menu
Standard display X
Press and hold the % button on the
steering wheel until the Trip menu with
trip odometer : and odometer ; is
shown. 208
Menus and submenus
On-board computer and displays
Page 218 of 572

You can determine whether the multifunction
display shows some messages in miles or
kilometers.
X
Press the = or ; button on the
steering wheel to select the Settings
menu.
X Press the : or 9 button to select the
Inst. Cluster submenu.
X Press the a button to confirm.
X Press the : or 9
button to select the
Display Unit Speed-/Odometer:
function.
You will see the selected setting: km or
miles.
X Press the a button to save the setting.
The selected unit of measurement for
distance applies to:
R the digital speedometer in the Trip menu
R odometer and the trip odometer
R trip computer
R current consumption and the range
R the navigation instructions in the Navi
menu
R cruise control
R DISTRONIC PLUS
R ASSYST PLUS service interval display
Selecting the
permanent display function
You can determine whether the multifunction
display permanently shows your speed or the
outside temperature.
X Press the = or ; button on the
steering wheel to select the Sett. menu.
X Press the : or 9
button to select the
Instr. Cluster submenu.
X Press the a button to confirm.
X Press the :
or 9
button to select the
Permanent Display function.
You will see the selected setting: Outside
Temperature or Speedometer.
X Press the a button to save the setting.
i Speed is displayed in mph. Light submenu Setting the daytime running lamps
i
This function is not available in Canada.
X Press the = or ; button on the
steering wheel to select the Sett. menu.
X Press the : or 9
button to select the
Lights submenu.
X Press the a button to confirm.
X Press the :
or 9
button to select the
Daytime Running Lights function.
If the Daytime Running Lights have
been switched on, the cone of light and the
W symbol in the multifunction display
are shown in red.
X Press the a button to save the setting.
If you have activated the Daytime Running
Lights
function and the light switch is in the
à position, the daytime running lamps or
parking lamps and low-beam headlamps are
switched on depending on the brightness of
the ambient light.
When the low-beam headlamps are switched
on, the L indicator lamp in the instrument
cluster lights up.
Further information on daytime running
lamps ( Y page 109).
Setting the brightness of the ambient
lighting
X Press the = or ; button on the
steering wheel to select the Sett. menu.
X Press the : or 9
button to select the
Lights submenu.
X Press the a button to confirm.
X Press the : or 9
button to select the
Amb. Light +/-. function.
You will see the selected setting.
X Press the a button to confirm.
X Press the :
or 9
button to adjust the
brightness to any level from Off to Level
5 (bright).
X Press the a or % button
to save the
setting. 216
Menus and submenus
On-board computer and displays
Page 487 of 572

Opening/closing the garage door
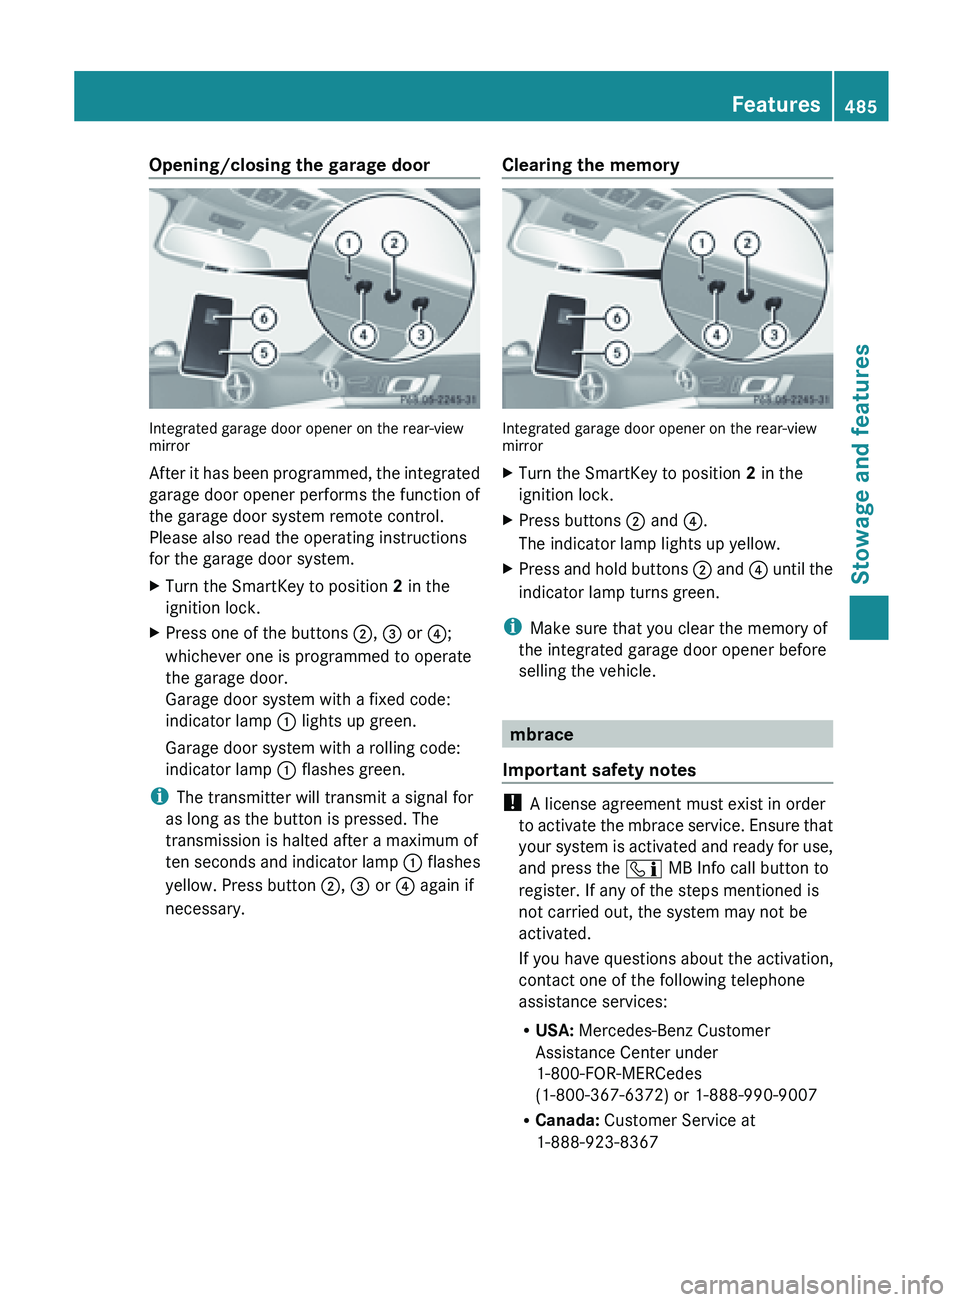
Integrated garage door opener on the rear-view
mirror
After
it
has been programmed, the integrated
garage door opener performs the function of
the garage door system remote control.
Please also read the operating instructions
for the garage door system.
X Turn the SmartKey to position 2 in the
ignition lock.
X Press one of the buttons ;, = or ?;
whichever one is programmed to operate
the garage door.
Garage door system with a fixed code:
indicator lamp : lights up green.
Garage door system with a rolling code:
indicator lamp : flashes green.
i The transmitter will transmit a signal for
as long as the button is pressed. The
transmission is halted after a maximum of
ten seconds
and indicator lamp : flashes
yellow. Press button ;, = or ? again if
necessary. Clearing the memory Integrated garage door opener on the rear-view
mirror
X
Turn the SmartKey to position 2 in the
ignition lock.
X Press buttons ; and ?.
The indicator lamp lights up yellow.
X Press and hold buttons ; and
?
until the
indicator lamp turns green.
i Make sure that you clear the memory of
the integrated garage door opener before
selling the vehicle. mbrace
Important safety notes !
A license agreement must exist in order
to activate
the mbrace service. Ensure that
your system is activated and ready for use,
and press the ï MB Info call button to
register. If any of the steps mentioned is
not carried out, the system may not be
activated.
If you have questions about the activation,
contact one of the following telephone
assistance services:
R USA: Mercedes-Benz Customer
Assistance Center under
1-800-FOR-MERCedes
(1-800-367-6372) or 1-888-990-9007
R Canada: Customer Service at
1-888-923-8367 Features
485
Stowage and features Z
Page 488 of 572

Shortly after successfully registering with the
mbrace service, a user ID and password will
be
sent
to you by mail. USA only: you can use
this password to log onto the mbrace area
under "Owners Online" at http://
www.mbusa.com.
The mbrace system is available if:
R it has been activated and is operational.
R the corresponding mobile phone network
is available for transmitting data to the
Customer Assistance Center.
R a service subscription is available.
R the starter battery is sufficiently charged.
i Determining the location of the vehicle on
a map is only possible if:
R GPS reception is available
R the vehicle position can be forwarded to
the Customer Assistance Center.
The mbrace system To adjust the volume during an mbrace call,
proceed as follows:
X
Press the W or X button on the
multifunction steering wheel.
or
X Use the volume controller of COMAND.
The mbrace system provides various
services, e.g.:
R automatic and manual emergency call
R Roadside Assistance call
R MB Info call
USA only: you can find information and a
description of all available features under
"Owners Online"
at http://www.mbusa.com. System self-test G
WARNING
A malfunction in the system has been
detected if one of the following conditions
occurs:
R the indicator lamp in the SOS button does
not light up during the system self-
diagnosis.
R the indicator lamp in the F Roadside
Assistance button does not light up during
the system self-diagnosis.
R the indicator lamp in the ï information
button does not light up during self-
diagnosis of the system.
R the indicator lamp in the SOS button, the
F Roadside Assistance button or the
ï information button continues to light
up red after the system self-diagnosis.
R The mbrace Inoperative or mbrace
Service Not Activated message
appears in the multifunction display after
the system self-diagnosis.
If a
malfunction is indicated as outlined above,
the system may not operate as expected. In
the event of an emergency, assistance must
be summoned by other means.
Have the system checked at the nearest
authorized Mercedes-Benz Center or contact
the following service hotlines:
R USA: Mercedes-Benz Customer Assistance
center at
1-800-FOR-MERCedes (1-800-367-6372)
or 1-888-990-9007
R Canada: Customer Service at
1-888-923-8367
After you have switched on the ignition, the
system carries out a self-diagnosis. 486
Features
Stowage and features