2013 MERCEDES-BENZ SL-CLASS ROADSTER display
[x] Cancel search: displayPage 288 of 572

Seat functions
Overview Using the T button next to the COMAND
controller or the Seat menu item in the
system menu, you can call up the following
seat functions:
R multicontour seat (with 4-way lumbar
support)
R active multicontour
seat (dynamic seat and
massage function)
R balance (seat heating distribution)
i You also can save and recall the current
settings of a seat function using the
memory button and the corresponding
memory position switch ( Y page 105).
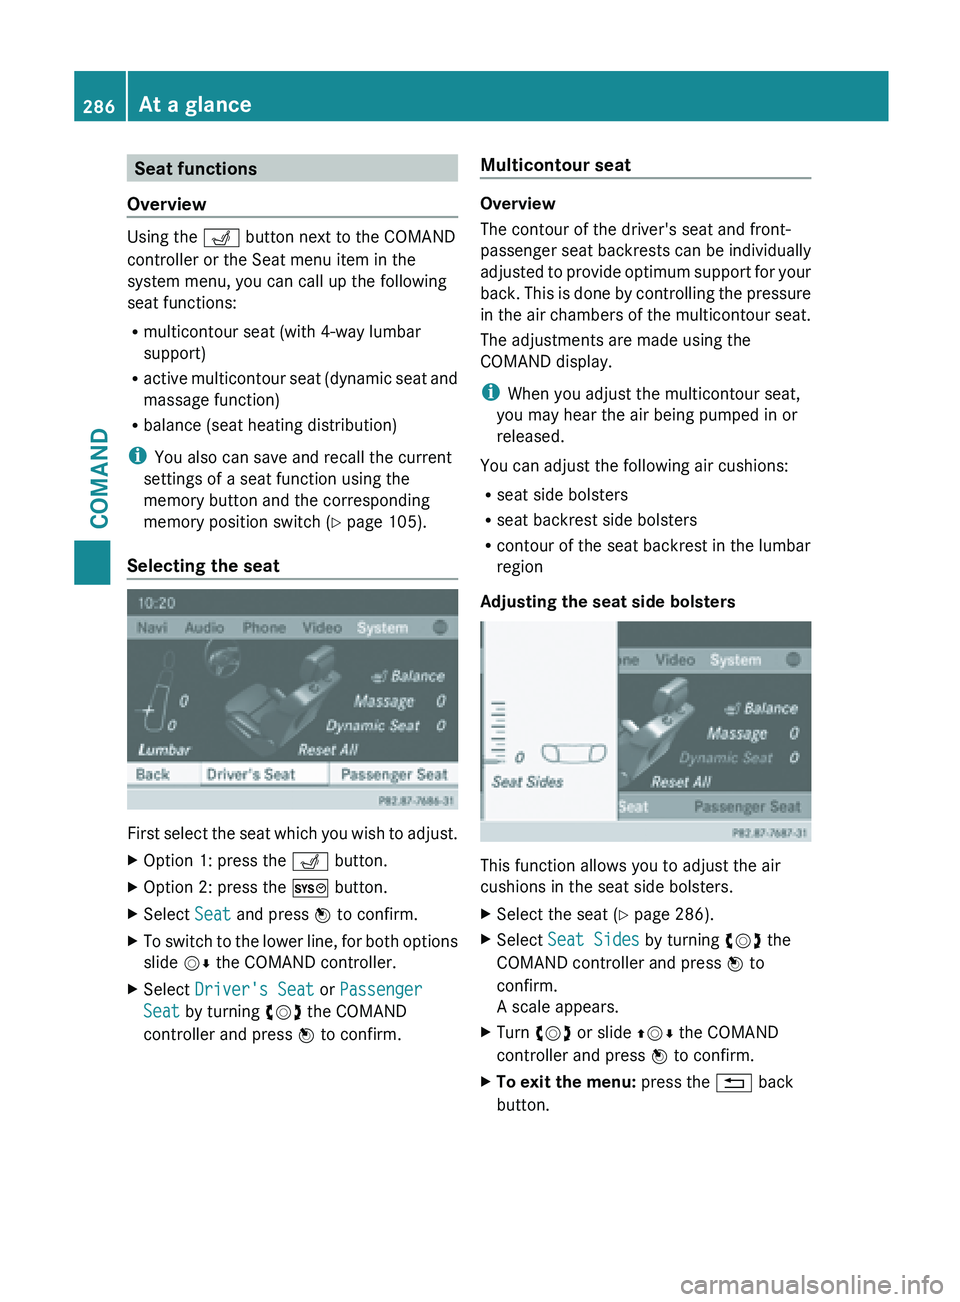
Selecting the seat First
select the seat which you wish to adjust.
X Option 1: press the T button.
X Option 2: press the W button.
X Select Seat and press W to confirm.
X To switch to the lower line, for both options
slide VÆ the COMAND controller.
X Select Driver's Seat or Passenger
Seat by turning cVd the COMAND
controller and press W to confirm. Multicontour seat Overview
The contour of the driver's seat and front-
passenger
seat
backrests can be individually
adjusted to provide optimum support for your
back. This is done by controlling the pressure
in the air chambers of the multicontour seat.
The adjustments are made using the
COMAND display.
i When you adjust the multicontour seat,
you may hear the air being pumped in or
released.
You can adjust the following air cushions:
R seat side bolsters
R seat backrest side bolsters
R contour of the seat backrest in the lumbar
region
Adjusting the seat side bolsters This function allows you to adjust the air
cushions in the seat side bolsters.
X
Select the seat ( Y
page 286).
X Select Seat Sides by turning cVd the
COMAND controller and press W to
confirm.
A scale appears.
X Turn cVd or slide ZVÆ the COMAND
controller and press W to confirm.
X To exit the menu: press the % back
button. 286
At a glance
COMAND
Page 291 of 572

X
Select the seat ( Y page 286).
X Select Reset All by turning cVd the
COMAND controller and press W to
confirm.
A query appears.
X Select Yes or No and press W to confirm.
If you select No, the process will be
canceled.
After you select Yes, all seat adjustments
are reset to the default values (factory
setting). System settings
Display settings
Setting the brightness The brightness detected by the display light
sensor affects the setting options for this
function.
X
Press W.
X Select Settings by turning cVd the
COMAND controller and press W to
confirm.
X Select Display and press W to confirm.
X Select Brightness and press W to
confirm.
X Adjust the brightness by turning cVd the
COMAND controller and press W to
confirm. Display design Your COMAND display features optimized
designs for operation during daytime and
night-time hours. You can set the design by
manually
selecting
day or night design or opt
for an automatic setting.
X Press W.
X Select Settings by turning cVd the
COMAND controller and press W to
confirm.
X Select Display and press W to confirm.
X Select Day Mode, Night Mode or
Automatic by turning cVd the COMAND
controller and press W to confirm.
A dot indicates the current setting. Design Explanation
Day Mode The display is set
permanently to day
design.
Night Mode The display is set
permanently to night
design.
Automatic If the
Automatic setting
is selected, COMAND
evaluates the readings
from the automatic
vehicle light sensor and
automatically switches
between the display
designs. Time settings
General information If COMAND is equipped with a navigation
system and has GPS reception, COMAND
automatically sets
the time and date. You can
also adjust the time yourself in 30-minute
increments, but the date cannot be changed.
i If you set the time in 30-minute
increments, any time zone settings and
settings for changing between summer and System settings
289
COMAND Z
Page 292 of 572

standard time are lost. Switching between
summer and standard time (
Y page 290).
i The following
navigation system functions
require the time, time zone and summer/
standard time to be set correctly in order
to work properly:
R route guidance on routes with time-
dependent traffic guidance
R calculation of expected time of arrival
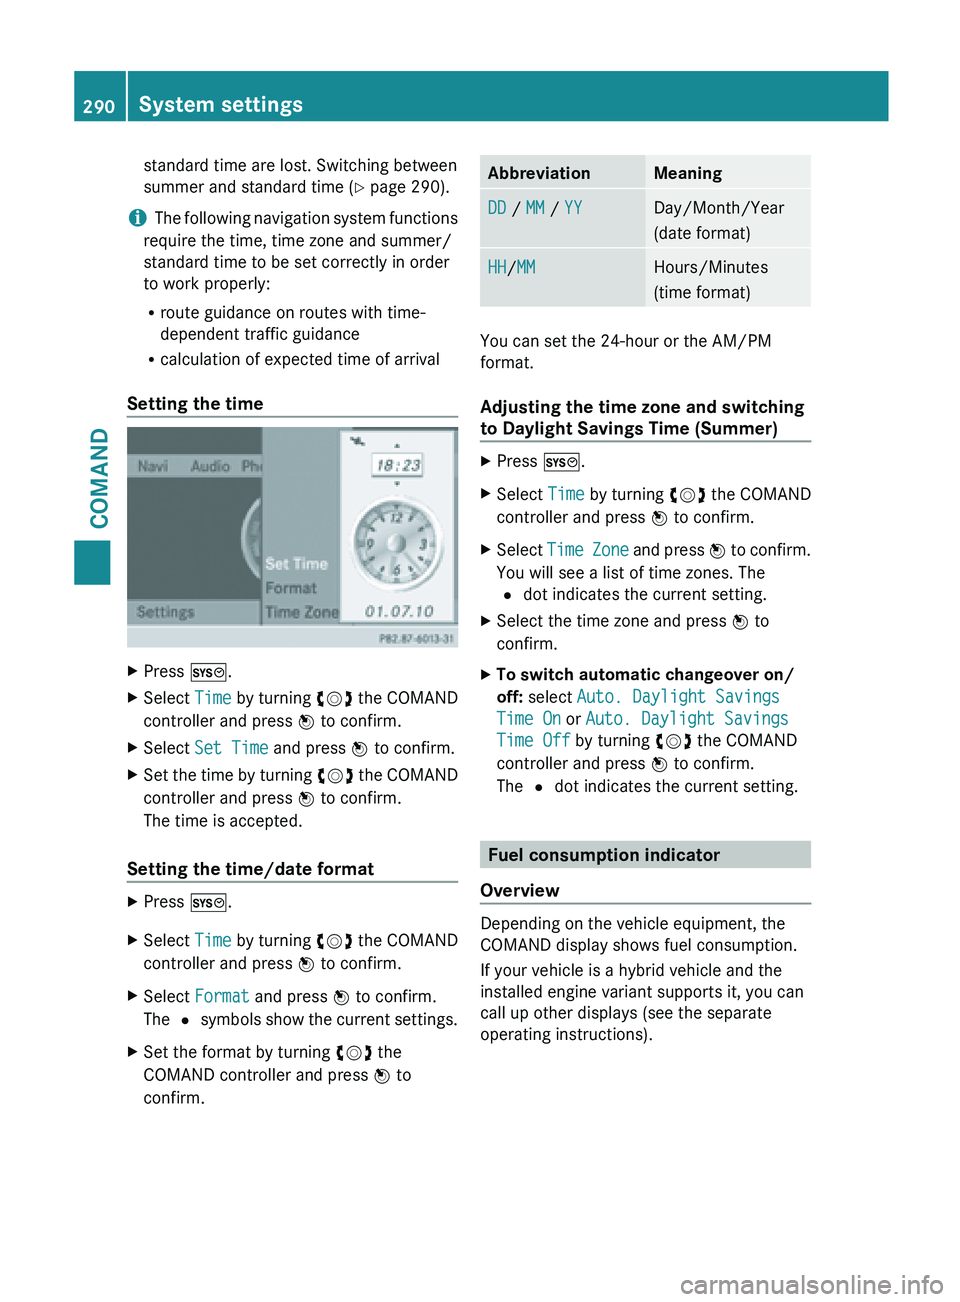
Setting the time X
Press W.
X Select Time by turning cVd the COMAND
controller and press W to confirm.
X Select Set Time and press W to confirm.
X Set the time by turning cVd the
COMAND
controller and press W to confirm.
The time is accepted.
Setting the time/date format X
Press W.
X Select Time by turning cVd the COMAND
controller and press W to confirm.
X Select Format and press W to confirm.
The # symbols
show the current settings.
X Set the format by turning cVd the
COMAND controller and press W to
confirm. Abbreviation Meaning
DD / MM / YY Day/Month/Year
(date format)
HH/MM Hours/Minutes
(time format)
You can set the 24-hour or the AM/PM
format.
Adjusting the time zone and switching
to Daylight Savings Time (Summer)
X
Press W.
X Select Time by turning cVd the COMAND
controller and press W to confirm.
X Select Time Zone
and press W to confirm.
You will see a list of time zones. The
# dot indicates the current setting.
X Select the time zone and press W to
confirm.
X To switch automatic changeover on/
off: select Auto. Daylight Savings
Time On or Auto. Daylight Savings
Time Off by turning cVd the COMAND
controller and press W to confirm.
The # dot indicates the current setting. Fuel consumption indicator
Overview Depending on the vehicle equipment, the
COMAND display shows fuel consumption.
If your vehicle is a hybrid vehicle and the
installed engine variant supports it, you can
call up other displays (see the separate
operating instructions).290
System settings
COMAND
Page 293 of 572

Calling up/exiting the display
X
To call up the full screen display: press
the W button.
X In the system menu, slide ZV the
COMAND controller up until the Full
Screen option is selected.
X Press W the COMAND controller.
The system display is shown as full screen
(without system menu).
X Slide XVY the COMAND controller
repeatedly until the fuel consumption
indicator appears.
The COMAND display shows the fuel
consumption for
the last 15 minutes of the
journey.
X To exit the full screen display: press W
the COMAND controller.
The system menu appears.
Every bar of the graph displays the average
value for one minute.
The fuel consumption indicator may differ
from the indicator in the FROM START trip
computer in the Trip menu (Y page 209).Driving conditions menu (Active Body
Control)
General notes On vehicles with Active Body Control (ABC),
you can display some driving systems and
additional information in the COMAND
display. Calling up drive status regulator (ABC) X
Press W.
X In the system menu, slide ZV the
COMAND controller up until the display/
selection window is selected.
X Slide XVY the COMAND controller
repeatedly until the drive status regulator
(ABC) appears.
The corresponding displays appear in the
COMAND display.
Details on the displays:
R for standard vehicles ( Y page 180)
R for AMG vehicles ( Y page 183)
Exiting the display X
Slide XVY the COMAND controller until
the desired display (clock or fuel
consumption) is shown. Text reader settings
X Press the W button.
X Select Settings by turning cVd the
COMAND controller and press W to
confirm.
X Select Text Reader Speed and press W
to confirm.
A list appears. The # dot indicates the
current setting.
X Select a setting by turning cVd the
COMAND controller and press W to
confirm. Voice Control System settings
Opening/closing the help window The help window provides information in
addition to the audible instructions during
individualization and during the subsequent
voice control. System settings
291
COMAND Z
Page 294 of 572

X
Press W.
X Select Settings by turning cVd the
COMAND controller and press W to
confirm.
X Select Voice Control and press W to
confirm.
X Select Help Window and press W to
confirm.
You have switched the help window on
O or off ª.
Individualization Using individualization, you can fine-tune the
Voice Control System to your own voice and
thus improve voice recognition; see the
separate operating instructions.
Bluetooth
®
settings
General information about Bluetooth ®Bluetooth
®
-capable devices, e.g. mobile
phones, have
to comply with a certain profile
in order to be connected to COMAND. Every
Bluetooth ®
device has its own specific
Bluetooth ®
name.
Bluetooth ®
technology is the standard for
short-range wireless data transmission of up
to approximately 10 meters. Bluetooth ®
allows, for example, the exchange of vCards. Bluetooth
®
is a registered trademark of
Bluetooth Special Interest Group (SIG) Inc.
Activating/deactivating Bluetooth ® X
Press W.
The system menu appears.
X Select Settings by turning cVd the
COMAND controller and press W to
confirm.
X Select Activate Bluetooth and press
W to confirm.
This switches Bluetooth ®
on O or off ª. Setting the system language
This function allows you to determine the
language for the menu displays and the
navigation announcements. The selected
language affects the characters available for
entry.
The navigation announcements are not
available in
all languages. If a language is not
available, the navigation announcements will
be in English.
When you set the system language, the
language of the Voice Control System will
change accordingly. If the selected language
is not supported by the Voice Control System,
English will be selected.
X Press the W button.
X Select Settings by turning cVd the
COMAND controller and press W to
confirm.
X Select Language and press W to confirm.
The list of languages appears. The # dot
indicates the current setting. 292
System settings
COMAND
Page 295 of 572

X
Select the language by turning cVd the
COMAND controller and press W to
confirm.
COMAND loads
the selected language and
sets it. Assigning a favorites button
X To assign a favorites button: press the
W button.
X Select Settings by
sliding VÆ and turning
cVd the COMAND controller and press
W to confirm.
X Select Assign as Favorite and press
W to confirm.
The list of predefined functions appears.
The dot
#
indicates the currently selected
function.
X Select the function by turning cVd the
COMAND controller and press W to
confirm.
The favorites button is assigned the
selected function.
X Example: to call up a favorite: press the
g favorites button.
This calls up the predefined function.
You can select the following predefined
functions in a menu:
R Display On/Off: you can switch the
display off or on.
R Full Screen: 'Clock': you can call up
the full screen with clock.
R Full Screen: 'Map' : you
can call up the
full screen with map.
R Spoken Driving Tip : you can call up the
current driving recommendation.
R Display Traffic Messages : you can call
up traffic reports.
R Navigate Home: you can start route
guidance to your home address if you have
already entered and saved the address
(Y page 304). R
Detour Menu: you can call up the Detour
menu and
then avoid a section of the route
and recalculate the route ( Y page 326).
R Compass Screen: you can call up the
compass.
R Driver’s Seat Massage, Front-
Passenger's Seat Massage or
Massage: Both Front Seats: you can
start the massage function, depending on
which seats are selected (Y page 288). Importing/exporting data
! Never remove the stick or card when
writing data
to the USB stick or the memory
card. You may otherwise lose data.
Using this function, you can:
R transfer your personal COMAND data from
one system/vehicle to another
R make a backup copy of your personal data
(export data) and load it again (import
data).
You can either use an SD memory card or a
USB storage device (e.g. a USB stick) as
temporary storage. System settings
293
COMAND Z
Page 297 of 572

If you select
Yes, a prompt will appear again
asking whether you really wish to reset.
X Select Yes or No and press W to confirm.
If you
select Yes, a message will be shown.
COMAND is reset and restarted.
If you select No, the process will be
canceled.
i Resetting personal COMAND data does
not reset the Internet and online settings
(Y page 401). Likewise, resetting the
Internet and
online settings does not reset
personal COMAND data. Navigation
Introduction
Safety notes G
WARNING
For safety reasons, only enter a new
destination when the vehicle is stationary.
When you are driving, another passenger
should enter the destination. Read the
Operator's Manual and select the route
before driving.
Bear in mind that at a speed of only 30 mph
(approximately 50 km/h
), the vehicle covers
a distance of 44 feet (approximately 14 m) per
second.
COMAND calculates the route to the
destination without taking account of the
following, for example:
R traffic lights
R stop and give way signs
R merging lanes
R parking or stopping in a no parking/no
stopping zone
R other road and traffic rules and regulations
R narrow bridges G
WARNING
COMAND may give incorrect navigation
commands if
the actual road/traffic situation
no longer corresponds to the data on the digital map. Digital maps do not cover all
areas nor all routes in an area. For example,
a route may have been diverted or the
direction of a one-way street may have
changed.
For
this
reason, you must always observe road
and traffic rules and regulations during your
journey. Road and traffic rules and regulations
always have priority over the system's driving
recommendations. G
WARNING
Navigation announcements are intended to
direct you
while driving without diverting your
attention from the road and driving.
Please always use this feature instead of
consulting the map display for directions.
Looking at the icons or map display can
distract you from traffic conditions and
driving, and increase the risk of an accident.
General notes Operational readiness of the navigation
system
The navigation system must determine the
position of the vehicle before first use or
whenever operational status is restored.
Therefore, you may have to drive for a while
before precise route guidance is possible.
GPS reception
Correct functioning of the navigation system
depends, amongst other things, on GPS
reception. In certain situations, GPS
reception may be impaired, there may be
interference or there may be no reception at
all, e.g. in tunnels or parking garages.
Entry restriction
On vehicles for certain countries, there is a
restriction on entering data.
The
restriction
is active from a vehicle speed
of above approximately 3 mph (5 km/h). As
soon as the speed falls below approximately Navigation
295
COMAND Z
Page 298 of 572

2 mph (3 km/h), the restriction becomes
inactive.
When
the
restriction is active, certain entries
cannot be made. This will be indicated by the
fact that certain menu items are grayed out
and cannot be selected.
The following entries are not possible, for
example:
R entering the destination city and street
R entering a destination via the map
R entering POIs in the vicinity of a city or via
a name search
R editing entries
R using the number keypad for direct entry
Other entries are possible, such as entering
points of interest in the vicinity of the
destination or current position.
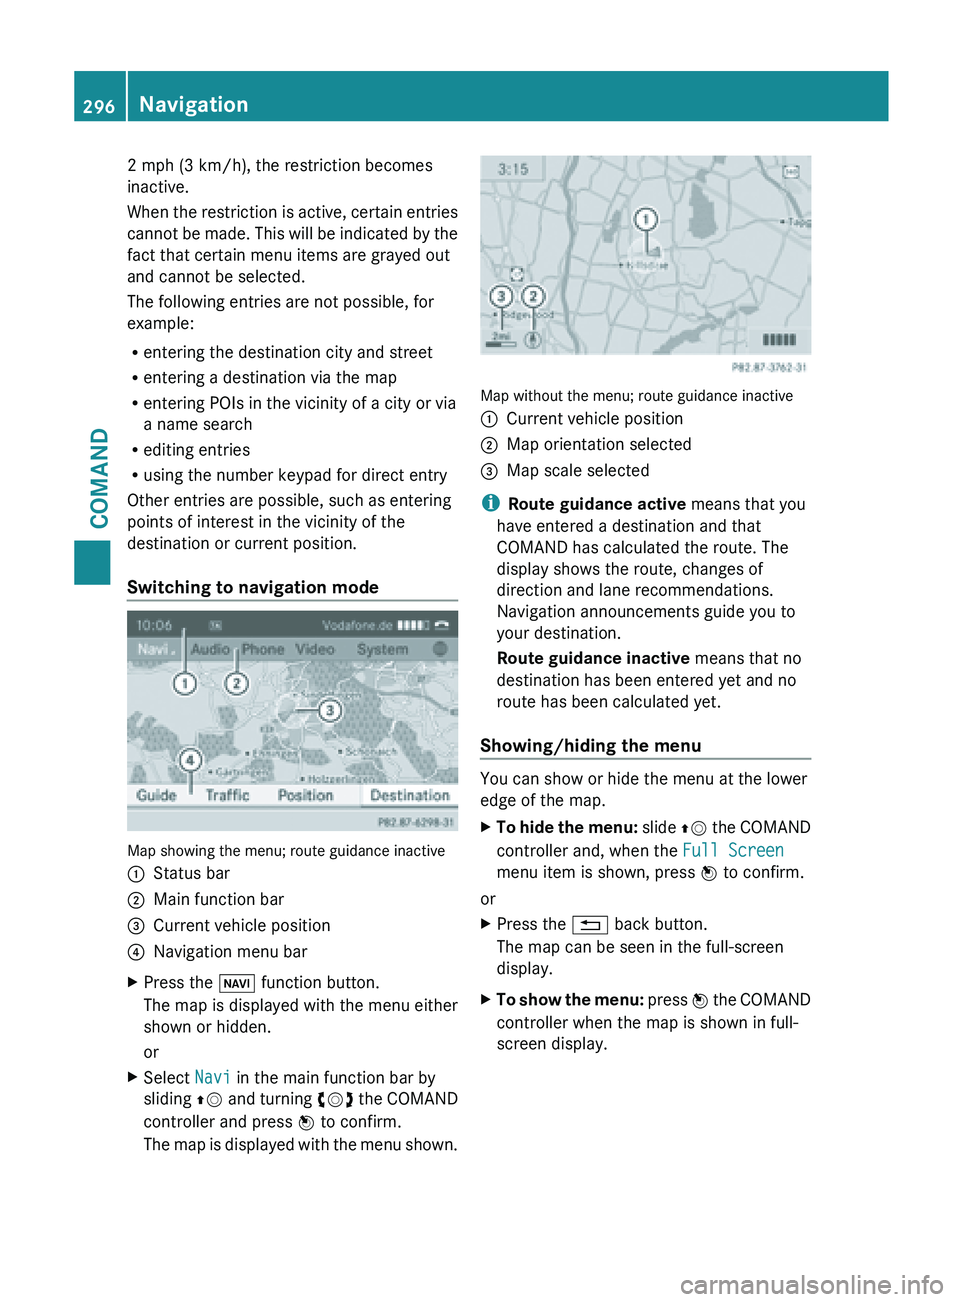
Switching to navigation mode Map showing the menu; route guidance inactive
:
Status bar
; Main function bar
= Current vehicle position
? Navigation menu bar
X Press the Ø function button.
The map is displayed with the menu either
shown or hidden.
or
X Select Navi in the main function bar by
sliding ZV and
turning cVd the COMAND
controller and press W to confirm.
The map is displayed with the menu shown. Map without the menu; route guidance inactive
:
Current vehicle position
; Map orientation selected
= Map scale selected
i Route guidance active means that you
have entered a destination and that
COMAND has calculated the route. The
display shows the route, changes of
direction and lane recommendations.
Navigation announcements guide you to
your destination.
Route guidance inactive means that no
destination has been entered yet and no
route has been calculated yet.
Showing/hiding the menu You can show or hide the menu at the lower
edge of the map.
X
To hide the menu: slide ZV
the COMAND
controller and, when the Full Screen
menu item is shown, press W to confirm.
or
X Press the % back button.
The map can be seen in the full-screen
display.
X To show the menu: press
W
the COMAND
controller when the map is shown in full-
screen display. 296
Navigation
COMAND