2013 MERCEDES-BENZ SL-CLASS ROADSTER wheel
[x] Cancel search: wheelPage 488 of 572
Shortly after successfully registering with the
mbrace service, a user ID and password will
be
sent
to you by mail. USA only: you can use
this password to log onto the mbrace area
under "Owners Online" at http://
www.mbusa.com.
The mbrace system is available if:
R it has been activated and is operational.
R the corresponding mobile phone network
is available for transmitting data to the
Customer Assistance Center.
R a service subscription is available.
R the starter battery is sufficiently charged.
i Determining the location of the vehicle on
a map is only possible if:
R GPS reception is available
R the vehicle position can be forwarded to
the Customer Assistance Center.
The mbrace system To adjust the volume during an mbrace call,
proceed as follows:
X
Press the W or X button on the
multifunction steering wheel.
or
X Use the volume controller of COMAND.
The mbrace system provides various
services, e.g.:
R automatic and manual emergency call
R Roadside Assistance call
R MB Info call
USA only: you can find information and a
description of all available features under
"Owners Online"
at http://www.mbusa.com. System self-test G
WARNING
A malfunction in the system has been
detected if one of the following conditions
occurs:
R the indicator lamp in the SOS button does
not light up during the system self-
diagnosis.
R the indicator lamp in the F Roadside
Assistance button does not light up during
the system self-diagnosis.
R the indicator lamp in the ï information
button does not light up during self-
diagnosis of the system.
R the indicator lamp in the SOS button, the
F Roadside Assistance button or the
ï information button continues to light
up red after the system self-diagnosis.
R The mbrace Inoperative or mbrace
Service Not Activated message
appears in the multifunction display after
the system self-diagnosis.
If a
malfunction is indicated as outlined above,
the system may not operate as expected. In
the event of an emergency, assistance must
be summoned by other means.
Have the system checked at the nearest
authorized Mercedes-Benz Center or contact
the following service hotlines:
R USA: Mercedes-Benz Customer Assistance
center at
1-800-FOR-MERCedes (1-800-367-6372)
or 1-888-990-9007
R Canada: Customer Service at
1-888-923-8367
After you have switched on the ignition, the
system carries out a self-diagnosis. 486
Features
Stowage and features
Page 490 of 572
Roadside Assistance button
X
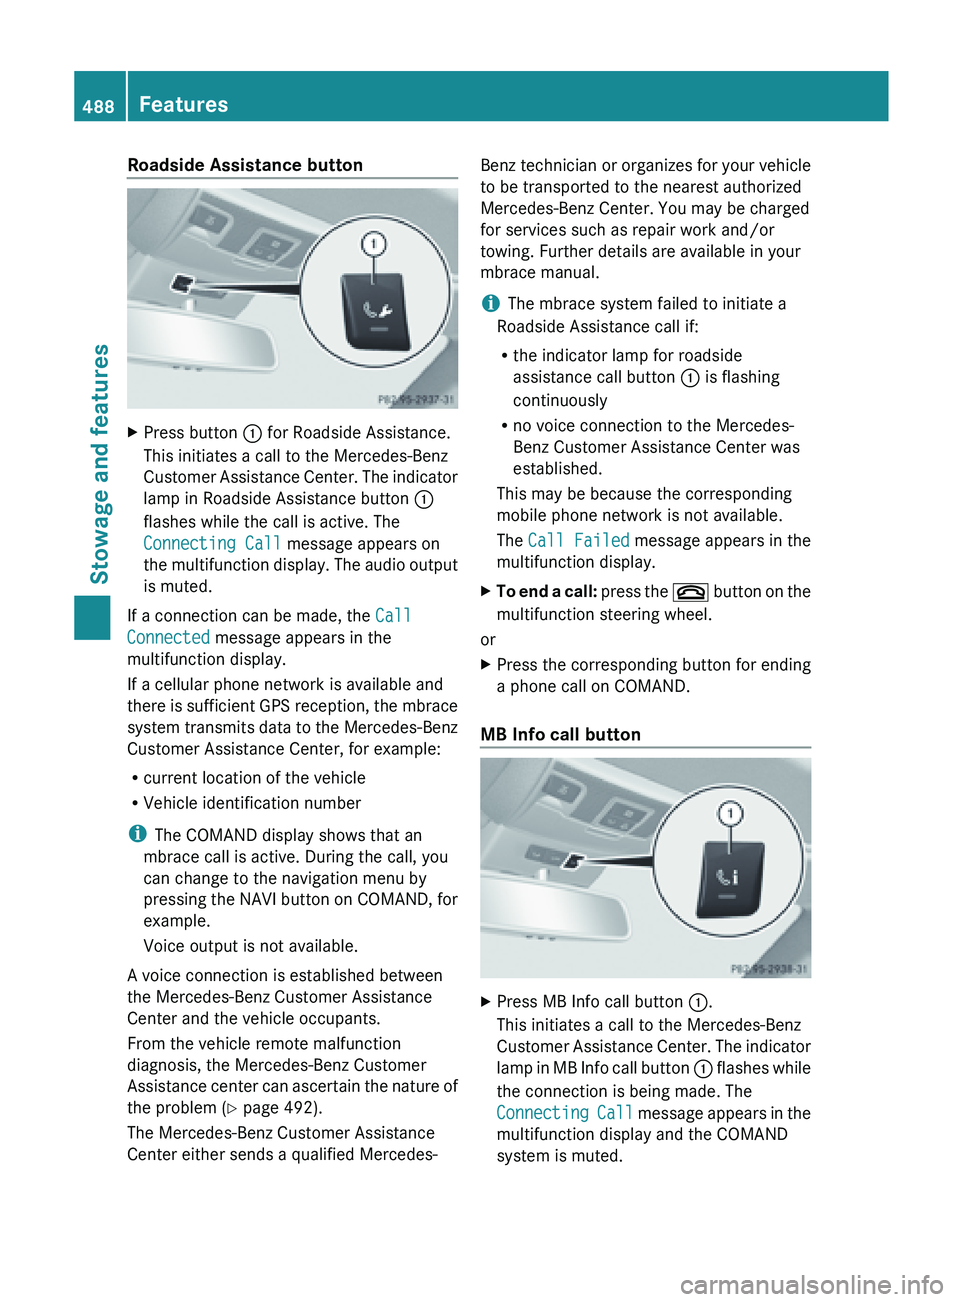
Press button : for Roadside Assistance.
This initiates a call to the Mercedes-Benz
Customer Assistance
Center. The indicator
lamp in Roadside Assistance button :
flashes while the call is active. The
Connecting Call message appears on
the multifunction display. The audio output
is muted.
If a connection can be made, the Call
Connected message appears in the
multifunction display.
If a cellular phone network is available and
there is
sufficient GPS reception, the mbrace
system transmits data to the Mercedes-Benz
Customer Assistance Center, for example:
R current location of the vehicle
R Vehicle identification number
i The COMAND display shows that an
mbrace call is active. During the call, you
can change to the navigation menu by
pressing the NAVI button on COMAND, for
example.
Voice output is not available.
A voice connection is established between
the Mercedes-Benz Customer Assistance
Center and the vehicle occupants.
From the vehicle remote malfunction
diagnosis, the Mercedes-Benz Customer
Assistance center can ascertain the nature of
the problem ( Y page 492).
The Mercedes-Benz Customer Assistance
Center either sends a qualified Mercedes- Benz technician or organizes for your vehicle
to be transported to the nearest authorized
Mercedes-Benz Center. You may be charged
for services such as repair work and/or
towing. Further details are available in your
mbrace manual.
i
The mbrace system failed to initiate a
Roadside Assistance call if:
R the indicator lamp for roadside
assistance call button : is flashing
continuously
R no voice connection to the Mercedes-
Benz Customer Assistance Center was
established.
This may be because the corresponding
mobile phone network is not available.
The Call Failed message appears in the
multifunction display.
X To end a call: press
the ~ button on the
multifunction steering wheel.
or
X Press the corresponding button for ending
a phone call on COMAND.
MB Info call button X
Press MB Info call button :.
This initiates a call to the Mercedes-Benz
Customer Assistance
Center. The indicator
lamp in MB Info call button : flashes while
the connection is being made. The
Connecting Call message appears in the
multifunction display and the COMAND
system is muted. 488
Features
Stowage and features
Page 491 of 572
If a connection can be made, the
Call
Connected message appears in the
multifunction display.
If a cellular phone network is available and
there is
sufficient GPS reception, the mbrace
system transmits data to the Mercedes-Benz
Customer Assistance Center, for example:
R current location of the vehicle
R vehicle identification number
i The COMAND display shows that an
mbrace call is active. During the call, you
can change to the navigation menu by
pressing the NAVI button on COMAND, for
example.
Voice output is not available.
A voice connection is established between
the Mercedes-Benz Customer Assistance
Center and the vehicle occupants. You can
obtain information on how to operate your
vehicle's systems, on the location of the
nearest authorized Mercedes-Benz Center,
and on further products and services offered
by Mercedes-Benz USA.
USA only: you can find further information on
the mbrace system under "Owners Online" at
http://www.mbusa.com.
i The mbrace system failed to initiate an
MB Info call if:
R the indicator lamp in MB Info call
button : is flashing continuously
R no voice connection to the Mercedes-
Benz Customer Assistance Center was
established.
This may be because the corresponding
mobile phone network is not available.
The Call Failed message appears in the
multifunction display.
X To end a call: press
the ~ button on the
multifunction steering wheel.
or
X Press the corresponding button for ending
a phone call on COMAND. Call priority When service calls are active, e.g. Roadside
Assistance or MB Info calls, an emergency
call can still be initiated. In this case, an
emergency
call
will take priority and override
all other active calls.
The indicator lamp of the respective button
flashes until the call is ended. An emergency
call can only be terminated by the Mercedes-
Benz Customer Assistance Center.
All other calls can be ended by pressing:
R the ~ button on the multifunction
steering wheel
R or the corresponding COMAND button for
ending a telephone call
i If an mbrace call is initiated, audio output
is muted. The mobile phone is no longer
connected to COMAND. However, if you
want to use your mobile phone, do so only
when the vehicle is stationary and in a safe
location.
Downloading destinations in COMAND Downloading destinations
Downloading destinations gives you access
to a data bank with over 15 million Points of
Interest
(POIs).
These can be downloaded on
the navigation system in your vehicle. If you
know the destination, the address can be
downloaded. Alternatively, you can obtain the
location of Points of Interest (POIs)/
important destinations in the vicinity.
Furthermore, you can download routes with
up to 20 way points.
You are prompted to confirm route guidance
to the address entered.
The system calculates the route and
subsequently starts the route guidance with
the address entered.
i If you select No, the address can be stored
in the address book.
i The Destination Download function is
available if the corresponding mobile Features
489
Stowage and features Z
Page 502 of 572

ASSYST PLUS
The ASSYST PLUS service interval display
informs you of the next service due date.
Information on
the type of service and service
intervals (see separate Maintenance
Booklet).
You can obtain further information from an
authorized Mercedes-Benz Center or at
http://www.mbusa.com (USA only).
i The ASSYST PLUS service interval display
does not show any information on the
engine oil level. Observe the notes on the
engine oil level ( Y page 497).Care
Notes on care
G
WARNING
Many cleaning products can be hazardous.
Some are poisonous, others are flammable.
Always follow the instructions on the
particular container. Always open your
vehicle's doors
or windows when cleaning the
inside.
Never use fluids or solvents that are not
designed for cleaning your vehicle.
Always lock away cleaning products and keep
them out of reach of children. H
Environmental note
Dispose of empty packaging and cleaning
cloths in an environmentally responsible
manner.
! For cleaning your vehicle, do not use any
of the following:
R dry, rough or hard cloths
R abrasive cleaning agents
R solvents
R cleaning agents containing solvents
Do not scrub.
Do not touch the surfaces or protective
films with hard objects, e.g. a ring or ice scraper. You could otherwise scratch or
damage the surfaces and protective film.
! Do not park the vehicle for an extended
period straight
after cleaning it, particularly
after having cleaned the wheels with wheel
cleaner. Wheel cleaners could cause
increased corrosion of the brake discs and
brake pads/linings. For this reason, you
should drive for a few minutes after
cleaning. Braking heats the brake discs and
the brake pads/linings, thus drying them.
The vehicle can then be parked.
Regular care of your vehicle is a condition for
retaining the quality in the long term.
Use care products and cleaning agents
recommended and approved by Mercedes-
Benz. Washing
the vehicle and cleaning the
paintwork
Automatic car wash G
WARNING
Braking efficiency is reduced after washing
the vehicle.
This could cause an accident. For
this reason, you must drive particularly
carefully after washing the vehicle until the
brakes have dried. G
WARNING
The
vehicle is braked when the HOLD function
or DISTRONIC PLUS is activated. Therefore,
deactivate the
HOLD function and DISTRONIC
PLUS before the vehicle is washed in an
automatic car wash.
! It is preferable to use car washes with
adjustable high-pressure pre-cleaning that
corresponds to the specification for the
Cabriolet program. In car washes that use
high water pressures, there is a risk that a
small amount of water may leak into the
vehicle.
! Never clean your vehicle in a Touchless
Automatic Car Wash as these use special 500
Care
Maintenance and care
Page 504 of 572
Scratches, corrosive deposits, areas affected
by corrosion and damage caused by
inadequate
care
cannot always be completely
repaired. In such cases, visit a qualified
specialist workshop.
X Remove dirt immediately, where possible,
while avoiding rubbing too hard.
X Soak insect remains with insect remover
and rinse off the treated areas afterwards.
X Soak bird droppings with water and rinse
off the treated areas afterwards.
X Remove coolant, brake fluid, tree resin,
oils, fuels and greases by rubbing gently
with a cloth soaked in petroleum ether or
lighter fluid.
X Use tar remover to remove tar stains.
X Use silicone remover to remove wax.
If water no longer forms "beads" on the paint
surface, use the paint care products
recommended and approved by Mercedes-
Benz. This is the case approximately every
three to five months, depending on the
climate conditions
and the care product used.
If dirt has penetrated the paint surface or if
the paint has become dull, the paint cleaner
recommended and approved by Mercedes-
Benz should be used.
Do not use these care products in the sun or
on the hood while the hood is hot.
X Use a suitable touch-up stick, e.g. MB
Touch-Up Stick, to repair slight damage to
the paintwork quickly and provisionally.
Matte finish care !
Never polish the vehicle or the light alloy
wheels. Polishing causes the finish to
shine. !
The following may cause the paint to
become shiny and thus reduce the matte
effect:
R Vigorous rubbing with unsuitable
materials.
R Frequent use of car washes.
R Washing the vehicle in direct sunlight.
! Never use paint cleaner, buffing or
polishing products,
or gloss preserver, e.g.
wax. These products are only suitable for
high-gloss surfaces. Their use on vehicles
with matte finish leads to considerable
surface damage (shiny, spotted areas).
Always have paintwork repairs carried out
at a qualified specialist workshop.
! Do not use wash programs with a hot wax
treatment under any circumstances.
Observe these notes if your vehicle has a
clear matte finish. This will help you to avoid
damage to the paintwork due to incorrect
treatment.
These notes also apply to light alloy wheels
with a clear matte finish.
i The vehicle should preferably be washed
by hand using a soft sponge, car shampoo
and plenty of water.
i Use only insect remover and car shampoo
from the range of recommended and
approved Mercedes-Benz care products. Cleaning the vehicle parts
Cleaning the wheels !
Do not
use acidic wheel cleaning products
to remove brake dust. This could damage
wheel bolts and brake components.
! Do not park the vehicle for an extended
period straight after cleaning it, particularly
after having cleaned the wheels with wheel
cleaner. Wheel cleaners could cause
increased corrosion of the brake discs and
brake pads/linings. For this reason, you 502
Care
Maintenance and care
Page 506 of 572

cloths could scratch or damage the plastic
lenses of the mirror turn signals.
X Clean the plastic lenses of the mirror turn
signals in
the exterior mirror housing using
a wet sponge and mild cleaning agent, e.g.
Mercedes-Benz car shampoo or cleaning
cloths.
Cleaning the sensors !
If you clean the sensors with a power
washer, make sure that you keep a
distance of
at least 11.8 in (30 cm) between
the vehicle and the power washer nozzle.
Information about the correct distance is
available from the equipment
manufacturer. X
Clean sensors : of the driving systems
with water, car shampoo and a soft cloth.
Cleaning the rear view camera !
Do not
clean the camera lens and the area
around the rear view camera with a power
washer. X
Use clear water and a soft cloth to clean
camera lens :.
Cleaning the exhaust pipe !
Do not clean the exhaust pipe with
alkaline-based cleaning agents, such as
wheel cleaner.
X Clean the exhaust pipe with a chrome care
product tested
and approved by Mercedes-
Benz.
Impurities combined with the effects of road
grit and
corrosive environmental factors may
cause flash rust to form on the surface. You
can restore the original shine of the exhaust
pipe by cleaning it regularly, especially in
winter and after washing. Interior care
Cleaning the display !
For cleaning, do not use any of the
following:
R alcohol-based thinner or gasoline
R abrasive cleaning agents
R commercially-available household
cleaning agents
These may
damage the display surface. Do
not put pressure on the display surface
when cleaning. This could lead to
irreparable damage to the display. 504
Care
Maintenance and care
Page 507 of 572
X
Before cleaning the display, make sure that
it is switched off and has cooled down.
X Clean the display surface using a
commercially available microfiber cloth
and TFT/LCD display cleaner.
X Dry the display surface using a dry
microfiber cloth.
Cleaning the plastic trim G
WARNING
When cleaning the steering wheel boss and
dashboard, do not use cockpit sprays or
cleaning agents
containing solvents. Cleaning
agents containing solvents cause the surface
to become porous, and as a result, plastic
parts may break away and be thrown around
the interior when an air bag is deployed, which
may result in severe injuries.
! Do not affix the following to plastic
surfaces:
R stickers
R films
R scented oil bottles or similar items
You can otherwise damage the plastic.
! Do not allow cosmetics, insect repellent
or sunscreen to come into contact with the
plastic trim. This maintains the high-quality
look of the surfaces.
X Wipe the plastic trim with a damp, lint-free
cloth, e.g. a microfiber cloth.
X Heavy soiling: use car care and cleaning
products recommended and approved by
Mercedes-Benz.
The surface
may change color temporarily.
Wait until the surface is dry again.
Cleaning the steering wheel and gear or
selector lever X
Thoroughly wipe with a damp cloth or use
leather care agents that have been
recommended and
approved by Mercedes-
Benz. Cleaning genuine wood and trim
elements !
Do not
use solvent-based cleaning agents
such as tar remover, wheel cleaners,
polishes or waxes. There is otherwise a risk
of damaging the surface.
! Do not use chrome polish on trim pieces.
The trim pieces have a chrome look but are
mostly made of anodized aluminum and
can lose their shine if chrome polish is
used. Use a damp, lint-free cloth instead
when cleaning the trim pieces.
If the chrome-plated trim pieces are very
dirty, you can use a chrome polish. If you
are unsure as to whether the trim pieces
are chrome-plated or not, consult an
authorized Mercedes-Benz Center.
X Wipe the wooden trim and trim pieces with
a damp, lint-free cloth, e.g. a microfiber
cloth.
X Heavy soiling: use car care and cleaning
products recommended and approved by
Mercedes-Benz.
Cleaning the seat covers !
Observe the following when cleaning:
R clean genuine leather covers carefully
with a damp cloth and then wipe the
covers down
with a dry cloth. Make sure
that the leather does not become
soaked. It may otherwise become rough
and cracked. Only use leather care
agents that have been tested and
approved by Mercedes-Benz. You can
obtain these from a qualified specialist
workshop.
R clean artificial leather covers with a cloth
moistened with a solution containing 1%
detergent (e.g. dish washing liquid).
R clean cloth covers with a microfiber cloth
moistened with a solution containing 1%
detergent (e.g. dish washing liquid). Rub
carefully and always wipe entire seat
sections to avoid leaving visible lines. Care
505
Maintenance and care Z
Page 511 of 572
Tire-change tool kit
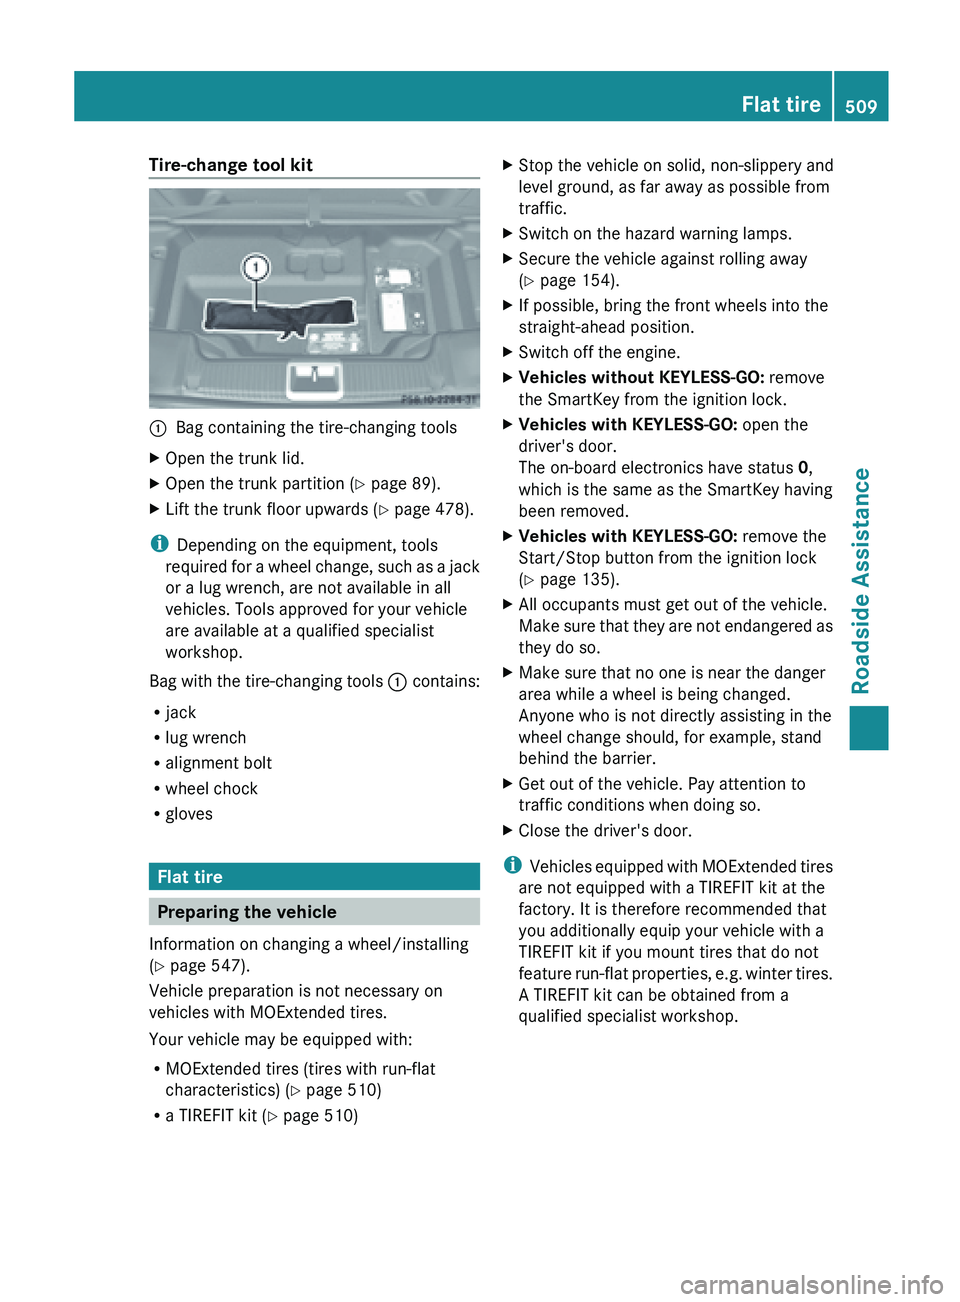
:
Bag containing the tire-changing tools
X Open the trunk lid.
X Open the trunk partition ( Y page 89).
X Lift the trunk floor upwards (Y page 478).
i Depending on the equipment, tools
required for
a wheel change, such as a jack
or a lug wrench, are not available in all
vehicles. Tools approved for your vehicle
are available at a qualified specialist
workshop.
Bag with the tire-changing tools : contains:
R jack
R lug wrench
R alignment bolt
R wheel chock
R gloves Flat tire
Preparing the vehicle
Information on changing a wheel/installing
(Y page 547).
Vehicle preparation is not necessary on
vehicles with MOExtended tires.
Your vehicle may be equipped with:
R MOExtended tires (tires with run-flat
characteristics) (Y page 510)
R a TIREFIT kit (Y page 510) X
Stop the vehicle on solid, non-slippery and
level ground, as far away as possible from
traffic.
X Switch on the hazard warning lamps.
X Secure the vehicle against rolling away
(Y page 154).
X If possible, bring the front wheels into the
straight-ahead position.
X Switch off the engine.
X Vehicles without KEYLESS-GO: remove
the SmartKey from the ignition lock.
X Vehicles with KEYLESS-GO: open the
driver's door.
The on-board electronics have status 0,
which is the same as the SmartKey having
been removed.
X Vehicles with KEYLESS-GO: remove the
Start/Stop button from the ignition lock
(Y page 135).
X All occupants must get out of the vehicle.
Make sure
that they are not endangered as
they do so.
X Make sure that no one is near the danger
area while a wheel is being changed.
Anyone who is not directly assisting in the
wheel change should, for example, stand
behind the barrier.
X Get out of the vehicle. Pay attention to
traffic conditions when doing so.
X Close the driver's door.
i Vehicles equipped
with MOExtended tires
are not equipped with a TIREFIT kit at the
factory. It is therefore recommended that
you additionally equip your vehicle with a
TIREFIT kit if you mount tires that do not
feature run-flat properties, e.g. winter tires.
A TIREFIT kit can be obtained from a
qualified specialist workshop. Flat tire
509
Roadside Assistance