2013 MERCEDES-BENZ S-Class stop start
[x] Cancel search: stop startPage 79 of 542

the brake syste
mchecked at a qualified
specialist workshop.
Observe information regarding indicator and
warning lamps (Y page 428) as well as
display messages (Y page 395).
EBD monitors and controls the brake
pressure on the rear wheels to improve
driving stability while braking. ADAPTIVE BRAKE
ADAPTIVE BRAKE enhances braking safety
and offers increased braking comfort. In
addition to the braking function, ADAPTIVE
BRAKE also has the HOLD function
(Y page 346) and hill start assist
(Y page 310). PRE-SAFE
®
Brake
i Observe the "Important safety notes"
section (Y page 73).
PRE-SAFE ®
Brake is only available in vehicles
with DISTRONIC PLUS.
PRE-SAFE ®
Brake can help you to minimize
the risk of a collision with a vehicle ahead or
reduce the effects of such a collision. If PRE-
SAFE ®
Brake has detected a risk of collision,
you will be warned visually and acoustically
as well as by automatic braking. PRE-SAFE ®
Brake cannot prevent a collision without your
intervention.
Above a speed of around 4mph (7 km/h), this
function warns you if you are very quickly
approaching a vehicle in front. An
intermitten twarning tone will then sound and
the 000D distance warning lamp will light up
in the instrument cluster.
X Brake immediately in order to increase the
distance from the vehicle in front.
or
X Take evasive action provide ditis safe to do
so. If the driver and front passenger have their
seat belt fastened, PRE-SAFE
®
Brake can also
brake the vehicle automatically at speeds
from approximately 4 mph (7 km/h) to
approximately 124 mph (200 km/h).
Due to the nature of the system, particularly
complicated driving conditions may cause
unnecessary warnings or the unnecessary
intervention of PRE-SAFE ®
Brake.
You can prevent the intervention of the PRE-
SAFE ®
Brake at any time by:
R depressing the accelerator pedal further
R activating kickdown
R releasing the brake pedal.
The braking action of PRE-SAFE ®
Brake is
ended automatically if:
R you maneuver to avoid the obstacle.
R there is no longer any danger of a rear-end
collision.
R there is no longer an obstacle detected in
front of your vehicle.
With the help of the radar sensor system,
PRE-SAFE ®
Brake can detect obstacles that
are in front of your vehicle for an extended
period of time.
At speeds of up to 40 mph (70 km/h), PRE-
SAFE ®
Brake can also detect stationary
obstacles, for example, stopped or parked
vehicles.
If you approach an obstacle and PRE-SAFE ®
Brake detects a risk of collision, the system
will initially alert you both visually and
acoustically.Ify ou do not brake or take
evasive action, the system will warn you by
automatically braking the vehicle gently. If
there is an increased risk of collision,
preventive passenger protection measures
(PRE-SAFE ®
) are activated (Y page 59). If, at
speeds over 20 mph (30 km/h), a risk of
collision remains and you do not brake, take
evasive action or significantly accelerate,
automatic braking may be performed up to
the level of emergency braking. Automatic
emergency braking is not performed until Driving safety systems
77Safety Z
Page 81 of 542

2. this device must accep
tany interference
received, including interference tha tmay
cause undesired operatio nofthe device.
Removal, tampering, or altering of the
device will void any warranties, and is not
permitted. Do not tamper with, alter, or use
the device in any non-approved way.
Any unauthorized modification to this
device could void the user's authority to
operate the equipment. Theft deterrent locking system
Immobilizer
The immobilizer prevents your vehicle from
being started without the correct SmartKey.
When leaving the vehicle, always take the
SmartKey with you and lock the vehicle. The
engine can be started by anyone with a valid
SmartKey that is left inside the vehicle.
X To activate with the SmartKey: remove
the SmartKey from the ignition lock.
X To activate with KEYLESS-GO: switch the
ignition off and open the driver's door.
X To deactivate: switch on the ignition.
i The immobilizer is always deactivated
when you start the engine. ATA (anti-theft alarm system)
Av isual and audible alarm is triggered if the
alarm system is armed and you open:
R a door
R the vehicle with the mechanical key
R the trunk lid
R the hood
The alarm is not switched off, even if you
close the open door that has triggered it, for
example. i
If the alarm stays on for more than
30 seconds, the mbrace (USA only) or TELE
AI D( Canada only) emergency call system
initiates a call to the Custome rAssistance
Center automatically. The emergency call
system initiates the call provided that:
R you have subscribed to the mbrace/
TELE AID service.
R the mbrace/TELE AID service has been
activated properly.
R the required mobile phone, power supply
and GPS are available. X
To arm: lock the vehicle with the SmartKey
or KEYLESS-GO.
Indicator lamp 0002flashes. The alarm
system is armed after approximately
30 seconds.
X To disarm: unlock the vehicle with the
SmartKey or KEYLESS-GO.
X To stop the alarm using the SmartKey:
insert the SmartKey into the ignition lock.
The alarm is switched off.
or
X Press the 000Bor0009 button on the
SmartKey.
The alarm is switched off. Theft deterrent locking system
79Safety Z
Page 82 of 542

X
To sto pthe alarm using KEYLESS-GO:
grasp the outside door handle. The
SmartKey must be outside the vehicle.
The alarm is switched off.
or
X Press the Start/Stop button on the
dashboard. The SmartKey must be inside
the vehicle.
The alarm is switched off. 80
Theft deterrent locking systemSafety
Page 86 of 542

X
To unloc kthe vehicle: pull the door
handle.
X To loc kthe vehicle: touch sensor
surface 0002.
X Convenience closing feature: touch
recessed sensor surface 0003for an
extended period (Y page 97).
If you pull on the handl eofthe trunk lid, only
the trunk of the vehicle is unlocked.
If the vehicle has been parked for a long time,
the sensor surfaces are deactivated
automatically .Inorder to unlock the door,
pull the door handle. In order to reactivate the
sensor surface, switch the ignitio nonagain. Changing the settings of the locking
system
You can change the setting of the locking
system in such a way that only the driver's
door and the fuel filler flap are unlocked. This
is useful if you frequently travel on your own.
X To change the setting: press and hold
down the 000Band0009 buttons
simultaneously for approximately
six seconds until the battery check lamp
flashes twice (Y page 85).
i If the setting of the locking system is
changed within the signal range of the
vehicle, pressing the 0009or000B button
locks or unlocks the vehicle.
The SmartKey now functions as follows:
X To unlock the driver's door: press the
000B button once.
X To unlock centrally: press the000B
button twice.
X To lock centrally: press the0009button. The KEYLESS-GO function is changed as
follows:
X
To unlock the driver's door :pull the door
handle on the driver's door.
X To unlock centrally: pull the door handle
on the front-passenger door or on the rear
doors.
X To lock centrally: touch the outer sensor
surface on one of the door handles. Restoring the factory settings
X Press the 000Band0009 buttons
simultaneously for approximately
six seconds until the battery chec klamp
flashes twice. Mechanical key
General notes If you use the mechanical key to unlock and
open the driver's door or the trunk lid, the
anti-thef
talarm system will be triggered
(Y page 79).
There are several ways to tur noff the alarm:
X To turn the alarm off with the
SmartKey: press the000Bor0009 button
on the SmartKey.
or
X Insert the SmartKey into the ignition lock.
or
X To deactivate the alarm with KEYLESS-
GO: press the Start/Stop button in the
ignition lock. The SmartKey must be in the
vehicle.
or
X Lock or unlock the vehicle using KEYLESS-
GO. The SmartKey must be outside the
vehicle. 84
SmartKeyOpening/closing
Page 95 of 542

Opening/closing automatically from
outside
Important safety notes G
WARNING
Make sure the trun klid is closed when the
engine is running and while driving. Among
other dangers, deadly carbo nmonoxide (CO)
gases may enter the vehicle interior resulting
in unconsciousness and death.
! The trunk lid swings upwards when
opened. Therefore, make sure that there is
sufficient clearance above the trunk lid.
To open the trunk lid completely, a minimum
clearance of 5.90 ft (1.80 m) above the
ground is necessary.
Opening You can open the trunk lid using the
SmartKey.
X
Press and hold the 0004button on the
SmartKey until the trunk lid opens.
Closing G
WARNING
Monitor the closing procedure carefully to
make sure no one is in danger of being
injured. To prevent possible personal injury,
always keep hands and fingers away from the
trunk opening when closing the trunk lid. Be
especially careful when small children are
around. To stop the closing procedure, do one
of the following:
R Press button 0004on the SmartKey.
R Press the remote trunk opening/closing
switch (on the driver's door).
R Press the trunk closing switch.
R Press the KEYLESS-GO locking/closing
switch.
R Pull the trunk lid handle. Even with the SmartKey removed from the
starter switch or the SmartKey with KEYLESS-
GO removed from the vehicle, the remote
trunk opening/closing switch can be
operated. Therefore, do not leave children
unattended in the vehicle, or with access to
an unlocked vehicle.
Achild's unsupervised
access to a vehicle could result in an accident
and/or serious personal injury.
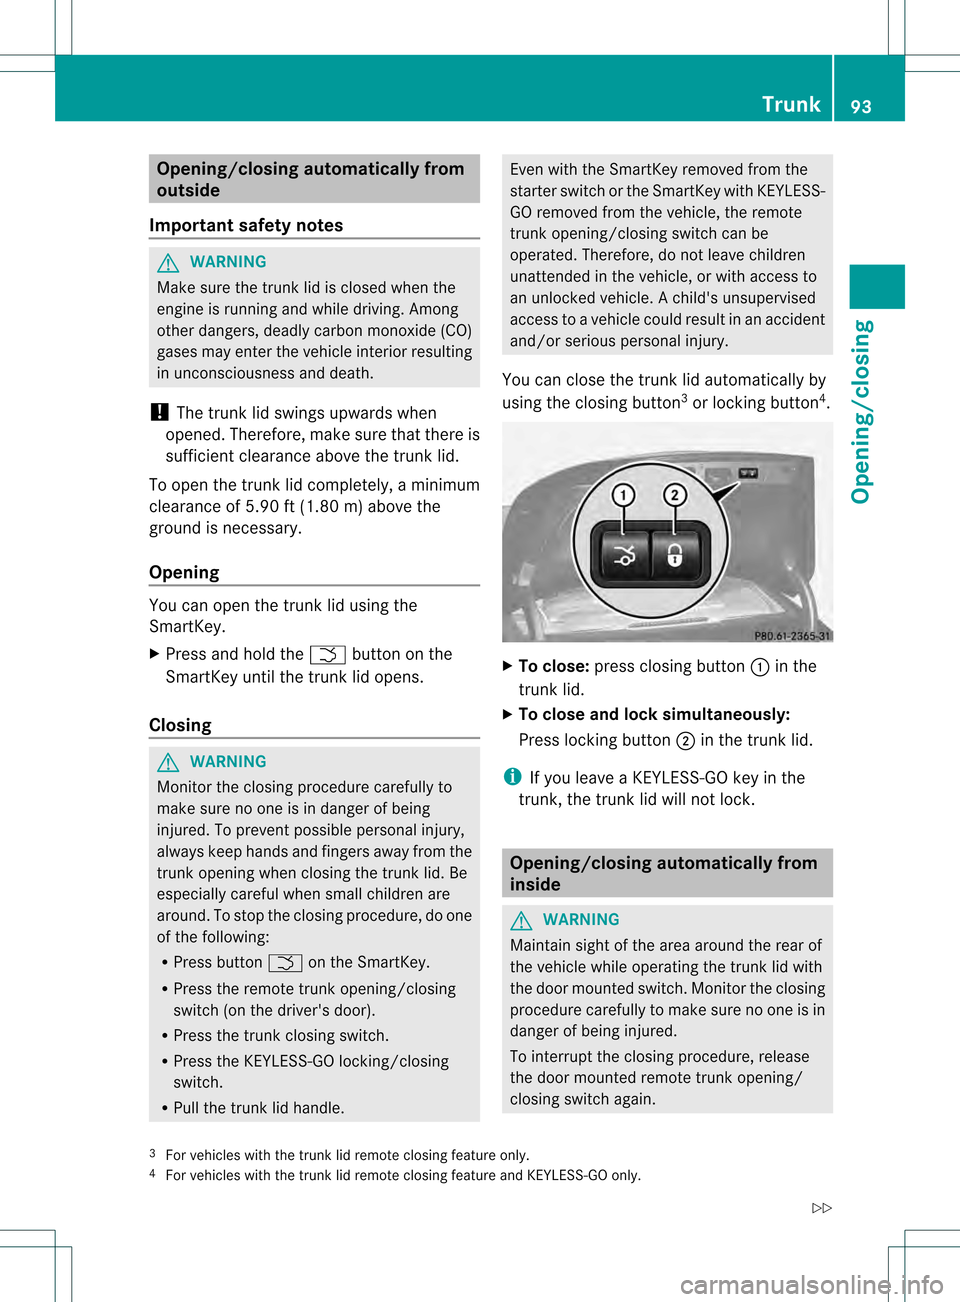
You can close the trunk lid automatically by
using the closing button 3
or locking button 4
. X
To close: press closing button 0002in the
trunk lid.
X To close and lock simultaneously:
Press locking button 0003in the trunk lid.
i If you leave a KEYLESS-GO key in the
trunk, the trunk lid will not lock. Opening/closing automatically from
inside
G
WARNING
Maintain sight of the area around the rear of
the vehicle while operating the trunk lid with
the door mounted switch. Monitor the closing
procedure carefully to make sure no one is in
danger of being injured.
To interrupt the closing procedure, release
the door mounted remote trunk opening/
closing switch again.
3 For vehicles with the trunk lid remote closing feature only.
4 For vehicles with the trunk lid remote closing feature and KEYLESS-GO only. Trunk
93Opening/closing
Z
Page 96 of 542

Even with the SmartKey removed from the
starter switch or the SmartKe
ywith KEYLESS-
GO removed from the vehicle, the remote
trunk opening/closing switch can be
operated. Therefore, do not leave children
unattended in the vehicle, or with access to
an unlocked vehicle. Achild's unsupervised
access to a vehicle could result in an accident
and/or serious personal injury. G
WARNING
Make sure the trunk lid is closed when the
engine is running and while driving. Among
other dangers, deadly carbon monoxide (CO)
gases may enter the vehicle interior resulting
in unconsciousness and death.
You can open and close the trunk lid from the
driver's seat when the vehicle is stationary
and unlocked. X
To open: press remote operating switch for
trunk lid 0002until the trunk lid opens.
X To close: press remote operating switch
for trunk lid 0002until the trunk lid is closed. Locking the trunk separately
You can lock the trunk separately.Ify ou then
unlock the vehicle centrally, the trunk
remains locked and cannot be opened.
X Close the trunk lid.
X Take the mechanical key out of the
SmartKey (Y page 84). X
Insert the mechanical key into the trunk lid
lock as far as the stop.
X Turn the mechanical key clockwise from
position 0005to position 0006.
X Remove the mechanical key.
X Insert the mechanical key into the
SmartKey. Unlocking the trunk (mechanical key)
! The trunk lid swings upwards when
opened. Therefore, make sure that there is
sufficient clearance above the trunk lid.
If the trunk cannot be unlocked with the
SmartKey or KEYLESS-GO, use the
mechanical key.
If you use the mechanical key to unlock and
open the trunk lid, the anti-theft alarm system
will be triggered (Y page 79).
X Take the mechanical key out of the
SmartKey (Y page 84).
X Insert the mechanical key into the trunk lid
lock as far as the stop. 94
TrunkOpening/closing
Page 98 of 542

Opening and closing the side
windows
0002
Front left
0003 Front right
0026 Rear right
0025 Rear left
The switches for all side windows are located
on the driver's door. There is also a switch on
each door for the corresponding side window.
The switches on the driver's door take
precedence.
i The side windows cannot be operated
from the rear when the override feature for
the side windows is activated (Y page 71).
X Turn the SmartKey to position 1or 2in the
ignition lock.
X To open: press the corresponding switch.
X To close: pull the corresponding switch.
i If you press the switch beyond the point
of resistance, an automatic opening/
closing process is started in the
corresponding direction. You can stop
automatic operation by operating the
switch again.
i You can continue to operate the side
windows after you switch off the engine or
remove the SmartKey. This function is
available for up to five minutes or until the
driver's or front-passenger door is opened. Sunblinds on the rear side windows
X
To close fully: pull the corresponding
switch when the side window is closed.
X To open fully: press the corresponding
switch.
i You can use the switches on the rear
doors to close the rear roller sunblinds for
the opposite side. Convenience opening
You can ventilate the vehicle before you start
driving. To do this, the key is used to carry out
the following functions simultaneously:
R unlock the vehicle
R open the side windows
R open the roller sunblinds on the rear side
windows
R open the sliding sunroof or the panorama
roof with power tilt/sliding panel and the
roller sunblinds
R switch on the seat ventilation for the
driver's seat
i The convenience opening feature can
only be operated using the SmartKey. The
SmartKey must be close to the driver's
door handle.
X Point the tip of the SmartKey at the driver's
door handle.
X Press and hold the 000Bbutton until the
side windows and the sliding sunroof or the
panorama roof with power tilt/sliding
panel are in the desired position.
If one of the sunblinds is closed, the sunblind
will open first.
i The roller sunblinds of the panorama roof
with power tilt/sliding panel and the roller
sunblinds on the rear side windows are
opened at the same time.
X Press and hold the 000Bbutton again until
the side windows and the sliding sunroof or 96
Side windowsOpening/closing
Page 101 of 542

term "sliding sunroof" refers to both types of
sliding sunroof.
G
WARNING
When opening or closing the sliding sunroof,
make sure that there is no danger of anyone
being harmed by the opening/closing
procedure.
The sliding sunroo fis equipped with
automatic operation and the anti-entrapment
feature. If the movement of the sliding sunroof
is blocked during the closing procedure, the
sliding sunroof will stop and open slightly.
The sliding sunroof operates differently when
the sliding sunroof switch is pressed and held.
See the "Problems with the sliding sunroof"
section for more details.
The opening/closing procedure of the sliding
sunroof can be immediately halted by
releasing the sliding sunroof switch or, if the
sliding sunroof switch was moved past the
resistance point and released,b y moving the
sliding sunroo fswitch in any direction. G
WARNING
The sliding sunroof is made out of glass. In the
even tofana ccident, the glass may shatter.
This may result in an opening in the roof.
In a vehicle rollover, occupants not wearing
thei rseat belts or not wearing them properly
may be thrown out of the opening. Such an
opening also presents a potential for injury for
occupants wearing their seat belts properly,
as entire body parts or portions of them may
protrude from the passenger compartment.
! Only open the sliding sunroof if it is free
of snow and ice. Otherwise, malfunctions
may occur.
Do not allow anything to protrude from the
sliding sunroof .Otherwise, the seals could
be damaged.
! The weather can change abruptly. It could
start to rain or snow. Make sure that the
sliding sunroo fis closed when you leave the
vehicle. The vehicle electronics can be damaged if water enters the vehicle
interior.
i Resonance noises can occur in addition
to the usual airflow noises when the sliding
sunroof is open. They are caused by minor
pressure fluctuations in the vehicle interior.
Change the position of the sliding sunroof
or open a side window slightly to reduce or
eliminate these noises. Operating the sliding sunroof
Opening and closing i
You can continue to operate the sliding
sunroof after switching off the engine or
removing the SmartKey from the ignition
lock. This function remains active for five
minutes or until you open a front door. Overhead control panel
0002
To raise
0003 To open
0026 To close/lower
X Turn the SmartKey to position 1or 2in the
ignition lock.
X Press or pull the 0003switch in the
corresponding direction.
i If you press the 0003switch beyond the
point of resistance, an automatic opening/
closing process is started in the
corresponding direction. You can stop
automatic operation by operating the
switch again. Sliding sunroof
99Opening/closing Z