2013 MERCEDES-BENZ GLK-CLASS SUV engine
[x] Cancel search: enginePage 320 of 380
Jump-starting
For the jump-starting procedure, use
only the jump-starting connection point, consisting of a
positive terminal and an earth point, in the engine compartment. G
WARNING
Battery acid is caustic. There is a risk of injury.
Avoid contact with the skin, eyes or clothing. Do not inhale any battery gases. Do not lean over
the battery. Keep children away from batteries. Wash battery acid immediately with water and
seek medical attention. G
WARNING
During charging and jump-starting, explosive gases can escape from the battery. There is a risk
of an explosion.
Particularly avoid fire, open flames, creating sparks and smoking. Ensure there is sufficient
ventilation while charging and jump-starting. Do not lean over a battery. G
WARNING
During the charging process, a battery produces hydrogen gas. If a short circuit occurs or sparks
are created, the hydrogen gas can ignite. There is a risk of an explosion.
R Make sure that the positive terminal of a connected battery does not come into contact with
vehicle parts.
R Never place metal objects or tools on a battery.
R It is important that you
observe the described order of the battery terminals when connecting
and disconnecting a battery.
R When jump-starting, make sure that the battery poles with identical polarity are connected.
R It is particularly important to observe the described order when connecting and disconnecting
the jumper cables.
R Never connect or disconnect the battery terminals while the engine is running. G
WARNING
Non-combusted fuel can collect in the exhaust system and ignite. There is a risk of fire. Avoid
repeated and lengthy starting attempts.
! Vehicles with a gasoline engine: avoid repeated and lengthy starting attempts.
Otherwise, the catalytic converter could be damaged by non-combusted fuel.
Do not start the vehicle
using a rapid charging device. If your vehicle's battery is discharged,
the engine can be jump-started from another vehicle or from a second battery using jumper
cables. Observe the following points:
R The battery is not accessible in all vehicles. If the other vehicle's battery is not accessible,
jump-start the vehicle using a second battery or a jump-starting device.
R Vehicles with a gasoline engine: only jump-start the vehicle when the engine and exhaust
system are cold.
R Do not start the engine if the battery is frozen. Let the battery thaw first.
R Jump-starting may only be performed from batteries with a nominal voltage of 12 V.318
Jump-starting
Breakdown assistance
Page 321 of 380
R
Only use jumper cables which have a sufficient cross-section and insulated terminal clamps.
R If the battery is fully discharged, leave the battery that is being used to jump-start connected
for a few minutes before attempting to start. This charges the battery slightly.
R Make sure that the two vehicles do not touch.
Make sure that:
R the jumper cables are not damaged.
R bare parts of the terminal clamp do not come into contact with other metal parts while the
jumper cables are connected to the battery.
R the jumper cables cannot come into contact with parts such as the V-belt pulley or the fan.
These parts move when the engine is started and while it is running.
X Apply the parking brake firmly.
X Shift the automatic transmission to position P.
X Switch off all electrical consumers (e.g. radio, blower, etc.).
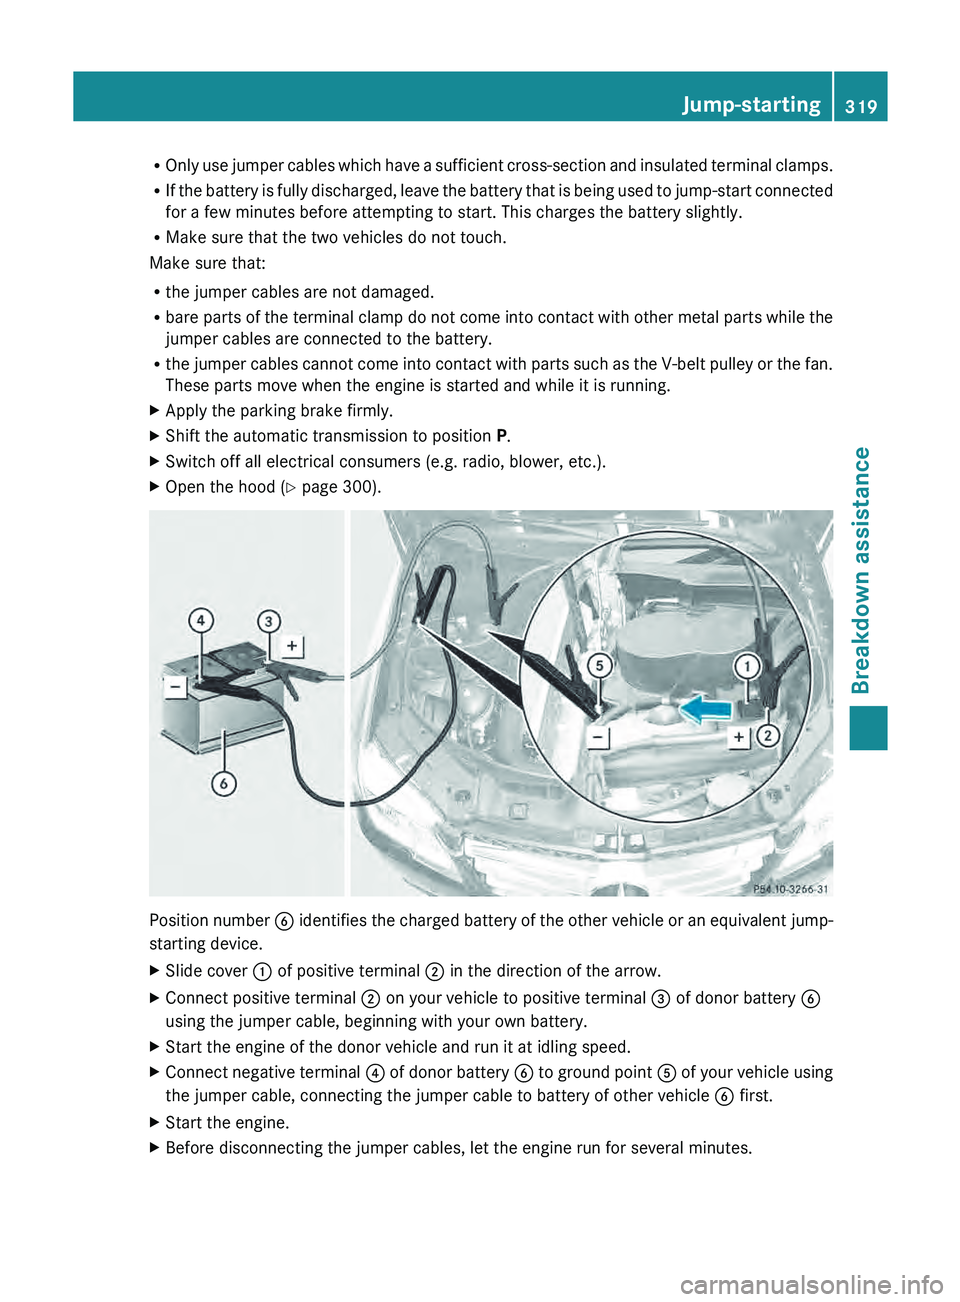
X Open the hood (Y page 300). Position number
0084 identifies the charged battery
of the other vehicle or an equivalent jump-
starting device.
X Slide cover 0043 of positive terminal 0044 in the direction of the arrow.
X Connect positive terminal 0044 on your vehicle to positive terminal 0087 of donor battery 0084
using the jumper cable, beginning with your own battery.
X Start the engine of the donor vehicle and run it at idling speed.
X Connect negative terminal 0085 of donor battery 0084
to ground point 0083 of your vehicle using
the jumper cable, connecting the jumper cable to battery of other vehicle 0084 first.
X Start the engine.
X Before disconnecting the jumper cables, let the engine run for several minutes. Jump-starting
319
Breakdown assistance Z
Page 325 of 380

Recovering a vehicle that has become
stuck
! Pull away smoothly, slowly, and in a
straight line when pulling out
a vehicle that
has become stuck. Excessive tractive
power could damage the vehicles.
If the drive wheels get trapped on loose or
muddy ground, recover the vehicle with the
utmost care, especially so if the vehicle is
laden.
Never attempt to recover a vehicle with a
trailer attached.
Pull out the vehicle backwards, if possible,
using the tracks it made when it became
stuck. Tow-starting (emergency engine
starting)
! Vehicles with automatic transmission
must not be started by tow-starting. This
could otherwise damage the transmission.
You can find information on "Jump-starting"
at (Y page 318). Fuses
Important safety notes
G
WARNING
If you manipulate or bridge a faulty fuse or if
you replace it with a fuse with a higher
amperage, the electric cables could be
overloaded. This could result in a fire. There
is a risk of an accident and injury.
Always replace faulty fuses with
the specified
new fuses having the correct amperage.
! Only use fuses that have been approved
for Mercedes-Benz vehicles and which
have the correct fuse rating for the system
concerned. Otherwise, components or
systems could be damaged.
The fuses in your vehicle serve to close down
faulty circuits. If a fuse blows, all the components on the circuit and their functions
stop operating.
Blown fuses must be replaced with fuses of
the same rating, which you can recognize by
the color and value.
The
fuse ratings are listed
in the fuse allocation chart.
If a newly inserted fuse also blows, have the
cause traced and rectified at a qualified
specialist workshop, e.g. an authorized
Mercedes-Benz Center. Before changing a fuse
X Secure the vehicle against rolling away
(Y page 160).
X Switch off all electrical consumers.
X Turn the SmartKey to position 0 in the
ignition lock and remove it (Y page 141).
or
X On vehicles with KEYLESS-GO, make sure
the ignition is switched off (Y page 141).
All indicator lamps in the instrument cluster
must be off.
The fuses are located in various fuse boxes:
R Fuse box on the driver's side of the
dashboard
R Fuse box in the engine
compartment on the
left-hand side of the vehicle, when viewed
in the direction of travel
R Fuse box in the stowage well under the
cargo compartment floor on the right-hand
side of the vehicle, when viewed in the
direction of travel
The fuse allocation chart is located in the
vehicle tool kit in the stowage compartment
under the cargo compartment floor
(Y page 312). Dashboard fuse box
! Do not use a pointed object such as a
screwdriver to open the cover in the
dashboard. You could damage the
dashboard or the cover. Fuses
323
Breakdown assistance Z
Page 326 of 380

!
Make sure that no moisture
can enter the
fuse box when the cover is open.
! When closing the cover, make sure that it
is lying correctly on the fuse box. Moisture
seeping in or dirt could otherwise impair
the operation of the fuses. X
To open: pull out cover 0043 slightly at the
bottom in the direction of arrow 0087.
X Pull cover 0043 outwards in the direction of
arrow 0044 and remove it.
X To close: clip in cover 0043 on the front of
the dashboard.
X Fold cover 0043 inwards until it engages. Fuse box in the engine compartment
G
WARNING
When the hood is open and the windshield
wipers are set in motion, you can be injured
by the wiper linkage. There is a risk of injury.
Always switch off the windshield wipers and
the ignition before opening the hood.
! Make sure that
no moisture
can enter the
fuse box when the cover is open.
! When closing the cover, make sure that it
is lying correctly on the fuse box. Moisture
seeping in or dirt could otherwise impair
the operation of the fuses.
X Make sure that the windshield wipers are
turned off.
X Open the hood. X
Use a dry cloth to remove any moisture
from the fuse box.
X To open: take lines 0044 from the guides.
X Open clamps 0043.
X Remove the fuse box cover forwards.
X To close: check whether the rubber seal is
lying correctly in the cover.
X Insert the cover at the rear of the fuse box
into the retainer.
X Fold down cover and close clamps 0043.
X Secure lines 0044 in the guides.
X Close the hood. Fuse box in the cargo compartment
! Make sure that no moisture
can enter the
fuse box when the cover is open.
! When closing the cover, make sure that it
is lying correctly on the fuse box. Moisture
seeping in or dirt could otherwise impair
the operation of the fuses.
X Open the tailgate.324
Fuses
Breakdown assistance
Page 355 of 380
Cleaning the wheels
G
WARNING
The water jet from a circular jet nozzle (dirt
blasters) can cause invisible exterior
damage
to the tires or chassis components.
Components damaged in this way may fail
unexpectedly. There is a risk of an accident.
Do not use power washers with circular jet
nozzles to clean the vehicle. Have damaged
tires or chassis components replaced
immediately. Mounting a wheel
Preparing the vehicle
X Stop the vehicle on solid, non-slippery and
level ground.
X Apply the parking brake.
X Bring the front wheels into the straight-
ahead position.
X Secure the vehicle against rolling away
(Y page 160).
X Switch off the engine.
X Vehicles without KEYLESS-GO: remove
the SmartKey from the ignition lock.
X Vehicles with KEYLESS-GO: open the
driver's door.
The on-board electronics have status 0,
which is the same as the SmartKey having
been removed.
X Vehicles with KEYLESS-GO: remove the
Start/Stop button from the ignition lock
(Y page 141).
X If included in the vehicle equipment,
remove the tire-change tool kit from the
vehicle.
X Secure the vehicle to prevent it from rolling
away. Securing the vehicle to prevent it
from rolling away
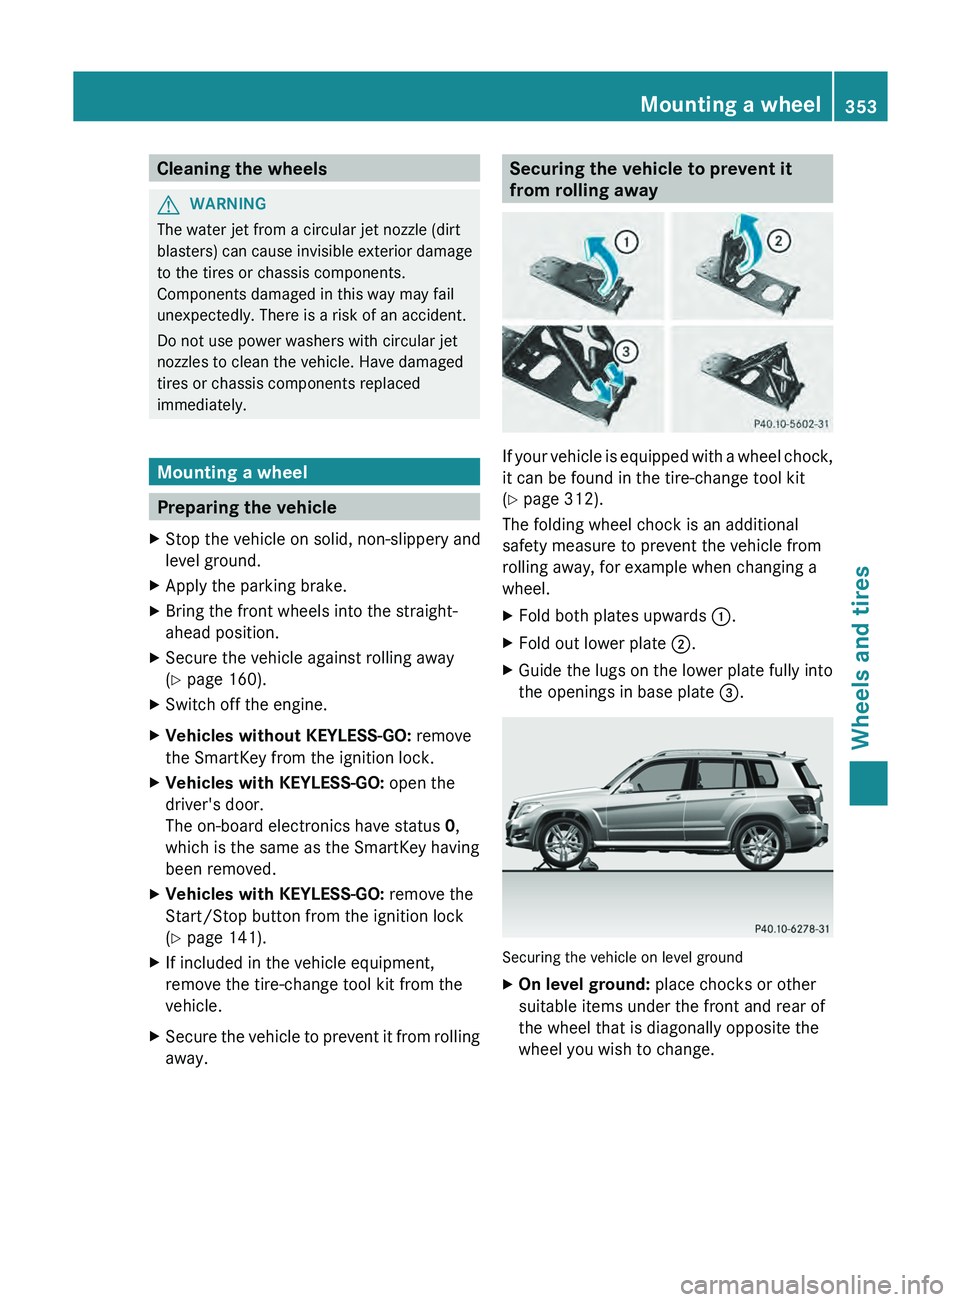
If your vehicle is equipped with a wheel chock,
it can be found in the tire-change tool kit
(Y page 312).
The folding wheel chock is an additional
safety measure to prevent the vehicle from
rolling away, for example when changing a
wheel.
X
Fold both plates upwards 0043.
X Fold out lower plate 0044.
X Guide the lugs on the lower plate fully into
the openings in base plate 0087. Securing the vehicle on level ground
X
On level ground: place chocks or other
suitable items under the front and rear of
the wheel that is diagonally opposite the
wheel you wish to change. Mounting a wheel
353
Wheels and tires Z
Page 356 of 380

Securing the vehicle on slight downhill gradients
X
On light downhill gradients: place
chocks or other suitable items in front of
the wheels of the front and rear axle. Raising the vehicle
G
WARNING
If you do not position the jack correctly at the
appropriate jacking point of the vehicle, the
jack could tip over with the vehicle raised.
There is a risk of injury.
Only position the jack at the appropriate
jacking point of the vehicle. The base of the
jack must be positioned vertically, directly
under the jacking point of the vehicle.
The following must be observed
when raising
the vehicle:
R to raise the vehicle, only use the vehicle-
specific jack that has been tested and
approved by Mercedes-Benz. If used
incorrectly, the jack could tip over with the
vehicle raised.
R the jack is designed only to raise and hold
the vehicle for a short time while a wheel
is being changed. It is not suited for
performing maintenance work under the
vehicle.
R avoid changing the wheel on uphill and
downhill slopes.
R before raising the vehicle, secure it from
rolling away by applying the parking brake
and inserting wheel chocks. Never disengage the parking brake while the
vehicle is raised.
R the jack must be placed on a firm, flat and
non-slip surface. On a loose surface, a
large, load-bearing underlay
must be
used.
On a slippery surface, a non-slip underlay
must be used, e.g. rubber mats.
R do not use wooden blocks or similar
objects as a jack underlay. Otherwise, the
jack will not be able to achieve its load-
bearing capacity due to the restricted
height.
R make sure that the distance between the
underside of the tires and the ground does
not exceed 1.2 inches (3 cm).
R never place your hands and feet under the
raised vehicle.
R never lie under the raised vehicle.
R never start the engine when the vehicle is
raised.
R never open or close a door or the tailgate
when the vehicle is raised.
R make sure that no persons are present in
the vehicle when the vehicle is raised.
! The jack is designed exclusively for
jacking up the vehicle at the jacking points.
Otherwise, your vehicle could be damaged. 354
Mounting a wheel
Wheels and tires
Page 367 of 380
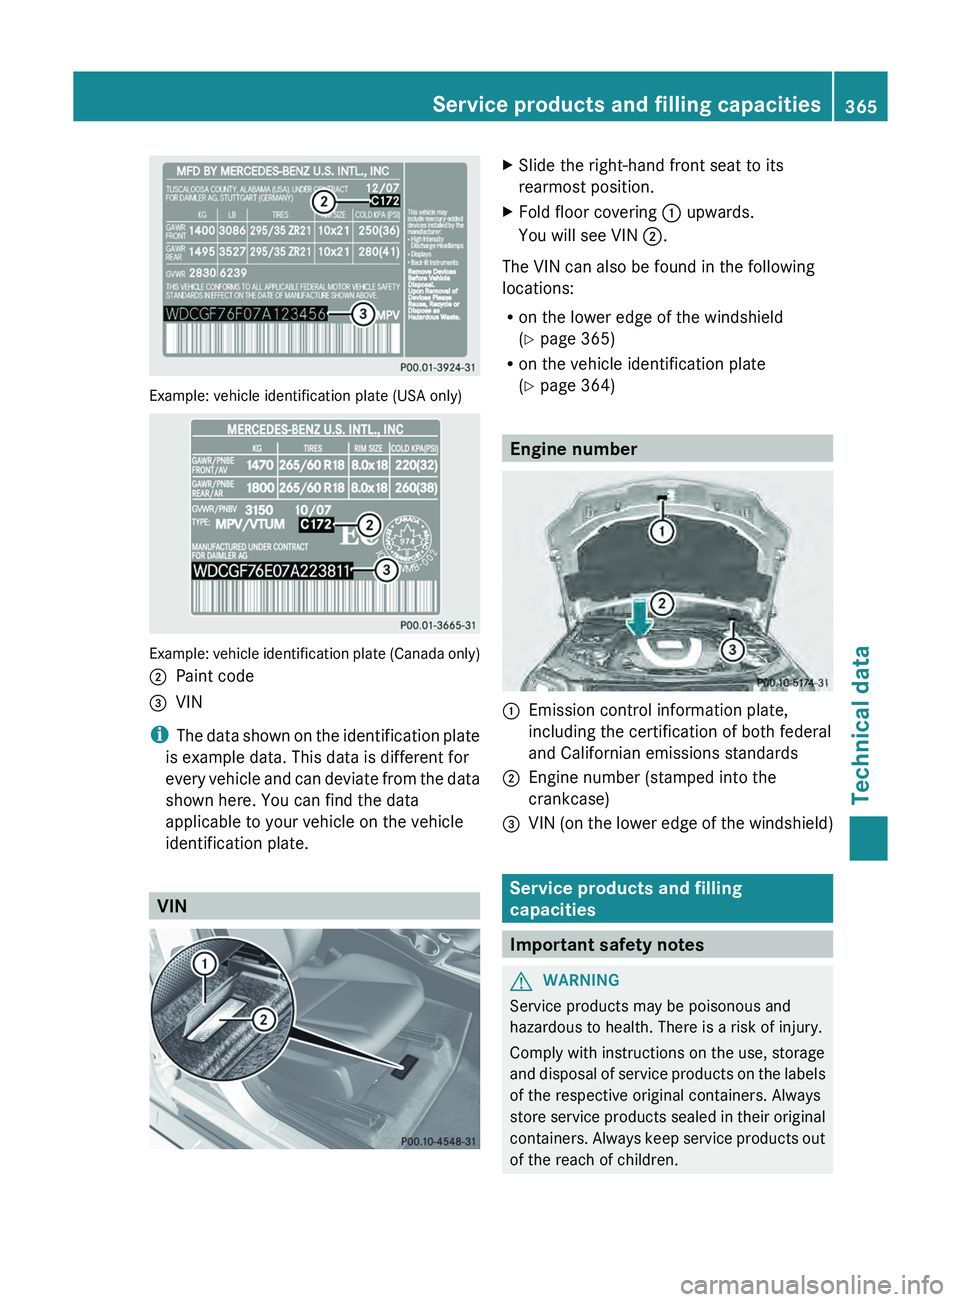
Example: vehicle identification plate (USA only)
Example: vehicle identification plate (Canada only)
0044
Paint code
0087 VIN
i The data shown on
the
identification plate
is example data. This data is different for
every vehicle and can deviate from the data
shown here. You can find the data
applicable to your vehicle on the vehicle
identification plate. VIN X
Slide the right-hand front seat to its
rearmost position.
X Fold floor covering 0043 upwards.
You will see VIN 0044.
The VIN can also be found in the following
locations:
R on the lower edge of the windshield
(Y page 365)
R on the vehicle identification plate
(Y page 364) Engine number
0043
Emission control information plate,
including the certification of both federal
and Californian emissions standards
0044 Engine number (stamped into the
crankcase)
0087 VIN (on the lower edge of the windshield) Service products and filling
capacities
Important safety notes
G
WARNING
Service products may be poisonous and
hazardous to health. There is a risk of injury.
Comply with instructions on the use, storage
and disposal of service products
on the labels
of the respective original containers. Always
store service products sealed in their original
containers. Always keep service products out
of the reach of children. Service products and filling capacities
365
Technical data Z
Page 368 of 380
H
Environmental note
Dispose of service products in an
environmentally responsible manner.
Service products include the following:
R Fuels (e.g. gasoline, diesel)
R Exhaust gas aftertreatment additives, e.g.
DEF
R Lubricants (e.g. engine oil, transmission
oil)
R Coolant
R Brake fluid
R Windshield washer fluid
R Climate control system refrigerant
Comply with all valid regulations with respect
to handling, storing, and disposing of service
fluids.
Components and service products must be
matched. You should therefore only use
products that have been tested and approved
by Mercedes-Benz.
Information about tested and approved
products can be obtained from an authorized
Mercedes-Benz Center or on the Internet at
http://bevo.mercedes-benz.com.
You can recognize service products approved
by Mercedes-Benz by the following
inscription on the containers:
R MB-Freigabe (e.g. MB-Freigabe 229.51)
R MB Approval (e.g. MB Approval 229.51)
Other designations or recommendations
indicate a level of quality or a specification in
accordance with an MB Sheet number (e.g.
MB 229.5). They have not necessarily been
approved by Mercedes-Benz. Fuel
Important safety notes G
WARNING
Fuel is highly flammable. If you handle fuel
incorrectly, there is a risk of fire and
explosion. You must avoid fire, open flames, creating
sparks and smoking. Switch off the engine
and, if applicable, the
auxiliary
heating before
refueling. G
WARNING
Fuel is poisonous and hazardous to health.
There is a risk of injury.
You must make sure that
fuel does not come
into contact with your skin, eyes or clothing
and that it is not swallowed. Do not inhale fuel
vapors. Keep fuel away from children.
If you or others come into contact with fuel,
observe the following:
R Wash away fuel from skin immediately
using soap and water.
R If fuel comes into contact with your eyes,
immediately rinse them thoroughly with
clean water. Seek medical assistance
without delay.
R If fuel is swallowed, seek medical
assistance without delay. Do not induce
vomiting.
R Immediately change out of clothing which
has come into contact with fuel.
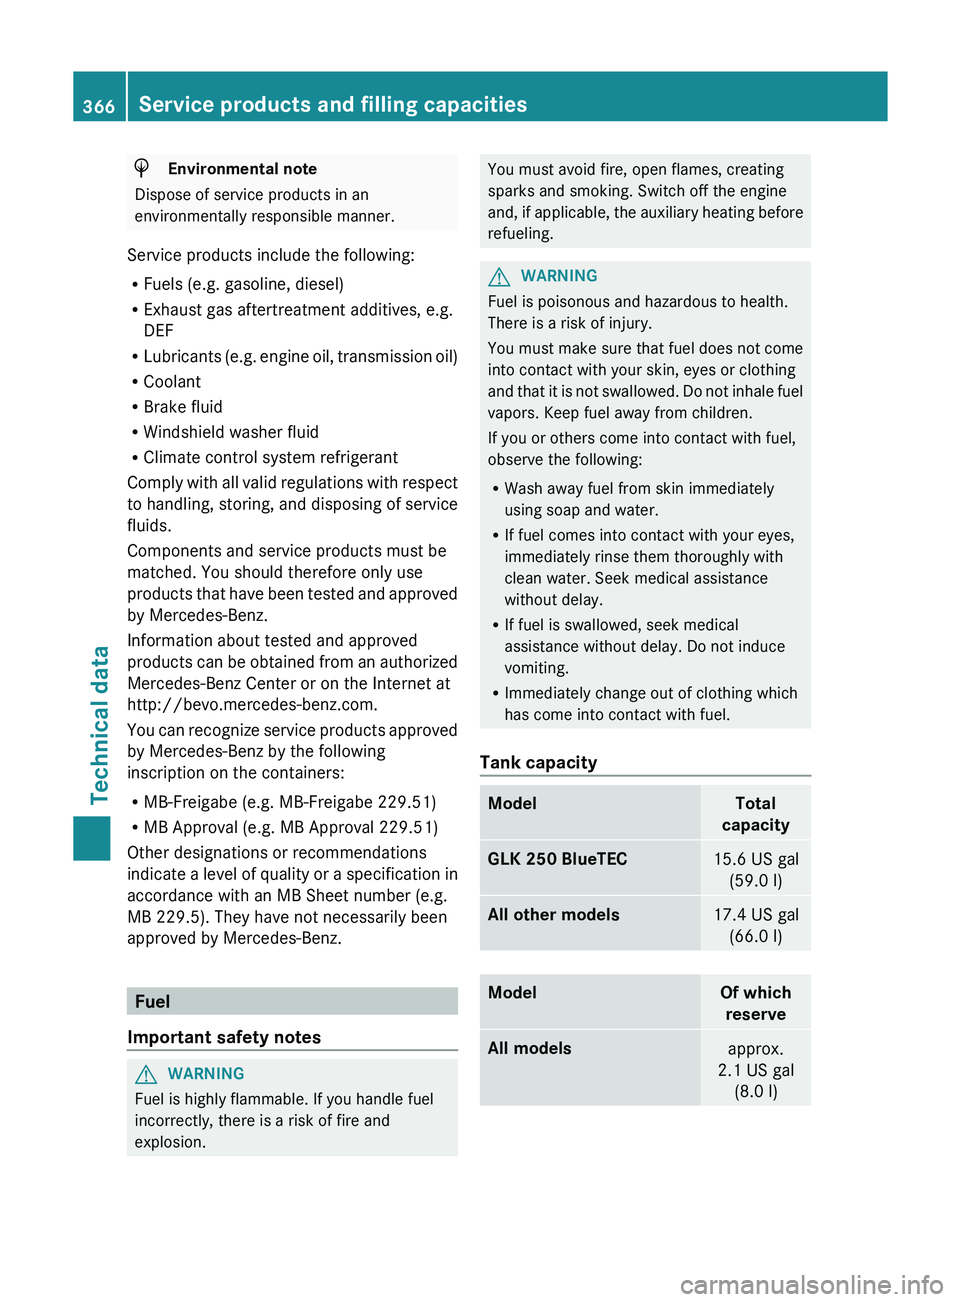
Tank capacity Model Total
capacity GLK 250 BlueTEC
15.6 US gal
(59.0 l) All other models
17.4 US gal
(66.0 l) Model Of which
reserve All models
approx.
2.1 US gal (8.0 l)366
Service products and filling capacities
Technical data