2013 MERCEDES-BENZ GLK-CLASS SUV ECO mode
[x] Cancel search: ECO modePage 7 of 380

ATTENTION ASSIST
Activating/deactivating ................. 225
Display message ............................ 247
Function/notes
............................. 197
Audio menu (on-board
computer) .......................................... 222
Audio system see separate operating instructions
Authorized Centers
see Qualified specialist workshop
Authorized Mercedes-Benz Center
see Qualified specialist workshop
Authorized workshops
see Qualified specialist workshop
AUTO lights
Display message ............................ 242
see Lights
Automatic engine start (ECO start/
stop function) .................................... 145
Automatic engine switch-off (ECO
start/stop function) .......................... 145
Automatic headlamp mode ..............111
Automatic transmission Automatic drive program ............... 152
Changing gear ............................... 151
DIRECT SELECT lever .....................148
Display message ............................ 254
Driving tips .................................... 151
Emergency running mode ..............154
Engaging drive position .................. 150
Engaging neutral ............................ 149
Engaging park position
automatically ................................. 149
Engaging reverse gear ................... 149
Engaging the park position ............ 149
Kickdown ....................................... 151
Overview ........................................ 148
Problem (malfunction) ...................154
Program selector button ................151
Pulling away ................................... 143
Shift ranges ................................... 152
Starting the engine ........................ 143
Steering wheel paddle shifters ...... 152
Trailer towing ................................. 151
Transmission position display ........ 149
Transmission positions .................. 150
Automatic transmission
emergency mode ............................... 154 B
Backup lamp Changing bulbs .............................. 120
Display message ............................ 241
Bag hook ............................................ 274
Ball coupling Installing
........................................ 210
Removing ....................................... 213
Storing ........................................... 213
BAS (Brake Assist System) ................. 65
BAS PLUS (Brake Assist System
PLUS) .................................................... 65
Battery (SmartKey) Checking .......................................... 77
Important safety notes .................... 76
Replacing ......................................... 77
Battery (vehicle)
Charging ........................................ 316
Display message ............................ 245
Important safety notes .................. 314
Jump starting ................................. 318
Blinds
see Roller sunblind
Blind Spot Assist
Activating/deactivating ................. 225
Display message ............................ 249
Notes/function .............................. 198
Trailer towing ................................. 200
see Active Blind Spot Assist
BlueTEC
Adding DEF .................................... 158
BlueTEC (DEF) .................................... 369
Brake Assist see BAS (Brake Assist System)
Brake fluid
Display message ............................ 234
Notes ............................................. 370
Brake lamps
Display message ............................ 240
Brakes
ABS .................................................. 64
BAS .................................................. 65
BAS PLUS ........................................ 65
Brake fluid (notes) .........................370
Display message ............................ 232
Driving tips .................................... 164
Important safety notes .................. 164 Index
5
Page 19 of 380

Speedometer
Digital ............................................ 220
In the Instrument cluster ................. 31
Segments ...................................... 217
Selecting the unit of
measurement ................................ 226
see Instrument cluster
SPORT handling mode
Activating/deactivating (AMG
vehicles) .......................................... 68
SRS
see SRS (Supplemental Restraint
System)
SRS (Supplemental Restraint
System)
Display message ............................ 235
Introduction ..................................... 41
Warning lamp ................................. 263
Warning lamp (function) ................... 41
Standing lamps
Changing bulbs .............................. 118
Display message ............................ 241
Switching on/off ........................... 112
Start/stop function
see ECO start/stop function
Starting (engine) ................................ 142
Steering (display message) ..............255
Steering wheel Adjusting (electrically) ...................102
Adjusting (manually) ...................... 102
Button overview ............................... 33
Buttons (on-board computer) ......... 217
Cleaning ......................................... 308
Important safety notes .................. 102
Paddle shifters ............................... 152
Storing settings (memory
function) ........................................ 106
Steering wheel paddle shifters ........152
Stowage areas ................................... 271
Stowage compartments Armrest (under) ............................. 271
Cup holders ................................... 278
Glove box ....................................... 271
Important safety information ......... 271
Rear ............................................... 272
Stowage net ................................... 272
Stowage net ....................................... 272Summer opening
see Convenience opening feature
Summer tires ..................................... 330
Sun visor ............................................ 278
Surround lighting (on-board
computer) .......................................... 227
SUV (Sport Utility Vehicle) .......................25
Switching air-recirculation mode
on/off ................................................. 136
Switching off the alarm (ATA) ............71 T
Tachometer ........................................ 216
Tailgate Display message ............................ 254
Emergency unlocking .......................85
Important safety notes .................... 82
Limiting the opening angle ...............85
Opening/closing (automatically
from inside) ......................................
84
Opening/closing (automatically
from outside) ................................... 83
Opening/closing (from outside) ....... 82
Opening dimensions ...................... 373
Tail lamps
Display message ............................ 240
Tank content
Fuel gauge ....................................... 31
Technical data
Capacities ...................................... 365
Emergency spare wheel ................. 362
Information .................................... 364
Tires/wheels ................................. 357
Trailer loads ................................... 374
Vehicle data ................................... 373
TELEAID
Call priority .................................... 287
Downloading destinations
(COMAND) ..................................... 287
Downloading routes .......................290
Emergency call .............................. 284
Geo fencing ................................... 290
Important safety notes .................. 283
Locating a stolen vehicle ............... 289
MB info call button ........................ 286
Remote vehicle locking .................. 288 Index
17
Page 42 of 380

Useful information
i This Operator's Manual describes all
models and all standard and optional
equipment of your vehicle available at the
time of publication of the Operator's
Manual. Country-specific differences are
possible. Please note that your
vehicle may
not be equipped with all features
described. This also applies to safety-
related systems and functions.
i Read the information on qualified
specialist workshops: ( Y page 27).Panic alarm
X
To activate: press 0033 button 0043 for
approximately one second.
An alarm sounds and the exterior lighting
flashes.
X To deactivate: press 0033 button 0043
again.
or
X Insert the SmartKey into the ignition lock.
or
X Press the KEYLESS-GO Start/Stop button.
The KEYLESS-GO key must be in the
vehicle. Occupant safety
Overview of occupant safety
In this section, you will learn the most
important facts about the restraint system
components of the vehicle.
The restraint system consists of:
R seat belts
R child restraint systems
R LATCH-type (ISOFIX) child seat anchors
Additional protection is provided by:
R SRS (Supplemental Restraint System)
R NECK-PRO head restraints/NECK-PRO
luxury head restraints
R air bag system components with:
-PASSENGER AIR BAG OFF indicator
lamp
- front-passenger seat with Occupant
Classification System (OCS)
The different air bag systems work
independently of each other. The protective
functions of the system work in conjunction
with each other. Not all air bags are always
deployed in an accident. G
WARNING
Modifications to or work improperly
conducted on restraint system components
or their wiring, as well as tampering with
interconnected electronic systems, can lead
to the restraint systems no
longer functioning
as intended.
Air bags or Emergency Tensioning Devices
(ETDs), for example, could deploy
inadvertently or fail to deploy in accidents
although the deceleration threshold for air
bag deployment is exceeded. Therefore,
never modify the restraint systems. Do not
tamper with electronic components or their
software.
i For information on infants and children
traveling with you in the vehicle restraint
systems for infants and children, see
"Children in the vehicle" ( Y page 58).40
Occupant safety
Safety
Page 105 of 380

thereby unintentionally activate the EASY-
ENTRY/EXIT feature and become trapped.
G
WARNING
Let the system complete the adjustment
procedure before setting the vehicle in
motion. All steering wheel adjustment must
be completed before setting the vehicle in
motion. Driving off with the steering wheel
still adjusting could cause the driver to lose
control of the vehicle.
The EASY-ENTRY/EXIT feature makes getting
in and out of your vehicle easier.
You can activate and deactivate the EASY-
ENTRY/EXIT feature in the on-board
computer (
Y page 229).
Position of the steering wheel when the
EASY-ENTRY/EXIT feature is active The steering wheel swings upwards when
you:
R
remove the SmartKey from the
ignition lock
R open the driver's door and KEYLESS-GO is
in position 1
R open the driver's door and the SmartKey is
in position 0 or 1 in the ignition lock
i The steering wheel only moves upwards if
it has not already reached the upper end
stop.
Position of the steering wheel for
driving The steering wheel is moved to the last
selected position when:
R
the driver's door is closed.
R you insert the SmartKey into the ignition
lock.
or
R you press the Start/Stop button once on
vehicles with KEYLESS-GO.
When you close the driver's door with the
ignition switched on, the steering wheel is also automatically moved to the previously
set position.
The last position of the steering wheel is
stored when you switch off the ignition or
when you store the setting with the memory
function (
Y page 106).
Crash-responsive EASY-EXIT feature If the crash-responsive EASY-EXIT feature is
triggered in an accident,
the
steering column
will move upwards when the driver's door is
opened. This occurs irrespective of the
position of the SmartKey in the ignition lock.
This makes it easier to exit the vehicle and
rescue the occupants.
The crash-responsive EASY-EXIT feature is
only operational if the EASY-EXIT/ENTRY
feature is activated in the on-board computer. Mirrors
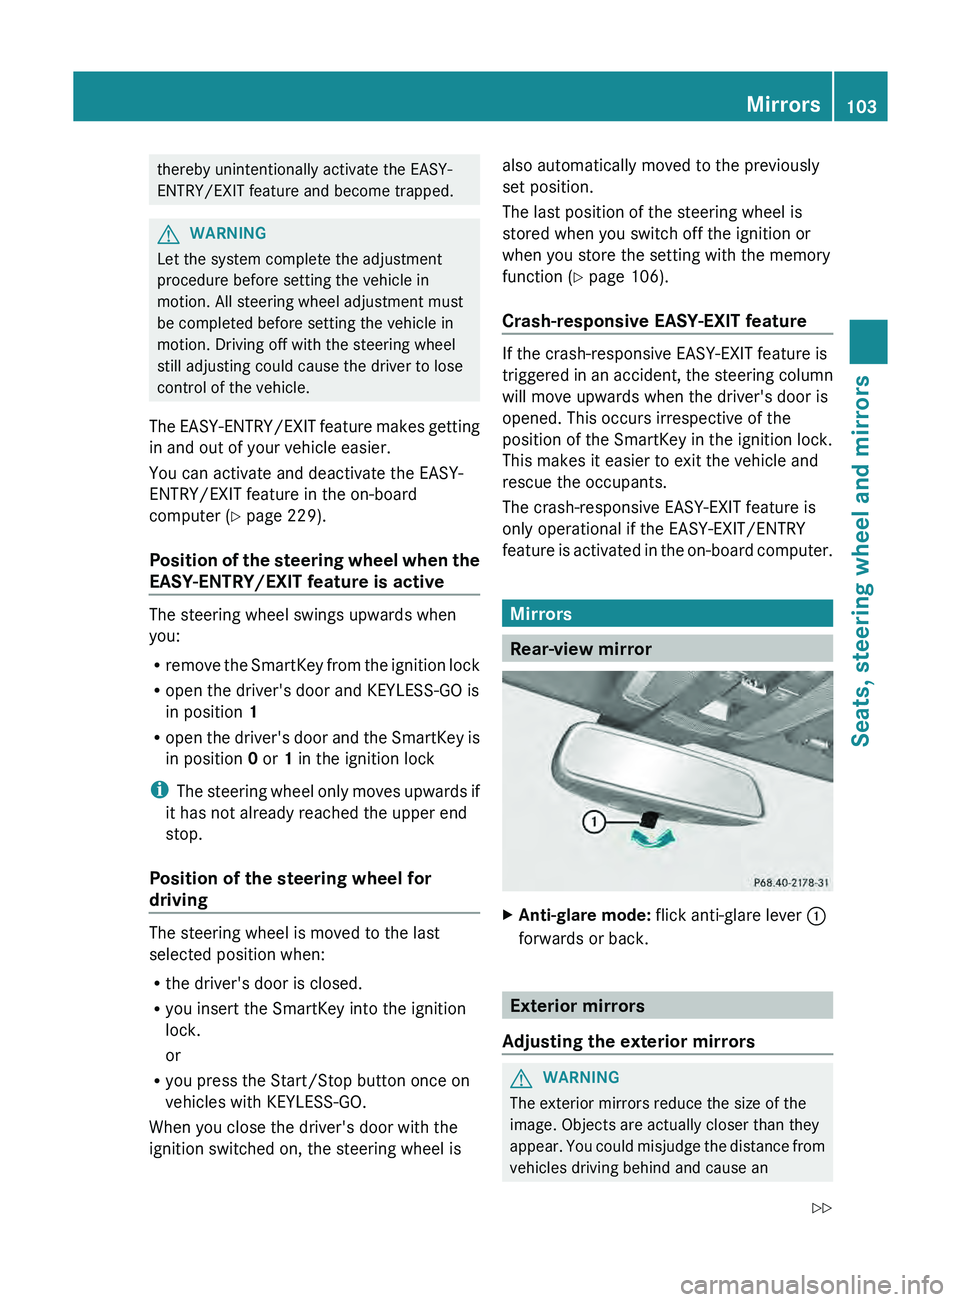
Rear-view mirror
X
Anti-glare mode: flick anti-glare lever 0043
forwards or back. Exterior mirrors
Adjusting the exterior mirrors G
WARNING
The exterior mirrors reduce the size of the
image. Objects are actually closer than they
appear. You could misjudge the
distance from
vehicles driving behind and cause an Mirrors
103
Seats, steering wheel and mirrors
Z
Page 112 of 380

Useful information
i This Operator's Manual describes all
models and all standard and optional
equipment of your vehicle available at the
time of publication of the Operator's
Manual. Country-specific differences are
possible. Please note that your
vehicle may
not be equipped with all features
described. This also applies to safety-
related systems and functions.
i Read the information on qualified
specialist workshops: ( Y page 27).Exterior lighting
General notes
For reasons of safety, Mercedes-Benz
recommends that you drive with the lights
switched on even during the
daytime. In some
countries, operation of the headlamps varies
due to legal requirements and self-imposed
obligations. Notes on driving abroad
Conversion to symmetrical low beam Switch the headlamps to symmetrical low
beam in countries in which traffic drives on
the opposite side of
the
road from the country
where the vehicle is registered. This prevents
glare to oncoming traffic. When using
symmetrical lights, the edge of the road is not
lit as widely and as far ahead as normal.
Have the headlamps converted at a qualified
specialist workshop as close to the border as
possible before driving in these countries.
Conversion to asymmetrical low beam
after returning Have the headlamps converted back to
asymmetrical low-beam headlamps at a
qualified specialist workshop as soon as
possible after crossing the border again. Setting the exterior lighting
Setting options Exterior lighting can be set using:
R
the light switch
R the combination switch ( Y page 112)
R the on-board computer (Y page 227)
Light switch Operation
00470063
Left-hand standing lamps
00480064 Right-hand standing lamps
00490060 Parking lamps, license plate and
instrument cluster lighting
004A0058 Automatic headlamp mode,
controlled by the light sensor
004B0058 Low-beam/high-beam headlamps
0084005E Rear fog lamp
006B005A Fog lamp (only vehicles with front fog
lamps)
If you hear a warning tone when you leave the
vehicle, the lights may still be switched on.
X Turn the light switch to 0058.
The exterior lighting (except the parking/
standing lamps) switches off automatically if
you:
R remove the SmartKey from
the
ignition lock
R open the driver's door with the SmartKey
in position 0.110
Exterior lighting
Lights and windshield wipers
Page 128 of 380

Useful information
i This Operator's Manual describes all
models and all standard and optional
equipment of your vehicle available at the
time of publication of the Operator's
Manual. Country-specific differences are
possible. Please note that your
vehicle may
not be equipped with all features
described. This also applies to safety-
related systems and functions.
i Read the information on qualified
specialist workshops: ( Y page 27).Overview of climate control systems
Important safety notes
Observe the settings recommended on the
following pages. The windows could
otherwise fog up.
To prevent the windows from fogging up:
R switch off climate control only briefly
R switch on air-recirculation mode only
briefly
R switch on the cooling with air
dehumidification function
R switch on the defrost windshield function
briefly, if required
Climate control regulates the temperature
and the humidity in the vehicle interior and
filters undesirable substances out of the air.
Climate control can only be operated when
the engine is running. Optimum operation is
only achieved with the side
windows and roof
closed.
The residual heat function can only be
activated or deactivated with the ignition
switched off (Y page 136).
i Ventilate the vehicle for a brief period
during warm weather, e.g. using the
convenience opening feature ( Y page 87).
This will speed up the cooling process and
the desired vehicle interior temperature
will be reached more quickly. i
The integrated filter can filter out most
particles of dust, and completely
filters out
pollen. A clogged filter reduces the amount
of air supplied to the vehicle interior. For
this reason, you should always observe the
interval for replacing the filter, which is
specified in the Maintenance Booklet. As it
depends on environmental conditions, e.g.
heavy air pollution, the interval may be
shorter than stated in the Maintenance
Booklet.
i It is possible that the dehumidification
function of the climate control system may
be activated automatically an hour after the
SmartKey has been removed. The vehicle
is ventilated for 30 minutes. 126
Overview of climate control systems
Climate control
Page 130 of 380

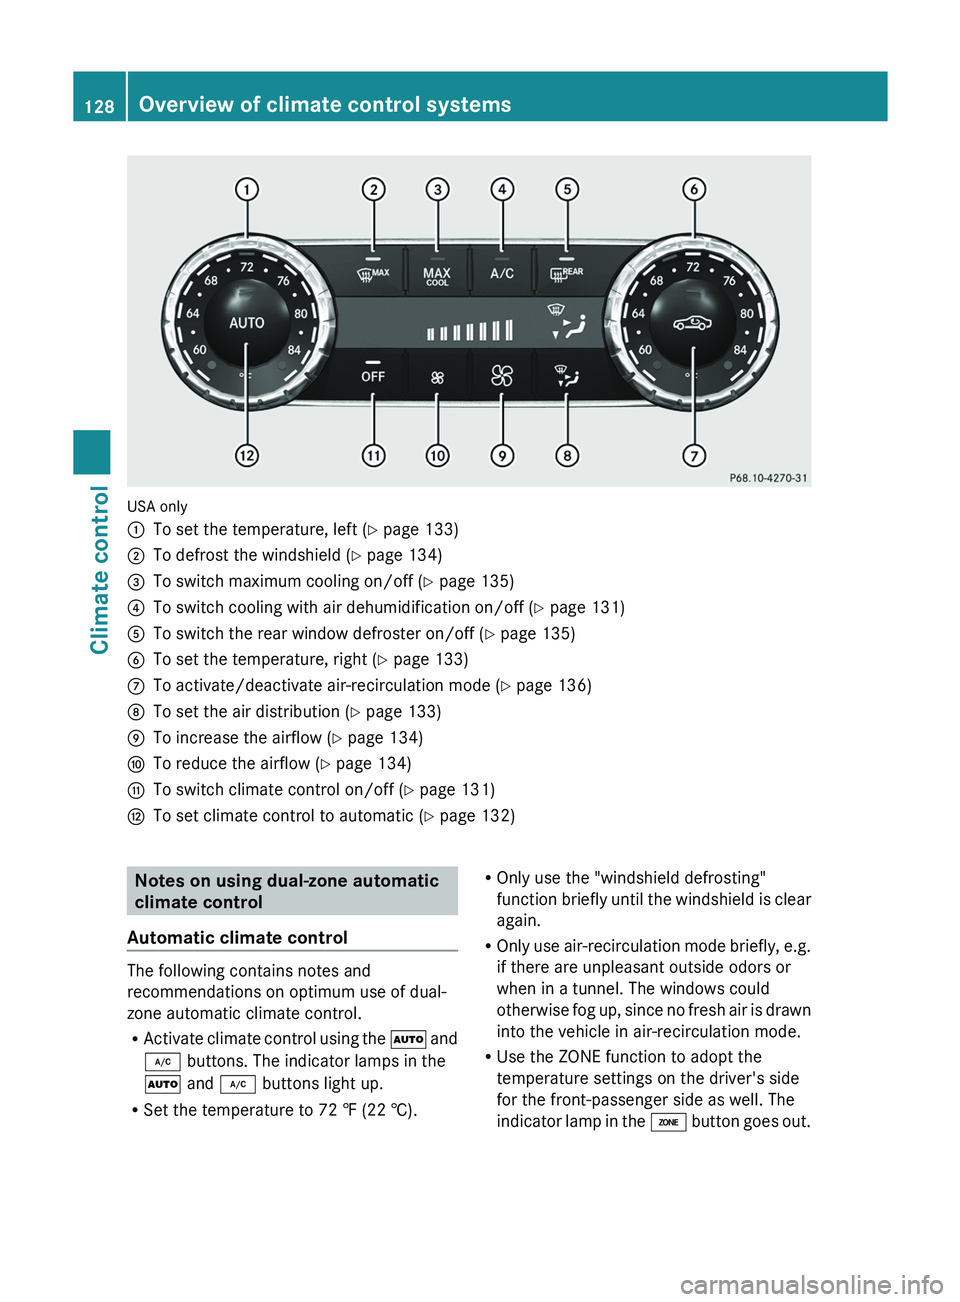
USA only
0043
To set the temperature, left (Y page 133)
0044 To defrost the windshield (Y page 134)
0087 To switch maximum cooling on/off (Y page 135)
0085 To switch cooling with air dehumidification on/off ( Y page 131)
0083 To switch the rear window defroster on/off (Y page 135)
0084 To set the temperature, right (Y page 133)
006B To activate/deactivate air-recirculation mode ( Y page 136)
006C To set the air distribution ( Y page 133)
006D To increase the airflow ( Y page 134)
006E To reduce the airflow ( Y page 134)
006F To switch climate control on/off (Y page 131)
0070 To set climate control to automatic ( Y page 132)Notes on using dual-zone automatic
climate control
Automatic climate control The following contains notes and
recommendations on optimum use of dual-
zone automatic climate control.
R
Activate climate control using the 0058
and
005A buttons. The indicator lamps in the
0058 and 005A buttons light up.
R Set the temperature to 72 ‡ (22 †). R
Only use the "windshield defrosting"
function briefly until the
windshield
is clear
again.
R Only use air-recirculation mode briefly, e.g.
if there are unpleasant outside odors or
when in a tunnel. The windows could
otherwise fog up, since no fresh air is drawn
into the vehicle in air-recirculation mode.
R Use the ZONE function to adopt the
temperature settings on the driver's side
for the front-passenger side as well. The
indicator lamp in the 00D6 button goes out.128
Overview of climate control systems
Climate control
Page 133 of 380

Notes on using 3-zone automatic
climate control
Automatic climate control The following contains instructions and
recommendations to enable you to get the
most out of your automatic climate control.
R
Activate climate control using the 0058
and
005A buttons. The indicator lamps in the
0058 and 005A buttons light up.
R In automatic mode, you can also use the
00F0 button to adjust airflow (FOCUS/
MEDIUM/DIFFUSE). The MEDIUM level is
recommended.
R Set the temperature to 72 ‡ (22 †).
R Only use the "windshield defrosting"
function briefly until the windshield is clear
again.
R Only use air-recirculation mode briefly, e.g.
if there are unpleasant outside odors or
when in a tunnel. The windows could
otherwise fog up, since no fresh air is drawn
into the vehicle in air-recirculation mode.
R Use the ZONE function to adopt the
temperature settings on the driver's side
for the front-passenger side and the rear
compartment as well. The indicator lamp in
the 00D6 button goes out.
R Use the residual heat function if you want
to heat or ventilate the vehicle interior
when the ignition is switched off. The
residual heat function can only be activated
or deactivated with the ignition switched
off.
ECO start/stop function During automatic engine switch-off, the ECO
start/stop function only operates at a
reduced capacity. If you require the full
climate control output, you can
switch off the
ECO start/stop function by pressing the ECO
button ( Y page 146). Operating the climate control
systems
Switching climate control on/off
Points to observe before use When the climate control is switched off, the
air supply and air circulation are also
switched off. Only use this setting for a brief
period. The windows could otherwise fog up.
Only switch off climate control briefly to
prevent the windows from fogging up.
i
Switch on climate control primarily using
the 0058 button ( Y page 132).
Activating/deactivating X
Turn the SmartKey to position 2 in the
ignition lock (Y page 141).
X To activate: press the 0058 button.
The indicator lamp
in the
0058
button lights
up. Airflow and air distribution are set to
automatic mode.
or
X Press the 0078 button.
The indicator lamp in the 0078
button goes
out. The previously selected settings are
restored.
X To deactivate: press the 0078 button.
The indicator lamp in the 0078
button lights
up. Activating/deactivating cooling with
air dehumidification
Points to observe before use If you switch off the cooling function, the
vehicle will not be cooled when weather
conditions
are
warm. The
windows
can fog up
more quickly. Only deactivate the cooling
with air dehumidification function for a short
time to prevent the windows from fogging up.
The cooling with air dehumidification function
is only available when the engine is running.
The air inside the vehicle is cooled and Operating the climate control systems
131
Climate control