2013 MERCEDES-BENZ GLA SUV engine
[x] Cancel search: enginePage 346 of 401
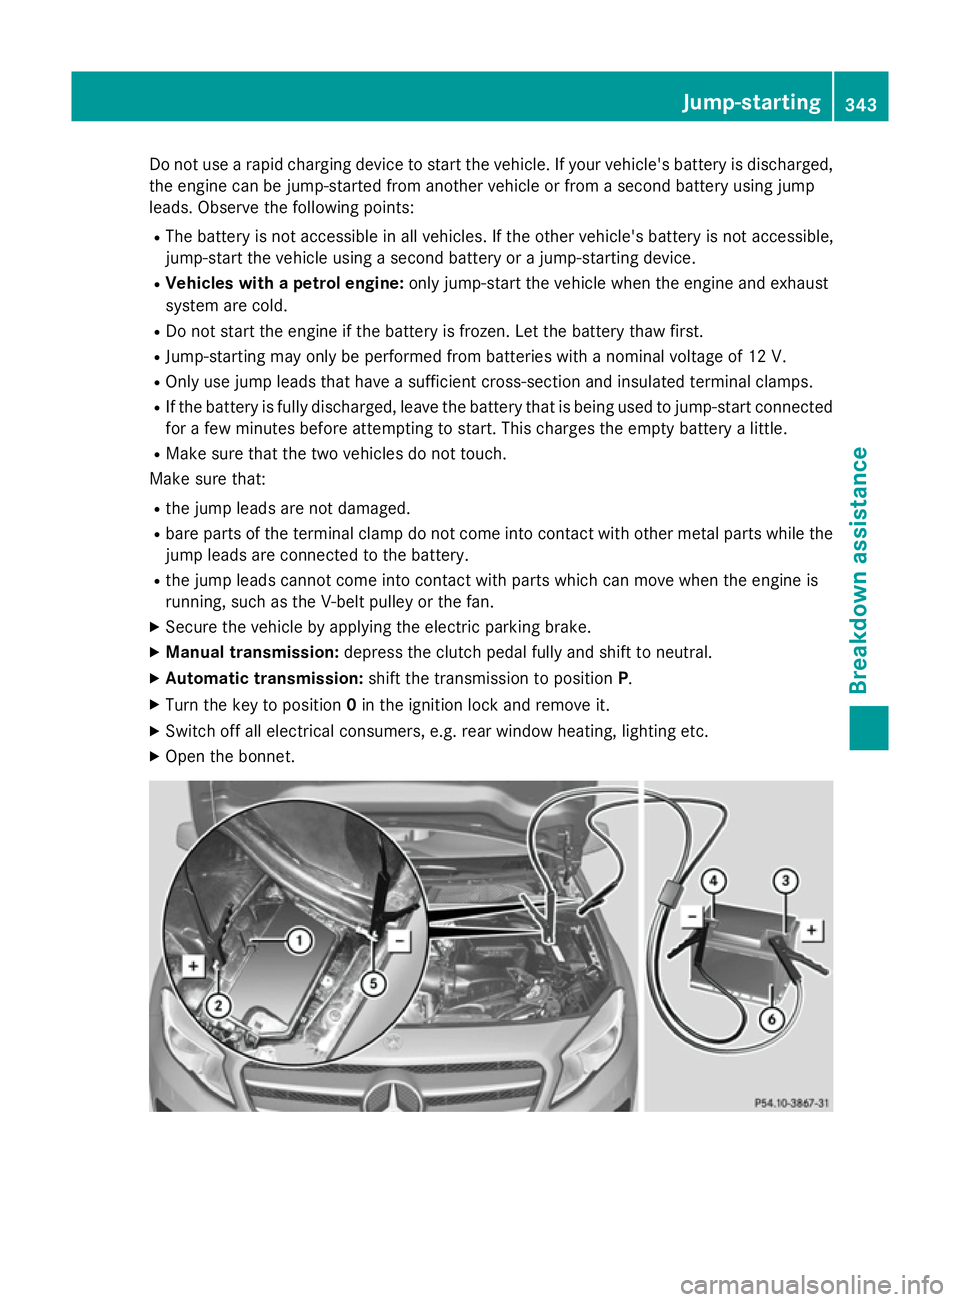
Do not use a rapid charging device to start the vehicle. If your vehicle's battery is discharged,
the engine can be jump-started from another vehicle or from a second battery using jump
leads. Observe the following points:
R The battery is not accessible in all vehicles. If the other vehicle's battery is not accessible,
jump-start the vehicle using a second battery or a jump-starting device.
R Vehicles with a petrol engine: only jump-start the vehicle when the engine and exhaust
system are cold.
R Do not start the engine if the battery is frozen. Let the battery thaw first.
R Jump-starting may only be performed from batteries with a nominal voltage of 12 V.
R Only use jump leads that have a sufficient cross-section and insulated terminal clamps.
R If the battery is fully discharged, leave the battery that is being used to jump-start connected
for a few minutes before attempting to start. This charges the empty battery a little.
R Make sure that the two vehicles do not touch.
Make sure that:
R the jump leads are not damaged.
R bare parts of the terminal clamp do not come into contact with other metal parts while the
jump leads are connected to the battery.
R the jump leads cannot come into contact with parts which can move when the engine is
running, such as the V-belt pulley or the fan.
X Secure the vehicle by applying the electric parking brake.
X Manual transmission: depress the clutch pedal fully and shift to neutral.
X Automatic transmission: shift the transmission to position P.
X Turn the key to position 0in the ignition lock and remove it.
X Switch off all electrical consumers, e.g. rear window heating, lighting etc.
X Open the bonnet. Jump-starting
343Breakdown assistance Z
Page 347 of 401
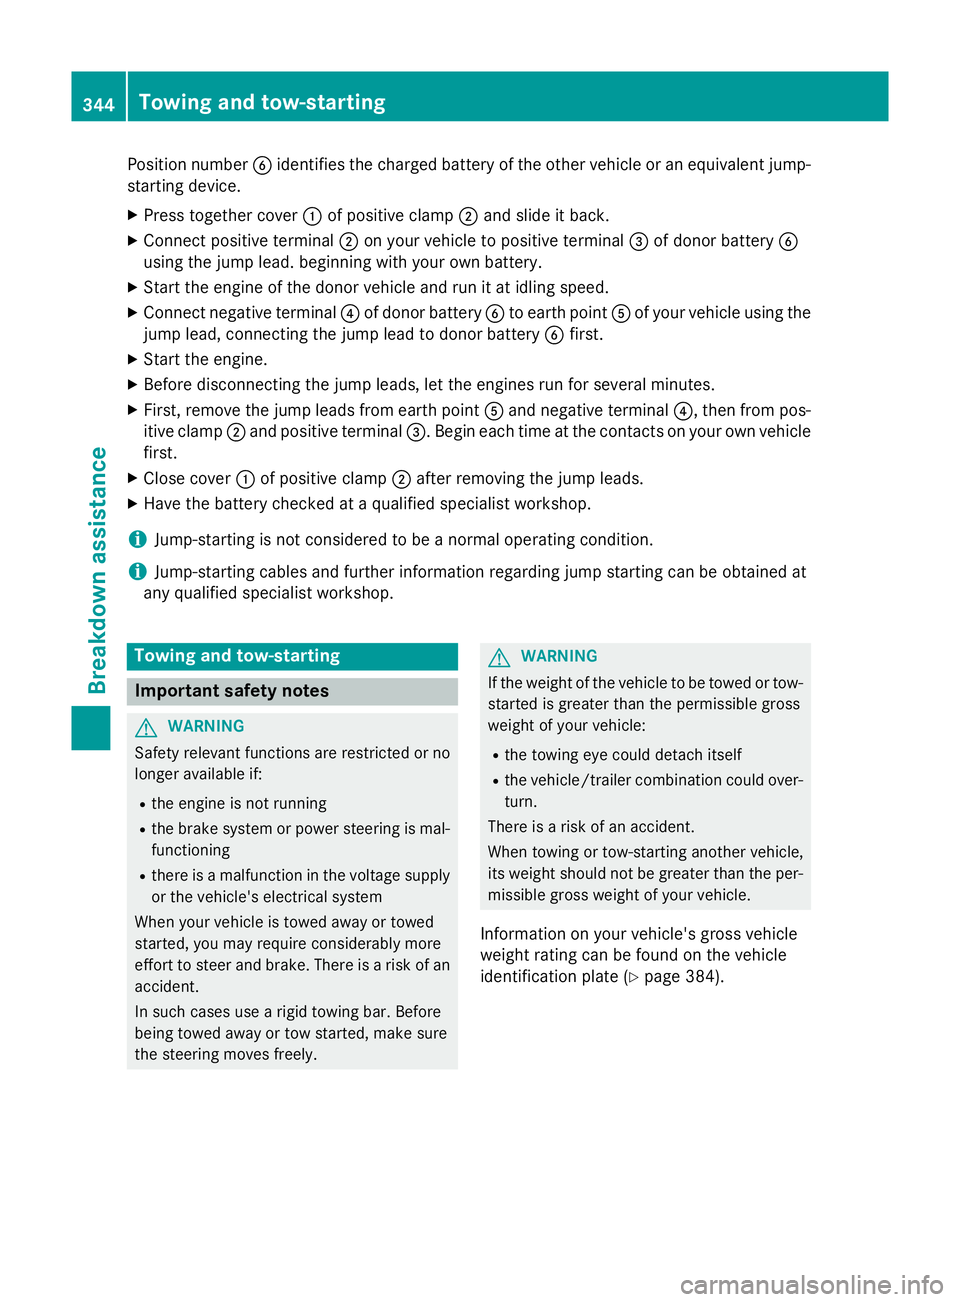
Position number
Bidentifies the charged battery of the other vehicle or an equivalent jump-
starting device.
X Press together cover :of positive clamp ;and slide it back.
X Connect positive terminal ;on your vehicle to positive terminal =of donor battery B
using the jump lead. beginning with your own battery.
X Start the engine of the donor vehicle and run it at idling speed.
X Connect negative terminal ?of donor battery Bto earth point Aof your vehicle using the
jump lead, connecting the jump lead to donor battery Bfirst.
X Start the engine.
X Before disconnecting the jump leads, let the engines run for several minutes.
X First, remove the jump leads from earth point Aand negative terminal ?, then from pos-
itive clamp ;and positive terminal =. Begin each time at the contacts on your own vehicle
first.
X Close cover :of positive clamp ;after removing the jump leads.
X Have the battery checked at a qualified specialist workshop.
i Jump-starting is not considered to be a normal operating condition.
i Jump-starting cables and further information regarding jump starting can be obtained at
any qualified specialist workshop. Towing and tow-starting
Important safety notes
G
WARNING
Safety relevant functions are restricted or no
longer available if:
R the engine is not running
R the brake system or power steering is mal-
functioning
R there is a malfunction in the voltage supply
or the vehicle's electrical system
When your vehicle is towed away or towed
started, you may require considerably more
effort to steer and brake. There is a risk of an
accident.
In such cases use a rigid towing bar. Before
being towed away or tow started, make sure
the steering moves freely. G
WARNING
If the weight of the vehicle to be towed or tow- started is greater than the permissible gross
weight of your vehicle:
R the towing eye could detach itself
R the vehicle/trailer combination could over-
turn.
There is a risk of an accident.
When towing or tow-starting another vehicle,
its weight should not be greater than the per-
missible gross weight of your vehicle.
Information on your vehicle's gross vehicle
weight rating can be found on the vehicle
identification plate (Y page 384).344
Towing and tow-startingBreakdown assistance
Page 351 of 401
N, you must provide power to the vehicle's
electrical system in the same way as when
jump-starting (Y page 342).
Have the vehicle transported on a transporter or trailer. Tow-starting (emergency engine
starting)
! Do not tow-start vehicles with automatic
transmission. You could otherwise damage the automatic transmission.
i You can find information on "Jump-start-
ing" under (Y page 342).
Before tow-starting, the following conditions
must be fulfilled:
R the battery is connected
R the engine has cooled down
R the exhaust system has cooled down
When tow-starting, it is important that you
observe the safety notes (Y page 344) and the
legal requirements in each respective coun-
try.
X Switch on the hazard warning lamps
(Y page 123).
X Fit the towing eye (Y page 346).
X Secure the rigid towing bar or the towing
rope.
X Depress and hold the brake pedal.
X Turn the key to position 2in the ignition
lock.
X Depress the clutch pedal fully, engage sec-
ond gear and continue to keep the clutch
pedal fully depressed.
X Release the brake pedal.
X Tow-start the vehicle.
X Release the clutch pedal slowly; do not
depress the accelerator pedal while doing
so.
X When the engine has been started, imme-
diately depress the clutch pedal fully and
shift to neutral. X
Pull over at a suitable place and stop the
vehicle safely, paying attention to road and
traffic conditions.
X Use the electric parking brake to secure the
vehicle and prevent it from rolling away.
X Remove the rigid towing bar or towing rope.
X Remove the towing eye (Y page 346).
X Switch off the hazard warning lamps. Electrical fuses
Important safety notes
G
WARNING
If you manipulate, bridge or replace a faulty
fuse with a fuse of a higher amperage, the
electric cables could be overloaded. This may result in a fire. There is a risk of an accident
and injury.
Always replace faulty fuses with specified new fuses of the correct amperage.
! Only use fuses that have been approved
for Mercedes-Benz vehicles and which
have the correct fuse rating for the system concerned. Only use fuses marked with an
"S". Components or systems could other-
wise be damaged.
The fuses in your vehicle disconnect faulty
circuits. If a fuse blows, all the components on the circuit and their functions will fail.
Blown fuses must be replaced with fuses of
the same rating, which you can recognise by
the colour and fuse rating. The fuse ratings
are listed in the fuse allocation chart.
If the newly inserted fuse also blows, have the
cause traced and rectified at a qualified spe-
cialist workshop, e.g. a Mercedes-Benz Ser-
vice Centre. 348
Electrical fusesBreakdown assistance
Page 352 of 401
Before replacing a fuse
X Secure the vehicle against rolling away
(Y page 179).
X Switch off all electrical consumers.
X Turn the key to position 0in the ignition
lock and remove it (Y page 159). All indi-
cator lamps in the instrument cluster must be off.
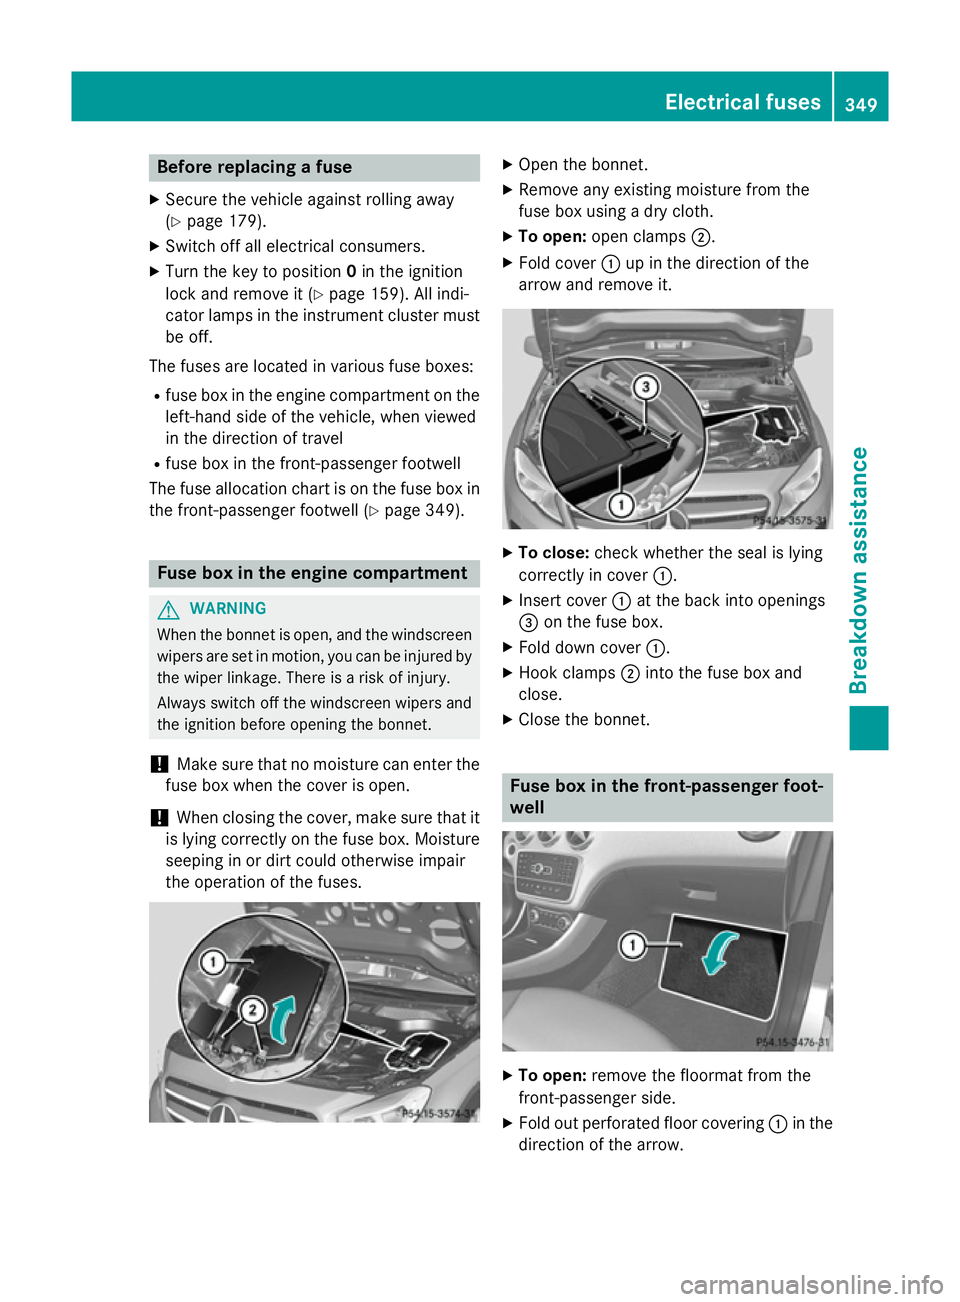
The fuses are located in various fuse boxes:
R fuse box in the engine compartment on the
left-hand side of the vehicle, when viewed
in the direction of travel
R fuse box in the front-passenger footwell
The fuse allocation chart is on the fuse box in
the front-passenger footwell (Y page 349).Fuse box in the engine compartment
G
WARNING
When the bonnet is open, and the windscreen wipers are set in motion, you can be injured by
the wiper linkage. There is a risk of injury.
Always switch off the windscreen wipers and
the ignition before opening the bonnet.
! Make sure that no moisture can enter the
fuse box when the cover is open.
! When closing the cover, make sure that it
is lying correctly on the fuse box. Moisture
seeping in or dirt could otherwise impair
the operation of the fuses. X
Open the bonnet.
X Remove any existing moisture from the
fuse box using a dry cloth.
X To open: open clamps ;.
X Fold cover :up in the direction of the
arrow and remove it. X
To close: check whether the seal is lying
correctly in cover :.
X Insert cover :at the back into openings
= on the fuse box.
X Fold down cover :.
X Hook clamps ;into the fuse box and
close.
X Close the bonnet. Fuse box in the front-passenger foot-
well
X
To open: remove the floormat from the
front-passenger side.
X Fold out perforated floor covering :in the
direction of the arrow. Electrical fuses
349Breakdown assis tance Z
Page 365 of 401
Interchanging the front and rear wheels of
differing dimensions can render the general
operating permit invalid.
Always pay attention to the instructions and
safety notes when changing a wheel
(Y page 361).
The wear patterns on the front and rear tyres differ, depending on the operating conditions. Interchange the wheels before a clear wear
pattern has formed on the tyres. Front tyres
typically wear more on the shoulders and the
rear tyres in the centre.
On vehicles that have the same size front and rear wheels, you can interchange the wheels
every 5,000 to 10,000 km depending on the
degree of tyre wear. Ensure that the direction
of rotation is maintained.
Clean the contact surfaces of the wheel and
the brake disc thoroughly every time a wheel
is interchanged. Check the tyre pressure and, if necessary, restart the tyre pressure loss
warning system or the tyre pressure monitor. Direction of rotation
Tyres with a specified direction of rotation
have additional benefits, e.g. if there is a risk of aquaplaning. You will only gain these ben-
efits if the correct direction of rotation is
observed.
An arrow on the sidewall of the tyre indicates
its correct direction of rotation. Storing wheels
Store wheels that are not being used in a cool, dry and preferably dark place. Protect the
tyres against oil, grease, petrol and diesel. Cleaning the wheels
G
WARNING
The water jet of circular-jet nozzles (dirt grind- ers) can cause damage not visible from the
outside to tyres or chassis components. Com- ponents damaged in this way can unexpect-
edly fail. There is a risk of an accident.
Do not use high-pressure cleaners with circu- lar-jet nozzles to clean the vehicle. Have dam-aged tyres or chassis components replaced
immediately. Fitting a wheel
Preparing the vehicle X
Stop the vehicle on solid, non-slippery and
level ground.
X Apply the electric parking brake manually
(Y page 180).
X Move the front wheels to the straight-
ahead position.
X Vehicles with manual transmission:
depress the clutch pedal fully and engage
first or reverse gear.
X Vehicles with automatic transmission:
move the DIRECT SELECT lever to P.
X Switch off the engine.
X Remove the key from the ignition lock.
X If a trailer is coupled to the vehicle, uncou-
ple it.
X If included in the vehicle equipment,
remove the tyre-change tool kit from the
vehicle.
X Secure the vehicle to prevent it from rolling
away.
i Apart from certain country-specific varia-
tions, vehicles are not equipped with a tyre-
change tool kit. For information on which
tools are required to perform a wheel
change on your vehicle, consult a
Mercedes-Benz Service Centre.
Necessary wheel-changing tools may
include, for example:
R jack
R wheel chock
R wheel wrench 362
Changing a wheelWheels and tyres
Page 367 of 401
release the parking brake while the vehicle
is raised.
R the jack must be placed on a firm, flat and
non-slip surface. On a loose surface, a
large, flat load-bearing underlay must be
used. On a slippery surface, a non-slip
underlay must be used, e.g. rubber mats.
R do not use wooden blocks or similar
objects as a jack underlay. Otherwise, the
jack will not be able to achieve its load-
bearing capacity due to the restricted
height.
R make sure that the distance between the
underside of the tyres and the ground does
not exceed 3 cm.
R never place your hands or feet under the
raised vehicle.
R do not lie under the vehicle.
R do not start the engine when the vehicle is
raised.
R do not open or close a door or the tailgate
while the vehicle is raised.
R make sure that no persons are present in
the vehicle when the vehicle is raised. Steel wheel with wheel trim
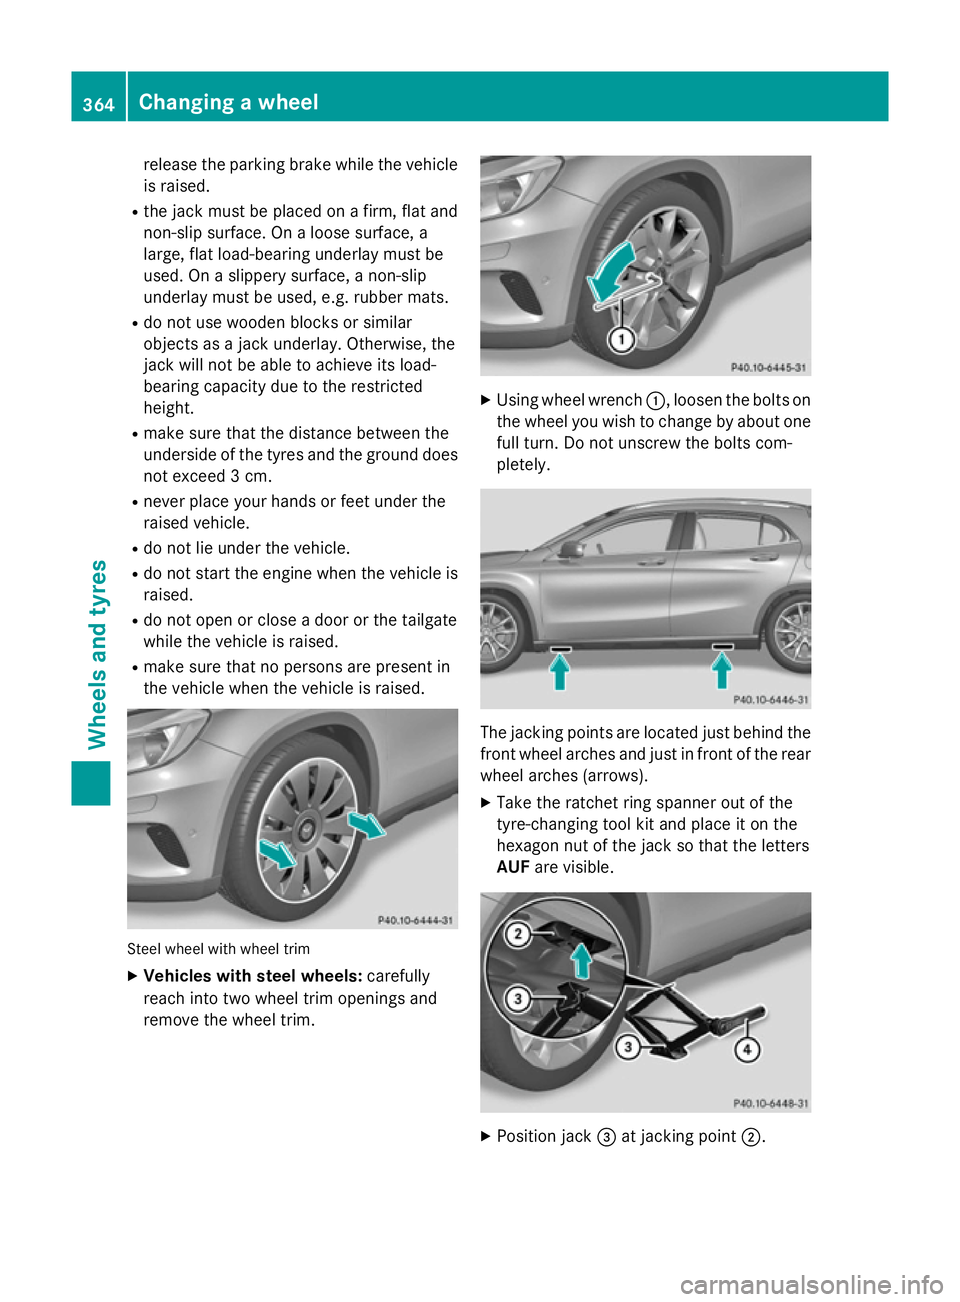
X
Vehicles with steel wheels: carefully
reach into two wheel trim openings and
remove the wheel trim. X
Using wheel wrench :, loosen the bolts on
the wheel you wish to change by about one full turn. Do not unscrew the bolts com-
pletely. The jacking points are located just behind the
front wheel arches and just in front of the rear wheel arches (arrows).
X Take the ratchet ring spanner out of the
tyre-changing tool kit and place it on the
hexagon nut of the jack so that the letters
AUF are visible. X
Position jack =at jacking point ;.364
Changing a wheelWheels and tyres
Page 385 of 401
Useful information
i This Owner's Manual describes all mod-
els, series and optional equipment for your
vehicle that were available at the time of
going to press. National variations are pos- sible. Note that your vehicle may not be
equipped with all of the functions descri-
bed. This is also the case for systems and
functions relevant to safety.
i Read the information on qualified special-
ist workshops: (Y page 25). Information on technical data
General notes
You can find current technical data on the
Internet on our Mercedes‑ Benz homepage.
i The technical data was determined in
accordance with EU Directives. All data
applies to the vehicle's standard equip-
ment. The data may therefore differ for
vehicles with optional equipment. You can
obtain further information from a
Mercedes-Benz Service Centre. Vehicle electronics
Tampering with the engine electron-
ics
! Only have work carried out on the engine
electronics and its associated parts, such
as control units, sensors, actuating com-
ponents and connector leads, at a qualified specialist workshop. Vehicle components
may otherwise wear more quickly and the
vehicle's operating permit may be invalida-
ted. Retrofitting two-way radios and
mobile phones (RF transmitters)
G
WARNING
If RF transmitters are tampered with or not
properly retrofitted, the electromagnetic radi- ation they emit can interfere with the vehicle
electronics. This may jeopardise the opera-
tional safety of the vehicle. There is a risk of an
accident.
You should have all work on electrical and
electronic components carried out at a quali-
fied specialist workshop. G
WARNING
If you use the RF transmitter in the vehicle in
an improper way, its electromagnetic radia-
tion can disrupt vehicle electronics, e.g. if:
R the RF transmitter is not connected to an
exterior aerial
R the exterior aerial is fitted incorrectly or is
not a low-reflection aerial
This can jeopardise the operating safety of the vehicle. There is a risk of an accident.
Have the low-reflection exterior aerial fitted at
a qualified specialist workshop. When oper-
ating in the vehicle, always connect the RF
transmitter to the low-reflection exterior aer-
ial.
! The operating permit may be invalidated if
the instructions for installation and use of
RF transmitters are not observed.
In particular, the following conditions must be complied with:
R only approved wavebands may be used.
R observe the maximum permissible out-
put in these wavebands.
R only approved aerial positions may be
used.
Excessive levels of electromagnetic radiation
may cause damage to your health and to the
health of others. The use of an exterior aerial
takes into consideration the scientific discus- 382
Vehicle electronicsTechnical data
Page 387 of 401
Identification plates
Vehicle identification plate with vehi-
cle identification number (VIN) X
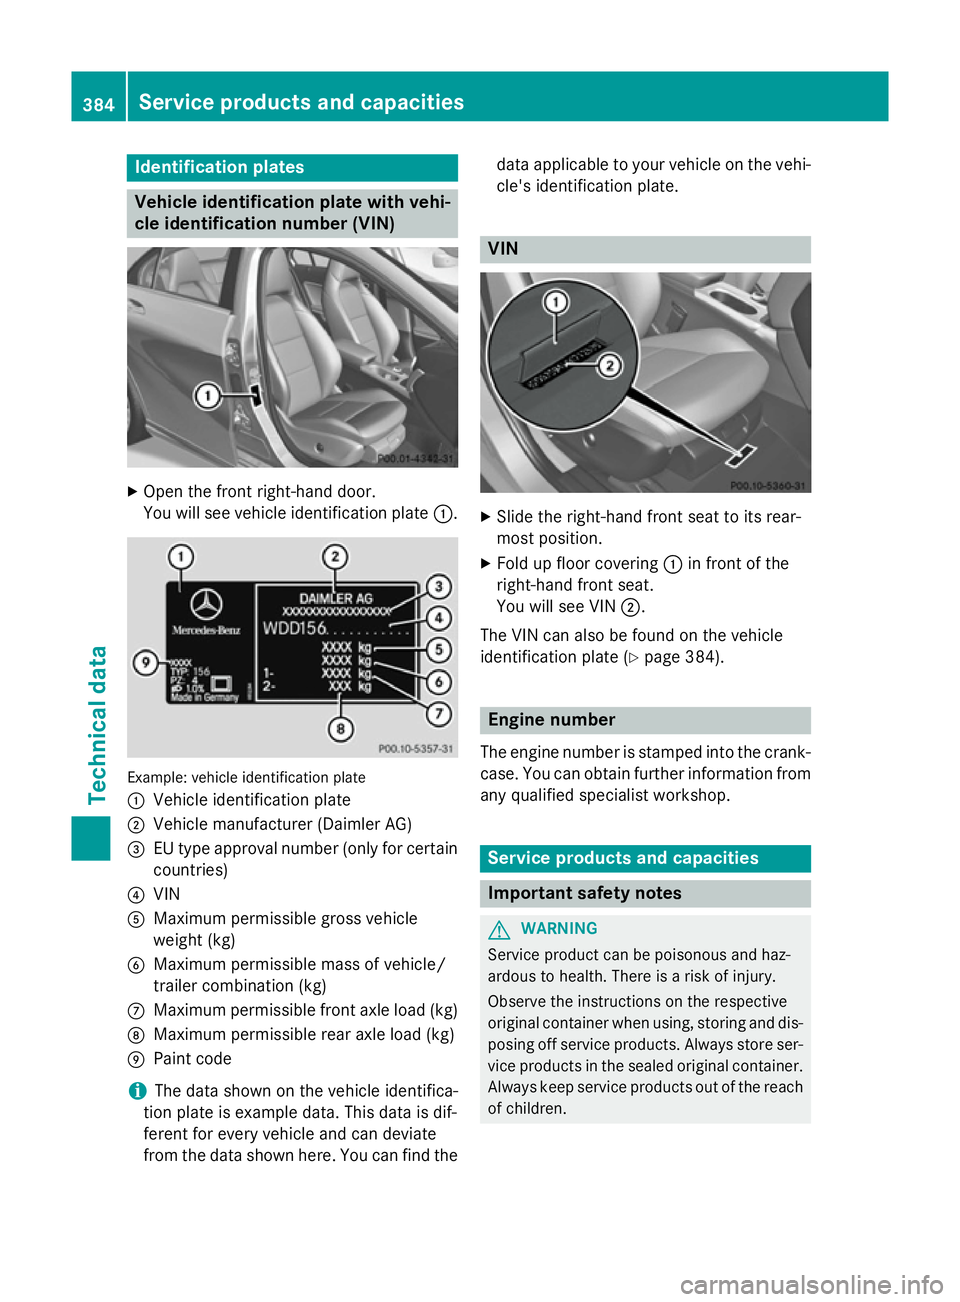
Open the front right-hand door.
You will see vehicle identification plate :.Example: vehicle identification plate
:
Vehicle identification plate
; Vehicle manufacturer (Daimler AG)
= EU type approval number (only for certain
countries)
? VIN
A Maximum permissible gross vehicle
weight (kg)
B Maximum permissible mass of vehicle/
trailer combination (kg)
C Maximum permissible front axle load (kg)
D Maximum permissible rear axle load (kg)
E Paint code
i The data shown on the vehicle identifica-
tion plate is example data. This data is dif-
ferent for every vehicle and can deviate
from the data shown here. You can find the data applicable to your vehicle on the vehi-
cle's identification plate. VIN
X
Slide the right-hand front seat to its rear-
most position.
X Fold up floor covering :in front of the
right-hand front seat.
You will see VIN ;.
The VIN can also be found on the vehicle
identification plate (Y page 384). Engine number
The engine number is stamped into the crank- case. You can obtain further information from
any qualified specialist workshop. Service products and capacities
Important safety notes
G
WARNING
Service product can be poisonous and haz-
ardous to health. There is a risk of injury.
Observe the instructions on the respective
original container when using, storing and dis- posing off service products. Always store ser-
vice products in the sealed original container. Always keep service products out of the reach
of children. 384
Service products and capacitiesTechnical data