2013 MERCEDES-BENZ GLA SUV transmission oil
[x] Cancel search: transmission oilPage 17 of 401
Main-beam headlamps
Changing bulbs .............................. 130
Display message ............................ 270
Switching on/off ........................... 123
Manual transmission
Engaging reverse gear ................... 167
Gear lever ...................................... 166
Pulling away ................................... 160
Shift recommendation ................... 167
Shifting to neutral ......................... .167
Starting the engine ........................ 160
Matt finish (cleaning instructions) .. 325
Media Interface
see Separate operating instructions
Memory card (audio) ......................... 241
Memory function ............................... 117
Mercedes-Benz Service Centre
see Qualified specialist workshop
Message memory (on-board com-
puter) ................................................. .254
Messages
see Display messages
Mirrors
see Exterior mirrors
see Rear-view mirror
see Vanity mirror (in sun visor)
Mobile phone
Frequencies ................................... 382
Installation ..................................... 382
Menu (on-board computer) ............ 241
Notes/placing in the bracket ......... 312
Transmission output (maximum) .... 382
Mobile telephone
Pre-installed bracket ..................... .313
Modifying the programming (key) ..... 87
MOExtended tyres .............................334
Motorway mode ................................ 124
MP3
Operating ....................................... 241
see Separate operating instructions
Multifunction display
Function/notes ............................ .236
Permanent display ......................... 246
Multifunction steering wheel
Operating the on-board computer .. 235
Overview .......................................... 35 N
Navigation Menu (on-board computer) ............ 239
see separate operating instructions
Notes on running in a new vehicle .. 158 O
Occupant safety Automatic measures after an acci-
dent ................................................. 59
Children in the vehicle ..................... 59
Important safety notes .................... 43
Pets in the vehicle ........................... 71
PRE-SAFE® (anticipatory occu-
pant protection) ............................... 59
Odometer .......................................... .237
see Total distance recorder
see Trip meter
Off-road driving
Approach/departure angle ............ 393
Checklist after driving off-road ...... 186
Checklist before driving off-road .... 186
General information ....................... 185
Important safety notes .................. 185
Maximum gradient climbing abil-
ity ................................................. .393
Maximum water depth ................... 392
Travelling uphill .............................. 187
Off-road lights ................................... .125
Off-road program ............................... 205
Off-road system
DSR ............................................... 204
Off road drive program .................. 205
Off-road 4ETS .................................. 77
Off-road ABS ................................... .73
Off-road ESP® ................................. 80
Oil
see Engine oil
On-board computer
AMG menu .....................................2 51
Assistance menu ........................... 243
Audio menu ................................... 240
Convenience submenu .................. 250
Display messages .......................... 254
Displaying a service message ....... .322
DISTRONIC PLUS ........................... 199 14
Index
Page 22 of 401

Rediallin
g....................................... 242
Rejecting/ending a call ................. 242
Telephone compartment ................ 302
Temperature
Coolant .......................................... 234
Coolant (on-board computer) ......... 251
Engine oil (on-board computer) ...... 251
Outside temperature ...................... 235
Setting (climate control )................ 144
TEMPOMAT
Function/note s............................. 188
Theft-deterrent system
ATA (Anti-Theft Alarm system) ......... 81
Immobiliser ...................................... 81
Through-loading ................................ 303
Time
see Separate Owner's manual
Timing (RACETIMER) ......................... 251
TIREFIT kit .......................................... 335
Top Tether ............................................ 62
Tow-away protection
Activating ......................................... 82
Deactivating ..................................... 82
Function ........................................... 81
Tow-starting
Emergency engine starting ............ 348
Fitting the towing eye .................... 346
Important safety notes .................. 344
Removing the towing eye ............... 346
Towing
Important safety notes .................. 344
Notes for 4MATIC vehicles ............ 347
Towing a trailer
Active Parking Assist ..................... 215
Axle load, permissibl e.................... 394
Bulb failure indicator for LED
lamps ............................................. 230
ESP® (Electronic Stability Pro-
gram) ............................................... 80
Pulling away with a traile r.............. 161
Trailer tow hitch display message .. 286
Towing away
Fitting the towing eye .................... 346
Removing the towing eye ............... 346
With both axles on the ground ....... 347
With front axle raised ..................... 346
Trailer coupling
see Towing a trailer Trailer towing
7-pin connecto r............................. 230
Blind Spot Assist ............................ 224
Cleaning the trailer tow hitch ......... 327
Coupling up a traile r...................... 229
Decoupling a trailer ....................... 229
Driving tips .................................... 225
Folding in the ball coupling ............ 229
Folding out the ball coupling .......... 228
Important safety notes .................. 225
Lights display message .................. 269
Mounting dimensions .................... 393
Parktronic ...................................... 209
Power supply ................................. 230
Trailer load s................................... 394
Transmission
see Automatic transmission
see Manual transmission
Transmission position display
(DIRECT SELECT lever) ...................... 168
Transporting the vehicle .................. 347
Travelling uphill
Brow of hill ..................................... 188
Driving downhill ............................. 188
Maximum gradient-climbing capa-
bility ............................................... 188
Trim pieces (cleaning instruc-
tions) .................................................. 328
Trip computer (on-board com-
puter) .................................................. 237
Trip meter
Calling up ....................................... 237
Resetting (on-board computer) ...... 238
Turn signals
Changing bulbs (front) ................... 130
Changing bulbs (rear) .................... 131
Switching on/of f........................... 123
Two-way radio
Frequencies ................................... 382
Installation ..................................... 382
Transmission output (maximum) .... 382
Type identification plate
see Vehicle identification plate
Tyre pressure
Calling up (on-board computer) ..... 358
Display message ............................ 280
Important safety notes .................. 358
Not reached (TIREFIT) .................... 337 Index
19
Page 173 of 401

A Neutral
No power is transmitted from the
engine to the drive wheels.
Releasing the brakes will allow you
to move the vehicle freely, e.g. to
push it or tow it.
If ESP ®
is deactivated or faulty:
only shift the transmission to posi-
tion Nif the vehicle is in danger of
skidding, e.g. on icy roads.
When you switch off the engine, the automatic transmission automati-
cally shifts into neutral N.7 Drive
The automatic transmission
changes gear automatically. All
forward gears are available.
Driving tips
Changing gear The automatic transmission shifts to the indi-
vidual gears automatically when it is in trans-
mission position D. Gearshifting is deter-
mined by:
R the selected drive program (Y page 171)
R the position of the accelerator pedal
(Y page 170)
R the road speed
Accelerator pedal position Your style of driving influences how the auto-
matic transmission shifts gear:
R little throttle: early upshifts
R more throttle: late upshifts
Holding the vehicle stationary on uphill gradients G
WARNING
If the clutch overheats, the electronic man-
agement system is automatically deactivated. This interrupts the power transmission. The
vehicle may, for example, roll backwards on
gradients. There is a risk of an accident.
Never hold the vehicle stationary on uphill
gradients by depressing the accelerator.
The clutch may overheat if you hold the vehi- cle stationary on uphill gradients by depress-
ing the accelerator pedal. If the clutch over-
heats, a warning tone sounds.
All vehicles (except AMG vehicles): the
Stop
Stop vehicle vehicle Shift
Shiftto
toP
PLeave
Leave engine
engine
running
running display message appears in the mul-
tifunction display. You will only be able to
continue your journey once the clutch has
cooled down and the display message in the
multifunction display has disappeared.
AMG vehicles: theTrans. oil overhea‐ Trans. oil overhea‐
ted Drive on with care
ted Drive on with care display message
appears in the multifunction display.
Never hold the vehicle stationary on uphill
gradients by depressing the accelerator.
Instead, only ever hold the vehicle stationary on uphill gradients by:
R depressing the brake pedal
R activating the HOLD function
R engaging the electric parking brake
Kickdown AMG vehicles:
it is only possible to use kick-
down in temporary manual drive program M.
For further information on manual drive pro-
gram M(Y page 172).
Use kickdown for maximum acceleration.
X Depress the accelerator pedal beyond the
pressure point.
The transmission shifts to a lower gear
depending on the engine speed.
X Ease off the accelerator pedal once the
desired speed is reached.
The automatic transmission shifts back up. 170
Automatic transmissionDriving an
d parking
Page 178 of 401
Problems with the transmission
Problem
Possible causes/consequences and
M
MSolutions The transmission has
problems shifting gear. The transmission is losing oil.
X Have the transmission checked at a qualified specialist work-
shop immediately. The acceleration ability
is deteriorating.
The transmission no
longer shifts into all of
the gears.
Reverse gear can no
longer be engaged. The transmission is in emergency mode.
X Stop.
X Shift the transmission to position P.
X Switch off the engine.
X Wait at least 10seconds before restarting the engine.
X Shift the transmission to position D.
X Have the transmission checked at a qualified specialist work-
shop immediately. Refuelling
Important safety notes
G
WARNING
Fuel is highly flammable. If you handle fuel
incorrectly, there is a risk of fire and explo-
sion.
You must avoid fire, naked flames, creating
sparks and smoking. Switch off the engine
and, if applicable, the auxiliary heating before refuelling. G
WARNING
Fuels are poisonous and hazardous to health. There is a danger of injury.
Do not swallow fuel or let it come into contact
with skin, eyes or clothing. Do not inhale fuel
vapours. Keep fuels out of the reach of chil-
dren.
If you or others come into contact with fuel,
observe the following:
R Wash the fuel off any affected areas of skin
with water and soap immediately.
R If you get fuel in your eyes, rinse them thor-
oughly with clean water immediately. Seek immediate medical attention. R
If fuel is swallowed, seek immediate medi-
cal attention. Do not induce vomiting.
R Change any clothing that has come into
contact with fuel immediately. G
WARNING
Electrostatic charge can cause sparks and
thereby ignite fuel vapours. There is a risk of
fire and explosion.
Always touch the vehicle body before opening the fuel filler flap or touching the fuel pump
nozzle. This discharges any electrostatic
charge that may have built up. G
WARNING
Vehicles with a diesel engine:
If you mix diesel fuel with petrol, the flash
point of this fuel mixture is lower than that of pure diesel fuel. When the engine is running,
components in the exhaust system may over-
heat unnoticed. There is a risk of fire.
Never refuel with petrol. Never add petrol to
diesel fuel.
! Do not use petrol to refuel vehicles with a
diesel engine. Do not use diesel to refuel
vehicles with a petrol engine. Do not switch Refuelling
175Driving and parking Z
Page 188 of 401
ensure an adequate supply of fresh air, open a
window on the side of the vehicle that is not
facing into the wind.
Have your vehicle winterproofed at a qualified specialist workshop at the onset of winter.
You should drive particularly carefully on slip- pery road surfaces. Avoid sudden accelera-
tion, steering and braking manoeuvres. Do
not use cruise control or DISTRONIC PLUS.
If the vehicle threatens to skid or cannot be
stopped when moving at low speed:
X Vehicles with manual transmission:
shift to neutral.
X Vehicles with automatic transmission:
shift the transmission to position N.
X Try to bring the vehicle under control by
using corrective steering.
The outside temperature indicator is not
designed to serve as an ice-warning device
and is therefore unsuitable for that purpose.
Changes in the outside temperature are dis-
played after a short delay.
Indicated temperatures just above the freez-
ing point do not guarantee that the road sur-
face is free of ice. The road may still be icy,
especially in wooded areas or on bridges.
You should pay special attention to road con-
ditions when temperatures are around the
freezing point.
For more information on driving with snow
chains, see (Y page 355).
For more information on driving with summer tyres, see (Y page 354).
Observe the notes in the "Winter operation"
section (Y page 354). Off-road driving
Important safety notes G
WARNING
If you drive up a steep incline at an angle or
turn on a steep incline, the vehicle could slip sideways, tip and overturn. There is a risk of
an accident.
When driving up an incline, drive into the line
of fall (upwards or downwards in a straight
line) and do not turn.
The vehicle is only designed for easily nego-
tiable off-road terrain and poor road surfaces. When driving off-road, substances such as
sand, mud and water or water mixed with oil
may get into the brakes. This may lead to a
reduction in braking performance or total
brake failure as a result of increased wear.
The braking characteristics will vary depend-
ing on the substances that get into the
brakes. Clean the brakes after driving off-
road. If you notice grinding noises or a reduc-
tion in braking performance, have the brake
system checked at a qualified specialist work- shop immediately. Adapt your driving style to
the altered braking characteristics.
Driving off-road increases the possibility of
damage to the vehicle, which may cause
assemblies or systems to fail. Adapt your
driving style to the conditions of the terrain.
Drive carefully. Have vehicle damage rectified immediately at a qualified specialist work-
shop.
Do not shift into transmission position N
when driving off-road. You could lose control
of the vehicle if you attempt to brake the
vehicle using the service brake. If the gradient
is too steep for your vehicle, back up in
reverse gear.
General notes H
Environmental note
Protection of the environment is of primary
importance. Treat nature with respect.
Observe all prohibiting signs.
Read this section before driving your vehicle
off-road.
Off-road driving is only possible with the Off-
Road Engineering package (Y page 205). Driving tips
185Driving and parking Z
Page 254 of 401
Resetting to factory settings
X
Press the =or; button on the steer-
ing wheel to select the Settings
Settings menu.
X Press the :or9 button to select the
Factory setting
Factory setting submenu.
X Press ato confirm.
The Reset all settings?
Reset all settings? message
appears.
X Press the :or9 button to select No
No
or Yes
Yes.
X Press the abutton to confirm the selec-
tion.
If you have selected Yes Yes, the multifunction
display shows a confirmation message.
For safety reasons, not all functions are reset: the Limit
Limit speed
speed(winter
(winter tyres)
tyres)function
in permanent SPEEDTRONIC can only be set
in the Vehicle
Vehicle submenu. If you want to reset
the Daytime
Daytime driving
drivinglights
lightsin theLights
Lights
submenu, you must turn the key to position 1
in the ignition lock. AMG menu in AMG vehicles
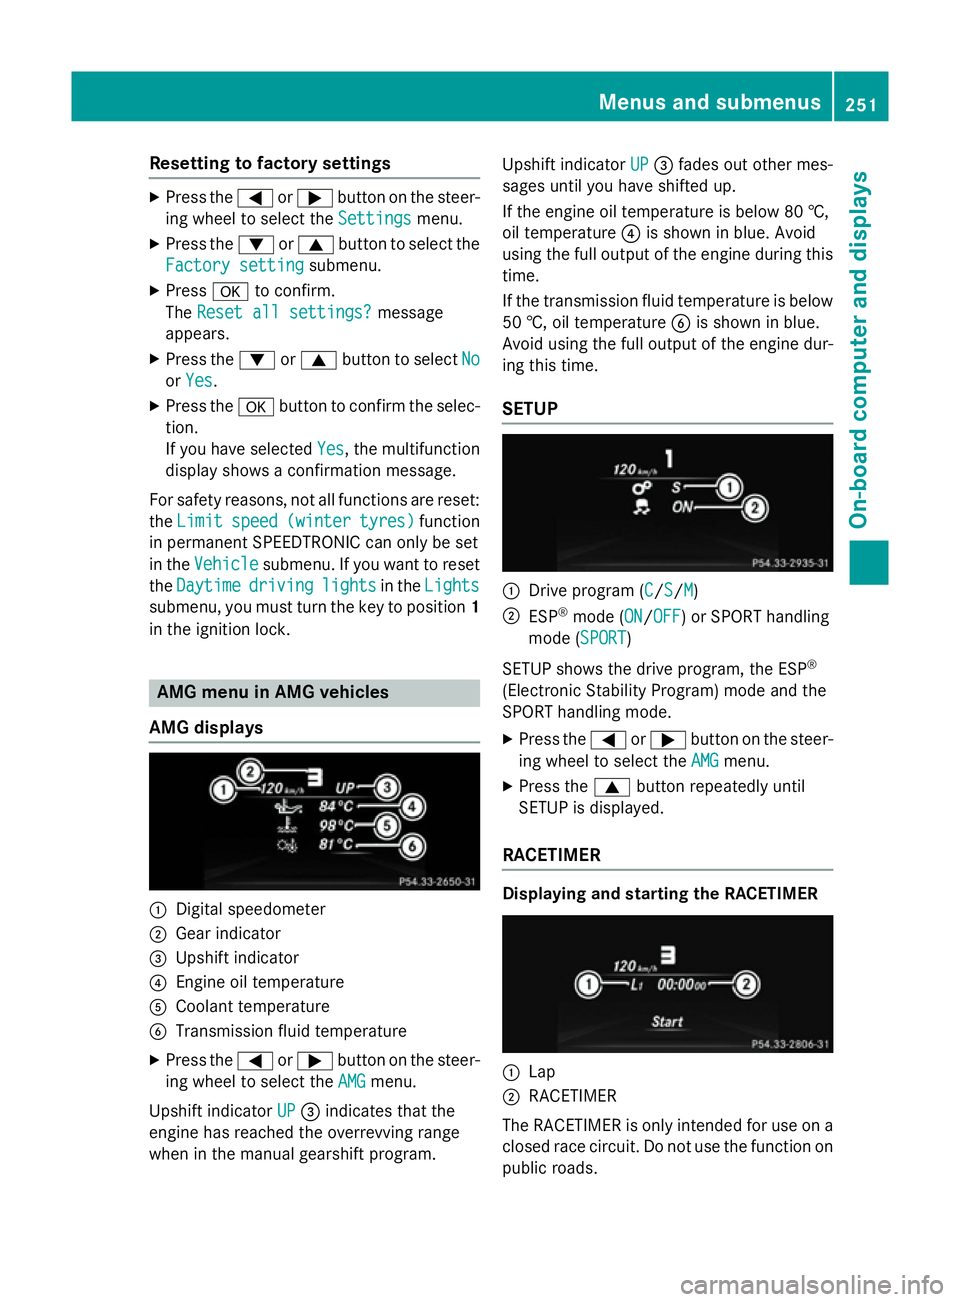
AMG displays :
Digital speedometer
; Gear indicator
= Upshift indicator
? Engine oil temperature
A Coolant temperature
B Transmission fluid temperature
X Press the =or; button on the steer-
ing wheel to select the AMG
AMG menu.
Upshift indicator UP
UP = indicates that the
engine has reached the overrevving range
when in the manual gearshift program. Upshift indicator
UP UP= fades out other mes-
sages until you have shifted up.
If the engine oil temperature is below 80 †,
oil temperature ?is shown in blue. Avoid
using the full output of the engine during this time.
If the transmission fluid temperature is below
50 †, oil temperature Bis shown in blue.
Avoid using the full output of the engine dur-
ing this time.
SETUP :
Drive program (C C/SS/MM)
; ESP ®
mode (ON ON/OFFOFF) or SPORT handling
mode (SPORT SPORT)
SETUP shows the drive program, the ESP ®
(Electronic Stability Program) mode and the
SPORT handling mode. X Press the =or; button on the steer-
ing wheel to select the AMG AMGmenu.
X Press the 9button repeatedly until
SETUP is displayed.
RACETIMER Displaying and starting the RACETIMER
:
Lap
; RACETIMER
The RACETIMER is only intended for use on a closed race circuit. Do not use the function on
public roads. Menus and submenus
251On-board computer and displays Z
Page 287 of 401

Display messages
Possible causes/consequences and
M
MSolutions Transmission Mal‐
Transmission Mal‐
function function The automatic transmission is malfunctioning.
X Visit a qualified specialist workshop. Transmission Mal‐
Transmission Mal‐
function Stop function Stop The automatic transmission is malfunctioning.
X Pull over and stop the vehicle safely as soon as possible, paying
attention to road and traffic conditions.
X Secure the vehicle against rolling away (Y page 179).
X Consult a qualified specialist workshop. Stop
Stop
vehicle
vehicle Shift
Shift
to P Leave engine
to P Leave engine
running running The automatic transmission has overheated.
X Drive on carefully.
If the display message disappears, the automatic transmission
is available again.
If the display message continues to be displayed:
X Pull over and stop the vehicle safely as soon as possible, paying
attention to road and traffic conditions.
X Secure the vehicle against rolling away (Y page 179).
X Wait until the automatic transmission has cooled down and the
display message goes out. Clutch overheated Clutch overheated
Avoid Avoid
pulling
pulling away
away
Engage/disengage
Engage/disengage
clutch quickly if clutch quickly if
req. req. The clutch is under considerable load and the permitted operating
temperature has been exceeded. A warning tone also sounds.
Avoid frequent pulling away and driving at walking pace over lon-
ger distances.
X Pull over and stop the vehicle safely as soon as possible, paying
attention to road and traffic conditions.
X Secure the vehicle against rolling away (Y page 179).
X Leave the engine running.
The clutch is cooled more quickly with the engine is running.
or X If possible, continue driving at a steady speed.
X Remove your foot from the clutch pedal and do not allow the
clutch to slip.
The clutch may also cool down during the journey.
It may take several minutes for it to cool down. When the clutch
has cooled down, the display message disappears. The clutch is
fully operational again. Trans. Trans.
oil
oiloverhea‐
overhea‐
ted Drive on with
ted Drive on with
care care AMG vehicles: the transmission oil has overheated.
Manual drive program
Mand the temporarily active manual drive
program are no longer available. Engine power output is reduced.
X Allow the vehicle to cool down. 284
Display
messagesOn-board computer and displays
Page 365 of 401
Interchanging the front and rear wheels of
differing dimensions can render the general
operating permit invalid.
Always pay attention to the instructions and
safety notes when changing a wheel
(Y page 361).
The wear patterns on the front and rear tyres differ, depending on the operating conditions. Interchange the wheels before a clear wear
pattern has formed on the tyres. Front tyres
typically wear more on the shoulders and the
rear tyres in the centre.
On vehicles that have the same size front and rear wheels, you can interchange the wheels
every 5,000 to 10,000 km depending on the
degree of tyre wear. Ensure that the direction
of rotation is maintained.
Clean the contact surfaces of the wheel and
the brake disc thoroughly every time a wheel
is interchanged. Check the tyre pressure and, if necessary, restart the tyre pressure loss
warning system or the tyre pressure monitor. Direction of rotation
Tyres with a specified direction of rotation
have additional benefits, e.g. if there is a risk of aquaplaning. You will only gain these ben-
efits if the correct direction of rotation is
observed.
An arrow on the sidewall of the tyre indicates
its correct direction of rotation. Storing wheels
Store wheels that are not being used in a cool, dry and preferably dark place. Protect the
tyres against oil, grease, petrol and diesel. Cleaning the wheels
G
WARNING
The water jet of circular-jet nozzles (dirt grind- ers) can cause damage not visible from the
outside to tyres or chassis components. Com- ponents damaged in this way can unexpect-
edly fail. There is a risk of an accident.
Do not use high-pressure cleaners with circu- lar-jet nozzles to clean the vehicle. Have dam-aged tyres or chassis components replaced
immediately. Fitting a wheel
Preparing the vehicle X
Stop the vehicle on solid, non-slippery and
level ground.
X Apply the electric parking brake manually
(Y page 180).
X Move the front wheels to the straight-
ahead position.
X Vehicles with manual transmission:
depress the clutch pedal fully and engage
first or reverse gear.
X Vehicles with automatic transmission:
move the DIRECT SELECT lever to P.
X Switch off the engine.
X Remove the key from the ignition lock.
X If a trailer is coupled to the vehicle, uncou-
ple it.
X If included in the vehicle equipment,
remove the tyre-change tool kit from the
vehicle.
X Secure the vehicle to prevent it from rolling
away.
i Apart from certain country-specific varia-
tions, vehicles are not equipped with a tyre-
change tool kit. For information on which
tools are required to perform a wheel
change on your vehicle, consult a
Mercedes-Benz Service Centre.
Necessary wheel-changing tools may
include, for example:
R jack
R wheel chock
R wheel wrench 362
Changing a wheelWheels and tyres