2013 MERCEDES-BENZ GLA SUV length
[x] Cancel search: lengthPage 184 of 401

Releasing
X Pull handle :.
The red !indicator lamp in the instru-
ment cluster goes out.
i You can only release the electric parking
brake when the key is in position 1or 2in
the ignition lock.
Applying automatically The electric parking brake is applied auto-
matically:
R if DISTRONIC PLUS brings the vehicle to a
standstill (vehicles with automatic trans-
mission) or
R if the HOLD function is keeping the vehicle
stationary or
R if Active Parking Assist is holding the vehi-
cle at a standstill
In addition, at least one of the following con-
ditions must be fulfilled:
R the engine is switched off
R the driver's door is open and the seat belt is
not fastened
R there is a system malfunction
R the power supply is insufficient
R the vehicle is stationary for a lengthy period
The red !indicator lamp in the instrument
cluster lights up.
i The electric parking brake is not automat-
ically applied if the engine is switched off by
the ECO start/stop function.
Releasing automatically i
The electric parking brake can only be
released automatically in vehicles with
automatic transmission.
The electric parking brake of your vehicle is
released automatically when all of the follow- ing conditions are fulfilled:
R the engine is running.
R the transmission is in position Dor R. R
the seat belt is fastened.
R you depress the accelerator pedal.
If the transmission is in position R, the tailgate
must be closed.
If your seat belt is not fastened, the following conditions must be fulfilled to automatically
release the electric parking brake:
R the driver's door is closed.
R you have shifted out of transmission posi-
tion Por you have previously driven faster
than 3 km/h.
i Ensure that you do not depress the accel-
erator pedal unintentionally. Otherwise the
parking brake will be released and the vehi-
cle will start to move.
Emergency braking The vehicle can also be braked during an
emergency by using the electric parking
brake.
X While driving, push handle :of the electric
parking brake (Y page 180).
i The vehicle is braked as long as you keep
handle :of the electric parking brake
pressed. The longer the electric parking
brake handle :is depressed, the greater
the braking force.
During braking:
R a warning tone sounds
R the Release parking brake Release parking brake message
appears
R the red !indicator lamp in the instru-
ment cluster flashes
When the vehicle has been braked to a stand- still, the electric parking brake is applied. Parking up the vehicle
If you leave the vehicle parked up for longer
than four weeks, the battery may be damaged by exhaustive discharging. Parking
181Driving and parking Z
Page 218 of 401

X
Drive forwards and reverse as prompted by
the PARKTRONIC warning displays, several
times if necessary.
X Vehicles with manual transmission:
stop, at the latest when PARKTRONIC
sounds the continuous warning tone.
Once you have exited the parking space com- pletely, the steering wheel is moved to the
straight-ahead position. You hear a tone and
the Park Assist switched off Park Assist switched off message
appears in the multifunction display. You will
then have to steer and merge into traffic on
your own. PARKTRONIC is still available. You
can take over the steering before the vehicle has exited the parking space completely. This
is useful, for example when you recognise
that it is already possible to pull out of the
parking space.
Cancelling Active Parking Assist You can cancel Active Parking Assist at any
time.
X Stop the movement of the multifunction
steering wheel or steer yourself.
Active Parking Assist will be cancelled at
once. The Park Assist cancelled Park Assist cancelled mes-
sage appears in the multifunction display.
or
X Press the PARKTRONIC button on the
centre console (Y page 208).
PARKTRONIC is switched off and Active
Parking Assist is immediately cancelled.
The Park Assist cancelled
Park Assist cancelled message
appears in the multifunction display.
Active Parking Assist is cancelled automati-
cally if:
R the electric parking brake is applied
R transmission position Pis selected
R parking using Active Parking Assist is no
longer possible
R you are driving faster than 10 km/h
R a wheel spins and ESP ®
intervenes or fails.
The ÷ warning lamp lights up in the
instrument cluster. A warning tone sounds. The parking symbol
disappears and the multifunction display
shows the Park Assist cancelled
Park Assist cancelled mes-
sage.
When Active Parking Assist is cancelled, you
must steer again yourself.
Vehicles with automatic transmission: if a
system malfunction occurs, the vehicle is
braked to a standstill. To drive on, depress the
accelerator again.
Towing a trailer For vehicles with a trailer tow hitch, the min-
imum required length for parking spaces is
slightly increased.
If you have attached a trailer to your vehicle,
you should not use Active Parking Assist.
Once the electrical connection is established between your vehicle and the trailer, Active
Parking Assist is no longer available. PARK-
TRONIC is deactivated for the rear area. Reversing camera
General notes Reversing camera
:is in the handle on the
tailgate.
The reversing camera is an optical parking
and manoeuvring aid. It uses guide lines to
show the area behind your vehicle in the
Audio/COMAND display.
The area behind the vehicle is displayed as a
mirror image, as in the rear-view mirror. Driving systems
215Driving and parking Z
Page 223 of 401
apply to objects that are at the same level
as the ball coupling.
X Reverse carefully, making sure that trailer
drawbar locating aid =points approx-
imately in the direction of trailer draw-
bar ?.
X Reverse carefully until trailer drawbar ?
touches red guide line ;.
X Couple up the trailer (Y page 225).ATTENTION ASSIST
General notes ATTENTION ASSIST helps you during long,
monotonous journeys such as on motorways and trunk roads. It is active in the 80 km/h to
180 km/h range.
If ATTENTION ASSIST detects typical indica-
tors of fatigue or increasing lapses in con-
centration on the part of the driver, it sug-
gests taking a break.
Important safety notes ATTENTION ASSIST is only an aid. It may not
always detect fatigue or lapses in concentra-
tion until too late, or may not detect them at
all. The system is not a substitute for a well-
rested and attentive driver.
ATTENTION ASSIST assesses your level of
fatigue or lapses in concentration by taking
the following criteria into account:
R your personal driving style, e.g. steering
characteristics
R journey-related parameters, e.g. time of
day, length of journey
The functionality of ATTENTION ASSIST is
restricted, and warnings may be delayed or
not occur at all:
R if the road condition is poor, e.g. if the sur-
face is uneven or if there are potholes
R if there is a strong side wind R
if you have adopted a sporty driving style
with high cornering speeds or high rates of
acceleration
R if you are predominantly driving slower
than 80 km/h or faster than 180 km/h
R if you are currently using COMAND Online
or making a telephone call with COMAND
Online
R if the time has been set incorrectly
R in active driving situations, such as when
you change lanes or change your speed
Warning and display messages in the
multifunction display X
Activate ATTENTION ASSIST using the on-
board computer (Y page 244).
If ATTENTION ASSIST is active, you will be
warned no sooner than 20 minutes after
your journey has begun. You then hear an
intermittent warning tone twice and the
Attention Assist: Take a break! Attention Assist: Take a break!
message appears in the multifunction dis-
play.
X If necessary, take a break.
X Press the aor% button to confirm
the message.
On long journeys, take regular breaks in good
time to allow yourself to rest properly. If you
do not take a break, you will be warned again
after 15 minute sat the earliest. This will only
happen if ATTENTION ASSIST still detects
typical indicators of fatigue or increasing lap-
ses in concentration.
ATTENTION ASSIST is reset and starts
assessing your tiredness again when you con- tinue your journey if:
R you switch off the engine
R you take off your seat belt and open the
driver's door, e.g. for a change of drivers or
to take a break
When ATTENTION ASSIST is deactivated, the é symbol appears in the multifunction
display in the assistance graphic display. 220
Driving systemsDriving an
d parking
Page 256 of 401
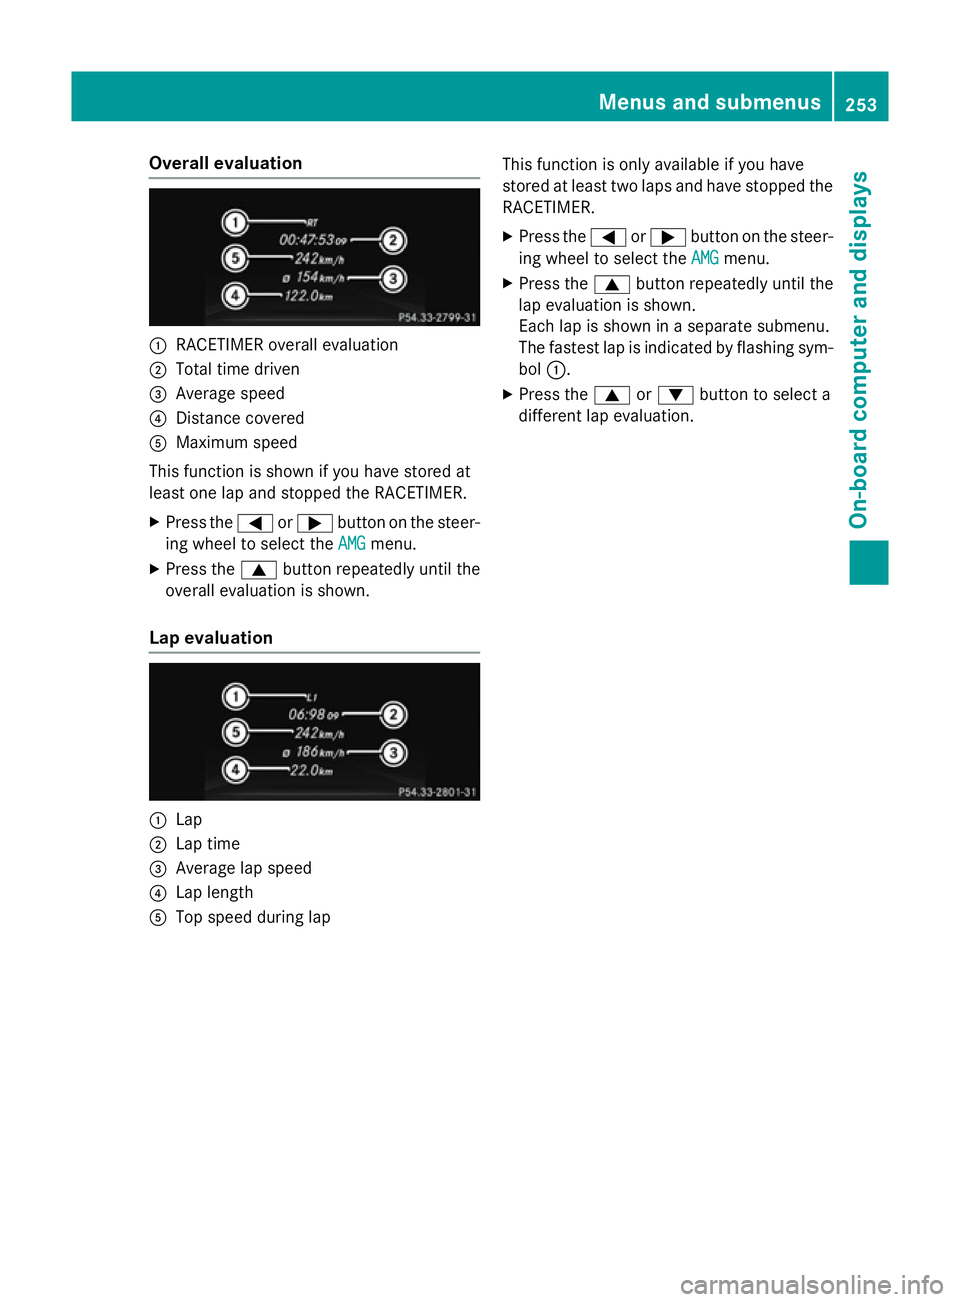
Overall evaluation
:
RACETIMER overall evaluation
; Total time driven
= Average speed
? Distance covered
A Maximum speed
This function is shown if you have stored at
least one lap and stopped the RACETIMER.
X Press the =or; button on the steer-
ing wheel to select the AMG AMGmenu.
X Press the 9button repeatedly until the
overall evaluation is shown.
Lap evaluation :
Lap
; Lap time
= Average lap speed
? Lap length
A Top speed during lap This function is only available if you have
stored at least two laps and have stopped the
RACETIMER.
X Press the =or; button on the steer-
ing wheel to select the AMG AMGmenu.
X Press the 9button repeatedly until the
lap evaluation is shown.
Each lap is shown in a separate submenu.
The fastest lap is indicated by flashing sym- bol :.
X Press the 9or: button to select a
different lap evaluation. Menus and submenus
253On-board computer and displays Z
Page 308 of 401
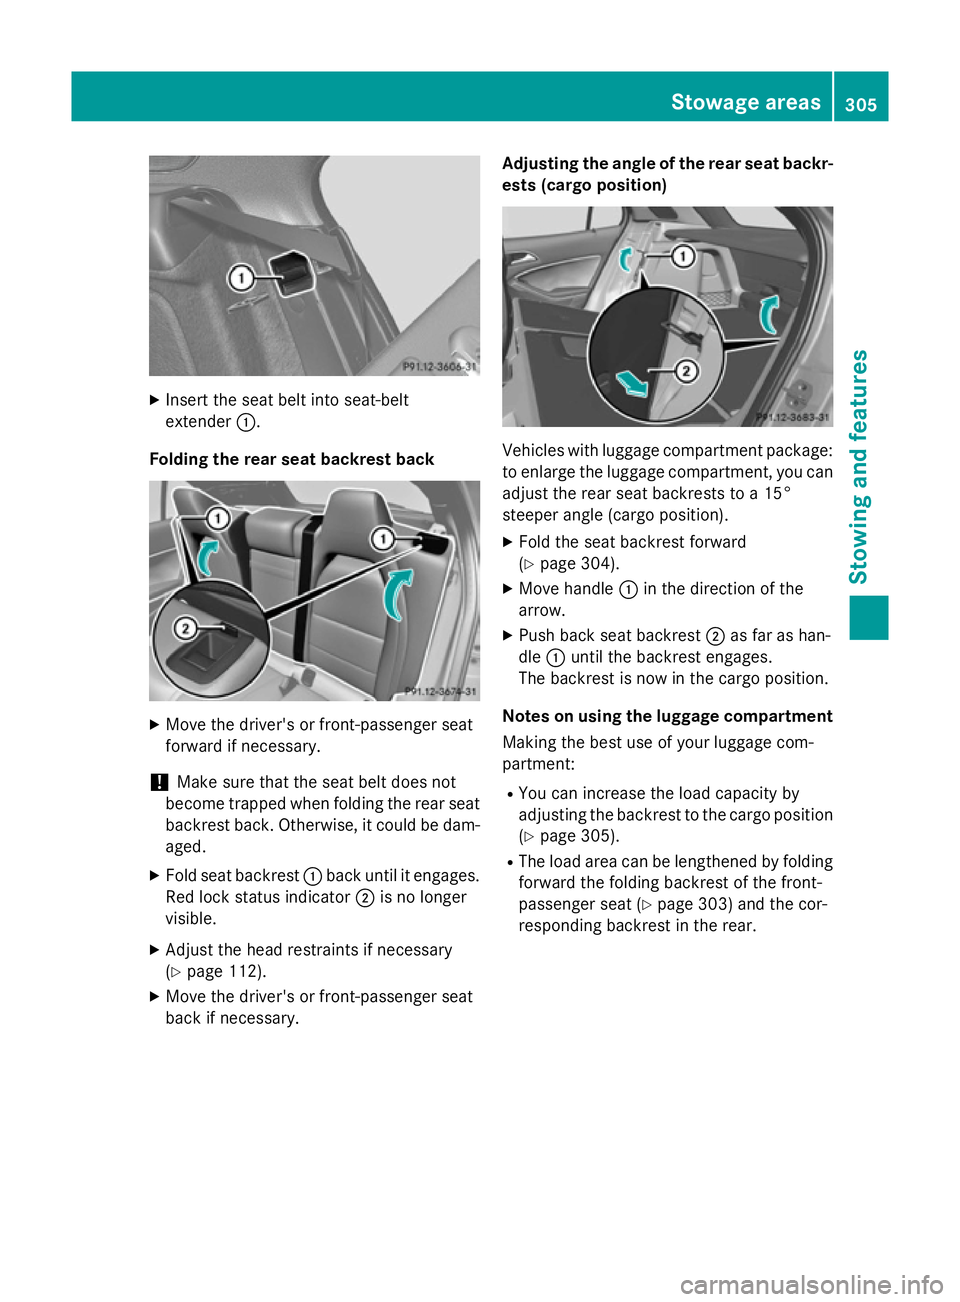
X
Insert the seat belt into seat-belt
extender :.
Folding the rear seat backrest back X
Move the driver's or front-passenger seat
forward if necessary.
! Make sure that the seat belt does not
become trapped when folding the rear seat backrest back. Otherwise, it could be dam-
aged.
X Fold seat backrest :back until it engages.
Red lock status indicator ;is no longer
visible.
X Adjust the head restraints if necessary
(Y page 112).
X Move the driver's or front-passenger seat
back if necessary. Adjusting the angle of the rear seat backr-
ests (cargo position) Vehicles with luggage compartment package:
to enlarge the luggage compartment, you canadjust the rear seat backrests to a 15°
steeper angle (cargo position).
X Fold the seat backrest forward
(Y page 304).
X Move handle :in the direction of the
arrow.
X Push back seat backrest ;as far as han-
dle :until the backrest engages.
The backrest is now in the cargo position.
Notes on using the luggage compartment Making the best use of your luggage com-
partment:
R You can increase the load capacity by
adjusting the backrest to the cargo position
(Y page 305).
R The load area can be lengthened by folding
forward the folding backrest of the front-
passenger seat (Y page 303) and the cor-
responding backrest in the rear. Stowage areas
305Stowing and features Z
Page 343 of 401
The vehicle electronics may otherwise be
damaged.
R on vehicles with automatic transmission,
the transmission is locked in position P
after disconnecting the battery. The vehi-
cle is secured against rolling away. You
can then no longer move the vehicle.
The battery and the cover of the positive
terminal clamp must be fitted securely dur- ing operation.
Comply with safety precautions and take pro-
tective measures when handling batteries. WARNING
Fire, naked flames and smoking
are prohibited when handling the
battery. Avoid creating sparks. Battery acid is caustic. Avoid con-
tact with the skin, eyes or clothing.
Wear suitable protective clothing,
in particular gloves, an apron and a
face mask.
Immediately rinse acid splashes
off with clean water. Consult a doc-
tor if necessary. Wear eye protection.
Keep children away.
Observe this Owner's Manual.
For safety reasons, Mercedes–Benz recom-
mends that you only use batteries that have
been tested and approved for your vehicle by
Mercedes-Benz. These batteries have greater impact resistance and as a result there is no
risk of acid burns to occupants when a batteryis damaged in an accident. In order for the battery to achieve the maxi-
mum possible service life, it must always be
sufficiently charged.
Like other batteries, the vehicle battery may
discharge over time if you do not use the
vehicle. In such cases, have the battery dis-
connected at a qualified specialist workshop.
You can also charge the battery with a
charger recommended by Mercedes-Benz.
For more information, please contact a quali-
fied specialist workshop.
Have the battery charge checked more fre-
quently if you use the vehicle mainly for short
trips or if you leave it standing idle for a
lengthy period. Consult a qualified specialist
workshop if you wish to leave your vehicle
parked up for a long period of time.
i When you park the vehicle, remove the
key if you do not require any electrical con-
sumers. The vehicle will then use very little energy, thus conserving battery power.
i If the power supply has been interrupted,
e.g. if the battery was discharged, you will
have to:
R set the clock (audio system/COMAND
Online, see the separate operating
instructions).
R reset the function for folding the exterior
mirrors in/out automatically, by folding
the mirrors out once (Y page 116). Charging the battery
G
WARNING
During charging and jump-starting, explosive
gases can escape from the battery. There is a risk of an explosion.
Particularly avoid fire, naked flames, creating
sparks and smoking. Ensure there is sufficient
ventilation while charging and jump-starting.
Do not lean over a battery. G
WARNING
Battery acid is caustic. There is a risk of injury. 340
Battery (vehicle)Breakdown assistance
Page 345 of 401
Jump-starting
For the jump-starting procedure, use only the jump-starting connection point, consisting of a positive terminal and an earth point, in the engine compartment. G
WARNING
Battery acid is caustic. There is a risk of injury.
Avoid contact with the skin, eyes or clothing. Do not inhale any battery gases. Do not lean over the battery. Keep children away from batteries. Wash battery acid immediately with water and seek
medical attention. G
WARNING
During charging and jump-starting, explosive gases can escape from the battery. There is a risk of an explosion.
Particularly avoid fire, naked flames, creating sparks and smoking. Ensure there is sufficient
ventilation while charging and jump-starting. Do not lean over a battery. G
WARNING
During the charging process, a battery produces hydrogen gas. If a short circuit occurs or sparks
are created, the hydrogen gas can ignite. There is a risk of an explosion.
R Make sure that the positive terminal of a connected battery does not come into contact with
vehicle parts.
R Never place metal objects or tools on a battery.
R It is important that you observe the described order of the battery terminals when connecting
and disconnecting a battery.
R When jump-starting, make sure that the battery poles with identical polarity are connected.
R It is particularly important to observe the described order when connecting and disconnecting
the jump leads.
R Never connect or disconnect the battery terminals while the engine is running. G
WARNING
A discharged battery can freeze at temperatures below freezing point. When jump-starting the
vehicle or charging the battery, gases can escape from the battery. There is a risk of an explosion.
Allow the frozen battery to thaw out before charging it or jump-starting.
! Vehicles with a petrol engine:
avoid repeated and lengthy starting attempts. Otherwise,
the non-combusted fuel may damage the catalytic converter.
If the indicator/warning lamps do not light up at low temperatures, it is very likely that the
discharged battery has frozen. In this case you may neither jump-start the vehicle nor charge
the battery. The service life of a battery that has been thawed may be reduced. The starting
characteristics may be impaired, especially at low temperatures. Have the thawed battery
checked at a qualified specialist workshop. 342
Jump-startingBreakdown assistance
Page 395 of 401

R
vehicle-specific weight information can be
found on the vehicle identification plate
(Y page 384).
R only for certain countries: you can find vehi-
cle-specific vehicle data in the COC docu-
ments (Certificate of Conformity). These
documents are delivered with your vehicle. Dimensions and weights
Model
: :
Maxi- mum
head- room ;
;
Opening height AMG vehicles
1866 mm 2019 mm
All other models
1876 mm 2045 mm
Missing values were not available at the time
of going to print. AMG vehicles
Vehicle length
4445 mm
Vehicle width including
exterior mirrors
2022 mm
Vehicle width excluding
exterior mirrors
1805 mm
Vehicle height
1479 mm
Wheelbase
2699 mm
Maximum roof load
100 kg All other models
Vehicle length
4417 mm
Vehicle width including
exterior mirrors
2022 mm
Vehicle width excluding
exterior mirrors
1804 mm
Vehicle height
1494 mm
Wheelbase
2699 mm
Model Maximum roof
load GLA 180
GLA 180 CDI
All other models
75 kg
Model Maximum boot
load GLA 180
GLA 180 CDI
All other models
100 kg
Vehicle data for off-road driving
Maximum water depth
! The water depth must not exceed the
specified value. Note that the permissible
water depth is less in flowing water. 392
Vehicle data for off-road drivingTechnical data