2013 MERCEDES-BENZ GLA SUV key battery
[x] Cancel search: key batteryPage 9 of 401

BAS (Brake Assist System)
................. 73
Battery (key)
Checking .......................................... 88
Important safety notes .................... 88
Replacing ......................................... 89
Battery (vehicle)
Charging ........................................ 340
Display message ............................ 273
Important safety notes .................. 338
Jump starting ................................. 342
Belt
see Seat belts
Belt tensioner
Activation ......................................... 57
Blind Spot Assist
Activating/deactivating ................. 245
Display message ............................ 276
Notes/function .............................. 222
Trailer towing ................................. 224
Bonnet
Active bonnet (pedestrian protec-tion) ............................................... 316
Closing ........................................... 318
Display message ............................ 285
Important safety notes .................. 316
Opening ......................................... 317
Boot
see Tailgate
Boot load (maximum) ........................ 391
Brake Assist
see BAS (Brake Assist System)
Brake fluid
Display message ............................ 261
Notes ............................................. 390
Brake lamps
Adaptive ........................................... 76
Changing bulb s.............................. 131
Display message ............................ 269
Brakes
ABS .................................................. 72
Adaptive Brake Assist ...................... 74
BAS .................................................. 73
Brake fluid (notes) ......................... 390
Display message ............................ 255
Driving tips .................................... 183
HOLD function ............................... 201
Important safety notes .................. 183
Parking brake ................................ 180 Warning lamp ................................. 289
Breakdown
see Flat tyre
see Towing away/tow-starting
Bulbs
see Replacing bulbs C
Calling up a fault see Display messages
Capacities (technical data) ............... 384
Car
see Vehicle
Car wash (care) ................................. 323
Care
Automatic car wash ....................... 323
Carpets .......................................... 329
Display ........................................... 328
Exhaust pipe .................................. 327
Exterior lighting ............................. 326
Gear or selector lever .................... 328
High-pressure cleaner .................... 324
Interior ........................................... 328
Matt paintwork .............................. 325
Notes ............................................. 323
Paint .............................................. 325
Plastic trim .................................... 328
Reversing camera .......................... 327
Roof lining ...................................... 329
Seat belt ........................................ 329
Seat cove r..................................... 328
Sensors ......................................... 326
Steering wheel ............................... 328
Trim pieces .................................... 328
Washing by hand ........................... 324
Wheels ........................................... 324
Windows ........................................ 325
Wiper blades .................................. 326
Wooden trim .................................. 328
Central locking
Automatic locking (on-board com-
puter) ............................................. 249
Locking/unlocking (key) .................. 87
Centre console
Lower section .................................. 37
Upper section .................................. 36 6
Index
Page 15 of 401

H
Handbrake see Parking brake
Hazard warning lamps ...................... 123
Display message ............................ 287
Head restraints
Adjusting ....................................... 111
Adjusting (electrically) ................... 111
Adjusting (manually) ...................... 111
Adjusting (rear) .............................. 112
Fitting/removing (rear) .................. 112
Headlamp
Cleaning system (function) ............ 124
Cleaning system (notes) ............... .391
Headlamps
Misting up ...................................... 126
Topping up the cleaning system .... 321
see Automatic headlamp mode
Heating
see Climate control
High-pressure cleaners .................... 324
Hill start assist .................................. 161
HOLD function
Activating ....................................... 202
Deactivating ................................... 202
Display message ............................ 275
Function/notes ............................ .201 I
Ignition lock see Key positions
Immobiliser .......................................... 81
Indicator and warning lamp
Restraint system ............................ 294
Indicator and warning lamps
Coolant .......................................... 295
DISTRONIC PLUS ........................... 297
Engine diagnostics ......................... 295
SPORT handling mode ................... 292
Indicator lamps
Display message ............................ 269
see Warning and indicator lamps
Indicators
see Turn signals
Instrument cluster
Overview .......................................... 32 Settings ......................................... 246
Warning and indicator lamps ........... 34
Instrument cluster lighting .............. 234
Intelligent Light System
Activating/deactivating ................. 247
Display message ............................ 271
Overview ........................................ 124
Setting the dipped-beam head-
lamps for driving on the right/left .. 247
Interior lighting ................................. 127
Automatic control system .............. 127
Delayed switch-off (on-board
computer) ...................................... 248
Emergency lighting ........................ 128
Manual control ............................... 128
Overview ........................................ 127
Reading lamp ................................. 127
Setting the ambient lighting
brightness (on-board computer) .... 247
Interior motion sensor
Deactivating ..................................... 83
Function .......................................... .82
Priming ............................................ 82
Switching off .................................... 82
ISOFIX child seat securing system ....61 J
Jack Storage location ............................3 33
Using ............................................. 363
Jump starting (engine) ......................342 K
Key Changing the battery ....................... 89
Checking the battery ....................... 88
Convenience closing feature ............ 99
Convenience opening feature .......... 99
Display message ............................ 287
Door central locking/unlocking ....... 87
Emergency key element ................... 87
Important safety notes .................... 86
Loss ................................................. 90
Modifying the programming ............. 87
Positions (ignition lock) ................. 159
Problem (malfunction) ..................... 90 12
Index
Page 90 of 401

is triggered if the door is opened from the
inside. Switch off the alarm . Key functions
:
& To lock the vehicle
; F To open the tailgate
= % To unlock the vehicle
X To unlock centrally: press button=.
If you do not open the vehicle within approx-
imately 40 seconds of unlocking: R the vehicle is locked again
R the anti-theft system is primed again
X To lock centrally: press button:.
The key centrally locks/unlocks: R the doors
R the tailgate
R the fuel filler flap
When unlocking, the turn signals flash once.
When locking, they flash three times.
i When it is dark, the surround lighting also
comes on if it is activated in the on-board
computer (Y page 247).
i You can also set an audible signal to con-
firm that the vehicle has been locked. The
audible signal can be activated and deacti- vated using the on-board computer
(Y page 249).
X To open the tailgate automatically:
press button ;until the tailgate opens
(Y page 96). Changing the settings of the locking
system
You can change the settings of the locking
system. This means that only the driver's door
and the fuel filler flap are unlocked when the
vehicle is unlocked. This is useful if you fre-
quently travel on your own.
X To change the setting: press and hold
down the %and& buttons simulta-
neously for approximately six seconds until
battery check lamp (Y page 88) flashes
twice.
i If the setting of the locking system is
changed within the signal range of the vehi- cle, pressing the &or% button:
R locks or
R unlocks the vehicle
The key now functions as follows:
X To unlock the driver's door: press the
% button once.
X To unlock centrally: press the%but-
ton twice.
X To lock centrally: press the&button.
X To restore the factory settings: press
and hold down the %and& buttons
simultaneously for approximately six sec-
onds until the battery check lamp flashes
twice (Y page 88). Emergency key element
General notes If the vehicle can no longer be unlocked with
the key, use the emergency key element.
If you use the emergency key element to
unlock and open the driver's door, the anti-
theft alarm system will be triggered
(Y page 81). Key
87Opening and closing Z
Page 91 of 401

There are several ways to deactivate the
alarm:
X Press the %or& button on the key.
or X Insert the key into the ignition lock.
If you unlock the vehicle using the emergency
key element, the fuel filler flap will not be
unlocked automatically.
X To unlock the fuel filler flap: insert the
key into the ignition lock.
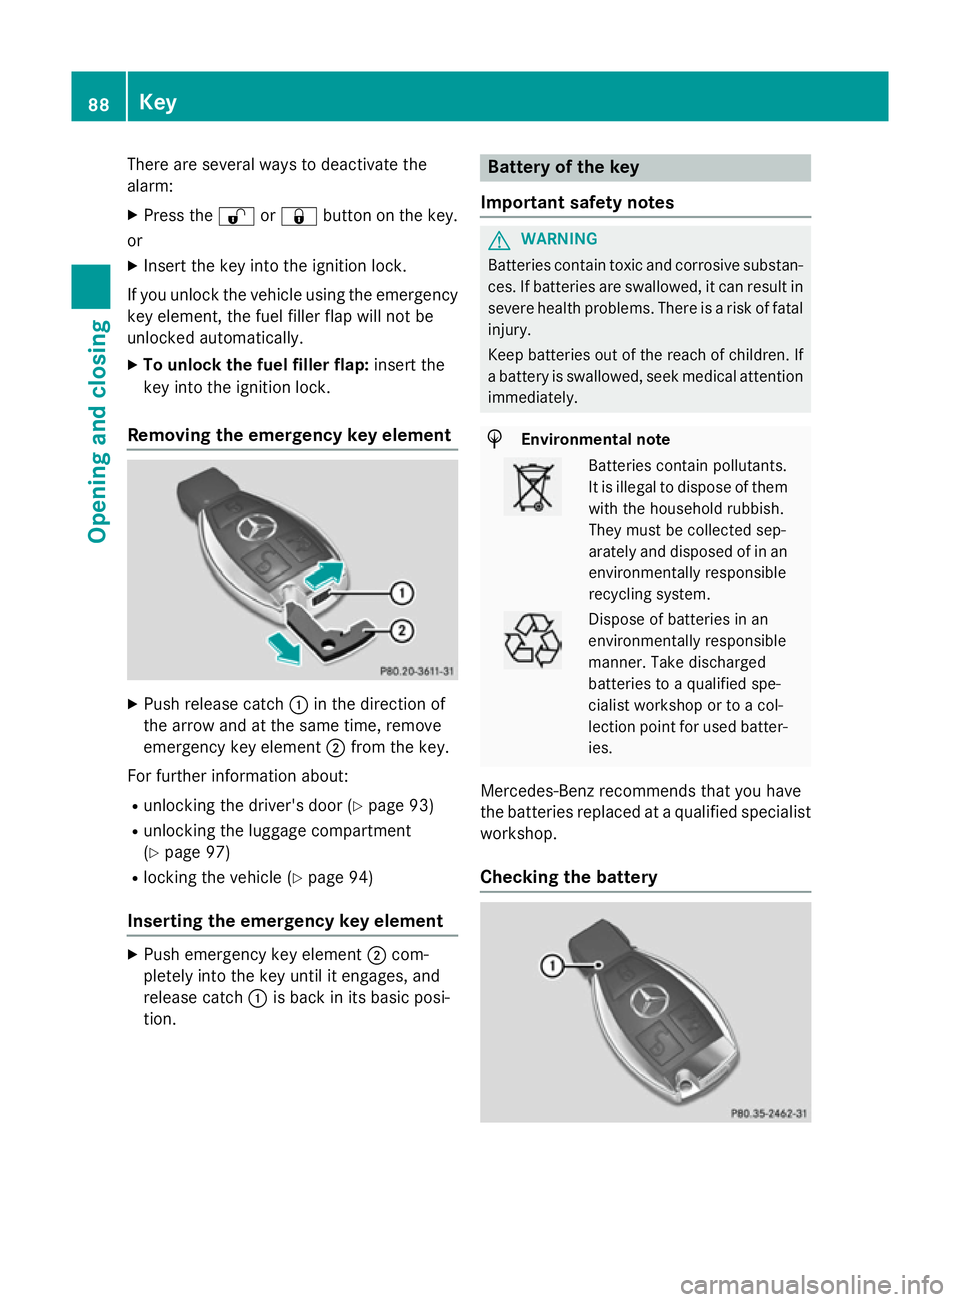
Removing the emergency key element X
Push release catch :in the direction of
the arrow and at the same time, remove
emergency key element ;from the key.
For further information about: R unlocking the driver's door (Y page 93)
R unlocking the luggage compartment
(Y page 97)
R locking the vehicle (Y page 94)
Inserting the emergency key element X
Push emergency key element ;com-
pletely into the key until it engages, and
release catch :is back in its basic posi-
tion. Battery of the key
Important safety notes G
WARNING
Batteries contain toxic and corrosive substan- ces. If batteries are swallowed, it can result in
severe health problems. There is a risk of fatal injury.
Keep batteries out of the reach of children. If
a battery is swallowed, seek medical attention immediately. H
Environmental note Batteries contain pollutants.
It is illegal to dispose of them
with the household rubbish.
They must be collected sep-
arately and disposed of in anenvironmentally responsible
recycling system. Dispose of batteries in an
environmentally responsible
manner. Take discharged
batteries to a qualified spe-
cialist workshop or to a col-
lection point for used batter-
ies.
Mercedes-Benz recommends that you have
the batteries replaced at a qualified specialist workshop.
Checking the battery 88
KeyOpening and closing
Page 92 of 401

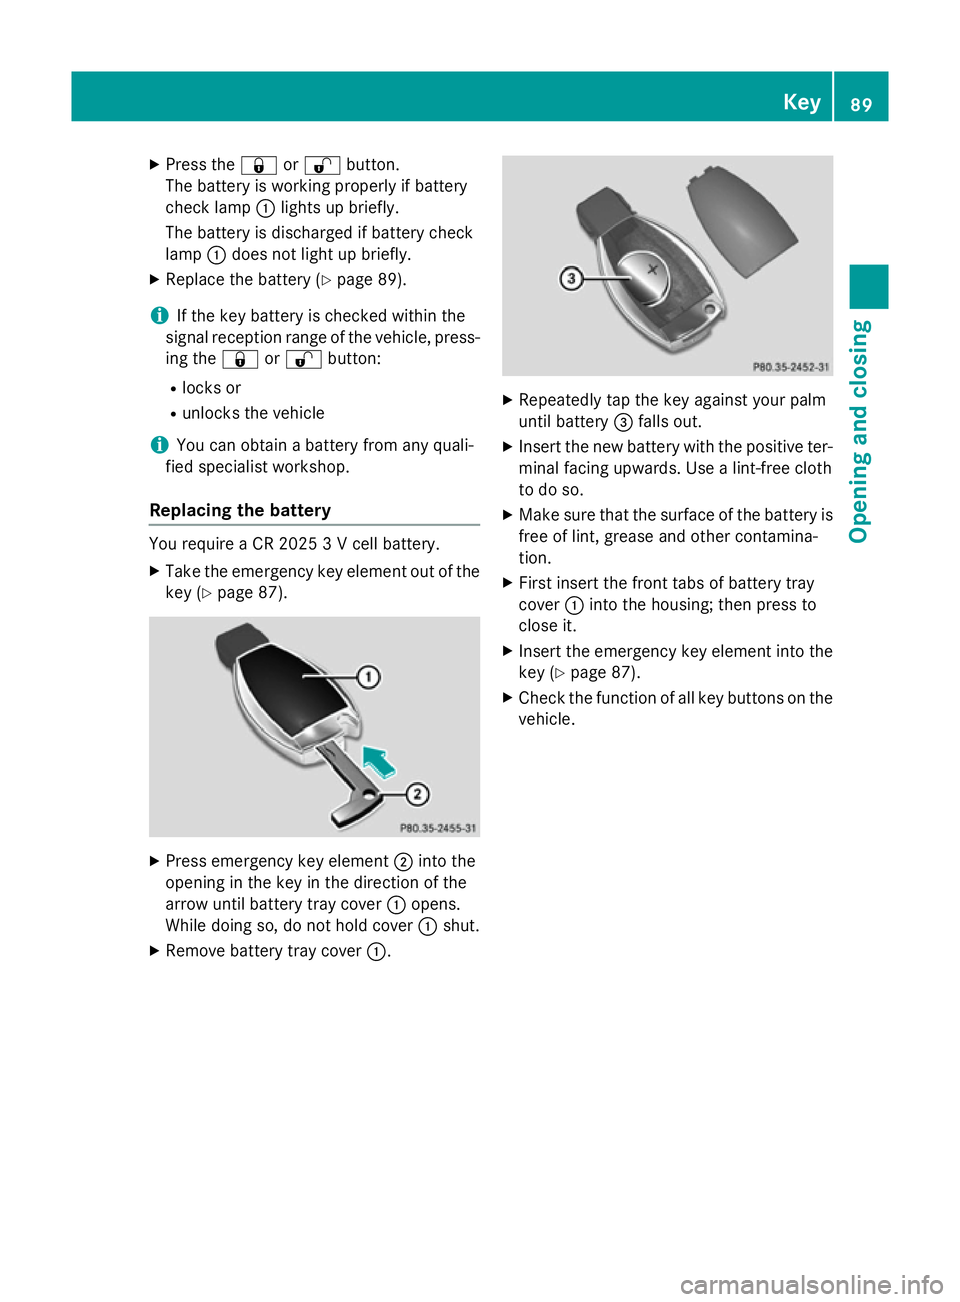
X
Press the &or% button.
The battery is working properly if battery
check lamp :lights up briefly.
The battery is discharged if battery check
lamp :does not light up briefly.
X Replace the battery (Y page 89).
i If the key battery is checked within the
signal reception range of the vehicle, press- ing the &or% button:
R locks or
R unlocks the vehicle
i You can obtain a battery from any quali-
fied specialist workshop.
Replacing the battery You require a CR 2025 3 V cell battery.
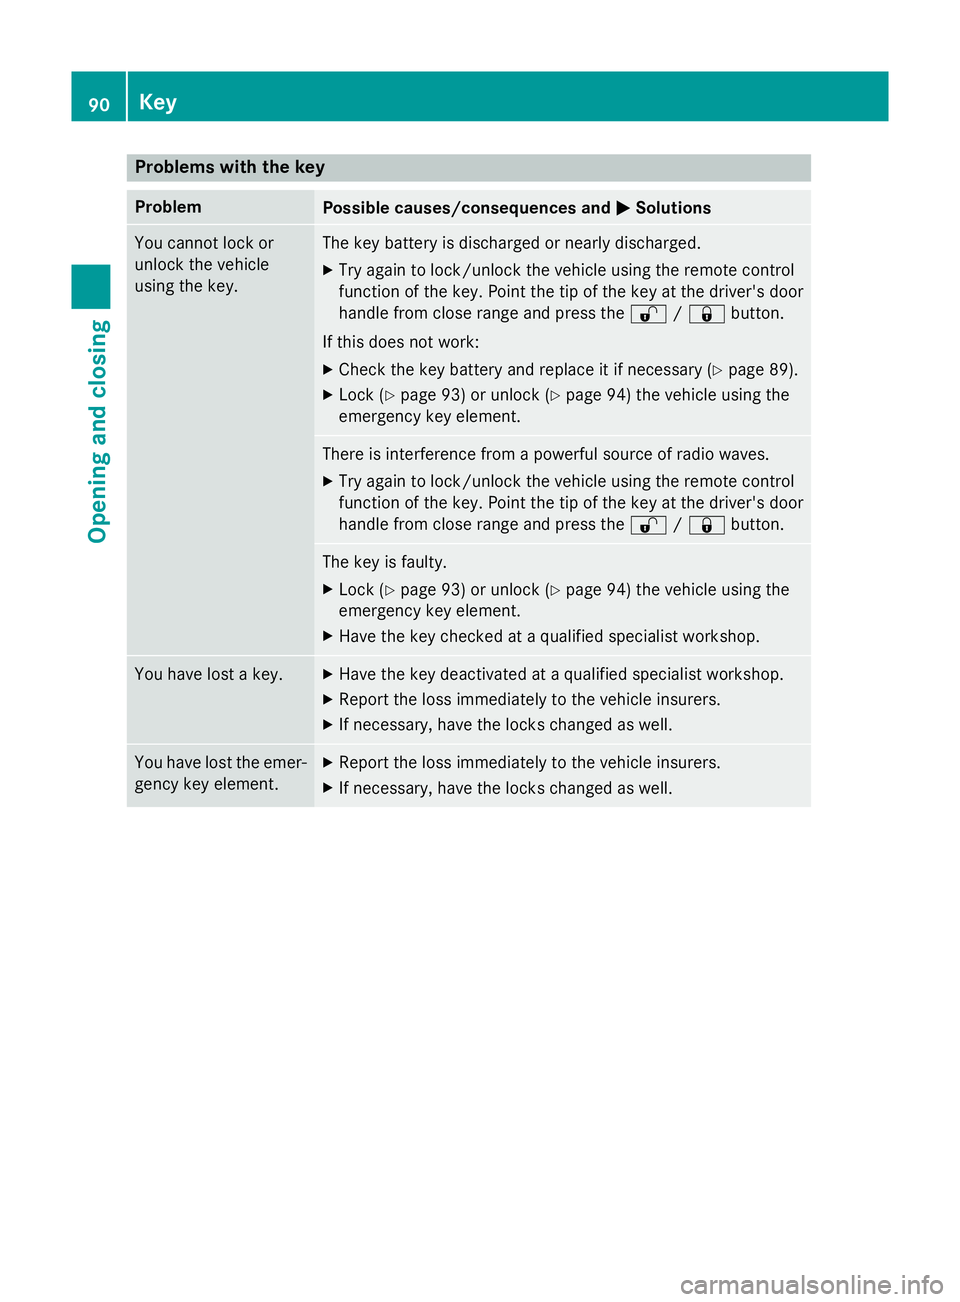
X Take the emergency key element out of the
key (Y page 87). X
Press emergency key element ;into the
opening in the key in the direction of the
arrow until battery tray cover :opens.
While doing so, do not hold cover :shut.
X Remove battery tray cover :. X
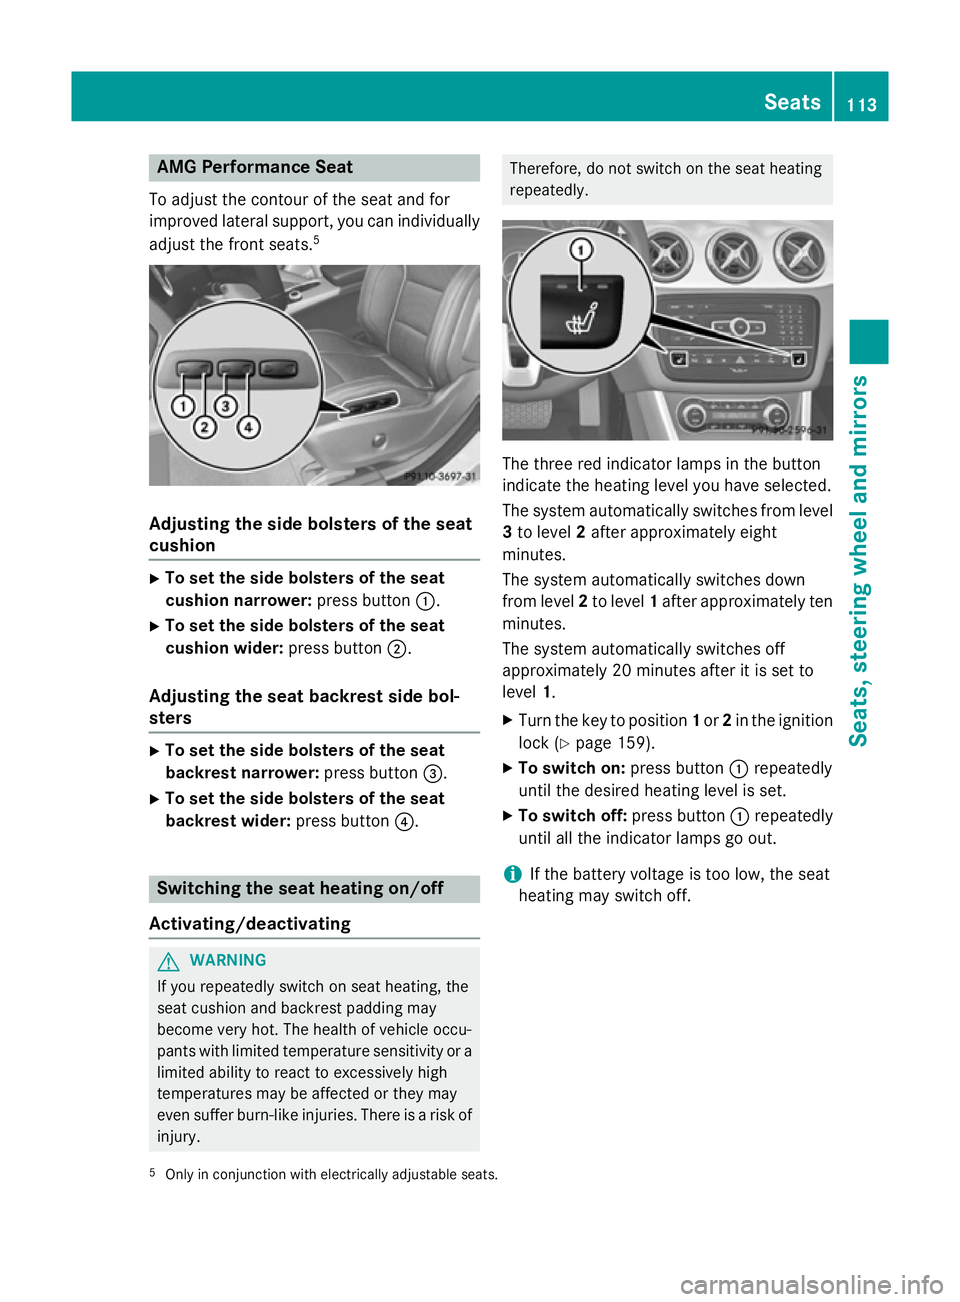
Repeatedly tap the key against your palm
until battery =falls out.
X Insert the new battery with the positive ter-
minal facing upwards. Use a lint-free cloth
to do so.
X Make sure that the surface of the battery is
free of lint, grease and other contamina-
tion.
X First insert the front tabs of battery tray
cover :into the housing; then press to
close it.
X Insert the emergency key element into the
key (Y page 87).
X Check the function of all key buttons on the
vehicle. Key
89Opening and closing Z
Page 93 of 401

Problems with the key
Problem
Possible causes/consequences and
M
MSolutions You cannot lock or
unlock the vehicle
using the key. The key battery is discharged or nearly discharged.
X Try again to lock/unlock the vehicle using the remote control
function of the key. Point the tip of the key at the driver's door
handle from close range and press the %/& button.
If this does not work: X Check the key battery and replace it if necessary (Y page 89).
X Lock (Y page 93) or unlock (Y page 94) the vehicle using the
emergency key element. There is interference from a powerful source of radio waves.
X Try again to lock/unlock the vehicle using the remote control
function of the key. Point the tip of the key at the driver's door
handle from close range and press the %/& button. The key is faulty.
X Lock (Y page 93) or unlock (Y page 94) the vehicle using the
emergency key element.
X Have the key checked at a qualified specialist workshop. You have lost a key. X
Have the key deactivated at a qualified specialist workshop.
X Report the loss immediately to the vehicle insurers.
X If necessary, have the locks changed as well. You have lost the emer-
gency key element. X
Report the loss immediately to the vehicle insurers.
X If necessary, have the locks changed as well. 90
KeyOpening and closing
Page 94 of 401

Problem
Possible causes/consequences and
M
MSolutions The engine cannot be
started using the key. The on-board voltage is too low.
X Switch off non-essential consumers, e.g. seat heating or interior
lighting, and try to start the engine again.
If this does not work:
X Check the starter battery and charge it if necessary
(Y page 338).
or
X Jump-start the vehicle (Y page 342).
or
X Consult a qualified specialist workshop. The engine cannot be
started using the key. The steering lock is mechanically blocked.
X Remove the key and reinsert it into the ignition lock. While doing
this, turn the steering wheel in both directions. Doors
Important safety notes
G
WARNING
If children are left unsupervised in the vehicle, they could:
R open doors, thereby endangering other per-
sons or road users
R get out and be struck by oncoming traffic
R operate vehicle equipment and become
trapped, for example
In addition, the children could also set the
vehicle in motion, for example, if they:
R release the parking brake
R shift the automatic transmission out of park
position P or shift manual transmission into
neutral
R start the engine
There is a risk of an accident and injury.
When leaving the vehicle, always take the key with you and lock the vehicle. Never leave
children and animals unattended in the vehi-
cle. Keep the keys out of the reach of children. G
WARNING
If persons (particularly children) are exposed
to heat or cold for a prolonged period, there is a risk of serious or even fatal injuries. Never
leave persons (particularly children) unatten-
ded in the vehicle.
Stow luggage or loads preferably in the lug-
gage compartment. Observe the loading
guidelines (Y page 300).
United Kingdom only: G
WARNING
When the double locks are activated, the
doors can no longer be opened from the
inside. People in the vehicle can no longer get out, e.g. in hazardous situations. There is a
risk of injury.
Therefore, do not leave any people unsuper-
vised in the vehicle, particularly children, eld-
erly people or people in need of special assis-
tance. Do not activate the double lock when
people are in the vehicle.
If the vehicle has been locked with the key,
the double lock function is activated as stand-
ard. It is then not possible to open the doors
from inside the vehicle. You can deactivate Doors
91Opening and closing Z
Page 116 of 401

AMG Performance Seat
To adjust the contour of the seat and for
improved lateral support, you can individually adjust the front seats. 5Adjusting the side bolsters of the seat
cushion X
To set the side bolsters of the seat
cushion narrower: press button:.
X To set the side bolsters of the seat
cushion wider: press button;.
Adjusting the seat backrest side bol-
sters X
To set the side bolsters of the seat
backrest narrower: press button=.
X To set the side bolsters of the seat
backrest wider: press button?. Switching the seat heating on/off
Activating/deactivating G
WARNING
If you repeatedly switch on seat heating, the
seat cushion and backrest padding may
become very hot. The health of vehicle occu-
pants with limited temperature sensitivity or a limited ability to react to excessively high
temperatures may be affected or they may
even suffer burn-like injuries. There is a risk of
injury. Therefore, do not switch on the seat heating
repeatedly.
The three red indicator lamps in the button
indicate the heating level you have selected.
The system automatically switches from level
3 to level 2after approximately eight
minutes.
The system automatically switches down
from level 2to level 1after approximately ten
minutes.
The system automatically switches off
approximately 20 minutes after it is set to
level 1.
X Turn the key to position 1or 2in the ignition
lock (Y page 159).
X To switch on: press button:repeatedly
until the desired heating level is set.
X To switch off: press button:repeatedly
until all the indicator lamps go out.
i If the battery voltage is too low, the seat
heating may switch off.
5 Only in conjunction with electrically adjustable seats. Seats
113Seats, steering wheel and mirrors Z