2013 MERCEDES-BENZ B-CLASS SPORTS key
[x] Cancel search: keyPage 143 of 336
!
Overfilling the fuel tank could damage the
fuel system.
! Take care not to spill any fuel on painted
surfaces. You could otherwise damage the
paintwork.
! Use a filter when refueling from a fuel can.
Otherwise, the fuel lines and/or injection
system could be blocked by particles from
the fuel can.
If you overfill the fuel tank, fuel could spray
out when the fuel pump nozzle is removed.
Further information on fuel and on fuel grades
can be found in the "Fuel" section
(Y page 324). Refueling
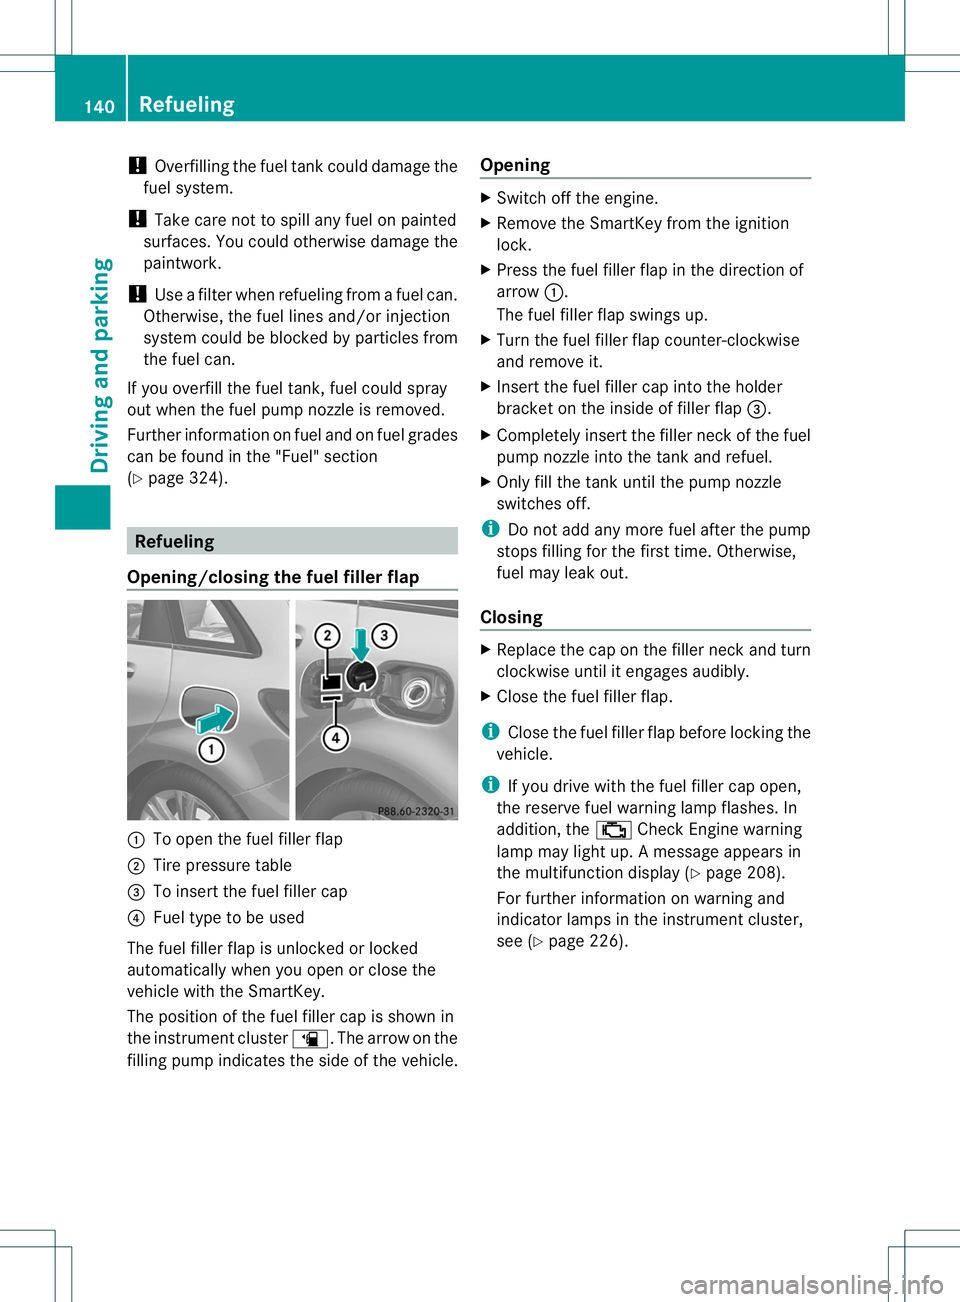
Opening/closing the fuel filler flap :
To open the fuel filler flap
; Tire pressure table
= To insert the fuel filler cap
? Fuel type to be used
The fuel filler flap is unlocked or locked
automatically when you open or close the
vehicle with the SmartKey.
The position of the fuel filler cap is shown in
the instrument cluster æ.The arrow on the
filling pump indicates the side of the vehicle. Opening X
Switch off the engine.
X Remove the SmartKey from the ignition
lock.
X Press the fuel filler flap in the direction of
arrow :.
The fuel filler flap swings up.
X Turn the fuel filler flap counter-clockwise
and remove it.
X Insert the fuel filler cap into the holder
bracket on the inside of filler flap =.
X Completely insert the filler neck of the fuel
pump nozzle into the tank and refuel.
X Only fill the tank until the pump nozzle
switches off.
i Do not add any more fuel after the pump
stops filling for the first time. Otherwise,
fuel may leak out.
Closing X
Replace the cap on the filler neck and turn
clockwise until it engages audibly.
X Close the fuel filler flap.
i Close the fuel filler flap before locking the
vehicle.
i If you drive with the fuel filler cap open,
the reserve fuel warning lamp flashes. In
addition, the ;Check Engine warning
lamp may light up. Amessage appears in
the multifunction display (Y page 208).
For further information on warning and
indicator lamps in the instrument cluster,
see (Y page 226). 140
RefuelingDriving and parking
Page 144 of 336
Problems with fuel and the fuel tank
Problem Possible causes/consequences and
M Solutions
Fuel is leaking from the
vehicle. The fuel line or the fuel tank is faulty.
G WARNING
Risk of explosion or fire.
X Turn the SmartKey to position 0in the ignition lock immediately
and remove it (Y page 127).
X Do not restart the engine under any circumstances.
X Consult a qualified specialist workshop. The fuel filler flap
cannot be opened. The fuel filler flap is not unlocked.
or
The SmartKey battery is discharged.
X
Unlock the vehicle (Y page 68).
or
X Unlock the vehicle using the mechanical key (Y page 69).The fuel filler flap is unlocked, but the opening mechanism is
jammed.
X
Consult a qualified specialist workshop. Parking
Important safety notes
G
WARNING
If flammable materials such as leaves, grass
or twigs are exposed to prolonged contact to
parts of the exhaust system that heat up, they
could ignite. There is a risk of fire.
Park the vehicle so that no flammable
materials come into contact with parts of the
vehicle which are hot. Take particular care not
to park on dry grassland or harvested grain
fields. G
WARNING
If you leave children unsupervised in the
vehicle, they could set it in motion by, for
example:
R releasing the parking brake
R shifting the automatic transmission out of
the parking position P
R starting the engine.
They could also operate the vehicle's
equipment. There is a risk of an accident and
injury.
When leaving the vehicle, always take the
SmartKey with you and lock the vehicle. Never
leave children unsupervised in the vehicle.
! Am oving vehicle can lead to damage to
the vehicle or damage to the drive train. Parking
141Driving and parking Z
Page 145 of 336
To ensure that the vehicle is secured against
rolling away unintentionally:
R
the electric parking brake must be applied.
R the transmission must be in position Pand
the transmission position display must
show P.
R the SmartKey must be removed from the
ignition lock.
R on uphill or downhill gradients, the front
wheels must be turned towards the curb. Switching off the engine
Important safety notes G
WARNING
The automatic transmission switches to
neutral position Nwhen you switch off the
engine. The vehicle may roll away.T here is a
risk of an accident.
After switching off the engine, always switch
to parking position P. Prevent the parked
vehicle from rolling away by applying the
parking brake.
Vehicles with automatic transmission X
Apply the electric parking brake.
X Shift the transmission to position P.
X Turn the SmartKey to position 0in the
ignition lock and remove it.
The immobilizer is activated.
i If you switch the engine off with the
transmission in position Ror D, the
automatic transmission shifts to N
automatically.
If you then open one of the front doors or
remove the SmartKey from the ignition, the
automatic transmission shifts to P.
If you shift the automatic transmission to
N before switching off the engine, the
automatic transmission remains in Neven
if a door is opened. i
The automatic transmission shifts to P
automatically if you:
R switch off the engine using the SmartKey
and remove the SmartKey from the
ignition lock or
R switch off the engine using the SmartKey
and open a front door.
If you attempt to turn off the engine when the
selector lever is not in position P:
R a message appears in the multifunction
display
R a warning signal sounds Electric parking brake
General notes G
WARNING
If you leave children unsupervised in the
vehicle, they could set it in motion by, for
example:
R releasing the parking brake
R shifting the automatic transmission out of
the parking position P
R starting the engine.
They could also operate the vehicle's
equipment. There is a risk of an accident and
injury.
When leaving the vehicle, always take the
SmartKey with you and lock the vehicle. Never
leave children unsupervised in the vehicle. i
The electric parking brake performs a
function test at regular intervals while the 142
ParkingDriving and parking
Page 146 of 336
engine is switched off. The sounds that can
be heard while this is occurring are normal.
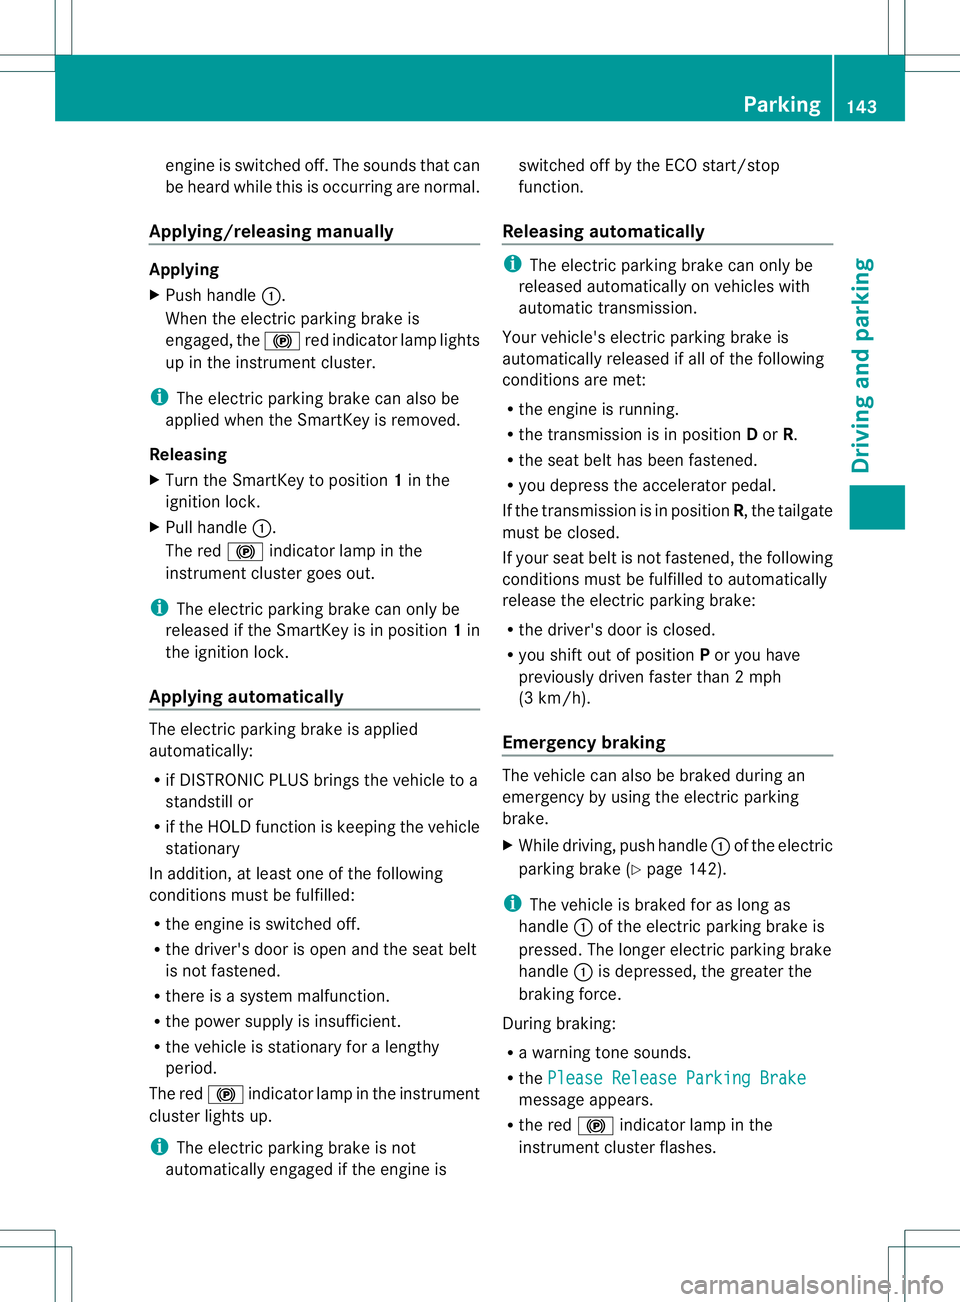
Applying/releasing manually Applying
X
Push handle :.
When the electric parking brake is
engaged, the !red indicator lamp lights
up in the instrument cluster.
i The electric parking brake can also be
applied when the SmartKey is removed.
Releasing
X Turn the SmartKey to position 1in the
ignition lock.
X Pull handle :.
The red !indicator lamp in the
instrument cluster goes out.
i The electric parking brake can only be
released if the SmartKey is in position 1in
the ignition lock.
Applying automatically The electric parking brake is applied
automatically:
R
if DISTRONIC PLUS brings the vehicle to a
standstill or
R if the HOLD function is keeping the vehicle
stationary
In addition, at least one of the following
conditions must be fulfilled:
R the engine is switched off.
R the driver's door is open and the seat belt
is not fastened.
R there is a system malfunction.
R the power supply is insufficient.
R the vehicle is stationary for a lengthy
period.
The red !indicator lamp in the instrument
cluster lights up.
i The electric parking brake is not
automatically engaged if the engine is switched off by the ECO start/stop
function.
Releasing automatically i
The electric parking brake can only be
released automatically on vehicles with
automatic transmission.
Your vehicle's electric parking brake is
automatically released if all of the following
conditions are met:
R the engine is running.
R the transmission is in position Dor R.
R the seat belt has been fastened.
R you depress the accelerator pedal.
If the transmission is in position R, the tailgate
must be closed.
If your seat belt is not fastened, the following
conditions must be fulfilled to automatically
release the electric parkin gbrake:
R the driver's door is closed.
R you shift out of position Por you have
previously drivenf aster than2mph
(3 km/h).
Emergency braking The vehicle can also be braked during an
emergency by using the electric parking
brake.
X
While driving, push handle :of the electric
parking brake (Y page 142).
i The vehicle is braked for as long as
handle :of the electric parking brake is
pressed. The longer electric parking brake
handle :is depressed, the greater the
braking force.
During braking:
R a warning tone sounds.
R the Please Release Parking Brake message appears.
R the red !indicator lamp in the
instrument cluster flashes. Parking
143Driving and parking Z
Page 150 of 336
Never use the brake pedal as a footrest. Never
depress the brake pedal and the accelerator
pedal at the same time.
! Depressing the brake pedal constantly
results in excessive and premature wearto
the brake pads.
If the brakes have been subjected to a heavy
load, do not stop the vehicle immediately.
Drive on for a short while. This allows the
airflow to cool the brakes more quickly.
Wet roads If you have driven for a long time in heav
yrain
without braking, there may be a delayed
reactio nfrom the brakes when braking for the
first time.
This may also occur after the vehicle has been
drive nthrough deep water.
You have to depress the brake pedal more
firmly. Maintain a greater distance from the
vehicle in front.
After driving on a wet road or having the
vehicle washed, brake firmly while paying
attention to the traffic conditions. This will
warm up the brake discs, thereby drying them
more quickly and protecting them against
corrosion.
Limited braking performance on salt-
treated roads If you drive on salted roads, a layer of salt
residue may form on the brake discs and
brake pads. This can result in a significantly
longer braking distance.
R
Brake occasionally to remove any possible
salt residue. Make sure that you do not
endanger other road users when doing so.
R Carefully depress the brake pedal and the
beginning and end of a journey.
R Maintain a greater distance to the vehicle
ahead. Servicing the brakes !
If the red brake warning lamp lights up in
the instrumentc luster and you hear a
warning tone while the engine is running,
the brake fluid level may be too low.
Observe additional warning messages in
the multifunction display.
The brake fluid level may be too low due to
brake pad wear or leaking brake lines.
Have the brake system checked
immediately. This work should be carried
out at a qualified specialist workshop.
! A function or performance test should
only be carried out on a2-axle
dynamometer. If you are planning to have
the vehicle tested on such a dynamometer,
contact an authorized Mercedes-Benz
Center to obtain further information first.
Otherwise, you could damage the drive
train or the brake system.
! As the ESP ®
system operates
automatically, the engine and the ignition
must be switched off (theS martKey must
be in position 0or 1in the ignitio nlock) if:
R the electric parking brake is tested on a
brake dynamometer (for a maximum of
ten seconds)
R the vehicle is towed with the front axle
raised.
Braking triggered automatically by ESP ®
may seriously damage the brake system.
All checks and maintenance work on the
brake system must be carried out at a
qualified specialist workshop. Consult a
qualified specialist workshop to arrange this.
Have brake pads installed and brake fluid
replaced at a qualified specialist workshop.
If the brake system has only been subject to
moderate loads, you should test the
functionality of your brakes at regular
intervals. To do so, press firmly on the brake
pedal when driving at a high speed. This
improves the grip of the brake pads. Driving tips
147Driving and parking Z
Page 166 of 336
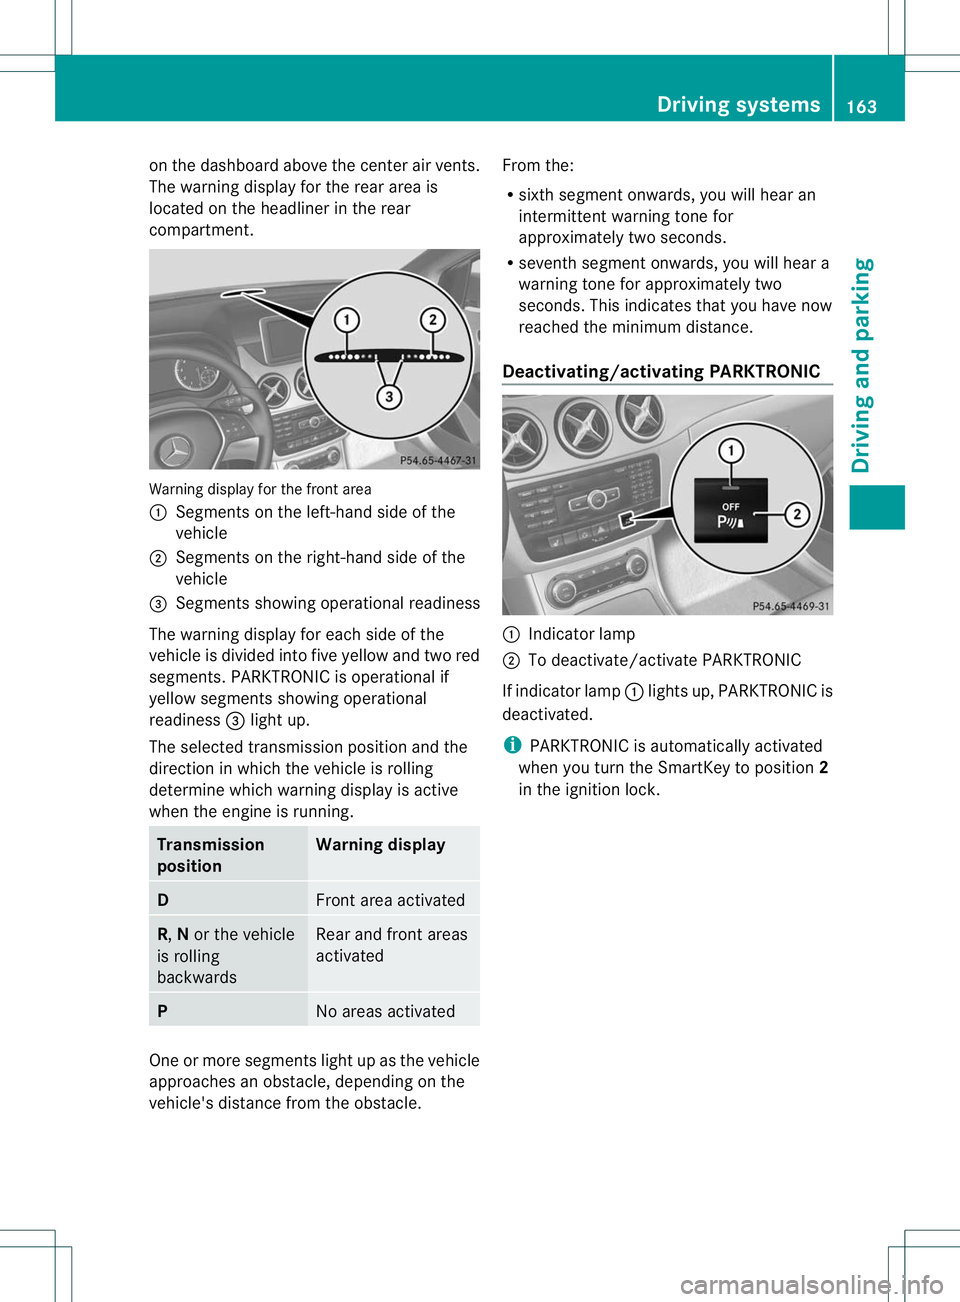
on the dashboard above the center air vents.
The warning display for the rear area is
located on the headliner in the rear
compartment.
Warning display for the front area
:
Segments on the left-hand side of the
vehicle
; Segments on the right-hand side of the
vehicle
= Segments showing operational readiness
The warning display for each side of the
vehicle is divided into five yellow and two red
segments. PARKTRONIC is operational if
yellow segments showing operational
readiness =light up.
The selected transmission position and the
direction in which the vehicle is rolling
determine which warning display is active
when the engine is running. Transmission
position Warning display
D
Front area activated
R,
Nor the vehicle
is rolling
backwards Rear and front areas
activated
P
No areas activated
One or more segments light up as the vehicle
approaches an obstacle, depending on the
vehicle's distance from the obstacle. From the:
R
sixth segment onwards, you will hear an
intermittent warning tonef or
approximately two seconds.
R seventh segment onwards, you will hear a
warning tone for approximately two
seconds. This indicates that you have now
reached the minimum distance.
Deactivating/activating PARKTRONIC :
Indicator lamp
; To deactivate/activate PARKTRONIC
If indicator lamp :lights up, PARKTRONIC is
deactivated.
i PARKTRONIC is automatically activated
when you turn the SmartKey to position 2
in the ignition lock. Driving systems
163Driving and parking Z
Page 172 of 336
Activating/deactivating the rea
rview
camera X
To activate: make sure that the SmartKey
is in position 2in the ignition lock.
X Make sure that in the audio system/
COMAND, the "Activation by R gear"
function is selected; see the separate
operating instructions for the audio
system/COMAND.
X Engage reverse gear.
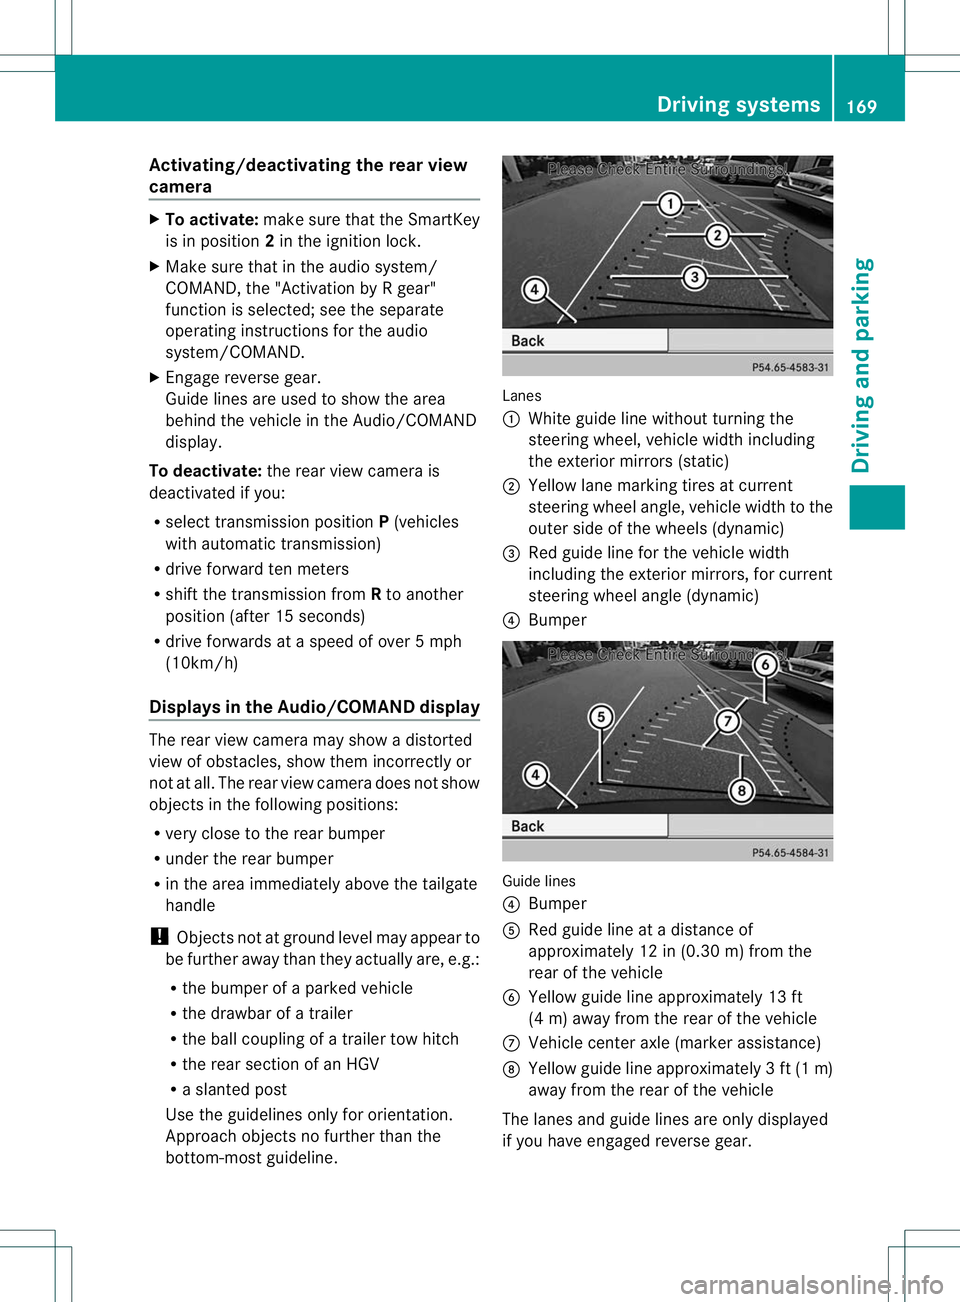
Guide lines are used to show the area
behind the vehicle in the Audio/COMAND
display.
To deactivate: the rear view camera is
deactivated if you:
R selec ttransmission position P(vehicles
with automatic transmission)
R drive forward ten meters
R shift the transmission from Rto another
position (after 15 seconds)
R drive forwards at a speed of over 5mph
(10km/h)
Displays in the Audio/COMAND display The rear view camera may show a distorted
view of obstacles, show them incorrectly or
not at all. The rear view camera does not show
objects in the following positions:
R
very close to the rear bumper
R under the rear bumper
R in the area immediately above the tailgate
handle
! Objects not at ground level may appear to
be further away than they actually are, e.g.:
R the bumper of a parked vehicle
R the drawbar of a trailer
R the ball coupling of a trailer tow hitch
R the rear section of an HGV
R a slanted post
Use the guidelines only for orientation.
Approach objects no further than the
bottom-most guideline. Lanes
:
White guide line without turning the
steering wheel, vehicle width including
the exterior mirrors (static)
; Yellow lane marking tires at current
steering wheel angle, vehicle width to the
outer side of the wheels (dynamic)
= Red guide line for the vehicle width
including the exterior mirrors, for current
steering wheel angle (dynamic)
? Bumper Guide lines
?
Bumper
A Red guide line at a distance of
approximately 12 in (0.30 m) from the
rear of the vehicle
B Yellow guide line approximately 13 ft
(4 m) away from the rear of the vehicle
C Vehicle center axle (marker assistance)
D Yellow guide line approximately 3ft(1m)
away from the rear of the vehicle
The lanes and guide lines are only displayed
if you have engaged revers egear. Driving systems
169Driving and parking Z
Page 177 of 336
If the lanes are narrow, vehicles driving in the
lane beyond the lane next to yourv
ehicle may
be indicated, especially if the vehicles are not
driving in the middle of their lane. This may
be the case if the vehicles are driving on the
inner side of their lane.
Due to the nature of the system:
R warnings may be issued in error when
driving close to crash barriers or similar
solid lane borders.
R warnings may be interrupted when driving
alongside particularly long vehicles, for
example trucks, for a prolonged time.
The two sensors for Blind Spot Assist are
integrated into the sides of the rear bumper.
Make sure that the bumper is free from dirt,
ice or slush around the sensors. The rear
sensors must not be covered, for example by
bicycle racks or overhanging loads. Following
a severe impact or in the event of damage to
the bumpers, have the function of the radar
sensors checked at a qualified specialist
workshop. Blind Spot Assist may otherwise
not work properly.
Indicator and warning display
Blind Spot Assist is not active at speeds below
approximately 20 mph (30 km/h) .Vehicles in
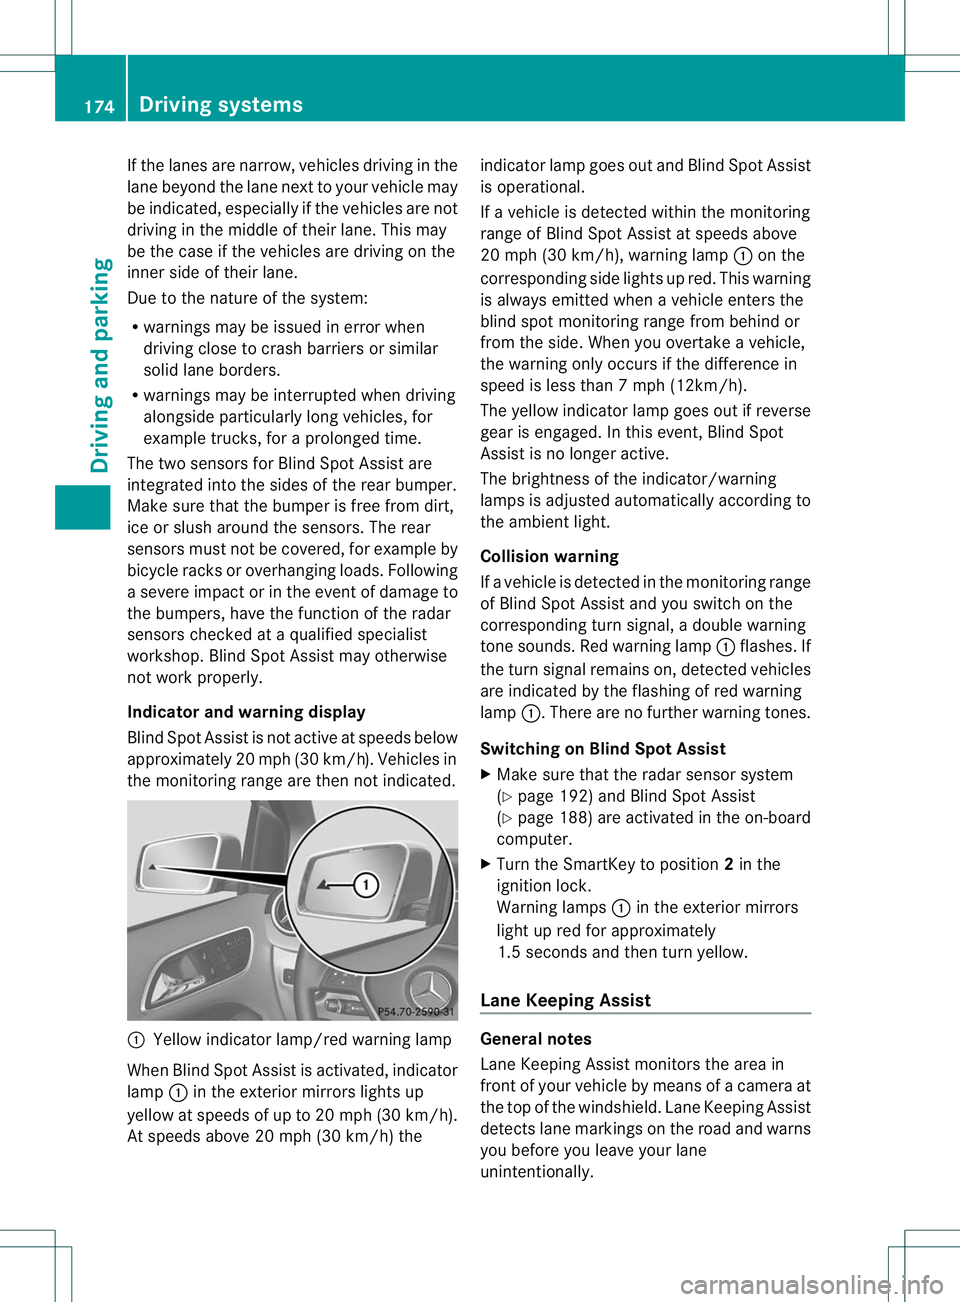
the monitoring range are then not indicated. :
Yellow indicator lamp/red warning lamp
When Blind Spot Assist is activated, indicator
lamp :in the exterior mirrors lights up
yellow at speeds of up to 20 mph (30k m/h).
At speeds above 20 mph (30 km/h) the indicator lamp goes out and Blind Spot Assist
is operational.
If a vehicle is detected withi
nthe monitoring
range of Blind Spot Assist at speeds above
20 mph (30 km/h), warning lamp :on the
corresponding side lights up red. This warning
is always emitted when a vehicle enters the
blind spot monitoring range from behind or
from the side. When you overtake a vehicle,
the warning only occurs if the difference in
speed is less than 7mph (12km/h).
The yellow indicator lamp goes out if reverse
gear is engaged. In this event, Blind Spot
Assist is no longer active.
The brightness of the indicator/warning
lamps is adjusted automatically according to
the ambient light.
Collision warning
If a vehicle is detected in the monitoring range
of Blind Spot Assist and you switch on the
corresponding turn signal, a double warning
tone sounds. Red warning lamp :flashes. If
the turn signal remains on, detected vehicles
are indicated by the flashing of red warning
lamp :.There are no further warning tones.
Switching on Blind Spot Assist
X Make sure that the radar sensor system
(Y page 192) and Blind Spot Assist
(Y page 188) are activated in the on-board
computer.
X Turn the SmartKey to position 2in the
ignition lock.
Warning lamps :in the exterior mirrors
light up red for approximately
1.5 seconds and then turn yellow.
Lane Keeping Assist General notes
Lane Keeping Assist monitors the area in
front of your vehicle by means of a camera at
the top of the windshield. Lane Keeping Assist
detects lane markings on the road and warns
you before you leave your lane
unintentionally.174
Driving systemsDriving and parking