2013 MERCEDES-BENZ B-CLASS SPORTS ESP
[x] Cancel search: ESPPage 113 of 336
For this reason, you shoul
dalways switch
off the windshield wipers in dry weather.
Vehicles with arain sensor: in theÄor
Å position, the appropriate wiping
frequency is automatically set according to
the intensity of the rain. In the Åposition,
the rains ensor is more sensitive than in
the Ä position, causing the windshield
wipers to wipe more frequently. Switching the rear window wiper on/
off
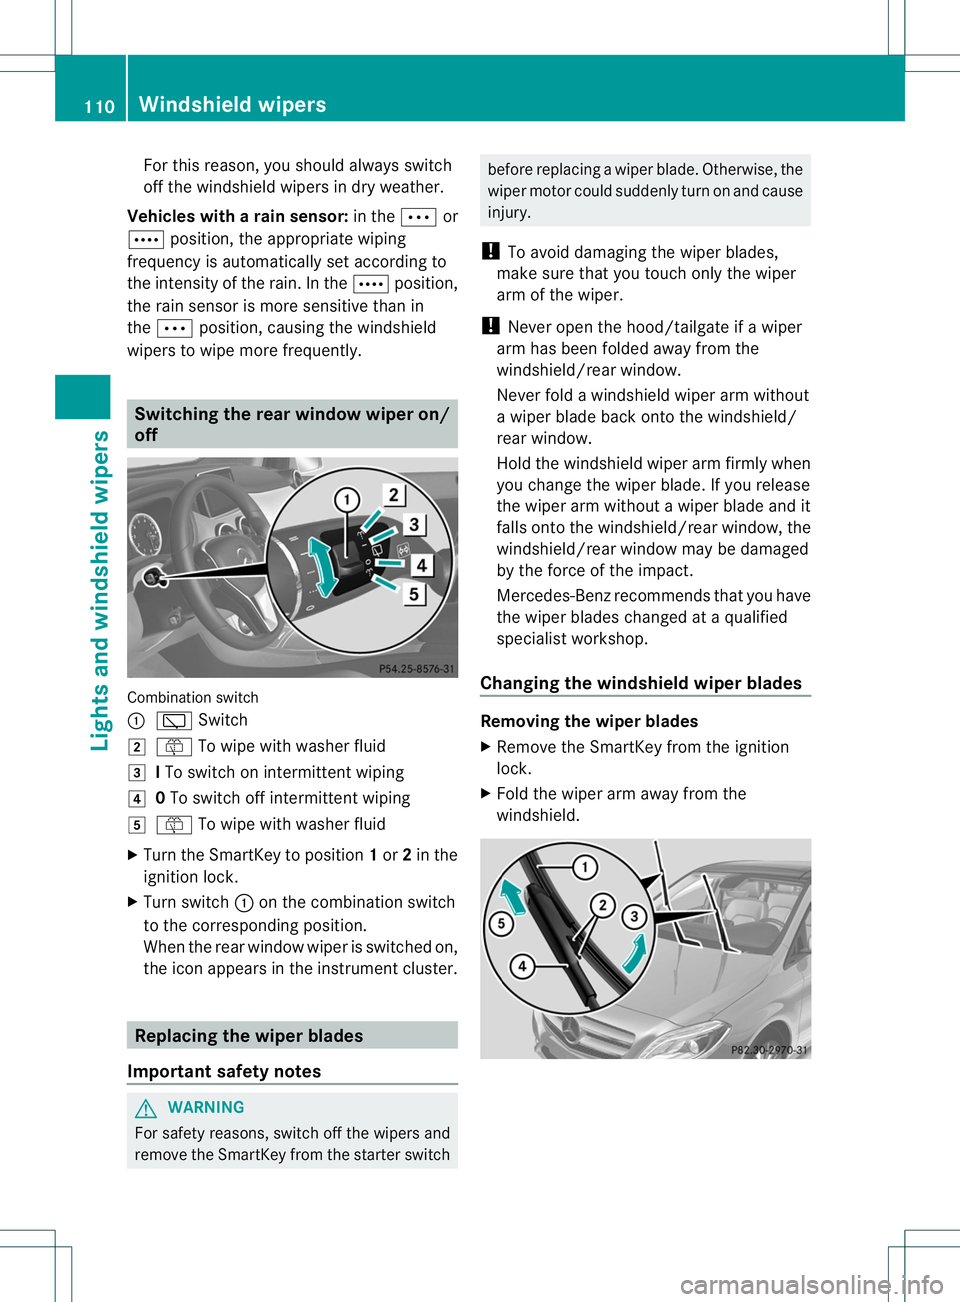
Combination switch
:
è Switch
2 ô To wipe with washer fluid
3 ITo switch on intermittent wiping
4 0To switch off intermittent wiping
5 ô To wipe with washer fluid
X Turn the SmartKey to position 1or 2in the
ignition lock.
X Turn switch :on the combination switch
to the corresponding position.
When the rear window wiper is switched on,
the icon appears in the instrument cluster. Replacing the wiper blades
Important safety notes G
WARNING
For safety reasons, switch off the wipers and
remove the SmartKey from the starter switch before replacing a wiper blade. Otherwise, the
wiper motor could suddenly turn on and cause
injury.
! To avoid damaging the wiper blades,
make sure that you touch only the wiper
arm of the wiper.
! Never open the hood/tailgate if a wiper
arm has been folded away from the
windshield/rear window.
Never fold a windshield wiper arm without
a wiper blade back onto the windshield/
rear window.
Hold the windshield wiper arm firmly when
you change the wiper blade. If you release
the wiper arm without a wiper blade and it
falls onto the windshield/rear window, the
windshield/rear window may be damaged
by the force of the impact.
Mercedes-Benzr ecommends that you have
the wiper blades changed at aqualified
specialist workshop.
Changing the windshield wiper blades Removing the wiper blades
X
Remove the SmartKey from the ignition
lock.
X Fold the wiper arm away from the
windshield. 110
Windshiel
dwipersLights and windshield wipers
Page 123 of 336
Setting the air distribution
Air distribution settings Climate control
¯
Directs air through the defroster vents
P Directs air through the center and side
air vents
O Directs the airflow through the
footwell air vents
i You can also activate several air
distribution settings simultaneously .To do
this, press multiple air distribution buttons.
The air is then directed through various
vents.
3-zone automatic climate control
¯ Directs air through the defroster vents
P Directs air through the center and side
air vents
O Directs the airflow through the
footwell air vents
b Directs the airflow through the center
and side air vents as well as the
defroster vents
a Directs air through the defroster and
footwell vents
i Regardless of the air distribution setting,
airflow is always directed through the side
air vents. The side air vents can only be
closed if the adjusters are turned clockwise
as far as possible.
Climate control X
Turn the SmartKey to position 2in the
ignition lock.
X Press one or more of the P,O,
¯ buttons.
The corresponding indicator lamp lights up
briefly. 3-zone automatic climate control X
Turn the SmartKey to position 2in the
ignition lock.
X Press the ÉorË button until the
desired symbol appears in the display. Setting the airflow
Climate control X
Turn the SmartKey to position 2in the
ignition lock.
X To increase/reduce: turn controlA
clockwise or counter-clockwise
(Y page 115).
3-zone automatic climate control X
Turn the SmartKey to position 2in the
ignition lock.
X To increase/reduce: press theKor
I button. Switching the ZONE function on/off
This function is only available with 3-zone
automatic climate control.
X To activate: press theábutton.
The indicator lamp in the ábutton lights
up.
The temperature setting for the driver's
side is not adopted for the front-passenger
side.
X To deactivate: press theábutton.
The indicator lamp in the ábutton goes
out.
The temperature setting for the driver's
side is adopted for the front-passenger
side. 120
Operating the climate control systemsClimate control
Page 129 of 336
Useful information
i This Operator's Manual describes all
models and all standard and optional
equipment of your vehicle available at the
time of publication of the Operator's
Manual. Country-specific differences are
possible. Please note that your vehicle may
not be equipped with all features
described. This also applies to safety-
related systems and functions.
i Please read the information on qualified
specialist workshops (Y page 23).Breaking-in notes
Important safety notes
New and replaced brake pads and discs only
reach their optimum braking effect after
several hundred kilometers of driving.
Compensate for this by applying greater force
to the brake pedal. The first 1,000miles (1,500 km)
The more you look after the engine when it is
new, the more satisfied you will be with its
performance in the future.
R You should therefore drive at varying
vehicle and engine speeds for the first
1,000 miles (1,500 km).
R Avoid heavy loads, e.g. driving at full
throttle, during this period.
R Change gear in good time, before the
tachometer needle is Ôof the way to the
red area of the tachometer.
R Do not manually shift to a lower gear to
brake the vehicle.
R If possible, do not depress the accelerator
pedal past the point of resistance
(kickdown).
R Ideally, for the first 1,000m iles (1,500 km),
drive in program E. After 1,000 miles (1,500km), you can
increase the engine speed gradually and bring
the vehicle up to full speed.
i
You should also observe these breaking-
in notes if the engine or parts of the drive
train on your vehicle have been replaced.
i Always observe the respective speed
limits. Driving
Important safety notes
G
WARNING
Objects in the driver's footwell can restric tthe
pedal travel or obstruct adepressed pedal.
The operating and road safety of the vehicle
is jeopardized. There is a risk of an accident.
Make sure that all objects in the vehicle are
stowed correctly, and that they cannot enter
the driver's footwell. Install the floormats
securely and as specified in order to ensure
sufficien tclearance for the pedals. Do not use
loose floormats. G
WARNING
Unsuitable footwear can hinde rcorrect usage
of the pedals, e.g.:
R shoes with thick soles
R shoes with high heels
R slippers
There is a risk of an accident.
Wear suitable footwear to ensure correct
usage of the pedals. G
WARNING
If you switch off the ignition while driving,
safety-relevant functions are only available
with limitations, or not at all. This could affect,
for example, the power steering and the brake
boosting effect.Y ou will require considerably
more effort to steer and brake. There is a risk
of an accident.
Do not switch off the ignition while driving. 126
DrivingDriving and parking
Page 131 of 336
i
If the transmission oil temperature is
below Ò4‡( Ò20 †) , you can only shift from
position Pwhen the engine is running.
X Depress the brake pedal and keep it
depressed.
X Shif tthe transmission to position Dor R.
X Release the brake pedal.
X Carefully depress the accelerator pedal.
The electric parking brake (Y page 142) is
automatically released.
The red !indicator lamp in the
instrumentc luster goes out.
i The vehicle locks centrally once you have
pulled away. The locking knobs in the doors
drop down.
You can open the doors fro mthe inside at
any time.
You can also deactivate the automatic
locking feature (Y page 191).
i Upshifts take place at higher engine
speeds after a cold start. This helps the
catalytic converter to reach its operating
temperature more quickly.
Hill starta ssist G
WARNING
After a short time, hill start assist will no
longer brake your vehicle and it could roll
away. There is a risk of an accident and injury.
Therefore, quickly move your foot from the
brake pedal to the accelerator pedal. Never
leave the vehicle when it is held by hill start
assist.
Hill start assist helps you when pulling away
forwards or in reverse on an uphill gradient.
It holds the vehicle for a short time after you
have removed your foot from the brake pedal.
This gives you enough time to move your foot
from the brake pedal to the accelerator pedal
and to depress it before the vehicle begins to
roll. X
Take your foot off the brake pedal.
The vehicle is then held for about a second.
X Pull away.
Hill start assist will not function if:
R you are pulling away on a level road or on
a downhill gradient.
R the transmission is in position N.
R the electric parking brake is applied.
R ESP ®
is malfunctioning. ECO start/stop function
Important safety notes G
WARNING
If the engine is switched off automatically and
you exit the vehicle, the engine is restarted
automatically. The vehicle may begin moving.
There is a risk of accident and injury.
If you wish to exit the vehicle, always turn off
the ignition and secure the vehicle against
rolling away.
General notes If the
¤ symbol is shown in the
multifunction display, the ECO start/stop
function switches the engine off
automatically when the vehicle stops.
The engine starts automatically when the
driver wants to pull away again. The ECO
start/stop function thereby helps you to
reduce the fuel consumption and emissions
of your vehicle.
The stop/start function is automatically
activated each time you start the engine with
the SmartKey.
If the ECO start/stop function has been
manually deactivated (Y page 130) or a
malfunction has caused the system to be
deactivated, the ¤symbol is not
displayed. 128
DrivingDriving and parking
Page 134 of 336
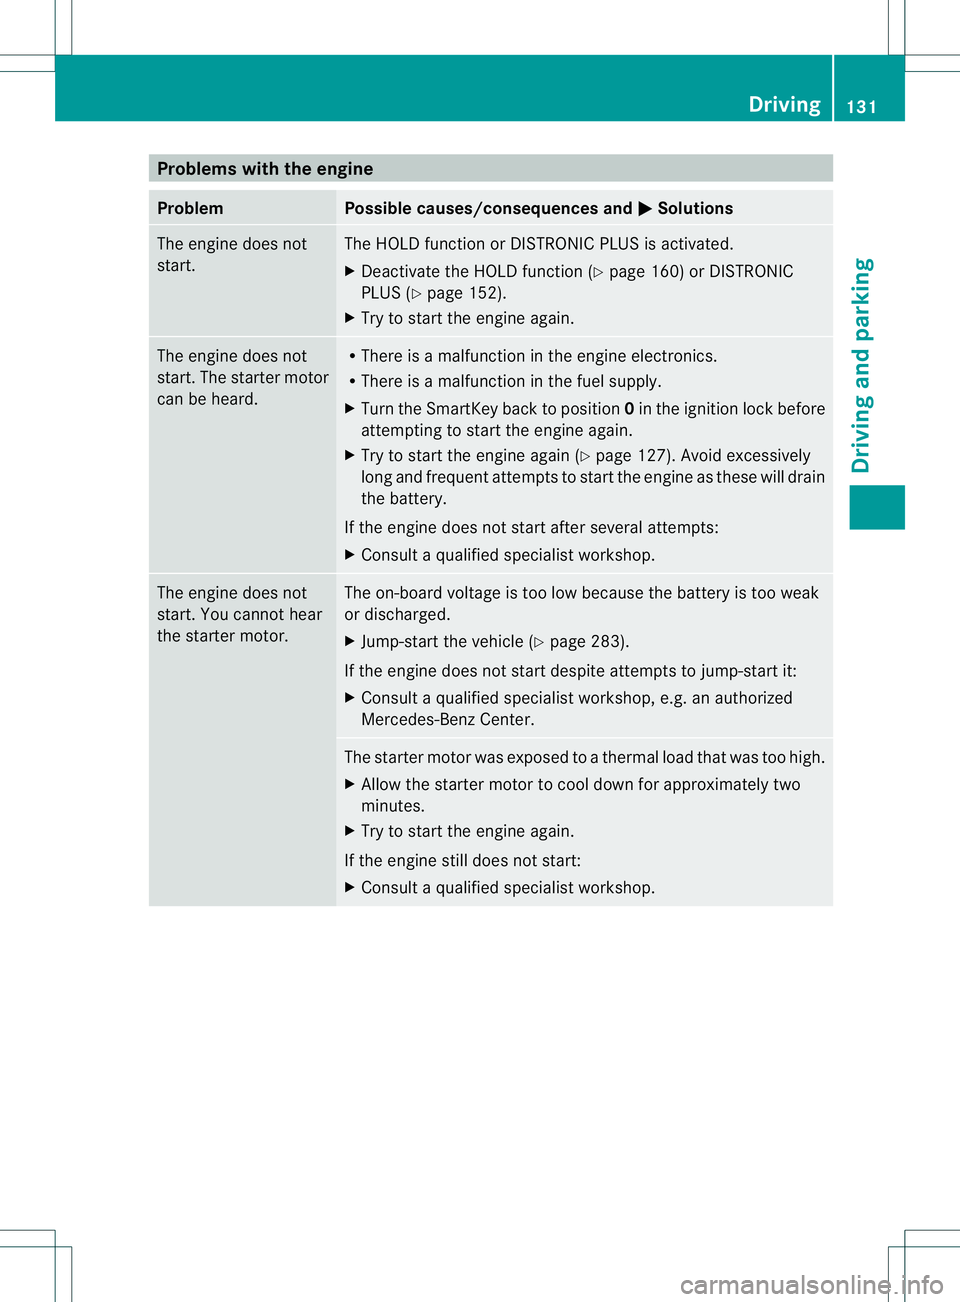
Problems with the engine
Problem Possible causes/consequences and
M Solutions
The engine does not
start. The HOLD function or DISTRONIC PLUS is activated.
X
Deactivate the HOLD function (Y page 160) or DISTRONIC
PLUS (Y page 152).
X Try to start the engine again. The engine does not
start. The starter motor
can be heard. R
There is a malfunction in the engine electronics.
R There is a malfunction in the fuel supply.
X Turn the SmartKey back to position 0in the ignition lock before
attempting to start the engine again.
X Try to start the engine again (Y page 127). Avoid excessively
long and frequent attempts to start the engine as these will drain
the battery.
If the engine does not start after several attempts:
X Consult a qualified specialist workshop. The engine does not
start. You cannot hear
the starter motor. The on-board voltage is too low because the battery is too weak
or discharged.
X
Jump-start the vehicle (Y page 283).
If the engine does not start despite attempts to jump-start it:
X Consult a qualified specialist workshop, e.g. an authorized
Mercedes-Benz Center. The starter motor was exposed to a thermal load that was too high.
X
Allow the starter motor to cool down for approximately two
minutes.
X Try to start the engine again.
If the engine still does not start:
X Consult a qualified specialist workshop. Driving
131Driving and parking Z
Page 138 of 336
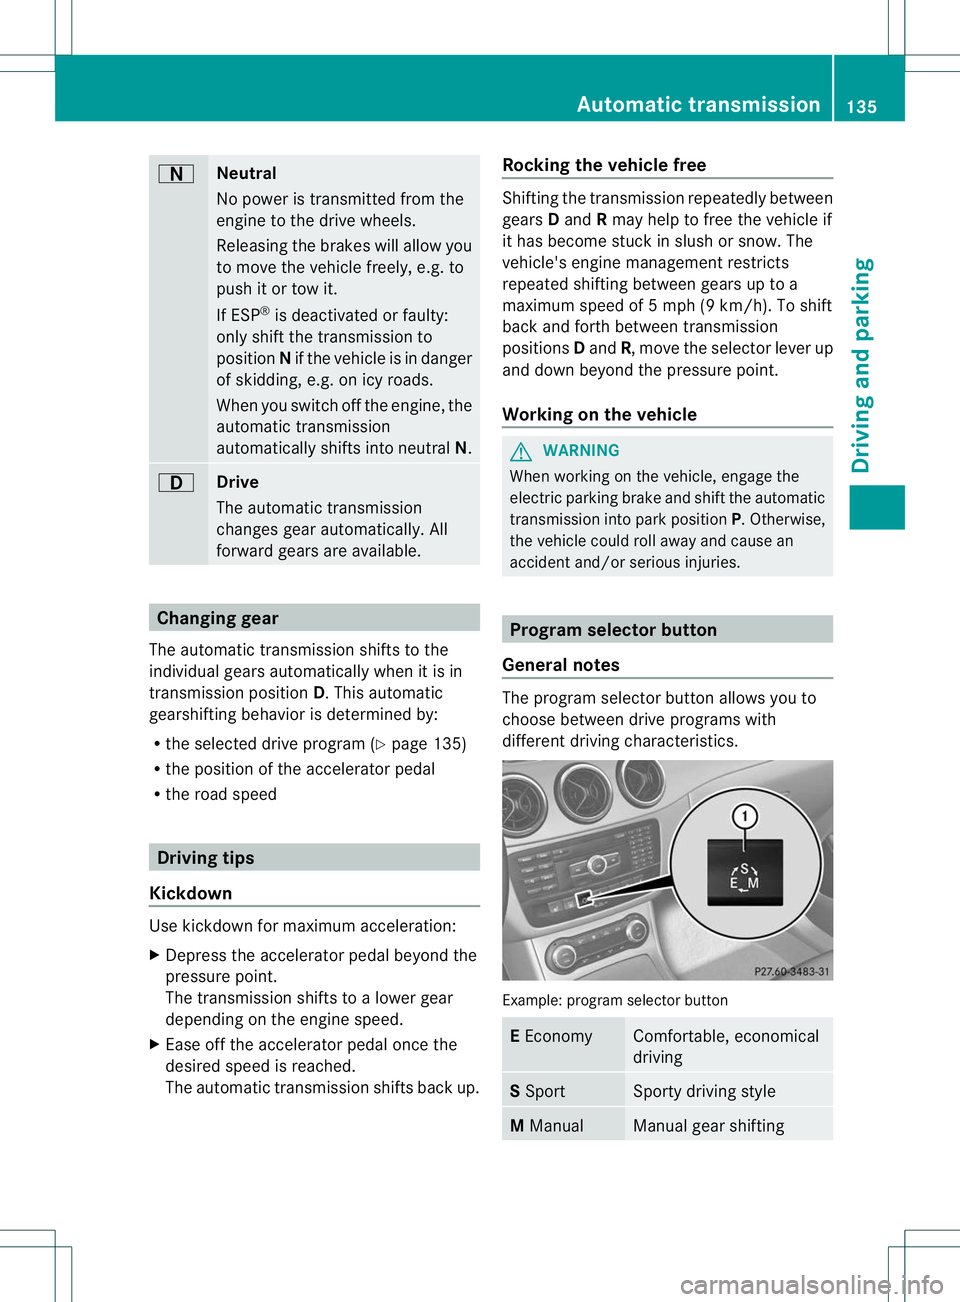
A
Neutral
No power is transmitted from the
engine to the drive wheels.
Releasing the brakes will allow you
to move the vehicle freely, e.g
.to
push it or tow it.
If ESP ®
is deactivated or faulty:
only shift the transmission to
position Nif the vehicle is in danger
of skidding, e.g. on icy roads.
When you switch off the engine, the
automatic transmission
automatically shifts into neutral N.7
Drive
The automatic transmission
changes gear automatically. All
forward gears are available.
Changing gear
The automatic transmission shifts to the
individual gears automatically when it is in
transmission position D.This automatic
gearshifting behavior is determined by:
R the selected drive program (Y page 135)
R the position of the accelerator pedal
R the road speed Driving tips
Kickdown Use kickdown for maximum acceleration:
X
Depress the accelerator pedal beyond the
pressure point.
The transmission shifts to a lower gear
depending on the engine speed.
X Ease off the accelerator pedal once the
desired speed is reached.
The automatic transmission shifts back up. Rocking the vehicle free Shifting the transmission repeatedly between
gears
Dand Rmay help to free the vehicle if
it has become stuck in slush or snow. The
vehicle's engine management restricts
repeated shifting between gears up to a
maximum speed of 5 mph (9 km/h). To shift
back and forth between transmission
positions Dand R, move the selector lever up
and down beyond the pressure point.
Working on the vehicle G
WARNING
When working on the vehicle, engage the
electric parking brake and shift the automatic
transmission into park position P.Otherwise,
the vehicle could roll away and cause an
accident and/or serious injuries. Program selecto
rbutton
General notes The progra
mselecto rbutton allows you to
choose between drive programs with
different driving characteristics. Example: program selector button
E
Economy Comfortable, economical
driving
S
Sport Sporty driving style
M
Manual Manual gear shiftingAutomatic transmission
135Driving and parking Z
Page 139 of 336
Only change from automatic drive program
E
or Sto manual drive program Mwhen the
vehicle is stationary.
X Press program selector button :
repeatedly until the letter for the desired
gearshift program appears in the
multifunction display.
i The automatic transmission shifts to
automatic drive program Eeach time the
engine is started.
i For further information on the automatic
drive program, see (Y page 136).Steering wheel paddle shifters
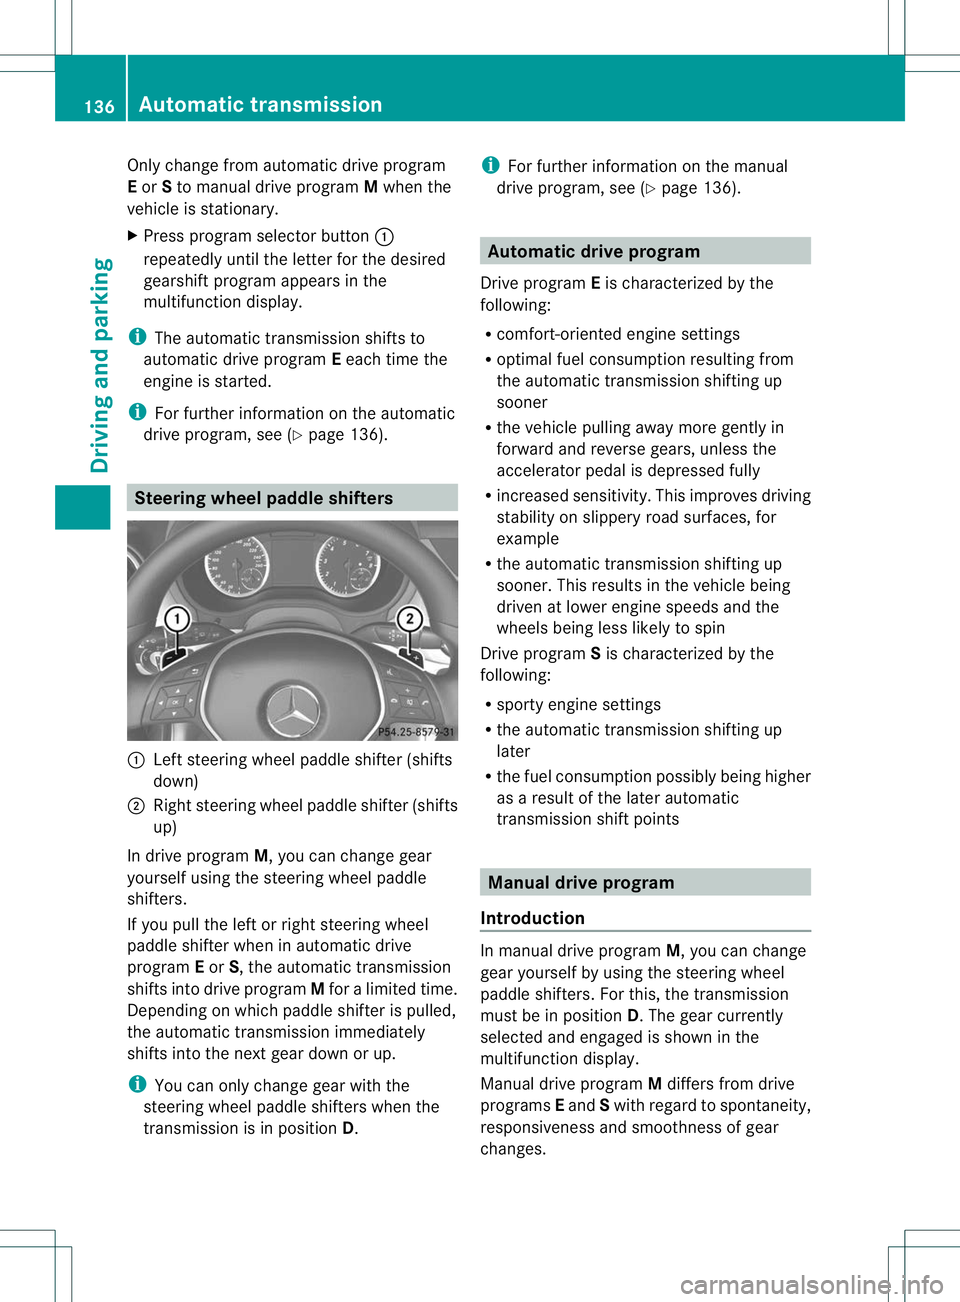
:
Left steering wheel paddle shifter (shifts
down)
; Right steering wheel paddle shifter (shifts
up)
In drive program M, you can change gear
yourselfu sing the steering wheel paddle
shifters.
If you pull the left or right steering wheel
paddle shifter when in automatic drive
program Eor S, the automatic transmission
shifts into drive program Mfor a limited time.
Depending on which paddle shifter is pulled,
the automatic transmission immediately
shifts into the next gear down or up.
i You can only change gear with the
steering wheel paddle shifters when the
transmission is in position D.i
For further information on the manual
drive program, see (Y page 136). Automatic drive program
Drive program Eis characterized by the
following:
R comfort-oriented engine settings
R optimal fuel consumption resulting from
the automatic transmission shifting up
sooner
R the vehicle pulling away more gently in
forward and reverse gears, unless the
accelerator pedal is depressed fully
R increased sensitivity. This improves driving
stability on slippery road surfaces, for
example
R the automatic transmission shifting up
sooner. This results in the vehicle being
driven at lower engine speeds and the
wheels being less likely to spin
Drive program Sis characterized by the
following:
R sporty engine settings
R the automatic transmission shifting up
later
R the fuel consumption possibly being higher
as a result of the later automatic
transmission shift points Manual drive program
Introduction In manual drive program
M, you can change
gear yourselfb y using the steering wheel
paddle shifters .For this, the transmission
must be in position D. The gear currently
selected and engaged is shown in the
multifunction display.
Manual drive program Mdiffers from drive
programs Eand Swith regard to spontaneity,
responsiveness and smoothness of gear
changes. 136
Automatic transmissionDriving and parking
Page 148 of 336
The possibility of a serious or even fatal
accident are greatly increased when you drink
or take drugs and drive.
Do not drink or take drugs and drive or allow
anyone to drive who has been drinking or
taking drugs.
Exhaust check G
WARNING
Combustion engines emit poisonous exhaust
gases such as carbon monoxide. Inhaling
these exhaust gases leads to poisoning. There
is a risk of fatal injury. Therefore never leave
the engine running in enclosed spaces
without sufficient ventilation.
Certain engine systems are designed to keep
the level of poisonous components in exhaust
fumes within legal limits.
These systems only work at peak efficiency if
they are serviced exactly in accordance with
the manufacturer's specifications. For this
reason, only have work on the engine carried
out by qualified and authorized Mercedes-
Benz technicians.
The engine settings must not be changed
under any circumstances. Furthermore, all
specific service work must be carried out at
regular intervals and in accordance with the
Mercedes-Benz service requirements. Details
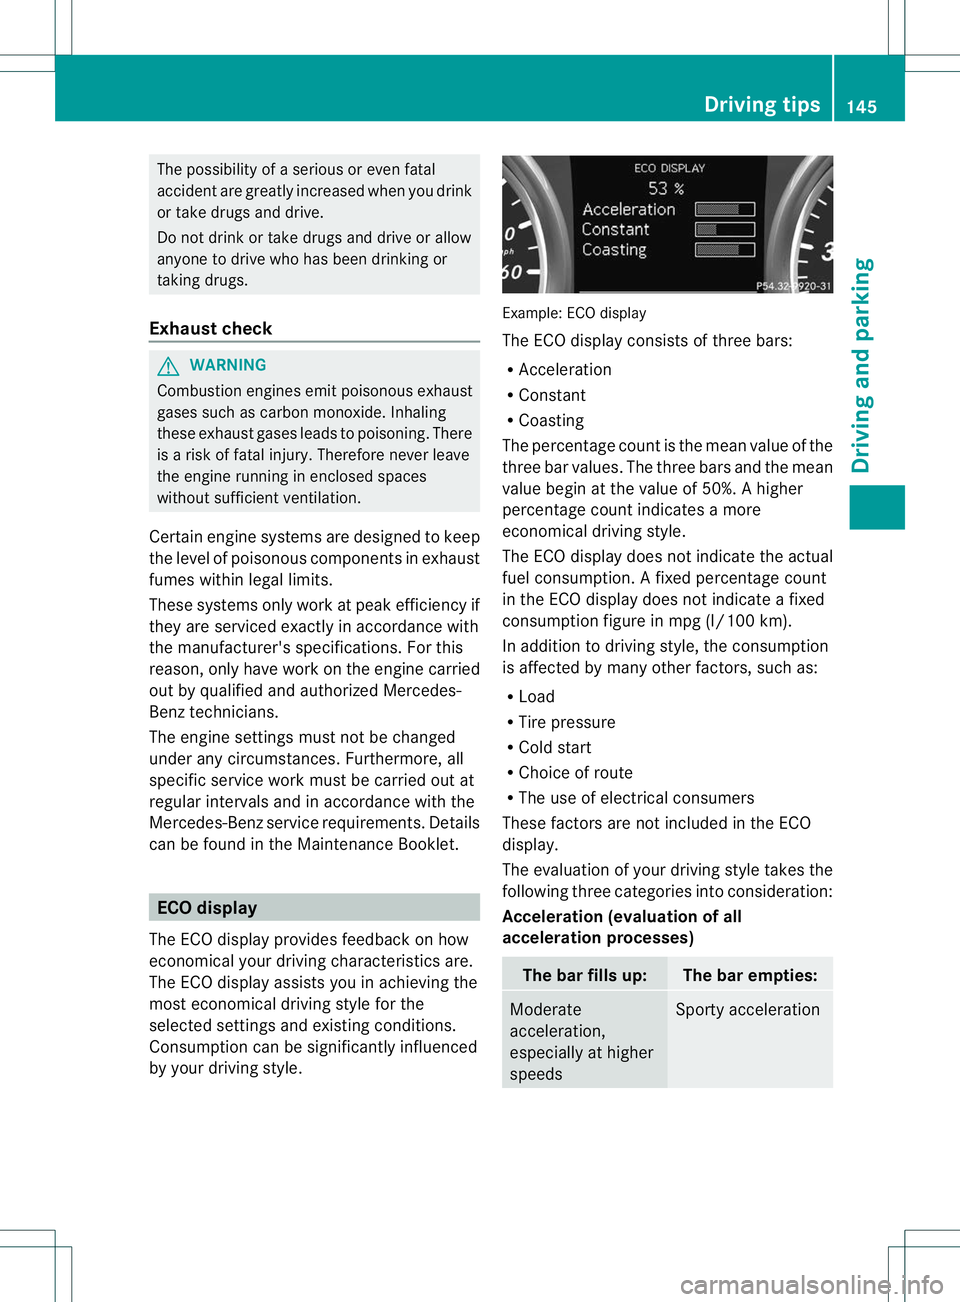
can be found in the Maintenance Booklet. ECO display
The ECO display provides feedback on how
economical your driving characteristics are.
The ECO display assists you in achieving the
most economical driving style for the
selected settings and existin gconditions.
Consumption can be significantly influenced
by your driving style. Example: ECO display
The ECO display consists of three bars:
R
Acceleration
R Constant
R Coasting
The percentage count is the mean value of the
three bar values. The three bars and the mean
value begin at the value of 50%. Ahigher
percentage coun tindicates a more
economical driving style.
The ECO display does not indicate the actual
fuel consumption. A fixed percentage count
in the ECO display does not indicate a fixed
consumption figure in mpg (l/100 km).
In additio nto driving style, the consumption
is affected by many other factors, such as:
R Load
R Tire pressure
R Cold start
R Choice of route
R The use of electrical consumers
These factors are not included in the ECO
display.
The evaluation of your driving style takes the
following three categories into consideration:
Acceleration (evaluation of all
acceleration processes) The bar fills up: The bar empties:
Moderate
acceleration,
especially at higher
speeds Sporty acceleration Driving tips
145Driving and parking Z